• Welcome to Photrio!
    Registration is fast and free. Join today to unlock search, see fewer ads, and access all forum features.
    Click here to sign up

Strategy For Minimizing Uneven Development Marks While Printing

Recent Classifieds

Forum statistics

Threads
203,213
Messages
2,851,525
Members
101,729
Latest member
Luis Angel Baca
Recent bookmarks
0

xtol121

Subscriber
Allowing Ads
Joined
Jul 18, 2020
Messages
105
Location
Los Angeles, CA
Format
35mm RF
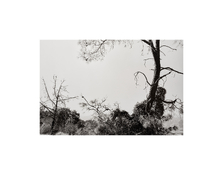
Hi! I have a negative that I really love and would like to make a print for an upcoming show, but unfortunately the negative has a bit of uneven development in a blank area of the sky that shows up in the print and I find it distracting. My first thought was to locally pre-flash that area of the print and then print as normal and hope that lowers the contrast in the highlights enough to hide the marks, but I haven't been able to test it yet. I was curious if anyone has any other tips or techniques I can apply in the darkroom to minimize the marks in the print. I'd love to get that part of the sky to exhibit an even grey while still maintaining the natural gradient of the sky.

Attached are two screenshots from scans of the negative. I did print this and it does show in the print, but I don't have the prints handy at the moment. I played with contrast to show how the print looked to my eyes (top) and then I enhanced contrast so the development marks are easily visible (bottom).
Untitled-1.jpg

And yes, I've worked out the uneven film developing issue since encountering this, thankfully!
 
Perhaps print it split-grade and use the low end filter to try and overcome the uneven-ness of it. It seems to overcome it you need to print it down but that it might progress to a dull thud type of gray. But maybe cut the low end filter short and print the sky to a higher Dmin, not sure.
 
Thanks Chuck! That sounds pretty similar to what I was thinking re: flashing, right? Essentially printing to a higher contrast (sky brighter) and then "burning the sky in" with low contrast, or via flash, to get the tone, but hopefully without going far enough to exhibit the darker tones of the marks? I think I'm lucky that this is mostly a silhouette of trees, I'm not really terribly worried about maintaining any highlight detail in the branches since there aren't any. FWIW I was planning on printing the sky to around zone VII, but I could see this print working with the sky at zone VIII or maybe a little higher, as long as I can maintain the illusion of gradation around the outside edges of the print.
 
I have a radical suggestion.
Print it as is.
Only you know that the patterns in the sky are due to uneven development.
The rest of the world is likely to assume cloud patterns and the light reflecting and refracting therein.
 
I'm not specifically referring to flashing. I mean use split-grade printing technique. Matt's suggestion might work......personally I'd prefer it to be more uniform for that particular image.
 
Print it as is.
Only you know that the patterns in the sky are due to uneven development.
The rest of the world is likely to assume cloud patterns and the light reflecting and refracting therein.
Indeed ! That was my thought even before reading the post of @MattKing
The rest of the world might also
  • not even notice
  • feel it adds substance to what would otherwise be blank and boring
 
I have a radical suggestion.
Print it as is.
Only you know that the patterns in the sky are due to uneven development.
The rest of the world is likely to assume cloud patterns and the light reflecting and refracting therein.
I agree. Another solution is to print high contrast, letting the sky go totally white. Either would be a good print IMO.
 
How much detail do you want in the tree trunks? What size print do you intend to make ? You might be able to print for the sky and split grade print the tree trunks and foreground. If you want some tone in the sky you could preflash to just get some while printing for a white sky. A slight vignette might make it work. Since you scanned the negative test on the computer and make a print as a guide.
 
My first thought was to locally pre-flash that area of the print and then print as normal and hope that lowers the contrast in the highlights enough to hide the marks

I think that's a pretty good idea, in fact. It should flatten out the sky area pretty effectively. I'd also try and print that area as light as possible (acceptable) which will help hide the density variations.
 
Have you noticed uneven development in your film in the past? Is this just a fluke, or are you just noticing it for the first time because of the clear sky?

You can concentrate on that one print as much as you want, but I'm wondering if you have a bigger problem.
 
Have you noticed uneven development in your film in the past? Is this just a fluke, or are you just noticing it for the first time because of the clear sky?

You can concentrate on that one print as much as you want, but I'm wondering if you have a bigger problem.

I was wondering the same thing initially, then I saw the last sentence at the bottom of that big image, where he said he worked out his development issues.
 
Thanks everyone for all of the suggestions, they've all been helpful, especially the ones reminding me that I'm probably the only one that will notice or even think about it. The images will be printed 16x20, so fairly large. The image is pretty high contrast as it is, and allowing the sky to go white would be mostly acceptable as long as there is tone. I'm hoping to get in the darkroom tomorrow and try a few options and hopefully report back here successfully or unsuccessfully. I'll post some scans once everything's dry!
 
Finally got a chance to scan the finished print. I was able to flash the problematic area and then print with a high contrast filter to minimize the streaking. I'll try and post my print notes, but it was around 7 or 8 steps to get to the final version with everything balanced. Also attached a photo of the installation!
 

Attachments

  • 04-JON_STARS-Monterey-County-California-2024-WEB.jpg
    04-JON_STARS-Monterey-County-California-2024-WEB.jpg
    685.1 KB · Views: 93
  • Jon_Stars_Photographs_2018-2025_Install_00011-WEB.jpg
    Jon_Stars_Photographs_2018-2025_Install_00011-WEB.jpg
    668.8 KB · Views: 94
That's very nice, congratulations! The unevenness seems to be totally gone; very effective. More importantly - the entire installation is gorgeous!
 
@koraks Thank you! I have to admit that I was surprised at how well it was hidden while still maintaining the luminosity of the sky. Flashing really can be a miracle tool! And thank you, the show was a lot of work to put together but I'm really proud of the result. Here's a link if anyone would like to view the show virtually - https://www.jonstars.com/photographs-2018-2025
 
Photrio.com contains affiliate links to products. We may receive a commission for purchases made through these links.
To read our full affiliate disclosure statement please click Here.

PHOTRIO PARTNERS EQUALLY FUNDING OUR COMMUNITY:


Ilford ADOX Freestyle Photographic Stearman Press Weldon Color Lab Blue Moon Camera & Machine
Top Bottom