SPP Saidane's Print Process

Hensol woods

Hensol woods

  • 6
  • 2
  • 61
Harbour at dusk

A
Harbour at dusk

  • 2
  • 0
  • 50
blossum in the night

D
blossum in the night

  • 1
  • 0
  • 39
Brown crested nuthatch

A
Brown crested nuthatch

  • 2
  • 2
  • 67

Recent Classifieds

Forum statistics

Threads
198,715
Messages
2,779,775
Members
99,685
Latest member
alanbarker
Recent bookmarks
0

koraks

Moderator
Moderator
Joined
Nov 29, 2018
Messages
22,643
Location
Europe
Format
Multi Format
When the particles are too small and they do go into the paper, then you got a stain that you cannot remove due to physics.
There's a number of things you hypothesize in your post about the size of pigment particles. I'm not sure if your statements hold up, although I'm not sure how accessible/easy to find is information on the exact physics involved.

In general, what I've learned so far on pigments is the following

* Some pigments are more transparent than others.
* Some pigments stain more so than others.

With regard to these performance aspects, there are differences between pigment types as well as the same nominal pigment from different manufacturers. It's furthermore important to consider the fact that you're never working with a 'pigment' as such, but always with a pigment dispersion. This means that the raw pigment is already somehow made miscible with a water-based solvent. This involves mixing the pigment with one or more suitable dispersants and perhaps adjuvants like stabilizing agents, anti-microbial chemicals/preservatives etc. This dispersion technology can be rather crude and rely on common ingredients; for instance, for classic watercolor paints, pigment would be ground with e.g. a glass muller using gum arabic and honey as binders. Modern-day dispersions for e.g. inkjet and printing inks are generally high-tech dispersions featuring rather arcane/specialist chemical building blocks with attractive properties such as a simultaneous affinity for functional groups of the pigment on the one hand and a water- or solvent-based carrier on the other hand.

In making a pigment dispersion, 'particle' size does indeed play a role. In general in making a high-quality dispersion, the clumps of pigment are kept quite small, although there's an optimum depending on the type of pigment (particularly its color) and the desired characteristics of the final colorant. There's also some relation between transparency and particle size, although this appears to be within certain limitations; e.g. some pigments appear to just be inherently more transparent than others, regardless of how they are dispersed. Smaller particle sizes (think in orders of magnitude of 50-100nm) tend to be favorable because of several reasons, including higher chroma (i.e. more colorful) and less problems with clumping, clogging etc.

Overall, it's kind of a complex field; to get an impression of what's involved, there's a rather neat little primer/example here: https://www.paint.org/wp-content/uploads/2021/09/jctDEC01-Adkins.pdf
 
OP
OP

imgprojts

Member
Joined
May 24, 2024
Messages
102
Location
Seattle WA
Format
Multi Format
Yeah, FAO is said to work better towards UV and FAC closer to blue. But FAO also reacts to green color. I hadn't actually thought about going to a blue laser. Since the formula works so well under UV, I wouldn't need a lot of power. The projector I'm working with has a very tiny glass rod that works as the integrator. I could remove that and the color wheel and replace them with a blue laser.

The 3D printing resin from what I understand and in my experience is composed of very tiny droplets of non water soluble resin in a water soluble matrix of some kind. After you print, you can put your print in a bucket of water or even soapy water and brush off residual resin. But the residues as they come off feel exactly as normal non water soluble stuff. It may be more economical to use non water soluble resin. When I add it to the PVA there isn't much of a change I think it does make a white foamy consistency with almost everything else in the mix depending on the pH.
 
OP
OP

imgprojts

Member
Joined
May 24, 2024
Messages
102
Location
Seattle WA
Format
Multi Format
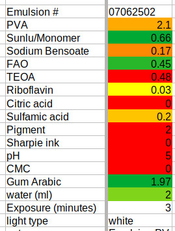
Last night and this morning I tried making test emulsions and I kept having them turn into polymerized blobs in the beaker. You have to keep the pH controlled at all times with this. Looking for a solution (pun intended) I decided to again separate the emulsion into two parts.

Emulsion: PVA+Monomer+Pigment, pH5
Activator: 2ml H20+SB+FAO has a pH of 5. light green. TEOA turns it almost red with pH 10. Adding sulfamic to drop pH to 7. Riboflavin doesn’t change pH. Add GA. Final pH5.

The emulsion having PVA, monomer and pigment haven't given me any issues and they mix really well. I actually checked this morning and starting with PVA, as soon as you add the monomer you do get a white colored cloudy mix. I assume that's billions of tiny non soluble monomer bubbles mixed with the rest of the stuff.
Then I mixed my activator. My tap water has a pH of like 8 to 9, its bad. then I add the Sodium Benzoate and FAO to a pH of 5 and that turns the milky white to milky green. TEOA boosts the pH to 10. Adding sulfamic drops it to 7. Next I add Riboflavin which doesn't change the pH and finally the GA which may or may not bring the pH back down to around 5, It was hard to read the pH strips. I'm pretty sure that it did change the pH. If you don't do it this way you're pretty much guaranteed that you'll get a blob.

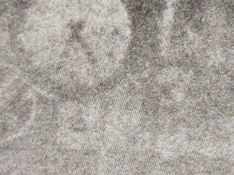
Anyway, this is the best combination so far which results in a good image via visible light (strong LED flashlight). The Gum Arabic makes the development really easy. I spray with 0.3% peroxide, then immediately (this is important) dunk into dilute acid and then finally wash the ink away in water. You can keep the acid relatively clean for a while if you just dunk quickly, might as well spray it on probably. I think CMC also works but I haven't found a good mix yet with it for visible light. the role of the gum is to prevent the pigment from going into the paper fibers to stain them permanently. As I explained before, very fine carbon/pigment and or inks just go right into the fibers. In fact, looking at a NewCyanotype under 1000X magnification you can see that its practically an ink that penetrates into the fibers there it changes color... that is why its so good. PS if you write : PVA, it works but :tongue:VA give you a smiley face LOL.
 

Attachments

  • Emulsion_07062502.jpg
    Emulsion_07062502.jpg
    43.3 KB · Views: 9
OP
OP

imgprojts

Member
Joined
May 24, 2024
Messages
102
Location
Seattle WA
Format
Multi Format
There's a number of things you hypothesize in your post about the size of pigment particles.

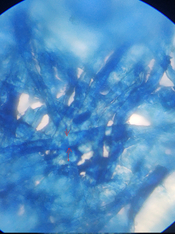
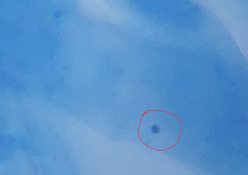
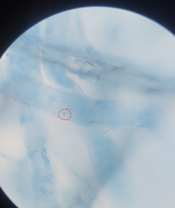
From what I've learned so far, one cannot see the liquid gel, its transparent, but as a mechanical engineer I can only assume that the velocity of a very viscous material at the microscopic level will be 0 near the wall which is at the paper. The sharing forces due to surface tension would largely overtake any kind of flow....thus if you wash it and it didn't come off, that particle in deep inside the various depths of the paper fiber web. Its pretty cool that you can actually travel thru the paper using the microscope since the light passing thru the almost transparent paper fibers actually forms an image as the focus place travels thru the paper. There are lots of crevices in between the fibers. Below you can see a well developed graphite ink PVAtype (LOL) on watercolor paper. As we zoom in 100X you can see that the ink is composed of a yellow chemical stain which we cannot see but gives the paper its yellow color and particles between 5 and 70microns. I circled two particles that I measured. Then we take a look at a 400X view of a NewCyanotype on regular 90lb printer paper. I marked the thickness of one of the fibers there and measured it to be 19 microns. so the question is where is the cyanotype particle? It has to be much smaller than 1 micron, possibly 50 or 100nm in size? And then another question I had was where is the gel? so I looked and looked for "floating particles", particles that would not be attached to a fiber but to the gel. I couldn't find anything like that. So if have stuff suspended to PVA and then you paint that over paper and wash it off after exposure, you are looking for particles attached to the fibers with a PVA film that is within the thickness of the fibers. the fibers look really big in the photos and really solid, but they are not, some are composed of smaller fibers, and in between those smaller fibers that's where you get staining that cannot be removed. Also in between fiber layers where there isn't a clear path for flow to happen. The only mechanism for removing stain is the shear forces created by the gel as it absorbs or releases water. Brushing helps but it only clears the top of the layers and not very well. These are just observations and hypotheses. It would be pretty cool to point the microscope at a sample thru the entire process some how with a mini exposure unit with built in wash lol just to see where the particles go and what they do during the various steps. I'll go take a look at the link about pigments, I can image that a few decades with better equipment than mine have been quite an eye opener.
 

Attachments

  • FOV_location_001.jpg
    FOV_location_001.jpg
    1.2 MB · Views: 12
  • big_vs_small_pigment.jpg
    big_vs_small_pigment.jpg
    521 KB · Views: 12
  • New_Cyano_particle size 2.jpg
    New_Cyano_particle size 2.jpg
    1.7 MB · Views: 14
OP
OP

imgprojts

Member
Joined
May 24, 2024
Messages
102
Location
Seattle WA
Format
Multi Format
LOL! they got images at 40,000X. my scope can only do 1000X max and I still cant see the particles of cyanotype even when its pretty sharp with oil immersion. I can go to 3500X with another ebay investment and a little luck, but the N.A. is probably going to make it useless.
 

koraks

Moderator
Moderator
Joined
Nov 29, 2018
Messages
22,643
Location
Europe
Format
Multi Format
particles between 5 and 70microns

What you're pointing out in the photo is particle agglomerations/clusters that are likely far bigger than the dispersed pigment particles.

so the question is where is the cyanotype particle?
Prussian blue molecules are the particles. But you're comparing apples & oranges here. The Prussian blue is formed in situ through the exposure of a sensitizer that was applied as a solution - which means that it's by definition way more finely divided in the print than any pigment-based print can ever be.

where is the gel? so I looked and looked for "floating particles", particles that would not be attached to a fiber but to the gel.
They're adhered to the paper fibers by means of the gel. If there were no binder, your fingers would turn black if you rubbed the print.
If you calculate the weight of the binder that you deposit in a print like this per square centimeter, you'll end up with figures in the mg/cm2 range. That's not a whole lot. You're not going to see a thick, yoghurt-like gel layer because there isn't one. What's there is basically just a thin lining that sticks to the paper fibers.
 
OP
OP

imgprojts

Member
Joined
May 24, 2024
Messages
102
Location
Seattle WA
Format
Multi Format
What you're pointing out in the photo is particle agglomerations/clusters that are likely far bigger than the dispersed pigment particles.


Prussian blue molecules are the particles. But you're comparing apples & oranges here. The Prussian blue is formed in situ through the exposure of a sensitizer that was applied as a solution - which means that it's by definition way more finely divided in the print than any pigment-based print can ever be.


They're adhered to the paper fibers by means of the gel. If there were no binder, your fingers would turn black if you rubbed the print.
If you calculate the weight of the binder that you deposit in a print like this per square centimeter, you'll end up with figures in the mg/cm2 range. That's not a whole lot. You're not going to see a thick, yoghurt-like gel layer because there isn't one. What's there is basically just a thin lining that sticks to the paper fibers.

Indeed! I have been interested in particle size for various reasons related to ceramics and glass for a while. Reviewing the images, I'm really curious to see if I could distinguish a 500nm particle. I think its possible because at the 400X level I can definitely distinguish 1micron/1000nm. The paper is saying that maximum color development happens at 50 to 100nm and maximum opacity at 250nm. it gets really hard to illuminate stuff at that size with my current setup.
 

koraks

Moderator
Moderator
Joined
Nov 29, 2018
Messages
22,643
Location
Europe
Format
Multi Format
I think you're running into basically the same problem as with trying to see film 'grain' with a scanner. Something pops up that looks a lot like particles, so they must be, right? Well, maybe...and maybe not.
 
OP
OP

imgprojts

Member
Joined
May 24, 2024
Messages
102
Location
Seattle WA
Format
Multi Format
I think you're running into basically the same problem as with trying to see film 'grain' with a scanner. Something pops up that looks a lot like particles, so they must be, right? Well, maybe...and maybe not.

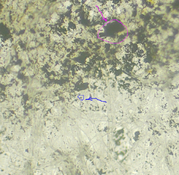
well with the graphite, those are definitely graphite particles. I just sacrificed an old failed cyanotype to see if I could find anything smaller than a micron. and I think I can. This one particle shown in the photo below was clear as day to the eye. my phone camera makes it pixelated and such, but to the eye, its still well resolved. I measured it to be 1.4 microns across. So I think .5 microns would still be obvious to see... however look at that fiber, its blue and no particles in sight lol, yup new Cyanotype is molecular level. its awesome to be able to observe stuff up close like this.
 

Attachments

  • small_particle_02.jpg
    small_particle_02.jpg
    401.1 KB · Views: 11
  • small_particle.jpg
    small_particle.jpg
    872.4 KB · Views: 12
OP
OP

imgprojts

Member
Joined
May 24, 2024
Messages
102
Location
Seattle WA
Format
Multi Format
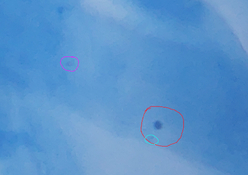
Oh I found a 0.75um (magenta) and a 0.5um (cyan) particle or more like agglomeration here:
 

Attachments

  • small_particle_03.jpg
    small_particle_03.jpg
    409.6 KB · Views: 13

koraks

Moderator
Moderator
Joined
Nov 29, 2018
Messages
22,643
Location
Europe
Format
Multi Format
well with the graphite, those are definitely graphite particles.

Graphite is rather coarse and may indeed show up as clearly visible particles. This is also what makes graphite as such not a very suitable pigment unless it's further ground into a fine carbon dust. One of the problems with graphite is also the particle size distribution, which will be rather broad.

Oh I found a 0.75um (magenta) and a 0.5um (cyan) particle or more like agglomeration here:
The specs you're finding are likely inclusions in the paper base from some kind of contaminant. This can be ink from previous uses of the same paper fiber or foreign particulate matter from another source.
Given the nature of a cyanotype sensitizer, which is a solution and not a dispersion, the resulting pigment will generally be very finely divided, especially with the New Cyanotype sensitizer. Classic cyanotype may exhibit clear pigment clumping due to pigment moving about after it has been formed; this is indeed one of the main reasons why Mike Ware developed New Cyanotype to begin with.
Note also that cyanotype as such will not form magenta or cyan (more so than its natural color) particles. It can go in the direction of magenta upon bleaching, but this would evidently affect a rather broad spot in the print, not a single cluster/agglomeration of particles.
 
OP
OP

imgprojts

Member
Joined
May 24, 2024
Messages
102
Location
Seattle WA
Format
Multi Format
Last night and over the weekend I tested PVA mixed with 3D printer monomer and pigment. Sure enough that works. Just not for visible light. But for all you working with a UV light near the 400nm range this will work great. 1part 5% PVA, 1part clear monomer/water washable resin, 2parts CMC. Without the CMC it may work if you pre-size the paper with PVA just to fill in the voids that would otherwise stain the paper. The monomer basically comes with some acrylate monomer, a dye (glows blue on sunlu clear) and and electron donor. The polysachrides or Gelatin just go along for the ride carrying the pigment in suspension. This is by far the cheapest option. Its relatively safe-ish.
 
OP
OP

imgprojts

Member
Joined
May 24, 2024
Messages
102
Location
Seattle WA
Format
Multi Format
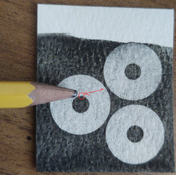
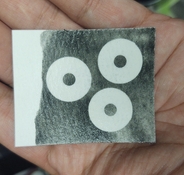
Okay I'm going back to the safe PVA only formula and I have a really good mix. Perfect sharp circles in 1 minute 380nm exposure:

2g 5%PVA
0.51g FAO
0.6ml og 0.01...dilute riboflavin into 50ml water
+Citric to pH 4 (before adding as 0.6ml
I don't know if this I'd necessary)
Lots of pigment
Add CMC to thicken liquid

Apply with brush and let it dry.

Expose for 1 minute

Spray with dilute 3%hydrogen peroxide
Immediately
Spray with with dilute citric+boric acids.
Wash in water. Depending on how much CMC you added it will clear within a few seconds to a minute. It clears to paper white and is very resistant to water. The boric acid polymerizes the exposed PVA after the peroxide magnifies the the ferric radicals.
 

Attachments

  • IMG_20250710_221212_1.jpg
    IMG_20250710_221212_1.jpg
    1.1 MB · Views: 8
OP
OP

imgprojts

Member
Joined
May 24, 2024
Messages
102
Location
Seattle WA
Format
Multi Format
It seems to be working for images using bright white light from a projector. For sure that includes some UV or at least strong blue light.
 

Attachments

  • IMG_20250712_143134_1_1.jpg
    IMG_20250712_143134_1_1.jpg
    746.6 KB · Views: 4
OP
OP

imgprojts

Member
Joined
May 24, 2024
Messages
102
Location
Seattle WA
Format
Multi Format
Just repeated the 3 circles with the same batch 2 day old formula and I exposed for 10 seconds under 380nm to get perfectly rounded circles. The formula works great for the standard UV process. I'm going to try it with a laser printed negative or maybe I'll find a used injet printer on craigs to try it out.
 
OP
OP

imgprojts

Member
Joined
May 24, 2024
Messages
102
Location
Seattle WA
Format
Multi Format
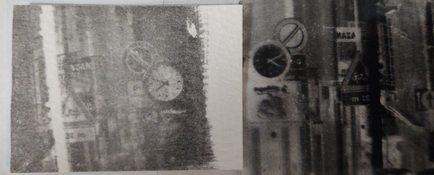
My laser printer cannot print on normal transparencies but I ran a sheet just to try it out. Its a new brother printer. With the emulsion side facing the print it kept getting jammed. Flipping it over worked but the ink was smeared. So I just made a sample near the clock. I get all the clock details and the text. I even get sharp microscopic patterns from the laser print pattern. I think we got this. My light source and negatives suck but maybe someone else can try it. Its all safe non toxic chemicals.
 

Attachments

  • IMG_20250712_182931_1.jpg
    IMG_20250712_182931_1.jpg
    1 MB · Views: 6
Photrio.com contains affiliate links to products. We may receive a commission for purchases made through these links.
To read our full affiliate disclosure statement please click Here.

PHOTRIO PARTNERS EQUALLY FUNDING OUR COMMUNITY:


Ilford ADOX Freestyle Photographic Stearman Press Weldon Color Lab Blue Moon Camera & Machine
Top Bottom