Small portfolio in Moleskine notebook

IMG_2142.jpeg

A
IMG_2142.jpeg

  • sly
  • May 20, 2025
  • 7
  • 1
  • 47
On The Mound.

A
On The Mound.

  • 2
  • 1
  • 59
Val

A
Val

  • 5
  • 2
  • 110
Zion Cowboy

A
Zion Cowboy

  • 10
  • 5
  • 100
.

A
.

  • 2
  • 2
  • 132

Forum statistics

Threads
197,792
Messages
2,764,370
Members
99,473
Latest member
Shootiqué
Recent bookmarks
0

arigram

Member
Joined
Sep 21, 2004
Messages
5,465
Location
Crete, Greec
Format
Medium Format
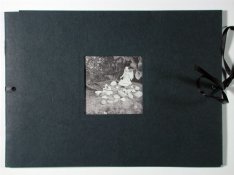
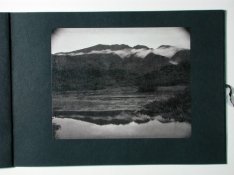
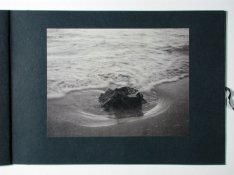
I was thinking of making a small portfolio in a Moleskine notebook. It wound't be a proper display one, but one to carry with to show the photos on a chance meeting. More for the others to get an idea.
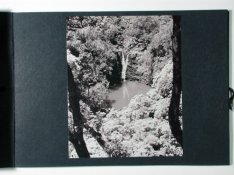
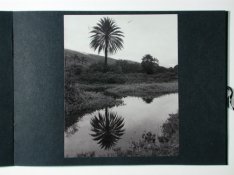
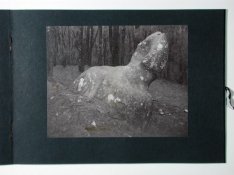
I have this Moleskine notebook which I love and the size is just a bit larger than 120 6x6cm contact prints and 35mm printed at similar size.
There is also the slight larger one that could take 13x18cm (5x7") or 9x13cm (3.5x5") prints.
The small one is great for portabillity as it fits all jacket pockets but doing the contacts right could be a pain, considering I wouldn't be able to do some photos that need dodging and burning. Plus they are tiny. The larger one has a good size for small prints but it doesn't fit any pockets thus goes a bit against the idea of carrying it with me everwhere I go. I would have to think about and carry it on hand or elsewhere, especially since I don't carry a bag with me.

What do you think?
 

David A. Goldfarb

Moderator
Moderator
Joined
Sep 7, 2002
Messages
19,974
Location
Honolulu, HI
Format
Large Format
I've been thinking of doing just the same thing.

I have a small portfolio of my work on my iPod, and that is handier for things that are originally 5x7" or larger negs, but I suppose I could dupe them in a smaller format and reduce them for the "pocket portfolio."

One issue with a bound notebook is that if you mount prints in it, it expands and doesn't close flat, and the binding can stretch and become weak. I was thinking maybe of a postbound album with removable pages, like the Kolo albums, but these are usually too large. Another option may be to take the small Moleskine drawing book and remove every other page (leaving enough of the sheet so as not to damage the binding).

Another possibility might be to make a pocket sized box for small prints.
 

Jeremy

Member
Joined
Oct 26, 2002
Messages
2,761
Location
Denton, TX
Format
Multi Format

David A. Goldfarb

Moderator
Moderator
Joined
Sep 7, 2002
Messages
19,974
Location
Honolulu, HI
Format
Large Format
The attraction of the Moleskine notebooks is that they are themselves beautiful objects, and are very practical for keeping in a pocket.

Here's the smallest of the Kolo books--

Dead Link Removed

They look attractive, but the ribbon tie seems less practical than the Moleskine elastic band, and the Kolo is a little larger.
 
OP
OP
arigram

arigram

Member
Joined
Sep 21, 2004
Messages
5,465
Location
Crete, Greec
Format
Medium Format
Thank you guys but where the hell I am gonna find all that stuff? Moleskine I can buy from a local bookstore and it is the most elegant notebook I have found, that's why I thought of it.
What's LULU anyway?
 

Struan Gray

Member
Joined
Nov 5, 2004
Messages
914
Location
Lund, Sweden
Format
Multi Format
Moleskine make what they call a 'memo pocket', which is like a minature concertina file with the same black trim and elastic keeper as their other notebooks. 2.5" x 5.5" in external size, it's better for the more rectangular formats than squares, but it's a neat way to carry around a set of small prints.
 

Michel Hardy-Vallée

Membership Council
Subscriber
Joined
Apr 2, 2005
Messages
4,793
Location
Montréal, QC
Format
Multi Format
Last semester my MA cohort had a seminar session with the rare books dept. of the uni library, and one of the thing that caught my attention was a bound collection of manuscripts by Rudyard Kipling.

I don't know how it was made, but they essentially took the original manuscript page, and "framed" it into another sheet of paper. That way, the two sides of the manuscript were visible (flip the page), and the surrounding area of paper made it easy to bind without altering the original, without the problem of double paper size.

I have no clue as to who would do that, nor where you could find it, but it was very neat to say the least.
 

David A. Goldfarb

Moderator
Moderator
Joined
Sep 7, 2002
Messages
19,974
Location
Honolulu, HI
Format
Large Format
Struan Gray said:
Moleskine make what they call a 'memo pocket', which is like a minature concertina file with the same black trim and elastic keeper as their other notebooks. 2.5" x 5.5" in external size, it's better for the more rectangular formats than squares, but it's a neat way to carry around a set of small prints.

I use these to file 3x3" gel filters. They are perfect for this.
 

Struan Gray

Member
Joined
Nov 5, 2004
Messages
914
Location
Lund, Sweden
Format
Multi Format
David A. Goldfarb said:
I use these to file 3x3" gel filters. They are perfect for this.

Lest Moleskines be accused of having the Tardis-like property of being larger on the inside than on the outside, let me confess to having been off by an inch in my measurement. The memo pocket I have here is 3.5" by 5.5" in outside dimensions.

When sentencing I would like it to be taken into consideration that all rulers have been appropriated from our desk drawer for infant art projects, leaving for impromptu measurements only an analogue drafting scale, which starts its 1:1 inch numbering at minus one.
 

John Koehrer

Subscriber
Joined
Apr 3, 2004
Messages
8,275
Location
Aurora, Il
Format
Multi Format
Do you set the mole free once you've skinned it?
 

pelerin

Member
Joined
Sep 11, 2004
Messages
343
Format
Multi Format
David A. Goldfarb said:
<SNIP>.

One issue with a bound notebook is that if you mount prints in it, it expands and doesn't close flat, and the binding can stretch and become weak.
<SNIP>

Another possibility might be to make a pocket sized box for small prints.

Hi,
This may be one of those things that is easier to show than explain but here goes... David is quite right of course that if you mount the pictures to the pages of the book you will quickly end up with an overstuffed little book that won't close. This look may suit a mad english professor's briefcase but certainly not a photo portfolio. There is a simple solution. Fold open the moleskine (including the flyleafs) and use a robust guillotine to trim out the contents so you are left with perhaps 8-10mm of the original width of the page still bound into the book. carefully measure the stack the of paper. Measure how many sheets of the photo paper you like stacked back to back equal the thickness of the the sheaf of paper you removed. (allow for interleaving paper if you choose) You now have a set of contents that will not cause the book to bulge.

The idea is to mount them back to back and then attach them to the short spine left in then book. I have succesfully tried: gluing a short spine of thin rag paper between that prints which is then mounted to the books spine and, mounting the prints back to back with the with the books spine sandwiched between the two prints. teh first is more tedious but carries the advantage that one error (of measurement, placement slipping during glue-up etc.) doesn't sink the the whole process.

Since the number of prints that fill the book is quite a bit fewer than the the nominal page count I first had the idea of trimming out the excess page count (divided equally across the # of pages in the journal) and mounting the prints directly to the remaining pages. I found however that this incurred all the problems of method two above and added the problem of obtaining even trim (which the guillotine eliminates) YMMV.

Two things to remember are: allow for a gutter on the spine side and if you use the spine don't forget to include it in your measurement for the stack height.
best.
Celac.
 

David A. Goldfarb

Moderator
Moderator
Joined
Sep 7, 2002
Messages
19,974
Location
Honolulu, HI
Format
Large Format
That's a very neat solution. I like it.
 

David A. Goldfarb

Moderator
Moderator
Joined
Sep 7, 2002
Messages
19,974
Location
Honolulu, HI
Format
Large Format
So I'm on Jury Duty this week, and that means that on my lunch hour I can wander over to Pearl Paint on Canal St., just a few blocks from the Manhattan courts. I picked up some small Kolo albums--5x7" and 2-3/8" square, and I'm going to try them out. I figure I can either drymount or starch mount the prints. I picked up some archival wheat starch and a wide brush as well.
 

David A. Goldfarb

Moderator
Moderator
Joined
Sep 7, 2002
Messages
19,974
Location
Honolulu, HI
Format
Large Format
So I ended up making a 5x7" book of albumen prints with one of the Kolo albums, and I think it came out nicely. I drymounted one 6x6cm print on the cover and six 4x5" prints inside. I keep it in my camera bag in a 6x9" envelope.

I'd post a picture, but I don't have access to a digital camera or a scanner for the next couple of months.
 

foto-r3

Member
Joined
Apr 1, 2006
Messages
67
Location
Spain
Format
Multi Format
This is a neat idea. Please do upload some shots of yours, Dave, when you get the chance.

For anyone interested in the different models available:

http://www.moleskine.com/eng/default.htm

They have one model with detachable pages designed for drawing/painting but it may also have a place for photographs.
 

David A. Goldfarb

Moderator
Moderator
Joined
Sep 7, 2002
Messages
19,974
Location
Honolulu, HI
Format
Large Format
Back home, so here is the album, pages 1-5 of 8.
 

Attachments

  • DSCN2922.jpg
    DSCN2922.jpg
    29.1 KB · Views: 367
  • DSCN2923.jpg
    DSCN2923.jpg
    47.4 KB · Views: 301
  • DSCN2924.jpg
    DSCN2924.jpg
    38.1 KB · Views: 285
  • DSCN2925.jpg
    DSCN2925.jpg
    34 KB · Views: 240
  • DSCN2926.jpg
    DSCN2926.jpg
    33.7 KB · Views: 253

David A. Goldfarb

Moderator
Moderator
Joined
Sep 7, 2002
Messages
19,974
Location
Honolulu, HI
Format
Large Format
...and here are pages 6-8. The back cover is blank.
 

Attachments

  • DSCN2927.jpg
    DSCN2927.jpg
    30.1 KB · Views: 202
  • DSCN2928.jpg
    DSCN2928.jpg
    29.5 KB · Views: 214
  • DSCN2929.jpg
    DSCN2929.jpg
    28.4 KB · Views: 244
Last edited by a moderator:

removed account4

Subscriber
Joined
Jun 21, 2003
Messages
29,833
Format
Hybrid
hi david:

really nice book!
its really nice to see photographs presented in book form.
i love how you included an image on the front cover. i keep wanting to do an image "on cover" but at the last minute shy away from it.


hi celac:

your suggestions sound like they work very well.
one thing i would also suggest is to stack the photos up and measure how high the stack is (compressed) this is the amount the book will expand "extra". when i have made books ( by hand ) either a closed spine or stab/japanese binding, you have to take into account this "extra" . in the case of a closed spine ( like a hard cover book you might buy in a store) the inner edge of each page is folded. this extra thickness of each page is enough to make the room needed. the pages/signatures are stitched and the cover glued. when it is a open ended / stab binding you can just interleave extra edges ( not the whole page but just an edge that is cut off ) between each page to add extra thickness. i like the look of torn pages on the sewn edge when it sticks out ( deckled edge ? ) so i don't fold the edge over when the spine is "open".

john

pelerin said:
Hi,
This may be one of those things that is easier to show than explain but here goes... David is quite right of course that if you mount the pictures to the pages of the book you will quickly end up with an overstuffed little book that won't close. This look may suit a mad english professor's briefcase but certainly not a photo portfolio. There is a simple solution. Fold open the moleskine (including the flyleafs) and use a robust guillotine to trim out the contents so you are left with perhaps 8-10mm of the original width of the page still bound into the book. carefully measure the stack the of paper. Measure how many sheets of the photo paper you like stacked back to back equal the thickness of the the sheaf of paper you removed. (allow for interleaving paper if you choose) You now have a set of contents that will not cause the book to bulge.

The idea is to mount them back to back and then attach them to the short spine left in then book. I have succesfully tried: gluing a short spine of thin rag paper between that prints which is then mounted to the books spine and, mounting the prints back to back with the with the books spine sandwiched between the two prints. teh first is more tedious but carries the advantage that one error (of measurement, placement slipping during glue-up etc.) doesn't sink the the whole process.

Since the number of prints that fill the book is quite a bit fewer than the the nominal page count I first had the idea of trimming out the excess page count (divided equally across the # of pages in the journal) and mounting the prints directly to the remaining pages. I found however that this incurred all the problems of method two above and added the problem of obtaining even trim (which the guillotine eliminates) YMMV.

Two things to remember are: allow for a gutter on the spine side and if you use the spine don't forget to include it in your measurement for the stack height.
best.
Celac.
 

David A. Goldfarb

Moderator
Moderator
Joined
Sep 7, 2002
Messages
19,974
Location
Honolulu, HI
Format
Large Format
Thanks, John. The Kolo albums are set up for cover images. The cover sheet is actually twice as long as the other pages, so it folds in half, and there is a 6x6cm window, and you can mount a photograph on the inside of the fold so that it will show through the window. Then the closure ribbon goes through a hole near the fold on the right edge of the book to keep it all together.

How are you mounting your photographs in your books? These are drymounted, but I've been experimenting with starch mounting a bit.
 

removed account4

Subscriber
Joined
Jun 21, 2003
Messages
29,833
Format
Hybrid
hi david

the kolo bookcover looks nice ..
i'll have to look into that as a quick alternative to what i have been doing ..
if i had an image on a cover, i would have to glue it to the book board, cut a window out of book cloth ( or whatever ) and do it that way. i always get a little nervous pasting to a book cover, and i would have to figure out a way to make the edge of the book cloth ( around the image ) to have a little extra thickness ...

for internal "block" pages, i have done it a few diffent ways.

one of them needed the photographs
to be easily removed. i placed each image on a page and
made a mark where each corner was and cut a diagonal to
slip each corner into the page ( kind of like a scrapbook ) ..

i like to use a simple paste ( rice or wheat linco from an art supply store ). the (top-side?) edge of the photograph was pasted down. i use wax paper, smoothed the pasted edge with the edge of my hand, and put between each page and just a few heavy books on top to keep it flat. it takes a little time to dry out -- and it can be reversed buy soaking in water. early on i made a few books where i pasted the whole image onto the page ( like dry mounting ). another way to get images into a book is to print small on a page, fold the edge over a 1/4 - 1/2 nch and drill your stitching holes right into the photo paper. no pasting required, but you don't have a decorative edge ... it can be reversed just by trimming the drilled edge.

i like just pasting an edge it seems to work best for me, but you have to remember it is paste when you store it in your fridge. once i forgot what it was and ate it by mistake thinking " i don't remember making cream of wheat ... " it didn't taste too bad :smile:

have fun!
john
 

David A. Goldfarb

Moderator
Moderator
Joined
Sep 7, 2002
Messages
19,974
Location
Honolulu, HI
Format
Large Format
Thanks!
 
Photrio.com contains affiliate links to products. We may receive a commission for purchases made through these links.
To read our full affiliate disclosure statement please click Here.

PHOTRIO PARTNERS EQUALLY FUNDING OUR COMMUNITY:


Ilford ADOX Freestyle Photographic Stearman Press Weldon Color Lab Blue Moon Camera & Machine
Top Bottom