SLIMT and Why You Should Be Using It

WWPPD2025-01-scaled.jpg

A
WWPPD2025-01-scaled.jpg

  • 0
  • 0
  • 33
Shannon Falls.jpg

D
Shannon Falls.jpg

  • 3
  • 0
  • 74
Trail

Trail

  • 1
  • 0
  • 92
IMG_6621.jpeg

A
IMG_6621.jpeg

  • 1
  • 2
  • 174
Carved bench

A
Carved bench

  • 1
  • 3
  • 196

Recent Classifieds

Forum statistics

Threads
198,077
Messages
2,769,325
Members
99,559
Latest member
Evraissio
Recent bookmarks
0

L Gebhardt

Member
Joined
Jun 27, 2003
Messages
2,363
Location
NH
Format
Large Format
I also used SLIMT for the first time on a print of the same negative as above. This is one I could not print to my satisfaction in the darkroom using low contrast filtration. I do have a very nice inkjet print on the wall, but it bothers me that I gave up on the darkroom print. I've decided to use it as a way to expand my knowledge of masking and printing. SLIMT was something I've wanted to experiment with for a while, despite all the negative comments I keep coming across.

My results were highly positive and encouraging. I simply found the correct exposure that still showed some of the waves in the main sun reflection printed at grade 2. That gave print with a lot of contrast but showed the play of light on the water as I wanted it. My first SLIMT print was at 4ml/400ml for 2 minutes, as recommended, and developed normally. That was unbelievably low contrast but still contained most of the detail in the brightest part of the water. Next I went to 1ml/400m for 2 minutes and developed normally. That resulted in a very convincing straight print with just about the right contrast and exposure. I did a few more variations but that second print is my favorite.

Thank you David Kachel for working out the details and publicizing your methods, as well as Christopher Layne for starting this thread which got me to try SLIMT.
 

georg16nik

Member
Joined
Aug 3, 2010
Messages
1,101
Format
Multi Format
[...]... Two, my development isn't even. I used trays and there are some areas that didn't get developed. These look like the same patterns I noticed in the bleach when the antihalation dye clumped in the eddy currents from the agitation (quite neat to actually get to watch under safe light). A longer dev time and more random agitation pattern should be able to fix this.
...[...]

The fix for uneven development of some films is plain water presoak, prior to the SLIMT bath.
Presoak in Photo-Flo instead of plain water may provide even more uniform development.
Also, don't forget that certain film might call for adding potassium bromide alongside potassium ferricyanide.
 

Andrew O'Neill

Moderator
Moderator
Joined
Jan 16, 2004
Messages
11,825
Location
Coquitlam,BC Canada
Format
Multi Format
I used this technique a lot back in the 90's/early 2000's. I experimented with many different films, and TMY gave the best results. One can get amazing contractions with this technique, but... My main film has always been HP5, and I could only get mediocre results.
 

john_s

Subscriber
Joined
Nov 19, 2002
Messages
2,132
Location
Melbourne, A
Format
Medium Format
I used this technique a lot back in the 90's/early 2000's. I experimented with many different films, and TMY gave the best results. One can get amazing contractions with this technique, but... My main film has always been HP5, and I could only get mediocre results.

Andrew, with the HP5+ did you persevere with time/concentration/bromide (mentioned above)? Just wondering, as I'm about to chage over to HP5+ now that I've used almost all of my Neopan400.
 

Andrew O'Neill

Moderator
Moderator
Joined
Jan 16, 2004
Messages
11,825
Location
Coquitlam,BC Canada
Format
Multi Format
Andrew, with the HP5+ did you persevere with time/concentration/bromide (mentioned above)? Just wondering, as I'm about to chage over to HP5+ now that I've used almost all of my Neopan400.

I honestly don't remember. I haven't employed SLIMT since about '05. I'd have to dig up my notes...
 

Ivo Stunga

Member
Joined
Apr 3, 2017
Messages
1,179
Location
Latvia
Format
35mm
Hmmmm, it should also work with contrasty film, right?
 
Joined
Sep 10, 2002
Messages
3,578
Location
Eugene, Oregon
Format
4x5 Format
SLIMT will work with just about any film. One just has to do the requisite testing to get dilution and treatment time down. FWIW, Kachel's SLIMT technique always uses a potassium ferricyanide/potassium bromide bleach.

Doremus
 

Ivo Stunga

Member
Joined
Apr 3, 2017
Messages
1,179
Location
Latvia
Format
35mm
Just tried it with Rollei Retro 80S/Aviphot 80 slides, 2min bleaching time - shadows lifted, nice! Now just to fine-tune.
 

Ivo Stunga

Member
Joined
Apr 3, 2017
Messages
1,179
Location
Latvia
Format
35mm
I was pulling Rollei Retro 80S to ISO 25 + SLIMT 5ml, 2minutes. Shadows were quite more open compared to the same pull without SLIMT - currently I'm running tests to verify this with normal processing and to arrive at a time/concentration.

If the results will be consistent and beneficial, I'll make a detailed post.

Doesn't hurt trying - imparts additional expense of whopping 0,0004 cents per film : D
 

Alain Deloc

Member
Joined
Sep 16, 2018
Messages
123
Location
Bucharest
Format
Multi Format
I was pulling Rollei Retro 80S to ISO 25 + SLIMT 5ml, 2minutes. Shadows were quite more open compared to the same pull without SLIMT - currently I'm running tests to verify this with normal processing and to arrive at a time/concentration.

If the results will be consistent and beneficial, I'll make a detailed post.

Doesn't hurt trying - imparts additional expense of whopping 0,0004 cents per film : D

Oh, thanks! I thought you were able to use the method at box speed.
 

Ivo Stunga

Member
Joined
Apr 3, 2017
Messages
1,179
Location
Latvia
Format
35mm
I am, test I did yesterday shows activity when doing SLIMT both - prior to first and second development stages. I just have to nail down, do it right before I start screaming Hallelujah online :wink:

But a little "Ha!" from it is already on my lips :wink:

If it works when pulling, it's obviously going to work at box speed and at pushing, because chemically nothing changes when altering development time.
 

chuckroast

Subscriber
Joined
Jun 2, 2023
Messages
2,154
Location
All Over The Place
Format
Multi Format
Some years ago, I spent a bunch of time working on long, low dilution techniques like (sem)stand and EMA. I ran across some of Kachel's writings (and he's no fan of these techniques) and looked at SLIMT, though I never tried it.

I have a found that an hour-long development cycle in highly dilute developer with one midpoint agitation will give you:

1. Full box speed
2. Expanded mid tone contrast
3. Very well managed highlights

This works across a variety of developer and film combination. HOWEVER, you have to take care to
use minimal suspension on sheet film and elevate the reels off the bottom of the tank (I use 2l open tanks) to avoid streaking and bromide drag artefacts.

This seemed to me to be far less fiddly than trying to work out how exactly to apply SLIMT, so I never pursued it further.
 

pentaxuser

Member
Joined
May 9, 2005
Messages
19,724
Location
Daventry, No
Format
35mm
I have a found that an hour-long development cycle in highly dilute developer with one midpoint agitation will give you:

1. Full box speed
2. Expanded mid tone contrast
3. Very well managed highlights

This works across a variety of developer and film combination.

This seemed to me to be far less fiddly than trying to work out how exactly to apply SLIMT, so I never pursued it further.
This is the famous stand development isn't? Can you say what the variety of developer and film you have had success with and is it possible to show us the results?

Given that what you do has nothing to do with SLIMT other than produce acceptable results that meet your requirements , it might be better to start a new thread on Stand Development and Your Success

Just a thought

pentaxuser
 

chuckroast

Subscriber
Joined
Jun 2, 2023
Messages
2,154
Location
All Over The Place
Format
Multi Format
This is the famous stand development isn't? Can you say what the variety of developer and film you have had success with and is it possible to show us the results?

Given that what you do has nothing to do with SLIMT other than produce acceptable results that meet your requirements , it might be better to start a new thread on Stand Development and Your Success

Just a thought

pentaxuser

I've posted this elsewhere, not sure about Photrio. If it turns into a long discussion, we'll move it to it's own thread...


Starting with the 2021 image of the snow on the trees, these are scans of silver prints done semistand or EMA:


The images at that URL are my "workbook" prints. They're not necessarily exhibition quality, some are serious attempts at something, others are just experiments of one sort or another. I make such prints from (almost) every shooting session with the idea that - when I have time - I'll pick the best dozen or so to make as wall hangings and print them more exactingly.
 

Ivo Stunga

Member
Joined
Apr 3, 2017
Messages
1,179
Location
Latvia
Format
35mm
Starting with the 2021 image of the snow on the trees, these are scans of silver prints done semistand or EMA:


Hmm, I'd expect far less contrast from Stand developed film, contrast boosted in printing stage?
Because that's about the contrast and shadow detail I get from my technical emulsions where SLIMT helps to balance things out without producing flat uniform gray slides due to stand development :wink:

Different birds altogether, yields different results.
 

Philippe-Georges

Subscriber
Joined
Apr 11, 2005
Messages
2,659
Location
Flanders Fields
Format
Medium Format
Perhaps a not so smart question, but how/where does Slimt stands in relation to the FARMER'S Reducer?
 

Attachments

  • FARMER4S REDUCER.pdf
    15.5 KB · Views: 176

Ivo Stunga

Member
Joined
Apr 3, 2017
Messages
1,179
Location
Latvia
Format
35mm
Perhaps a not so smart question, but how/where does Slimt stands in relation to the FARMER'S Reducer?
My 2 cents, starting to familiarize with this - Farmer and Stand will act globally, SLIMT acts selectively.

If I dig my midtones and highlights, but lack shadow detail or vice versa, I'll employ SLIMT not Stand or Farmer.
 

koraks

Moderator
Moderator
Joined
Nov 29, 2018
Messages
21,704
Location
Europe
Format
Multi Format
but how/where does Slimt stands in relation to the FARMER'S Reducer?

SLIMT is done before development, Farmer's reducer is used on a finished negative.

If you read the documentation on SLIMT, it's also purported to work particularly strongly on the highlights, so it will compress images. Farmer's reducer tends to act on all density at the same rate, which results in shadows being lopped off before highlights are touched noticeably (due to the log-nature of silver image density).

So quite distinct/significant differences that make them suitable for quite distinct/different situations.
 

chuckroast

Subscriber
Joined
Jun 2, 2023
Messages
2,154
Location
All Over The Place
Format
Multi Format
My 2 cents, starting to familiarize with this - Farmer and Stand will act globally, SLIMT acts selectively.

If I dig my midtones and highlights, but lack shadow detail or vice versa, I'll employ SLIMT not Stand or Farmer.

Hmm, I'd expect far less contrast from Stand developed film, contrast boosted in printing stage?
Because that's about the contrast and shadow detail I get from my technical emulsions where SLIMT helps to balance things out without producing flat uniform gray slides due to stand development :wink:

Different birds altogether, yields different results.
(I've left this on this thread because it's a comparison of SLIMT and long standing development and still on topic, I think.)

I don't quite agree entirely. Here is my understanding:

SLIMT works prior to development to reduce the highlight areas. This allows the exposure and development doctrine to be optimized for shadows and midtones, particularly where there is a long SBR and you want extra development time for the shadows to fully develop. Such long development times would ordinarily overdevelop the highlights in a long SBR scene so SLIMT prevents this a priori.

Stand & EMA tactics depend on dilute developer exhausting quickly at the highlights to give you the same effect. This works particularly well with compensating developers like D-23 and Pyrocat-HD. Since the developer is highly dilute and rarely agitated, the highlights develop to completion quickly and then stop. The shadows and midtones continue to develop because of the very long standing times. (That's because shadows develop slowly and highlights develop relatively rapidly.)

So both of them achieve the same things by somewhat different mechanisms. The claim that standing techniques inherently lead to lower contrast negatives is simply not the case. For (semi)stand, contrast is controlled by developer dilution and can be set pretty much wherever you wish (within the capabilities of the film). Extreme Minimal Agitation can adjust contrast by dilution, but more usually does it by time in solution and agitation frequency/duration.

More to the point, semistand/EMA noticeably expand mid tone contrast. I've shot in entirely flat gray lighting, and then gotten wonderful mid tone local contrast by using this approach.

So, both SLIMT and long/high dilution development are different ways to achieve the same things:

  • Control highlights from being blown out
  • Fully develop shadows
  • Expand mid tone local contrast
The one thing that long/high dilution development can offer that I don't think SLIMT does, is enhancing edge effects. For example, here is a scan of a print from a negative shot in absolutely flat late afternoon shadow, but semistand developed in DK-50 1:3. Yes, it was split VC printed, but the negative has plenty of contrast. Check out the edges of leaves:

https://www.tundraware.com/Photogra.../media/large/20230525-1-14-Firmly_Planted.jpg

What neither technique can save you from is negatives exposed so aggressively that the highlights are off the right end of the film's HD curve. You cannot get detail that is entirely absent, either from underexposed shadows or fully blocked highlights.

Standing techniques got a bad reputation because they can lead to streaking and bromide drag effects. If you look at my monograph posted above, you'll see that after quite a bit testing, what I found is that this can be avoided doing two things :
  • Minimize contact between the film support mechanism and film
  • Get the bottom of the sheet/reel away from the bottom of the tank while it is standing so that its not sitting in a pool of development artifacts that have settled there.

When I first went down this rabbit hole a few years ago, it was astonishing the amount of religious fervor this discussion engenders. Some people where strong supporters, some were honestly curious, but a surprising number of "internet experts" assured me it was complete nonsense and snakeoil - often without having ever tried it themselves. That's why I went off to do my own testing. Once I mastered the film suspension problem, I got really good results.

By the way, most recently, I've been fiddling with very high dilution semistand development - DK-50 1:5, D-23 1:9, and HC-110 1:128 - to try to amplify the highlight compensation effects and maximize negative sharpness. The results are mentioned toward the end of the aforementioned monograph.

SLIMT remains on my to do list as a matter of comparing how it works and where it might fit in my workflow.
 
Last edited:

MurrayMinchin

Membership Council
Subscriber
Joined
Jan 9, 2005
Messages
5,476
Location
North Coast BC Canada
Format
Hybrid
My favourite thing about SLIMT, beyond it's spooky ability to proportionally effect highlights while pretty much leaving low tone and mid tone local contrast intact, is being able to develop minus and normal negatives together.

While developing in open trays, you keep normal negatives in the water pre-soak while minus negatives get their SLIMT treatment, then gather and develop them altogether at normal development time, in normal developer dilution, with normal agitation.

HP5 worked just fine for me.

Big fan.
 
Last edited:

Ivo Stunga

Member
Joined
Apr 3, 2017
Messages
1,179
Location
Latvia
Format
35mm
When I first went down this rabbit hole a few years ago, it was astonishing the amount of religious fervor this discussion engenders. Some people where strong supporters, some were honestly curious, but a surprising number of "internet experts" assured me it was complete nonsense and snakeoil - often without having ever tried it themselves. That's why I went off to do my own testing. Once I mastered the film suspension problem, I got really good results.
Bromide drag is the reason I am not doing this regularly as I got plenty of streaks even doing semi stand, but I might retry with having empty reel at the bottom. Because as you said, the edge sharpness increases lovely, making sharp slides to appear even more so! And flattens extreme contrast nicely.

How do you control contrast in stand? More developer?


If I could avoid Bromide drag with PQ Universal, I'd do both - Stand and SLIMT - employ one or the other where needed.

 
Last edited:

chuckroast

Subscriber
Joined
Jun 2, 2023
Messages
2,154
Location
All Over The Place
Format
Multi Format
Bromide drag is the reason I am not doing this regularly as I got plenty of streaks even doing semi stand, but I might retry with having empty reel at the bottom. Because as you said, the edge sharpness increases lovely, making sharp slides to appear even more so! And flattens extreme contrast nicely.

How do you control contrast in stand? More developer?


If I could avoid Bromide drag with PQ Universal, I'd do both - Stand and SLIMT - employ one or the other where needed.

First, I would note that I process everything in the dark in 2 litre open tanks or larger. (I have temporary covers I place over the tank when I want to leave the darkroom between semistand or EMA agitations so I don't have to sit there in the dark for an hour!) This allows for plenty of developer and room to properly position film.

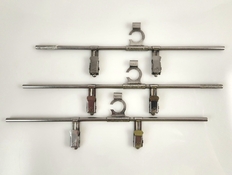
For sheet film, I use frameless pinch clip style hanger, though an X-Ray film clip would probably work. The idea is to hang the film horizontally so that the bottom edge is well off the bottom of the tank and to do this with the absolute minimum of contact with the film. Some people (Steve Sherman leaps to mind) have gotten very good results by making PVC tubes to hold their film to achieve this same idea...

For reels, I invert a small funnel, placing the nozzle in the center core of the reel. Then I feed the reel lift rod through the wide end of the funnel. That way, when I place it in the developer, the lift rod is there as usual, but the reel is suspended off the bottom of the tank 1-2 inches. As I mention in the paper I wrote, I'd avoid plastic reels and stick with the Nikor stainless type reels that have good spacing between wind layers.

To date, I have found this approach to work well with highly dilute D-23, DK-50, HC-110, and Pyrocat-HD. I initially prewet the film for 3 minutes in a running water bath temperature matched to the developer. I then continuously agitate the film in developer for 2 minutes and proceed with my agitation scheme thereafter (either semistand or EMA).

Image below is the sheet film hanger type I mentioned above.

With semistand, I find that explicit contrast control isn't as important as it is with conventional developer. For long SBRs,the highlights are controlled because of the compensation effect of not agitating very often. The shadows develop to completion because of the long standing time. For really huge SBRs, you can increase developer dilution. For example, my normal Pyrocat-HD dilution is 1.5:1:200 but if I have a highly contrasty scene, I will increase this to 1.5:1:250 or 300.

Short SBRs tend to have a lot of middle tone content. Here, the very long development time will expand that contrast considerably. For example, here is an image shot on an absolutely flat, gray day, with very little tonal range. Scan of split VC printed silver print:


Notice that the overall scene is a sort of low contrast gray, semistand has really made the midtones separate an 'pop'. Kachel has written a lot about the importance of midtone local contrast.

Another way to increase contrast is to switch from semistand and resort to more frequent agitations via EMA.

The hardest thing about this is getting away from the old Zone System of thinking about N+- development. With semistand, you're always reining in the highlights and developing the shadows to completion, so the extremes of N+-3 development just aren't needed. For this reason, I don't segregate film by SBR when semistand processing. Everything goes into the tank regardless of the SBR I was shooting at the time (unless I have a really extreme SBR problem to solve).

Note that there are times when I still develop conventionally. For example, if I want nice cloud edge effects, I develop in PMK Pyro agitating every 15 sec. If I am photographing people, I may resort to HC-110 or DK-50 at conventional dilutions and agitations because I don't want their faces to be razor sharp.


As far as bromide drag goes, I have seen almost no evidence that it is more- or less likely based on developer type. It appears to be more more an artifact of how the film is suspended and getting it off the bottom of the tank. I would not try this with a conventional daylight tank. Like I said, I use open tanks in the dark to give me room to get the film away from the bottom.

The one exception to this was very very old Plus-X (40+ years out of date) which consistently showed drag effects in Pyrocat-HD. Interestingly, it was just fine in D-23.
 

Attachments

  • Kodak-Pinch-Hanger.jpg
    Kodak-Pinch-Hanger.jpg
    124.3 KB · Views: 43
Last edited:
Photrio.com contains affiliate links to products. We may receive a commission for purchases made through these links.
To read our full affiliate disclosure statement please click Here.

PHOTRIO PARTNERS EQUALLY FUNDING OUR COMMUNITY:


Ilford ADOX Freestyle Photographic Stearman Press Weldon Color Lab Blue Moon Camera & Machine
Top Bottom