• Welcome to Photrio!
    Registration is fast and free. Join today to unlock search, see fewer ads, and access all forum features.
    Click here to sign up

Seeking advice on retrofit old photo images

Refuge

H
Refuge

  • 1
  • 0
  • 37
Solitude

H
Solitude

  • 1
  • 0
  • 31

Recent Classifieds

Forum statistics

Threads
203,611
Messages
2,857,078
Members
101,931
Latest member
ShaheedMalik
Recent bookmarks
0

satimis

Member
Joined
May 10, 2022
Messages
44
Location
Hong Kong
Format
Medium Format
Hi all,

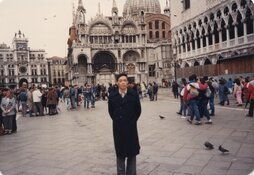
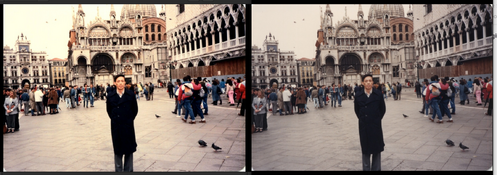
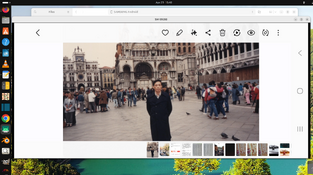
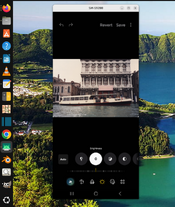
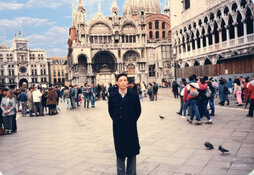
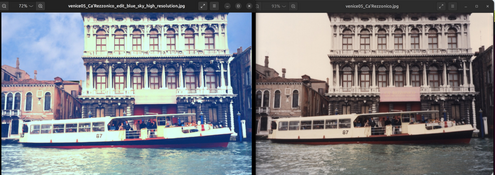
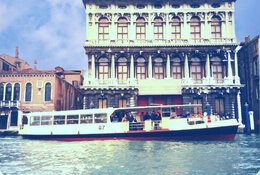
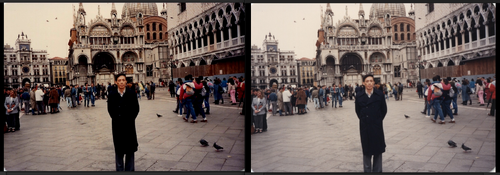
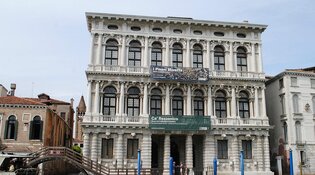
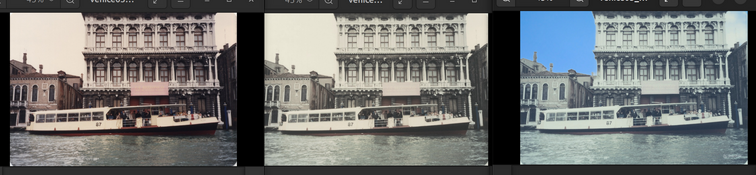
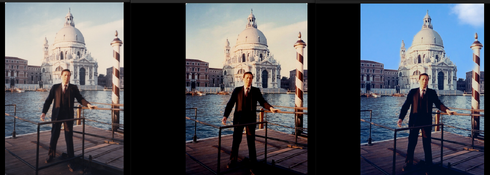
I have old photo images scanned on Epson Photo Flatbed scanner >10 years ago. I need to enhance/retrofit their quality and to be used for creating Digital slideshow. I have both Darktable and GIMP running on Ubuntu 24.04 PC here. Please advise which of them shall I use? I'm searching for an easy and not too complicated solution. Thanks

Regards
 

Attachments

  • venice02_me_St Mark's Basilica in Venice.jpg
    venice02_me_St Mark's Basilica in Venice.jpg
    452.6 KB · Views: 52
In what way do the images need to be improved/enhanced?

If this is about increasing detail rendering, there's not a lot you can do. There currently are tools to up-res images using AI technology, but these also cannot make up detail that wasn't captured in the first place. Neither Darktable nor GIMP offer such a feature.

If these were old film images (e.g. slides) when you scanned them, I'd consider just leaving them as they are. You could optionally adjust the colors a bit to come closer to what the original scene might have looked like.

Hi koraks,

Lot of thanks for your advice.

Actually I have done it quite sometimes (to retrofit old digital photos/images) using the camera built-in functions of my Samsung Galaxy S24 Ultra Smart Phone. It works for me seamlessly.

Built-in features of Smart Phone Camera:-
Filters
Light balance
Brightness
Exposure
Contrast
Highlights
Shadows
Saturation
Tint
Temperature
Sharpness
Definition

The only disadvantage is to upload the old digital photos to the Smart Phone. After finish download the edited digital photos back to my desktop PC. Besides I can increase the resolution of the digital photos, if needed..

I use remote-access to connect the smart phone to my desktop PC. All works are done on the keyboard of the desktop PC.
(please refer to upload photos)

Just for curiosity I start this thread. I have both Darktable and GIMP running on my Desk PC

Regards
 

Attachments

  • photo_comparison.png
    photo_comparison.png
    1.7 MB · Views: 36
  • remote_access.png
    remote_access.png
    1.5 MB · Views: 37
Adobe Premiere Elements movie editor program has adjustments you can make to individual photos first as you make the video itself with sound, music, titles, and credits added as desired. See sample below I dumped on YouTUbe of a slide show. But I would use another program like their companion Adobe Photoshop Elements for photo editing first. Both together are around $150 or $100 for just one.

IrfanView is a free basic photo editor for cropping, size change, and basic editing of photos.

Windows has a movie editor.

I use the aforementioned Premiere Elements for final movie at 3840x2160 pixels for fit smart TV, monitors, phones, and other 16:9 frames.

 
The skin tones and colors look more natural in the original image. In my opinion your enhancement has gone too far, I think you need a much smaller increase in contrast.

I used the rotation and curves tools in Gimp to edit this to the point I think looks best. I adjusted the R, G, B channels individually to reduce color cast. Both changing their white and black points and the midpoints of their curve. Your original image does not have enough blue in the highlights, so the overcast sky looked orange. The shadows I darkened only slightly as to not lose detail.

1777461788797.png
 
I have old photo images scanned on Epson Photo Flatbed scanner
Were these photo images scanned from slides or negatives or prints?

If these were 35mm slides, it is difficult to get good, sharp, high resolution scans from a flatbed scanner. As mentioned by @koraks, if the scans lack resolution or sharpness, there is not much that can be done about that.

What are the pixel dimensions of your scans?

I need to enhance/retrofit their quality and to be used for creating Digital slideshow
How do you expect this slideshow to be viewed? If the scans do not have much pixel resolution, then the slideshow may look OK on a small phone screen, but maybe not so good on a big screen TV or a computer monitor, especially if viewed from a close distance.

The word "retrofit" does not really work here. The word "enhance" makes more sense to me.

I have both Darktable and GIMP running on Ubuntu 24.04 PC here. Please advise which of them shall I use? I'm searching for an easy and not too complicated solution.
If all you want to do is adjust the contrast and the colors, any editing software should be capable of doing what you want. But you will have to learn how to work the software. Be sure to MAKE COPIES and do not attempt to adjust your originals, While you are learning, it is easy to ruin a photo, and you want to be able to start over with another copy of the original.

So pick one, and learn how to use it. You can search for online tutorials, or you can learn by trial and error. It takes a while to learn, so have patience. For me, adjusting scans of slides did not start to get "easy" until after I had spent many hours learning the process.
 
Last edited:
Hi all,

Thanks for your advice

The hard copy photos were scanned on Epson Photo Flatbed Scanner.

Actually the built-in photo/image editing software on the Samsung Galaxy Smart Phone are quite easy to use with robust features. Each feature is built on slides. Just move the slide, left <--> right, to find your need.

Please see upload screenshots;
- Exposure
- brightness
- light balance
etc.

It took me about 5~8 min to finish editing one photo/image.

The only regret is unable adding a blue sky. I have to do it separately.

Regards
 

Attachments

  • feature_brightness_50.png
    feature_brightness_50.png
    965.9 KB · Views: 28
  • feature_exposure_50.png
    feature_exposure_50.png
    965.9 KB · Views: 30
  • feature_light_balance_50.png
    feature_light_balance_50.png
    964.1 KB · Views: 26
  • venice02_me_St Mark's Basilica in Venice_bluesky.jpeg
    venice02_me_St Mark's Basilica in Venice_bluesky.jpeg
    257.2 KB · Views: 33
Hi all,

Thanks for your advice

The hard copy photos were scanned on Epson Photo Flatbed Scanner.

Actually the built-in photo/image editing software on the Samsung Galaxy Smart Phone are quite easy to use with robust features. Each feature is built on slides. Just move the slide, left <--> right, to find your need.

Please see upload screenshots;
- Exposure
- brightness
- light balance
etc.

It took me about 5~8 min to finish editing one photo/image.

The only regret is unable adding a blue sky. I have to do it separately.

Regards
There is still the question about if your scans have enough resolution (pixels) to display properly on whatever screen your slideshow will be viewed on. But otherwise, it sounds like you have it all sorted out.

You can make all of those same adjustments in either GIMP or Darktable -- of course, the user interface and layout of the controls will be different for each software.

To my eye, adding a blue sky to a photo that was obviously taken on a cloudy day does not look quite right. Half of learning how to "enhance" scans of old photos is learning how to work the controls to get the result you want. The other half is developing the good judgement it takes to know when to quit. Like many others, when I first started to post process scans of my slides many years ago, I tried to add too much contrast, too much color saturation, and too much sharpness / texture. When I finally realized I was overdoing it, I had to go back and reprocess all my early images with more restraint and subtlety.

I notice the background behind your editing window is very colorful. Because adjacent colors can affect the way we see colors, I like to surrond my editing windows with neutral medium gray -- I think it helps me to see the colors in my images more accurately.

The software of Samsung Smart Phone can increase the resolution of an edited photo. Please see the upload photos.

The editing is performed on Smart Phone. The colorful background is the background of the PC. There is no connection. The screen of Smart Phone is remotely displayed on PC.

Edit
===
The building is little bid yellow in color. Do you have suggestion to remove it?
 

Attachments

  • boat_comparison_30.png
    boat_comparison_30.png
    700.4 KB · Views: 28
  • venice05_Ca’Rezzonico_edit_blue_sky_high_resolution.jpg
    venice05_Ca’Rezzonico_edit_blue_sky_high_resolution.jpg
    499.3 KB · Views: 29
It took me about 5~8 min to finish editing one photo/image.
Less than 2 minutes (GIMP):

1777482829136.png

Straighten & crop
Adjust curves to increase contrast and bring color balance back to close to neutral
Unsharp mask

I wouldn't do more than this as it would not constitute an improvement IMO.
I agree with @loccdor that the Samsung app edit went too far and that the original is just better.
 
Less than 2 minutes (GIMP):
Can GIMP do all following steps in less than 2 minutes ?

Built-in features of Smart Phone Camera:-
Filters
Light balance
Brightness
Exposure
Contrast
Highlights
Shadows
Saturation
Tint
Temperature
Sharpness
Definition

View attachment 423508
Straighten & crop
Adjust curves to increase contrast and bring color balance back to close to neutral
Unsharp mask

I wouldn't do more than this as it would not constitute an improvement IMO.
I agree with @loccdor that the Samsung app edit went too far and that the original is just better.
Just apply "auto filter" of
Built-in features of Smart Phone Camera:-

Can do it in 2 seconds, one click (see upload photo at the left)

Edit
===
Besides just discover that there are many filters can be added on Smart Phone (also see upload photos). The color of edited photo will look similar to the,colors of the filter.

Wonderful, I'll find time testing them.
 

Attachments

  • photo_compare_20260430.png
    photo_compare_20260430.png
    1.7 MB · Views: 15
  • filters_1.png
    filters_1.png
    718 KB · Views: 17
  • filters_2.png
    filters_2.png
    364.6 KB · Views: 18
Last edited:
Can GIMP do all following steps in less than 2 minutes ?

Built-in features of Smart Phone Camera:-
Filters
Light balance
Brightness
Exposure
Contrast
Highlights
Shadows
Saturation
Tint
Temperature
Sharpness
Definition
Yes, if you are proficient in GIMP.

Just apply "auto filter" of
Built-in features of Smart Phone Camera:-

can do it.

There are auto settings for a number of GIMP adjustments as well.
 
The software of Samsung Smart Phone can increase the resolution of an edited photo. Please see the upload photos.
In the context of photography, the word "resolution" can have different meanings. Here, I am using the word to ask how many pixels your scans have. Every digital image is made up of pixels, and when the image is displayed it will be x-number of pixels wide, and y-number of pixels tall. The photos you show tell me nothing about how many pixels your scans have.

As a Mac user, my operating software can show me the pixel dimentions of an image -- maybe Ubuntu can do something similar? If not, any decent image editing software should be able to tell you the pixel dimensions of an image.

Screenshot 2026-04-29 at 3.23.23 PM.png


The editing is performed on Smart Phone. The colorful background is the background of the PC. There is no connection. The screen of Smart Phone is remotely displayed on PC.
Yes, I understand why your background looks like it does. But I don't think you understand my point about why it is better to avoid colorful backgrounds when editing. In the illustration below, the smaller squares are both exactly the same color. The true color of the smaller square is only apparent when it is surrounded by neutral gray (on left). If you are trying to adjust the color of the smaller square on the right, you are going to have a very hard time seeing what you are really doing. If possible, you might consider changing your desktop wallpaper to something less colorful?
Color-Saturation-Illusion.jpg


The building is little bid yellow in color. Do you have suggestion to remove it?
My first question would be, are you certain the building is not actually a little bit yellow?

I could tell you how I would reduce the yellow color of the building in Adobe Lightroom, but I don't know exactly how it would be done in GIMP or Darkroom or on your phone.
 
Last edited:
View attachment 423518


My first question would be, are you certain the building is not actually a little bit yellow?

I could tell you how I would reduce the yellow color of the building in Adobe Lightroom, but I don't know exactly how it would be done in GIMP or Darkroom or on your phone.
Hi,

I captured the photo myself with film camera
Ca 'Rezzonico - Museum of the Venetian eighteenth century

I still have a recollection. It is a white marble building.

My recent search result on Internet
Ca' Rezzonico in Venice features a distinctive white or off-white marble facade on the Grand Canal. The building, designed by Baldassare Longhena and completed by Giorgio Massari, is a prime example of Baroque and Rococo architecture, contrasting with the earthy, pink-plastered buildings common elsewhere in

Please refer to the upload 2026 photo of the building which was download on Internet about 5 min ago.
 

Attachments

  • ca-rezzonico.jpg
    ca-rezzonico.jpg
    117.3 KB · Views: 15
If the building is supposed to be neutral, how did it get to be yellow?

Was the original print neutral, but the file from the Epson scanner came out too yellow? If so, and if you still have the print, then re-scan it with different scanner settings.

Did the Epson software make a neutral scan, but then you introduced the yellow highlights while you were working with the file with your editing software? If so, then rather than trying fix the yellow highlights now, I would suggest starting over with a fresh copy of the file from the scanner, and learning how to make adjustments without introducing the yellow color cast.

Not only is the building too yellow, but the highlights are blown out. Hopefully, that was something you did while processing the file, and hopefully, you still have an original (either the print, or an unmodified copy of the file from the scanner), and hopefully the highlights are not blown out on the original?

Hi,

Tried it again on Samsung Galaxy S24 Ultra Smart Phone

Please compare it on the upload photos
- Left photo -- original
- Middle photo -- add "auto filter"
- Right photo -- add "auto filter" and "blue sky"

Ca’Rezzonico is a white marble building

In the past I have visited Venice, including Mestre" several times in different seasons.

I tried similar steps on anther photo, also captured in Venice with film camera and converted to digital image on Epson Photo Flatbed Scanner.

Please compare the upload photo, "background - St. Mark's Basilica"
- Left photo -- original
- Middle photo -- add "auto filter"
- Right photo -- add "auto filter" and "blue sky"

Basilica di San Marco (St. Mark's Basilica) is also a white marble building !!!

All of us have Smart Phone. You can try photo editing on your smart phone !!!

Regards
 

Attachments

  • photo_compare_venice05_Ca’Rezzonico_orig_80.png
    photo_compare_venice05_Ca’Rezzonico_orig_80.png
    997.1 KB · Views: 18
  • photo_compare_venice16_me_St. Mark's Basilica.png
    photo_compare_venice16_me_St. Mark's Basilica.png
    1.4 MB · Views: 15
Last edited:
The nice thing about a phone is, like you said, nearly all of us have one and have it on us all the time. I sometimes edit photos using Snapseed, which gives similar controls (esp. curves) as on a desktop app. And it's free. The automatic adjustments/filters never worked for me. I understand how people might find the results pretty, but to me they just look weird, unrealistic and even if they're nice in some way, there's also virtually always something else that happens that I just dislike. I'd rather be in control and decide for myself what happens to the image. It's relatively easy to adjust colors with curves, do local contrast enhancements and add effects like vignetting using an app like Snapseed.
 
The nice thing about a phone is, like you said, nearly all of us have one and have it on us all the time. I sometimes edit photos using Snapseed, which gives similar controls (esp. curves) as on a desktop app. And it's free. The automatic adjustments/filters never worked for me. I understand how people might find the results pretty, but to me they just look weird, unrealistic and even if they're nice in some way, there's also virtually always something else that happens that I just dislike. I'd rather be in control and decide for myself what happens to the image. It's relatively easy to adjust colors with curves, do local contrast enhancements and add effects like vignetting using an app like Snapseed.

Hi,

Thanks for your advice. To run Snapseed on phone or on PC? I'll try it.

The beauty of editing photos on Galaxy phone is easy and convenient to use, just moving the slides, left <--> right, to edit the photos, not necessary to input data.

The inconvenience is to upload the photos to the phone and download the edited photos back to PC.

Besides I run remote desktop to connect my Galaxy phone to desktop PC. All operations are on PC. The screen is much bigger, not the screen of a smart phone.
 
Last edited:
I use Snapseed on my phone. GIMP on PC.

just moving the slides, left <--> right, to edit the photos, not necessary to input data.
Virtually all controls in desktop image editing software can be done with sliders, buttons etc. and do not require data input.
The main difference is that desktop editing offers far more control.
The sliders on a phone might seem nice but ultimately they're just a compromise to deal with the inherent shortcomings of a small device with only one physical input that at the same time acts as a display. Frankly in my view/experience it's not really a benefit; I find phones an ergonomic disaster.
 
I use Snapseed on my phone. GIMP on PC.


Virtually all controls in desktop image editing software can be done with sliders, buttons etc. and do not require data input.
The main difference is that desktop editing offers far more control.
The sliders on a phone might seem nice but ultimately they're just a compromise to deal with the inherent shortcomings of a small device with only one physical input that at the same time acts as a display. Frankly in my view/experience it's not really a benefit; I find phones an ergonomic disaster.

In the past I ran GIMP to enhance old photos.

If going back to PC to do the job, I'll do it with "Enhancing and retrofitting old photos with AI". I'm now searching/collecting technical information how to do it.
 
Last edited:
Please keep us posted on that, it's very interesting. So far, I've not seen anything that convinced me; either the AI enhancements aren't better than the kind we used to get with algorithmic tools (e.g. dust removal), or they amount to re-generation of the image with substantial hallucinations.
 
Please keep us posted on that, it's very interesting. So far, I've not seen anything that convinced me; either the AI enhancements aren't better than the kind we used to get with algorithmic tools (e.g. dust removal), or they amount to re-generation of the image with substantial hallucinations.

Hi,

Yes, I'll if successful.

I'll start from enhancing digital photos/image with AI, not starting from scanning the old film photos. Also I'll start my adventure on Open Source - Linux.

The top AI Photo Enhancement Tools for Linux are;
1. Upscayl (GUI Method)
2. Upscaler (GTK-based)
3. GFPGAN (Face Restoration)
etc.

They can be download, installed and free to use.

I must search an AI Photo Enhancement Tool suitable for my use. I only use the enhanced old photos for building digital slideshow !!! Nothing else for the time being.

Regards
 
Hi koraks,

Again.

I just found Galaxy S24 Ultra Smart Phone having advanced AI photo enhancement tools powered by Galaxy AI and Generative Edit

Please refer to below online video;
1)


2)
Use contextual photo enhancements on your Galaxy device's photos | Samsung US


It is very interesting !!!

Folks on the forum can try your own Smart Phone to check what you have on it ???

Regards
 
Photrio.com contains affiliate links to products. We may receive a commission for purchases made through these links.
To read our full affiliate disclosure statement please click Here.

PHOTRIO PARTNERS EQUALLY FUNDING OUR COMMUNITY:


Ilford ADOX Freestyle Photographic Stearman Press Weldon Color Lab Blue Moon Camera & Machine
Top Bottom