Salt printing - Can't Avoid Brush Marks - Need Help.

Recent Classifieds

Forum statistics

Threads
199,123
Messages
2,786,503
Members
99,818
Latest member
Haskil
Recent bookmarks
0

Will you buy this image with a slight brush mark being visible ? say for $150 ?

  • Yes I will.

    Votes: 1 10.0%
  • No I will not.

    Votes: 9 90.0%
  • If the price is slightly less or if it is $100

    Votes: 0 0.0%

  • Total voters
    10
Joined
Aug 5, 2016
Messages
41
Location
India
Format
Multi Format
Hi All ,
I'm kind of two months experienced with salt printing :smile:
I use Silver Metal Salt and Sodium Chloride Salt for my printing process , on a Canson Montval Paper.
Only recently I have started making A4 size prints.
My solutions are about two months old.
I couldn't avoid the brush marks in my pictures. How to get rid of that ?
I do Sepia & Selenium toning to my pictures.
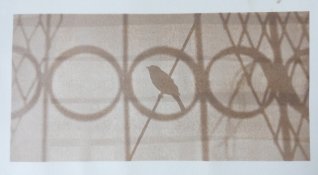
If I pour the silver Nitrate solution & spread , the area in which I poured is creating a mark.
Hence I preferred using a brush... a sponge brush ( common one - black sponge & wooden handle)
which also seems to create marks ..!
How can I avoid ?
The glass rods seems to be not available in India.

Attached a image sample for reference. Forgive the quality of the image , coz it was taken from mobile & has been made to suite the upload.
 

Attachments

  • Caged.jpg
    Caged.jpg
    979.4 KB · Views: 326

sepiareverb

Member
Joined
Feb 17, 2007
Messages
1,103
Location
St J Vermont
Format
Multi Format
Float the paper on the sensitizer? I've never used a sponge brush, but rather a hake brush, and 'paint' on in two directions.
 

Peter Schrager

Subscriber
Joined
Jul 19, 2004
Messages
4,172
Location
fairfield co
Format
Large Format
Buy a richeson...best brush there is
Not sure number though and you might still get streaks..salt is tricky..wish you luck
Best peter
 
Joined
Jan 19, 2009
Messages
406
Location
Forks, Wa
Format
Medium Format
I have zero trouble with brush makes. Maybe my brush is a good one. I do pay careful attention to how I spread it on. Up down back and forth criss cross over and over again.
 

nmp

Member
Joined
Jan 20, 2005
Messages
2,029
Location
Maryland USA
Format
35mm
I'm kind of two months experienced with salt printing :smile:
.......
The glass rods seems to be not available in India.

You have a nice image, so you are doing something right.

As per the glass rod, you don't need a fancy puddle pusher to do the job. A nice straight glass tubing, kind you will find in a chemistry lab can be used as well. I am sure you can find something like that in India.
 
Joined
Dec 10, 2009
Messages
6,297
Format
Multi Format
First off, I would say that your salt prints are hand made so brush marks make them unique. I've had brush marks with silver nitrate solution because it's clear. With cyanotype and Ziatype, the solution has a color so I can see streaks when I brush the emulsion on my paper. Glass rods are a bit harder to use because you have to use exactly the right amount of emulsion. You either put too much solution which can over saturate you paper or not enough which you'll get streaks at one end of your print. I've never tried this with salt printing, but maybe try a drop of surfactant like polysorbate 80 to help the emulsion spread easier. It works with Ziatypes well. Also, try another type of brush like a Japanese Hake brush.

Good luck!
 

Jim Noel

Member
Joined
Mar 6, 2005
Messages
2,261
Format
Large Format
I wonder if you are using enough sensitizer, and if the paper is getting equally dry over the entire surface.
It appears to me you are taking a brush wet with sensitizer and starting at the top of the paper to apply the liquid. the second brush stroke has less liquid, and the third even less. If you pour the sensitizer along one edge then quickly brush it across the paper then brush in the opposite direction it may help solve your problem.
My method is to assure adequate amount of sensitizer which I pour in a line in the center of the paper. I then spread it quickly side to side,then top to bottom. I then brush in every direction until there is no apparent wetness on the paper. This can take anywhere from 2 - 5 minutes depending on the paper and its size.

Another method is to double coat. Let the first coat dry, then re-coat and brushing the opposite direction first.

Does your paper soak up the liquid too quickly? If so, soak it in starch or gelatin to seal it better.
 

M Carter

Member
Joined
Jan 23, 2013
Messages
2,147
Location
Dallas, TX
Format
Medium Format
I don't know about salt printing, but for liquid emulsion, I've enjoyed this brush - comes in a variety of sizes, good quality, no falling hairs, very affordable and doesn't drink up tons of emulsion...
 

Gerald C Koch

Member
Joined
Jul 12, 2010
Messages
8,131
Location
Southern USA
Format
Multi Format
I would say that traditionally the salted paper was gently floated on the silver nitrate solution. Begin with one end and slowly lower the paper so as not to trap any air bubbles. You can also consider any brush marks as part of the charm of the process.
 

pdeeh

Member
Joined
Jun 8, 2012
Messages
4,765
Location
UK
Format
Multi Format
I use a chunk of car-washing sponge to coat cyanos, salts, sepias and just about anything that needs coating. never get marks. always even. no special methods. dunk sponge in sensitiser, apply to paper. job done
 

Dibbd

Member
Joined
Aug 26, 2016
Messages
20
Location
Leeds
Format
8x10 Format
Caveat: I've never done salt prints, only cyanotype and argyrotype but I do use a foam bush the same as you do.

It looks to me like you are soaking your brush in sensitiser and only brushing it once left to right top to bottom.

Here's how I do it but as I said I use different chemistry.

First I wet the foam brush with water and squeeze as much out as possible so that it is just slightly damp. This stops the foam from sucking up all the sensitiser as soon as you put your brush in it.

Then I measure out my sensitiser. Usually about 2 - 2.5ml for A4 but it depends on how thirsty the paper is.

Then, adding a little bit of sensitiser for each brush stroke I go left to right top to bottom. That's usually used up my sensitiser. There should be a little liquid sitting on the paper at this point. If not, a little more sensitiser is required. Then I go over it again, very gently now so as not to damage the wet surface of the paper, bottom to top, right to left. No pressure, just dragging the brush over the surface to move the solution about. If it's still forming puddles at the end of the strokes I'll go again right to left, top to bottom, then if necessary once again bottom to top, left to right.

I get good even coverage this way.
 

darkroommike

Subscriber
Joined
Mar 22, 2007
Messages
1,728
Location
Iowa
Format
Multi Format
You have a nice image, so you are doing something right.

As per the glass rod, you don't need a fancy puddle pusher to do the job. A nice straight glass tubing, kind you will find in a chemistry lab can be used as well. I am sure you can find something like that in India.

The fancy glass rods are just plain glass rods with a bit of acrylic plastic glued on for a handle, cut your rod to length, fire polish the ends with a propane torch or Bunsen burner, glue on your handle with aquarium cement or clear silicon and you're good to go. If all else fails you could try double coating your paper.
 

nmp

Member
Joined
Jan 20, 2005
Messages
2,029
Location
Maryland USA
Format
35mm
The fancy glass rods are just plain glass rods with a bit of acrylic plastic glued on for a handle, cut your rod to length, fire polish the ends with a propane torch or Bunsen burner, glue on your handle with aquarium cement or clear silicon and you're good to go. If all else fails you could try double coating your paper.
I took my own advice after I broke my pricey puddle pusher and recently bought this cheap ($1.24 a piece) glass tubing from Home Depot that is straight as can be and robust as well. It only took a little bit of sanding with a coarse sand-paper to get rid of the sharp ends. At 12" length it will be longer than I probably will ever need.

http://www.homedepot.com/p/Gauge-Glass-1724006/202273049
 
Last edited:
Joined
Dec 10, 2009
Messages
6,297
Format
Multi Format
I took my own advice after I broke my pricey puddle pusher and recently bought this cheap ($1.24 a piece) glass tubing from Home Depot that is straight as can be and robust as well. It only took a little bit of sanding with a coarse sand-paper to get rid of the sharp ends. At 12" length it will be longer than I probably will ever need.

http://www.homedepot.com/p/Gauge-Glass-1724006/202273049
This is brilliant! I'm going to look for it at home Depot this weekend. But puddle pushers take practice and waste little chemistry. A also use a Magic brush. I wet the brush in distilled water before using.
 

nmp

Member
Joined
Jan 20, 2005
Messages
2,029
Location
Maryland USA
Format
35mm
This is brilliant! I'm going to look for it at home Depot this weekend. But puddle pushers take practice and waste little chemistry. A also use a Magic brush. I wet the brush in distilled water before using.
My local HD store didn't carry it on the shelf. I ordered it on line and had shipped to store for free. I agree that the rod is a little tricky. But that's what I started with. Most people I suspect try the rod first but migrate to brush eventually. Brush is also good if you want to make quick small size test strips.

So what the heck is a Magic brush?
 
Last edited:

nmp

Member
Joined
Jan 20, 2005
Messages
2,029
Location
Maryland USA
Format
35mm
Joined
Dec 10, 2009
Messages
6,297
Format
Multi Format
Thanks. I thought "Magic" was a brand name. Lots of good stuff on dc's website. I will buy me one when I think my print are worth more than $40. In the mean time I will make do with foam brushes.

For me, it's not whether how my print might be worth, but how much are your materials and frustration is worth. I print with palladium that's very expensive. For cyanotype, I use a foam brush. What I do like to mention is that foam brushes can also cause contamination in the sponge which can issues in your print. Brushes and glass rods have less issues with contamination.
 

darkroommike

Subscriber
Joined
Mar 22, 2007
Messages
1,728
Location
Iowa
Format
Multi Format
For me, it's not whether how my print might be worth, but how much are your materials and frustration is worth. I print with palladium that's very expensive. For cyanotype, I use a foam brush. What I do like to mention is that foam brushes can also cause contamination in the sponge which can issues in your print. Brushes and glass rods have less issues with contamination.
Foam brushes are so cheap I wouldn't use one for more than one session.
 

w.out

Member
Joined
Dec 2, 2016
Messages
19
Location
Melbourne
Format
Multi Format
Did OP find a solution to this?

I had exactly the same problem appear after months of no issues - brush stroke 'bars' appeared in all the last few dozen papers I've sensitised. Used a new brush, still got the bars. Used a different type of brush, still got the bars. Used different paper, still got the bars. Used different batch of sensitiser - still got the bars.

Reminds me of when I used to build computers. Can't find the hardware problem, so replace each component one bit at a time... until you have a whole new machine and the problem is still there.

Theseus problems, man.
 
Photrio.com contains affiliate links to products. We may receive a commission for purchases made through these links.
To read our full affiliate disclosure statement please click Here.

PHOTRIO PARTNERS EQUALLY FUNDING OUR COMMUNITY:


Ilford ADOX Freestyle Photographic Stearman Press Weldon Color Lab Blue Moon Camera & Machine
Top Bottom