RH Designs Analyser Pro

REEM

A
REEM

  • 2
  • 0
  • 64
Kitahara Jinja

D
Kitahara Jinja

  • 3
  • 0
  • 59
Custom Cab

A
Custom Cab

  • 4
  • 1
  • 76
Table for four.

H
Table for four.

  • 11
  • 0
  • 123

Forum statistics

Threads
197,608
Messages
2,761,803
Members
99,415
Latest member
SS-5283
Recent bookmarks
1

Luckypete

Member
Joined
Feb 15, 2024
Messages
34
Location
UK
Format
Multi Format
Hello all, I am new to the forum and would like to ask some advice about the above which I just acquired.

It states in the manual that the device has a built-in calibration for Ilford Multigrade RC 1V .

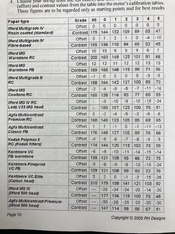
When I go into the PAP 1-8 settings the following offset & contrast is in all 8 PAP channels: Offset 00,00,00,00,00,00,00,00 Contrast 179,144,,132,109,89,65,47

I am using MGRC V

On the RH Designs website the following settings are listed for MGRC V : Offset -1, -8, -4, -2, -3, -4, -10 Contrast 175, 152, 126, 105, 86, 61, 55

First of all why is the Offset all grades set at "00"

Second as a starting point for using the device should I use the latter settings for use with MGRV V before i get into calibrating the device.

Thank you

Peter
 

Andrew4x5

Member
Joined
Mar 9, 2007
Messages
56
Location
Australia
Format
4x5 Format
When the RH guys designed the analyser - quite a few years ago now - RC 1V was the 'standard' (commonly available, especially in the UK) paper. Consequently, they used RC IV as the benchmark. However, every other paper, including RC V, requires its own settings.
So, you can use the values for RC V on the website as a starting point. But, you will get the best results if you calibrate the analyser. It's a bit of a hassle, but worthwhile in the long term.
 
OP
OP
Luckypete

Luckypete

Member
Joined
Feb 15, 2024
Messages
34
Location
UK
Format
Multi Format
When the RH guys designed the analyser - quite a few years ago now - RC 1V was the 'standard' (commonly available, especially in the UK) paper. Consequently, they used RC IV as the benchmark. However, every other paper, including RC V, requires its own settings.
So, you can use the values for RC V on the website as a starting point. But, you will get the best results if you calibrate the analyser. It's a bit of a hassle, but worthwhile in the long term.

Thank you for your reply.

I will get to the calibration when I get more familiar with the device.

In the meantime can you (or anyone) explain why the Contrast numbers are pre installed (MG 1V) but the Offset numbers are all "0" rather than those shown in the tables supplied by RH – see my first post.
 

Saganich

Subscriber
Joined
Nov 21, 2004
Messages
1,233
Location
Brooklyn
Format
35mm RF
The standard used was MG IV so the offset would be all 0's and I guess they still ship with that standard preset. You listed the settings for MG V in first post: "On the RH Designs website the following settings are listed for MGRC V : Offset -1, -8, -4, -2, -3, -4," which would be an update from original production I guess.

Image from original calibration Manual 2005.
 

Attachments

  • AP II.jpg
    AP II.jpg
    126 KB · Views: 72

Saganich

Subscriber
Joined
Nov 21, 2004
Messages
1,233
Location
Brooklyn
Format
35mm RF
Here is a PDF of 2005 Calibration Manual if anyone is interested.
 

Attachments

  • AP Cal Man.pdf
    524.5 KB · Views: 49
OP
OP
Luckypete

Luckypete

Member
Joined
Feb 15, 2024
Messages
34
Location
UK
Format
Multi Format
Yes I see that in the manual. However I was looking at the RH Designs website for colour enlargers (I have a Durst M670)

Screenshot 2024-02-16 at 15.26.17.png
 

logan2z

Subscriber
Joined
Jan 11, 2019
Messages
3,656
Location
SF Bay Area, USA
Format
Multi Format
I will get to the calibration when I get more familiar with the device.

You can do a rough 'calibration' by dialing in offsets based on observations of your prints, but it's worth doing a full calibration at some point.

I recently switched enlargers and the calibration I'd done for my previous enlarger was way off for my new one. It took me several hours to perform the calibration procedure for the new enlarger but it was well worth it - I'm again getting print results that are very close to the analyzer's predictions.
 

logan2z

Subscriber
Joined
Jan 11, 2019
Messages
3,656
Location
SF Bay Area, USA
Format
Multi Format
Yes I see that in the manual. However I was looking at the RH Designs website for colour enlargers (I have a Durst M670)

View attachment 363146

From the simplified calibration guide on the RH Designs web site.

The analyser’s default settings are based on Ilford MG1V RC deluxe, with under the lens
contrast filters. If you use, as I do, a dichro colour head, all the settings will require
recalibration

I switched from an enlarger with above the lens Ilford filters to an LPL with dichroic color head and my previous calibration was way off for my new enlarger.
 

Saganich

Subscriber
Joined
Nov 21, 2004
Messages
1,233
Location
Brooklyn
Format
35mm RF
Yup light source is a factor. I was using a cold light head for a while and well calibration for that was way weird.
 
OP
OP
Luckypete

Luckypete

Member
Joined
Feb 15, 2024
Messages
34
Location
UK
Format
Multi Format
Ive just done my first prints and taking the settings from the shadows and highlights, then adjusting for contrast range & grade (as per the manual) It seems my enlarger is overexposing by 1.5 – 2 stops with decent negs. So rather than throw a guess at it and do a temp adjustment I will spend tomorrow and calibrate the device. I find the manual is somewhat vague and counter intuitive in places. The support is none existent, Ive emailed and called with no answer to either ? Anyway thanks for the input...
 
OP
OP
Luckypete

Luckypete

Member
Joined
Feb 15, 2024
Messages
34
Location
UK
Format
Multi Format
Just an update on the support. They just called me and the tech guy has been on holiday so he's back on the case if I need any help – good to know.
 

Joel_L

Subscriber
Joined
Mar 12, 2011
Messages
579
Location
Colorado
Format
Multi Format
I have the StopClock and Zonemaster. Pretty much the same as your Analyser Pro. The listed settings worked OK, but things get much better if you calibrate.

I mention it briefly in this thread.


Andrew4x5

Member
Joined
Mar 9, 2007
Messages
56
Location
Australia
Format
4x5 Format
Given that you have a colour enlarger, you can choose between using the inbuilt colour filters or below-lens Multigrade filters. Personally, I use under-lens filters because they are consistent and quicker to use.
 
OP
OP
Luckypete

Luckypete

Member
Joined
Feb 15, 2024
Messages
34
Location
UK
Format
Multi Format
I have the StopClock and Zonemaster. Pretty much the same as your Analyser Pro. The listed settings worked OK, but things get much better if you calibrate.

I mention it briefly in this thread.


Thanks for the input, I think that part makes sense. I will crack on this weekend and attempt the calibration process. Id be interested in how you made your test strip holder ?
 

Joel_L

Subscriber
Joined
Mar 12, 2011
Messages
579
Location
Colorado
Format
Multi Format
Thanks for the input, I think that part makes sense. I will crack on this weekend and attempt the calibration process. Id be interested in how you made your test strip holder ?

I 3D printed mine,

 
OP
OP
Luckypete

Luckypete

Member
Joined
Feb 15, 2024
Messages
34
Location
UK
Format
Multi Format
Nice, unfortunately I am not into 3D printing. Could you print one for me ?
 
OP
OP
Luckypete

Luckypete

Member
Joined
Feb 15, 2024
Messages
34
Location
UK
Format
Multi Format
not really a problem , I buy stuff from Ebay USA either US post or DHL, etc...
 
OP
OP
Luckypete

Luckypete

Member
Joined
Feb 15, 2024
Messages
34
Location
UK
Format
Multi Format
I spent some over the weekend calibrating my analyser pro and have made significant progress.

The test strips were exposed at 1/4 G: 00, 0, 1 – 1/6 G: 2,3 – 1/12 G: 4,5.

I had to reduce the exposure from G2 – 5 as they were too dark, I got very consistent test strips. I had trouble matching my strips with the D=0.04 patch, it has a very different paper base (very white) to the Ilford MGRC V.

Anyway my first attempt was not really successful, then today the light was much better and I calibrated a shade darker from the strips – I don't have a densitometer.

I then tried the analyser on a negative I have been using since I started and got a really great result first time, whereas before it was way over exposed.

I tried several more and got similar results; non of these negs are particularly easy to print and will still require some dodging and burning but for a first shot measuring shadows and then highlights I am more than impressed considering my limited experience with the device and didn't even print a test strip.

I suspect I need to take a closer look at the contrast calibration. There are two stages, I did the first one. I will try the second which apparently gives a more accurate result.
 

markbau

Member
Joined
Apr 16, 2009
Messages
867
Location
Australia
Format
Analog
I've been using the Analyser pro for a few years now and love how much time it saves me in the darkroom, I get a decent working print 9 out of 10 times and when I mess up its usually because of a I selected the wrong part of the neg to meter. I only use ILFORD MG FB which I did calibrations for and am very happy with the results.
 
OP
OP
Luckypete

Luckypete

Member
Joined
Feb 15, 2024
Messages
34
Location
UK
Format
Multi Format
Thanks Mark, your comment "I've been using the Analyser pro for a few years" really sums it up.

Now that I have completed the calibration process not only am getting very initial results, I also understand much more about how the works and how it relates to one own specific gear.

I guess now, as you say, its about gaining those years of experience and where to meter your negs.
 
Photrio.com contains affiliate links to products. We may receive a commission for purchases made through these links.
To read our full affiliate disclosure statement please click Here.

PHOTRIO PARTNERS EQUALLY FUNDING OUR COMMUNITY:


Ilford ADOX Freestyle Photographic Stearman Press Weldon Color Lab Blue Moon Camera & Machine
Top Bottom