Repairs: Do it yourself or have it done?

The Kildare Track

A
The Kildare Track

  • 3
  • 1
  • 38
Stranger Things.

A
Stranger Things.

  • 0
  • 0
  • 26
Centre Lawn

A
Centre Lawn

  • 2
  • 2
  • 41

Recent Classifieds

Forum statistics

Threads
198,906
Messages
2,782,894
Members
99,744
Latest member
NMSS_2
Recent bookmarks
0
OP
OP

Andreas Thaler

Subscriber
Joined
Nov 19, 2017
Messages
4,863
Location
Vienna/Austria
Format
35mm
Do you think I should attempt the repair myself, or is that an indicator of a total CLA?

If the error occurs irregularly, I would actually suspect contamination or lack of lubrication. I have an F3P and an SRT 303b with a similar problem. I don't dare approach the F3P yet, there are instructions for fixing the SRT on the web.

I would first find out whether this error is already known. With the base plate off, you have access to some of the mechanics and may be able to see the problem when you trigger the camera. I wouldn't do anything more myself without special knowledge of the camera.

I'll look in Thomas Tomosy's Nikon Repair Book, maybe I'll find a hint and you can estimate whether DIY makes sense here.
 
OP
OP

Andreas Thaler

Subscriber
Joined
Nov 19, 2017
Messages
4,863
Location
Vienna/Austria
Format
35mm
A Leica repair probably wouldn't be of much value to me other than learning some general repair techniques. But I'd be happy to follow whatever you posted.

It would just be about getting closer to the camera. But maybe you have a current project?

I think it's important to be able to assess a problem and whether you can make meaningful progress yourself. There is no point in trying to do something that you definitely won't be able to do. By „trying“ I mean sticking with it, seeing what you can do without playing roulette 😉

We could also look at soldering? I believe that was your topic in the other thread?
 

KerrKid

Member
Joined
Feb 5, 2022
Messages
1,512
Location
Kerrville, TX
Format
35mm
I have a nikon fm2 with a shutter that locks up(or sticks) if I switch it to B it releases, then I use the multiple exposure to not lose the frame. If it sits overnight it will lock like this, once freed it's good for the day. So I have a way around it, but I would like it to work.(I got it from KEH, and when I talked to them they don't do repairs...)
It seems like something under the bottom cover? But what I don't know.
Do you think I should attempt the repair myself, or is that an indicator of a total CLA?

I have a Nikon with a very similar problem. The mirror stays up after a shutter release and never comes down. After that, I can wind it until the cows come home and it won't fire. I do some sort of dance with the shutter speeds to get it to fire once I pull the mirror down manually.

I read somewhere that there is a pin under the top cover that gets misplaced inside there. It could be a very easy fix. Just don't know what I'd be looking at if I took the top cover off.
 
OP
OP

Andreas Thaler

Subscriber
Joined
Nov 19, 2017
Messages
4,863
Location
Vienna/Austria
Format
35mm
And another word from Vienna:

It's not important whether you manage to repair it. The important thing is that you try it.

Literally everything you gain on this way in terms of experience is your capital. And the fertile ground for success - today, tomorrow or the day after 💫

I have to add that. By „try“, I mean stick to the problem and not be intimidated. And also to try something without overdoing it. If I can't open a particular camera today, I might be able to open it tomorrow because I've learned something in the meantime.

Always stick with it, like a cat with a mouse 🙃
 

KerrKid

Member
Joined
Feb 5, 2022
Messages
1,512
Location
Kerrville, TX
Format
35mm
It would just be about getting closer to the camera. But maybe you have a current project?

I think it's important to be able to assess a problem and whether you can make meaningful progress yourself. There is no point in trying to do something that you definitely won't be able to do. By „trying“ I mean sticking with it, seeing what you can do without playing roulette 😉

We could also look at soldering? I believe that was your topic in the other thread?

A tutorial on soldering and desoldering would be welcome.
 
OP
OP

Andreas Thaler

Subscriber
Joined
Nov 19, 2017
Messages
4,863
Location
Vienna/Austria
Format
35mm
A tutorial on soldering and desoldering would be welcome.

I like to show how I do it. And I would be happy if someone told me how to do it better. You never stop learning.

I have an X-700 for practice, there are a lot of cables on the flexible circuit board, which is good for a demo. I also managed to unsolder the ICs, but not to solder them in. Maybe @koraks can help here?

Lets start this forthcoming Sunday 👍
 

koraks

Moderator
Moderator
Joined
Nov 29, 2018
Messages
22,988
Location
Europe
Format
Multi Format
Maybe @koraks can help here?

Not sure...I'd have to have the device here. But in general, there are a couple of ways to solder SMD IC's onto PCB's:

* Reflow oven. Really only works for flat, rigid PCB's and mostly for new assemblies.

* Reflow hot plate. Pretty much as above. I sometimes to rework on PCB's using the hot plate if it's a lot or cannot be done otherwise (e.g. alu-core PCB's), but for flex type PC'B's, not really a viable option, I suspect.

* Hot air soldering station. Should work. First clean the contacts on the (flex) PCB with a soldering iron and a fine tip and some flux. Make sure each pad has a nice little shiny bead on it and no pointy 'whiskers' sticking up (use more flux). Then tack the IC in place with some flux; the stickiness of the flux will mostly keep it in place. Press down lightly with tweezers etc. and then blast the IC with the hot air gun. The temperature setting is a bit of a gamble, but I like to set it pretty hot so it doesn't take much time. I figure it's better to only have to blast it for a few seconds at high heat vs. holding it at a high temperature for up to several minutes. Btw, I've maltreated IC's by heating them to ridiculous levels (even with a small butane torch!) and have never destroyed one. The worst I managed was to get the glass filter unstuck from an SMD photodiode, but that's really an outlier case.

* Plain old soldering iron. Use a small tip. Clean pads as above, and tin them a little if there's no tin (anymore) on them. Apply flux on/around the pads, stick down the IC and hold it down with tweezers. Then tack two pins in opposite direction with the soldering iron, one at a time. This should hold the IC in place as you solder the other pins, pressing gently down on them with the soldering iron and allowing the tin to flow between the pad and the pin. Do this one by one. On IC's with a very small pitch, you may end up fusing several pins together especially if you've used quite a bit of tin. Don't worry about it and just suck up the excess using some solder wick.

The advantage of the soldering iron approach is that you only heat the assembly very locally and very briefly (at least after a bit of practice). The drawback is that you usually bend down the pins of the IC very slightly as you press them through the tin ball on the pad, which is not necessarily a problem, but it sometimes leaves a pin 'hovering'. Be sure to inspect each pin carefully with a good loupe, microscope or magnifier, and do a continuity test between each pin and its pad. Don't press down the test leads strongly when doing the continuity test, as you'll get a false positive by temporarily pressing the pin down onto the pad, making it seem that there's good contact, while there really isn't anymore once you release the test lead from the pin.

Use flux-core lead solder, and no lead-free. Lead free is there to meet environmental regulations, but literally everyone who has done any soldering will confirm it's far easier to work with leaded solder. So unless you have to meet RoHS regulations (e.g. you do commercial repairs), do yourself a favor and just use old-fashioned 67/33 SnPb solder. The flux core is very important. I like 0.75mm diameter solder, which is a good general purpose for relatively fine work.

Use a temp. controlled soldering iron. They're cheap if you don't insist on getting e.g. a Weller. The 'Hakko'-ripoff Chinese units tend to work just fine. For practice, pick up any old piece of junkyard electronics and solder everything off of it and then back onto it. For desoldering SMD parts, using a hot air station is pretty much the only practical way. Again, the Chinese-made units are cheap and work fine.

Use a decent, modern flux, and no resin. Resin works very well as a flux, but the remnants cannot be cleaned up (they're harmless, but it looks ugly) and with rework it tends to carbonize. Modern, colorless flux, either the paste or the liquid kind, can be cleaned with IPA/ethanol or even soapy water (dry well). Don't believe "no-clean flux". There's no such thing. But that's OK because some ethanol or IPA and a brush cost virtually nothing.

SMD soldering seems daunting at first, but it really isn't. Things get challenging with QFN packages that have no leads, but even these can successfully soldered at home (I've done so many times). The only thing I personally won't touch, is BGA (ball grid array). Theoretically, I could do it with the hot air gun and the hot plate, but really, I don't bother and instead just select regular SMD and if needs be QFN components. In cameras, I think BGA packages only appeared some 15 years ago or so, so when working on film cameras, don't worry about this, or QFN, which was also not yet around the corner in the 1990s.
 

Chuck1

Member
Joined
Jul 4, 2022
Messages
672
Location
Arlington ma
Format
Multi Format
I have a Nikon with a very similar problem. The mirror stays up after a shutter release and never comes down. After that, I can wind it until the cows come home and it won't fire. I do some sort of dance with the shutter speeds to get it to fire once I pull the mirror down manually.

I read somewhere that there is a pin under the top cover that gets misplaced inside there. It could be a very easy fix. Just don't know what I'd be looking at if I took the top cover off.

Thanks Kerr and Andreas,
The top cover I'd be reluctant to try(basically because of the rewindpost/film door release- as well as the fact that it probably wouldn't go back together without something else not working after the fact.
 

MattKing

Moderator
Moderator
Joined
Apr 24, 2005
Messages
53,011
Location
Delta, BC Canada
Format
Medium Format
This at least starts out as almost entirely off topic, but ....
The thread title made me think of an exchange I heard about recently between someone close to me and a pharmacist.
The customer/patient required an injection into the eye to deal with retinal inflammation.
The ophthalmologist scheduled an appointment and wrote out a prescription for the injectable drug.
The prescription was filled by the regular pharmacist for the patient/customer.
When the patient/customer went to pick up the drug, the pharmacist required a consult first, which began with the memorable words:
"You must not inject this yourself into your own eye - you must have your ophthalmologist do it".
For me, with the skills I have, most camera repairs would be akin to self-administered eye injections ..... 😲 .
I have friends who are good at this stuff - I admire and envy them.
 

Paul Howell

Subscriber
Joined
Dec 23, 2004
Messages
9,695
Location
Scottsdale Az
Format
Multi Format
Over the past years I have taken apart old Petri, Miranda, Kowa cameras to build a skill base. One,a Miranda, I did manage to fix a frozen shutter, the others needed parts not just a service. I learned that I don't have the space, the tools, and repair manuals to really dig deep into repair. I send my cameras out or buy a another body.
 

ic-racer

Member
Joined
Feb 25, 2007
Messages
16,549
Location
USA
Format
Multi Format
I repair things for the fun of it. It is a sad addiction that extends beyond photography gear for me.
 

Sirius Glass

Subscriber
Joined
Jan 18, 2007
Messages
50,372
Location
Southern California
Format
Multi Format
I will repair Graphics, Graflexes, and Hasselblads but I will not work on my other cameras. I have a large collection of tools but the most import are the jeweler's screwdrivers, diagonal clutters, needle nose pliers and other assorted small tools. I learned how to repair Graphics and Graflexes from a retire Graphic and Graflex repairman who was on www.graflex.org. My Hasselblad repair man and YouTube videos taught me to do minor repairs on Hasselblads. As I age, I am handing some of those repairs to professional repairmen.
 

kl122002

Member
Joined
Apr 17, 2022
Messages
391
Location
Hong Kong
Format
Analog
I can do some of the repairing but not all of them, especially the soldering. I am really bad at soldering tbh. So for everytime that involves soldering I would try to avoid as much as I can.

On the other side repairing is a kind of art for sure. Not many people could easily learn or master it. I have seen some just opened the cover, saw all parts and then they have no idea inside, unable to remember all screws location, unaware of left handed screws....they just messed up.
 
OP
OP

Andreas Thaler

Subscriber
Joined
Nov 19, 2017
Messages
4,863
Location
Vienna/Austria
Format
35mm
I feel comfortable with cameras where electronics and mechanics are balanced. And always hope that cleaning and soldering is the solution. I wouldn't dismantle a mechanical camera because I lack the knowledge and precision mechanical skills.
 

campy51

Subscriber
Joined
Oct 16, 2014
Messages
1,215
Location
Boston area USA
Format
Multi Format
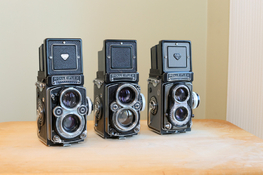
I have done many repairs on mostly twin lens cameras like the Rolleiflex, Rolleicord, Minolta Autocord and Yashica. Most just need flushing with an electronic spray to clean the dirt from levers and shutters and a little dab of sewing machine oil. I will only tackle a serious repair if I am willing to throw it in a box and write it off as training. I never buy an expensive camera for more than I can sell it for in the same condition as I bought it. My most recent was a 3.5F that only had pictures of it in a case and the seller said it wasn't tested and didn't know if it worked. I paid pretty good money for it but seeing what others sold for in unknown condition on ebay I knew I would lose very little if at all. The parts that were showing with the front of the case opened looked excellent so I took the chance. When I got it and took it out of the case it was in better condition than I expected, but got nervous when I tested the shutter and it didn't even try to fire and the film winding was stiff. I wasn't sure if I had a problem with the winder or the shutter, so I took the front plate off and also the rings off the shutter and spayed a little electronic spray in different areas and it came back to life and everything worked , even the film advance was freely moving. I did my usual flushing and lightly oiling of the the shutter and it works like a charm now. The hardest part was putting the faceplate back on which took me a long time until I read part of the repair manual that showed me what step I missed. I have been extremely lucky so far but I'm sure one day it will come back and bite me in the A$$. I fix copiers and printers for a living so I am used to taking things apart that I have not done before. These are my three Rolleiflex cameras that were bought in need of repair or in the case of the 2.8E in the middle was bought with lens slight separation, which I had repaired by someone on this site, I don't remember who but it came out great. All of which are worth much more than I paid for them so it has been well worth it for me. I also find the hunt to find these gems to be very much part of the fun.
 

Attachments

  • R6II0025.JPG
    R6II0025.JPG
    201.2 KB · Views: 40
OP
OP

Andreas Thaler

Subscriber
Joined
Nov 19, 2017
Messages
4,863
Location
Vienna/Austria
Format
35mm
@campy51 Great story thanks for sharing!

That would mean that damage to mechanical cameras such as broken springs, bent parts or broken screws are rather rare? Unless the camera was subjected to violence?
 

jk0592

Member
Joined
Jul 7, 2011
Messages
107
Location
Canada
Format
Medium Format
I am just starting to learn, for the days that my mechanical cameras will start failing. Better be prepared than be panicked. First things first, Blad A12 backs, and pentax SL. So, I will follow your thread with great attention.
 

campy51

Subscriber
Joined
Oct 16, 2014
Messages
1,215
Location
Boston area USA
Format
Multi Format
@campy51 Great story thanks for sharing!

That would mean that damage to mechanical cameras such as broken springs, bent parts or broken screws are rather rare? Unless the camera was subjected to violence?

I haven't had one with broken parts yet, but I'm sure that will change. If they look abused I don't bother with them.
 

KerrKid

Member
Joined
Feb 5, 2022
Messages
1,512
Location
Kerrville, TX
Format
35mm
@campy51 Great story thanks for sharing!

That would mean that damage to mechanical cameras such as broken springs, bent parts or broken screws are rather rare? Unless the camera was subjected to violence?

Considering all the mechanical cameras that I have, I think it's more likely that the internal meter may fail or have problems before anything mechanical on the camera does.

I wonder if everyone who had cameras in need of repair could post those cameras and their issues. Maybe that would reveal some common issues and/or things we'd like to see a repair process for.

Currently mine are:

Nikon FM with some brown images in the viewfinder. Could be a prism issue.

Nikon FE with a shutter/mirror issue.

Pentax KX with a messed up shutter curtain.

Wards ep 504 with negative battery terminal that came out (a small screw).

Vivitar 55mm f1.4 lens with front element damage and filter ring dent.
 
OP
OP

Andreas Thaler

Subscriber
Joined
Nov 19, 2017
Messages
4,863
Location
Vienna/Austria
Format
35mm
I wonder if everyone who had cameras in need of repair could post those cameras and their issues. Maybe that would reveal some common issues and/or things we'd like to see a repair process for.

Spontaneous:
  • Minolta X: leaking electrolytic capacitors; grounded wire; unknown electronic failures
  • Nikon F3/T: faulty LCD; damaged exposure compensation dial
  • Canon T90: faulty LCD, sticky shutter, faulty magnet
  • Other cameras/devices: problems with the power supply due to leaked battery acid. A real plague that could be avoided.
Everything fixed except BLUE
 

Laurent

Subscriber
Joined
Oct 15, 2004
Messages
1,829
Location
France
Format
Multi Format
I have a F1 old I bought for parts which will become a project camera, it would be great to have a backup to my F1n. Mostly works, but has a few issues like stuck aperture lever, bent top cover which may explain the stiff back block, etc...

I'd also be happy to restart the Sv camera and old friend gave me. Again, mostly ok but stiff parts and somewhat gummed shutter.

I'll follow this thread carefully.
 

KerrKid

Member
Joined
Feb 5, 2022
Messages
1,512
Location
Kerrville, TX
Format
35mm
I have a F1 old I bought for parts which will become a project camera, it would be great to have a backup to my F1n. Mostly works, but has a few issues like stuck aperture lever, bent top cover which may explain the stiff back block, etc...

I'd also be happy to restart the Sv camera and old friend gave me. Again, mostly ok but stiff parts and somewhat gummed shutter.

I'll follow this thread carefully.

My SV is in perfect shape, but I wouldn't mind seeing a repair on one.
 

Chuck1

Member
Joined
Jul 4, 2022
Messages
672
Location
Arlington ma
Format
Multi Format
I took apart(improperly)a compur shutter to find a spring end sticking out holding that down it worked properly, (just like chris sherlock said)but I couldn't get it back together, maybe learned something?
A wollensack(maybe raptar) shutter in a lot purchase came back to life when before throwing it away I noticed the shutter speed setting spun freely, upon aligning the speed setting and tightening a lockring down, it worked! Pretty well.
Any tips to clean and oil a compur shutter with bad slow speeds?
And any recommendations for a repair person to work on shutters, as well as someone who would be willing to work on glass, stop the little of fungus that's there. Clean as best as possible and maybe recement separating elements, I know it won't be perfect....
 
Photrio.com contains affiliate links to products. We may receive a commission for purchases made through these links.
To read our full affiliate disclosure statement please click Here.

PHOTRIO PARTNERS EQUALLY FUNDING OUR COMMUNITY:


Ilford ADOX Freestyle Photographic Stearman Press Weldon Color Lab Blue Moon Camera & Machine
Top Bottom