Projector Cyanotype and Chiba python digital negative.

Recent Classifieds

Forum statistics

Threads
200,009
Messages
2,800,443
Members
100,103
Latest member
jtorres
Recent bookmarks
0
OP
OP

imgprojts

Member
Joined
May 24, 2024
Messages
106
Location
Seattle WA
Format
Multi Format
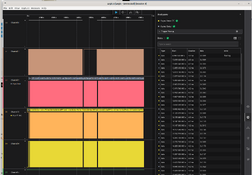
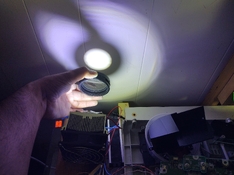
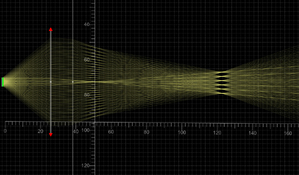
Today I looked into calibrating UV focus. Holy moly! Look at that! My focus was at zero in visible light but in UV it's shown at 16 or more in this chart.
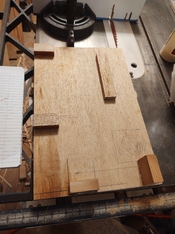
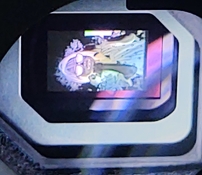
The card was at 45 degrees, the distance to 16 mark from 0 is 76mm so it means that I have to focus my projector 54mm in front of the actual photo. And I just did my first image with these changes and boy! wow! its nice!
1727320722800.png
 
OP
OP

imgprojts

Member
Joined
May 24, 2024
Messages
106
Location
Seattle WA
Format
Multi Format
But one thing I noted was that the focus 54mm away is around 10%. Every footnote i've read says that UV focuses 5 to 10% in front of visible light. Here for whatever reason, the UV light is focusing 10% behind visible. I guess I should not really expect a particular number or direction since lens makers can pretty much swing the focal plane any way they want. Any comment or opinion on this? The lens on this projector is weird. It has this sort of central pinch to it. Like the center part of the lens looks almost flat if not reversed inward. I thought it was maybe parabolic or hyperbolic or something. but if you look from the side you don't see the typical parabola shape, you see this center pinch. The same with the light's lens. I think they are playing some sort of focal plane correction from both sides of the optical chain.
 
OP
OP

imgprojts

Member
Joined
May 24, 2024
Messages
106
Location
Seattle WA
Format
Multi Format
OK So last week I worked on the focus thing. Today I gave up on processing the images locally on the little thinkcentre computer. Instead I went back to Mr ChatGPT and I asked it to build me an HTML page and serve it locally using podman. The benefit of this is that you can have a big powerful computer do the image crunching and a tiny computer do the projecting. It can be the same computer it doesn't matter. To use it:

You will need Ubuntu or some other Linux. I don't do windows programs sorry for you if you must use windows:
first allow the network traffic :
sudo ufw allow 5000
Then
podman run -d -p 5000:5000 my-flask-app

it looks like this:
1727643372092.png


then just open an email file, hit process image. That will start the threshold as a series of images in a cache folder on the server. then when it is done, go hit start or stop. Oh and input your exposure time. Its really working finally!! like if you set it to 12minutes it will expose for 12 minutes!


One last bit. On Firefox (friends don't let friends use chrome anymore) go to : about:config and then search for "full-screen-api.ignore-widgets" double click her to set it to true. Now if you press F11, the top menus of your browser will disappear and you will have a single window with your image ready to go. Hit start then take the pointer and put it somewhere else so the menus autohide. Its working OK. It probably needs some TLC but I am not complaining.

my projector is 1080p, but you can change the native resolution in the python app called app.py:
1727643795993.png
 

Attachments

  • APES_HTML_002.zip
    9.2 KB · Views: 46
OP
OP

imgprojts

Member
Joined
May 24, 2024
Messages
106
Location
Seattle WA
Format
Multi Format
I'm following this recipe: https://lemmy.world/post/26591859 and I'm getting photographic level resolution on my cyanotypes. On textured paper its interesting because you can Illuminate it directly overhead and see the resolution you saw when it was wet, but as soon as the illumination comes from elsewhere it looks like a regular slightly blurry cyanotype. On glass and plastic as well as flat photo paper it keeps its full resolution. The formula comes from the latest experiments by Habib Saidane but are modified and a completely separate thing. The tissue poured with the sensitizer doesn't actually dissolve away when developed in water. the image is embedded inside of it. The formula seems to clear to paper-white unless you use some sort of staining liquid.
 
OP
OP

imgprojts

Member
Joined
May 24, 2024
Messages
106
Location
Seattle WA
Format
Multi Format
Finally! After solo many months of wandering around with all sorts of electronics and ideas I got my DLP projector to post and then go to desktop.

As they say, necessity is the mother of invention so when the normal lightbulb went out I started desperately trying to reverse engineer the signal to the lamp so I could play it back. Well as it turns out it cannot be simply played back unless you got exact timing. Digging deeper into the burnt ballast I found that 3 of the wires went into the LED side of an optocoupler and the 4th wire went into the receiving end of an optocoupler. So the 4th wire was the signal back from the lamp's ballast. Now I don't need the lamp or the ballast. I get the clock signal, the command signal and the video on signal and basically I replay the response digits and the exact time needed. Now I need to write a protocol to send responses to the commands and to force the video signal on.

The whole thing is just so I can try removing the last mirror so I can stick a UV LED there to project it down to make prints. Man, when I saw my Linux desktop on the DMD chip I was so freaking happy. But there are so many open issues between now and being able to make images. The biggest for me is what the DMD chip will project when I shine UV light. The high voltage halogen lamp gets focused into a rectangular glass rod with mirror faces. The result being that the light gets mapped into infinite geometrical replicas. Then the light passes thru the Color wheel which is no doubt synchronized using the clock signal. I bet the lamp flashes bright as the correct color passes and then the DMD aligns the correct set of mirrors for that particular color at that particular time step. After the wheel the light reflects off a final mirror and into a lens that is bonded to a beam splitter prism. So the image is focused by the lens on to the DMD, then the reflection bounces off into either the lens or a little beam dump. The reflection angle is definitely not 45degrees. So there's the question... After all this work am I just going to get a weirdly parallelogramed image worth less than a fly's posterior?

I just like over complicating things I guess.
 
Photrio.com contains affiliate links to products. We may receive a commission for purchases made through these links.
To read our full affiliate disclosure statement please click Here.

PHOTRIO PARTNERS EQUALLY FUNDING OUR COMMUNITY:


Ilford ADOX Freestyle Photographic Stearman Press Weldon Color Lab Blue Moon Camera & Machine
Top Bottom