Printing Diptichs and Triptichs in the darkroom

Recent Classifieds

Forum statistics

Threads
198,512
Messages
2,776,432
Members
99,637
Latest member
Besson
Recent bookmarks
1

mexipike

Member
Joined
Feb 12, 2007
Messages
377
Location
Los Angeles, CA
Format
Med. Format RF
I'm printing for an upcoming show and have a two triptychs and one diptych from 3 and 2 separate negatives each respectively that I'm trying to think about how I would print in the darkroom? The images will be framed and window matted.

I'm sure I could cover one part of the paper and then print the next one but I feel like registration would be a nightmare.

Another idea is to print each image at the size they would be in the triptych/diptych, cut each one full bleed and then mount them, guessing I would probably have to dry mount them I would guess. I mocked up the images in PS and I don't mind not having space between them so I would just mount them right next to each other.

I'd love to hear any and all ideas and how people have done this in the past.
 

tedr1

Member
Joined
Feb 3, 2016
Messages
940
Location
50 miles from NYC USA
Format
Multi Format
How much time do you have? The creation of a triple image from three separate negs one at a time would challenge my skills and patience I would try to find ways to mount three separate prints in a sympathetic arrangement. Depending on the images it is likely they will interact visually, if it were my project I would need to see a mock-up finished size before committing to the finished design in terms of aspect ratio, cropping, density, and contrast.
 

Rick A

Subscriber
Joined
Mar 31, 2009
Messages
9,904
Location
Laurel Highlands
Format
8x10 Format
I normally make individual images then mat and mount them together as a triptych, easier to cut matboard than try to figure print spacing in the dark.
 

Sirius Glass

Subscriber
Joined
Jan 18, 2007
Messages
50,321
Location
Southern California
Format
Multi Format
I would print them separately and then have the mats cut for the two or three prints. Leave room to move the print locations around.
 

kevs

Member
Joined
Aug 21, 2006
Messages
711
Location
North of Pangolin
Format
Multi Format
It's possible to do this, depending on how much time you have. It's not something I've tried and it seems a bit of a faff, but I think your routine would be something like this:

First of all, work out exposure times for each image; you'll need to know exactly how you want to expose each negative before you start.

Make yourself a template in card the same size as your paper. Mark out the positions of the exposures then cut apertures slightly larger than each of your planned exposures. Tidy and raggedy bits.

Make sure you have enough space both sides of the enlarger to accommodate your baseboard, which you'll need to slide across.

Make sure your baseboard, template and photographic paper won't slide across each other while you're working.

Under the enlarger, use the template to align aperture 1 for the first exposure, then place the photographic paper on your baseboard under the template. Check alignment using your red or orange swing-filter. Use another sheet of card to cover apertures 2 and 3 so the paper doesn't catch any stray light.

Uncover aperture 1 and make your first exposure, then cover aperture 1 with card. Slide the baseboard across and change the negative to set up the second exposure; you shouldn't need to refocus if you're using the same magnification and/or crop. Slide aperture 2 under the enlarger, uncover the paper and align the exposure using a red or orange swing filter to avoid exposing the paper. Make the second exposure in the same way, then repeat the sequence for the third exposure.

Once you've done this a few times, you'll get into a routine and it should become easier. Personally, I'd take the suggestions of making individual prints and presenting them together behind a single mat; but then I'm quite lazy! :D Good luck. :smile:
 

M Carter

Member
Joined
Jan 23, 2013
Messages
2,147
Location
Dallas, TX
Format
Medium Format
One could also dial in the separate prints, trim and mount them, and re-photogarph the print 4x5 to make a "master" neg. I'd guess the copy shoot might call for slightly reduced contrast, etc. I've done this with bromoil prints to get nice fiber copies of them, but bromoil is more "abstract" vs. a print with lots of subtle tonal gradation and so on. I'll be experimenting with copying some of my more complex lith prints this was across the next few weeks (not triptychs, just want to be able to replicate prints that were a huge pain to get in the first place).
 

AgX

Member
Joined
Apr 5, 2007
Messages
29,973
Location
Germany
Format
Multi Format
I'm sure I could cover one part of the paper and then print the next one but I feel like registration would be a nightmare.

Just cut and position mats for each image on the paper, then position them at red light by moving the whole easel and expose, best with respective mat in place. Then just cover that mat during the neighbouring exposure.
There were/are even special easels for this.
 

horacekenneth

Member
Joined
Aug 10, 2012
Messages
515
Location
MD
Format
Multi Format
As long as you can consistently align your paper with your easel, move it back into the box between each exposure and use a template to setup and register the next exposure. Just make sure you stick the paper back in the same way it was before
 

koraks

Moderator
Moderator
Joined
Nov 29, 2018
Messages
22,303
Location
Europe
Format
Multi Format
Use masking tape to make a reference on your paper before exposure. When putting the paper on the easel, you can use the tape reference to properly align each of the exposures. Cover the part of the paper that is not covered by the masking blades of the easel while making the exposures. Remove tape and develop. Regular masking tape used for house painting may do the trick and otherwise look for tape for delicate surfaces.
 

Tim Stapp

Member
Joined
Dec 21, 2012
Messages
557
Location
Big Rapids, MI
Format
4x5 Format
drafting tape or freezer tape??? Or, regular masking tape put down on a surface and remove a couple times to remove the "stickiness." - ???
 

Fluidphoto

Subscriber
Joined
Jul 15, 2008
Messages
40
Location
Hamilton, ON
Format
Multi Format
I had good luck taping a piece of regular paper to the easel and marking the first neg projection onto the paper with a pencil and then doing the same with the second. I'd make the first exposure, put in the second neg, re-align, put the paper back down and make the second exposure. Just make sure that you line up your paper to the same corner every time. I managed to do 30 triptych panoramas with only a few errors.
 

Pieter12

Member
Joined
Aug 20, 2017
Messages
7,578
Location
Magrathean's computer
Format
Super8
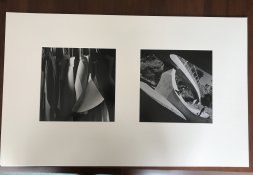
I did a series of 7 diptychs, each image printed 10x10 and matted in two windows with 3" between. Came out nice (although the iPhone photo is crude).
Diptych.jpg
 

rolfehorn

Member
Joined
Mar 25, 2008
Messages
17
Location
Oakland, CA
Format
Medium Format
I’ve always printed them separately. You can match them up when they’re wet in terms of tone and contrast. When matting, you can adjust the horizon line when trimming if needed, and I am always careful to align everything before dry mounting.

Good luck, it very rewarding when the images turn out.
 
OP
OP

mexipike

Member
Joined
Feb 12, 2007
Messages
377
Location
Los Angeles, CA
Format
Med. Format RF
I ended up printing them separately as three 8x10s and had them matted. I'm very pleased with how they came out.
 
Photrio.com contains affiliate links to products. We may receive a commission for purchases made through these links.
To read our full affiliate disclosure statement please click Here.

PHOTRIO PARTNERS EQUALLY FUNDING OUR COMMUNITY:


Ilford ADOX Freestyle Photographic Stearman Press Weldon Color Lab Blue Moon Camera & Machine
Top Bottom