Pix of your home-built cams, mods and creations here please (part 2)

Pomegranate

A
Pomegranate

  • 2
  • 2
  • 38
The Long Walk

H
The Long Walk

  • 1
  • 0
  • 90
Trellis in garden

H
Trellis in garden

  • 0
  • 0
  • 59
Giant Witness Tree

H
Giant Witness Tree

  • 0
  • 0
  • 65
at the mall

H
at the mall

  • Tel
  • May 1, 2025
  • 1
  • 0
  • 54

Recent Classifieds

Forum statistics

Threads
197,507
Messages
2,760,276
Members
99,392
Latest member
stonemanstephanie03
Recent bookmarks
1

dirkfletcher

Subscriber
Joined
Jan 29, 2012
Messages
509
Location
Chicago
Format
4x5 Format
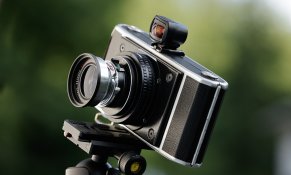
View attachment 244410 View attachment 244411 Finally finished my custom built (and bargain basement priced) XPan.

I'm using a 1980's Nimslo camera that has the 4 lenses (used for making 3D 'lenticular' prints) removed and cut out into a single 24mm X 74mm panoramic opening. Thats almost 10mm wider than an XPan and not much more then 1/10 the price for the entire camera.

As long as I've been building cameras, I only recently realized that you can gut a Bronica lens and the front and rear lens groups screw directly into a Copal shutter just as a Super Angulon would. It is a brilliant option that opens so many doors in terms of lens options for custom cameras.

This camera is using the smaller of the two Bronica 40mm f/4 (made the 645 ETR) and it covers the three inch negative with only a little falloff. At f/8 its surprisingly good. The larger 40mm that was made for the 6x6 SQ system would probably cover with a little less fall off but I 'd rather have the mild vignette in exchange for a smaller camera. I'm using Oscars Oweson's 3D printed shade that gives the lens some protection and finished the cameras.

You can check out more of my custom cameras here: https://www.flickr.com/photos/dirkfletcher/albums
or on my Instagram: https://www.instagram.com/dirkfletcher

Thanks for looking!
Dirk

Instead of using a larger lens shade I’m trying a cut out shade to keep the entire camera smaller and more ‘backpack-able’. I think it’s clearing the frame, I’ll post some test pictures this weekend.
Dirk
96F40319-0437-47E6-AC4D-C2BDB8E0BA9C.jpeg
 

Donald Qualls

Subscriber
Joined
Jan 19, 2005
Messages
12,087
Location
North Carolina
Format
Multi Format
Nice.

I've got the two film chambers left over after someone made a 6x17 out of two Moskva 5 -- I've been meaning (for several years, now) to build them into something. It'll probably be pinhole, due to the cost of lenses that will cover larger than 6x9 at portable focal lengths.
 

kahlheins

Member
Joined
Mar 29, 2020
Messages
69
Location
Germany
Format
Multi Format
Finished my Zeiss Ikonta 520/15 with a 47mm Super Angulon today. The build was inspired by Dirk Fletcher's similar build, however I went for a slightly different approach with a 3D-printed mount that I attached directly to the sealed folder door. I haven't put the first roll of film through it yet, but very excited for the results.

DSC_5454.JPG
DSC_5455.JPG
 

Dan Fromm

Member
Joined
Mar 23, 2005
Messages
6,789
Format
Multi Format
Pretty, but I still have to ask the obvious stupid question. Focusing? I ask because I use a 47/5.6 SA on a Crown Graphic and on a 4x5 Cambo with 6x12 roll holder. Image quality suffers when I focus at an arbitrary distance.
 

Nokton48

Member
Joined
Oct 8, 2006
Messages
2,951
Format
Multi Format
Pretty, but I still have to ask the obvious stupid question. Focusing? I ask because I use a 47/5.6 SA on a Crown Graphic and on a 4x5 Cambo with 6x12 roll holder. Image quality suffers when I focus at an arbitrary distance.

So pick a circle of confusion size of your liking and create a personal DOF and hyperfocal chart. :smile:

Years ago I charted my location lenses and the work immediately sharpened up bigtime. Took a while to do all the math.
 
Last edited:

kahlheins

Member
Joined
Mar 29, 2020
Messages
69
Location
Germany
Format
Multi Format
Beautiful shutter! What’s that?
It's a Prontor professional 01S. It's a very nice design: self cocking, easy to set and read aperture and shutter speed dials, shutter speeds up to 1/250th and a separate T-style cable release if you're using ground glass to focus. It takes #0 size lenses but required a #1 size mounting hole.
 

bunip

Member
Joined
May 13, 2012
Messages
281
Location
Parma, Italy
Format
Multi Format
Here’s my Voigtlander avus 6x9 wideangle camera
623EC6B5-0425-49B3-8AA7-1A78461F507E.jpeg 2B89F18C-659E-4B39-BF50-273FB4CC35C1.jpeg 312A7663-0A32-44B6-A489-A63E1442DBC1.jpeg 86F5585F-2618-4B2E-BE77-84269EA9F6B5.jpeg B4C0EEC3-1FAF-4866-8E00-AA4E30B13FCC.jpeg 5CAB3DAB-0D08-4603-8221-B4CF8E592AD7.jpeg 5FF48FBE-9A11-4BFD-9889-DA747DCBE467.jpeg 18DD11D0-3562-4C02-A8DC-0C9E94BB4434.jpeg
it has an Angulon 6,8 65mm lens, I sawed the rail and the bed to prevent the rail to show in the frame. Rada 6x9 rollfilm back, groundglass, plates if you prefer, a focusing scale to guesstimate focus if you want to avoid gg focusing, external finder, movements...
 

bunip

Member
Joined
May 13, 2012
Messages
281
Location
Parma, Italy
Format
Multi Format
It was made to have a light compact 6x9 wideangle camera. At 850g lens and film including I can’t think of anything lighter.
 

dirkfletcher

Subscriber
Joined
Jan 29, 2012
Messages
509
Location
Chicago
Format
4x5 Format
Finished my Zeiss Ikonta 520/15 with a 47mm Super Angulon today. The build was inspired by Dirk Fletcher's similar build, however I went for a slightly different approach with a 3D-printed mount that I attached directly to the sealed folder door. I haven't put the first roll of film through it yet, but very excited for the results.

View attachment 245908 View attachment 245909
This looks amazing!! The body is also in fantastic shape as well with beautiful paint.
Dirk
 

dirkfletcher

Subscriber
Joined
Jan 29, 2012
Messages
509
Location
Chicago
Format
4x5 Format
4x5 65mm Superwide.jpg
4x5 65mm Superwide-2.jpg 6x12_.jpg Recently finished a 65mm 4x5 wide camera based on the WillTravel 3D printable camera. I replaced his bungie loaded ground glass back with a non ground glass spring style back that makes it easier to unload and reload with one hand. I replaced the grip with a smaller grip that keeps the camera smaller to fit in a bag better and lastly I removed his 3D printed helical and replaced it with a flange that allows the same lens and helical combination to be removed and fitted to my 6x12 camera.
 

awty

Subscriber
Joined
Jul 24, 2016
Messages
3,638
Location
Australia
Format
Multi Format
View attachment 247098 View attachment 247099 View attachment 247097 Recently finished a 65mm 4x5 wide camera based on the WillTravel 3D printable camera. I replaced his bungie loaded ground glass back with a non ground glass spring style back that makes it easier to unload and reload with one hand. I replaced the grip with a smaller grip that keeps the camera smaller to fit in a bag better and lastly I removed his 3D printed helical and replaced it with a flange that allows the same lens and helical combination to be removed and fitted to my 6x12 camera.
Very innovative Dirk. So it is just 6x12 or does it do 4x5 as well? Can you show a picture of how the film holder fits on?
 

dirkfletcher

Subscriber
Joined
Jan 29, 2012
Messages
509
Location
Chicago
Format
4x5 Format
Very innovative Dirk. So it is just 6x12 or does it do 4x5 as well? Can you show a picture of how the film holder fits on?

The first camera is a 4x5 camera, here is a shot with a cut film holder:
4x5 65mm Superwide-3.jpg


You can then unscrew the the helical and lens and use it on the 6x12 camera this is the third shot above. The 6x12 camera currently has Schneider Super Angulon on it but I'm going to use that lens on a different project and move the Fujinon back and forth depending on what I want to shoot with.

Dirk

(PS) there are some construction pictures on my blog too: http://dirkfletcher.blogspot.com
 
Last edited:

awty

Subscriber
Joined
Jul 24, 2016
Messages
3,638
Location
Australia
Format
Multi Format
I made (not quite finished) a reducing back for my 24 x 30 camera to take half plate holders.
reducing back 1.jpg reducing back 2.jpg reducing back 3.jpg reducing back 4.jpg

Just need to make a ground glass/adjust film plain to match glass, do some light seals and paint. plus a few other bits and pieces.
Think I might also try and make a back for my Cambo legend to take half plate holders, which I can adapt to take 4x5 plates....this will need some working out, especially to make the back rotatable.
 

John Earley

Member
Joined
May 1, 2012
Messages
423
Location
Central Virginia
Format
Multi Format

dirkfletcher

Subscriber
Joined
Jan 29, 2012
Messages
509
Location
Chicago
Format
4x5 Format
I recently completed two cameras that are virtually the same except for their finish. One has the traditional 1970-80’s era SLR style finish with polished chrome and black leather. This camera has a chrome Linhof Technika branded 65mm f/8 Super Angulon. The second camera has a more of a blacked-out stealthy, tactical finish with all of its exposed chrome surfaces sprayed with a luster black finish and also a fresh black leather kit. This camera is fitted with a black anodized second generation Super Angulon.

I’ve added a 49mm to 52mm step up ring on the lenses to give the lens a little bit of physical protection and bring the 49mm filter ring up to a more common (and affordable) 52mm thread if you want to use filters, especially when shooting black and white.

The cameras began their life somewhere 1931 and 1934 as classic folding Zeiss Ikon 520/15’s which were also known as the Ikonta D. Shooting 116 and later 616 you got eight 6.5 x 11 images per roll. After my conversion, the camera yields six 2 1/4 x 11 images on standard 120 film that’s loaded using two sets of spindle adapters. Advancing through (an updated) red gel window, you advance to frames 3, 5 1/2, 8, 10 1/2, 13, 15 1/2.

The permanently attached Arca Swiss plates are mounted perpendicular to the camera body which keeps the camera level when it’s on a flat surface. Helpful when shooting, it also keeps pressure off of the helical assembly. I recently found a much lower profile spring loaded accessory shoe which keeps the masked 21mm Voigtlander viewfinder much lower then using an accessory shoe for a flash. The profile is lower than my previous conversions which helps when go to fitting it into a camera bag.

These are the 5th and 6th 6x12 conversions (I think...) that I’ve made, and without a doubt, the most refined to date. My goal was to make a camera as small and easy to use as possible with the reality they will most likely be used alongside a digital system. This is how most of my custom cameras end up being used.
BothFinishes6x12.jpg
blkstdobotm.jpg


blkstdo.jpg

Bellagio.jpg Bridge.jpg
 

Attachments

  • Chrome6x12.jpg
    Chrome6x12.jpg
    1.3 MB · Views: 156
Last edited:

awty

Subscriber
Joined
Jul 24, 2016
Messages
3,638
Location
Australia
Format
Multi Format
Very nice work again Dirk. Im amazed you get such a good coverage. Do you have any pictures of the guttered camera, do you just remove the bellows or need to do more cutting?
Are you going to fit a shutter release onto the camera?
Nice pictures btw, like the nightscape.
 

fdonadio

Member
Joined
Jan 15, 2015
Messages
2,062
Location
Berlin, DE
Format
Multi Format
Great job, Dirk! You really inspire me in making my own cameras. My projects are still in hold, but I believe I will have something to show very soon.
 

Donald Qualls

Subscriber
Joined
Jan 19, 2005
Messages
12,087
Location
North Carolina
Format
Multi Format
That's made from a Nettar or some such? How do you advance 6x12 with the 6x9 window?
 

Donald Qualls

Subscriber
Joined
Jan 19, 2005
Messages
12,087
Location
North Carolina
Format
Multi Format
Okay. A Wirgin Auta would be a good body donor, then; it's a dual format, 6x9 and 6x4.5 with both windows on the 6x9 track, so you'd do 2, 5, 8, 11, 14 in the first window of the two.
 
Photrio.com contains affiliate links to products. We may receive a commission for purchases made through these links.
To read our full affiliate disclosure statement please click Here.

PHOTRIO PARTNERS EQUALLY FUNDING OUR COMMUNITY:


Ilford ADOX Freestyle Photographic Stearman Press Weldon Color Lab Blue Moon Camera & Machine
Top Bottom