Pictorico media setting on canon printers

Eno River-5

A
Eno River-5

  • 0
  • 0
  • 146
Drizzle, but harmonious

D
Drizzle, but harmonious

  • 2
  • 3
  • 163

Recent Classifieds

Forum statistics

Threads
200,820
Messages
2,814,633
Members
100,394
Latest member
mrt123
Recent bookmarks
1

nmp

Member
Joined
Jan 20, 2005
Messages
2,049
Location
Maryland USA
Format
35mm
I decided to redo the HSB print with the "matte" setting. EDN is now giving me H=40 as optimum, so it's all over the place. I've seen H=330, H=270, H=220, etc. I'll have to do more samples to make sure this is right, but here's the scan:

View attachment 342757

OK....so it does look like the densest color is indeed black, as the cleanest blocks are the one in the top row - which are all RGB = (0,0,0). At least to the accuracy of 10% steps.

I also ran the Color Blocker 3.0 on Mhrar's site with your scan without any problem (so earlier failure on my part must be something to do with the file I was using to simulate.) It gave me Max Blocking Color HSB of (0,100,0) which is RGB = (0,0,0). And Optimum Blocking Color HSB of (340,100,0). I downloaded the two LUTs. And they both are give a reddish step wedge starting from black - the utility of which I don't completely understand. To me, the all black strip in the above scan (H=360, all the way to the right) looks the best.

:Niranjan.
 

jarane

Member
Joined
Mar 19, 2015
Messages
6
Location
SoFla
Format
35mm Pan
Hi, zuluz
did you solve your Pro-100 issue?

I am starting in this journey and have the same printer and would like to print my negatives for palladium or carbon printmaking.

Thanks in advance,
E.C.
 

MMH

Member
Joined
Dec 23, 2024
Messages
12
Location
New Jersey
Format
Hybrid
I was hoping to get some input on this as well.

I am printing cyanotype on Hahnemule platinum rag paper using a Quans 395nm 50W LED light approx 12 inches above the contact print.

I print on my Canon Pro-100 using the Apple Preview Program, Photo Glossy II, high quality, printer manages colors. (I found I was getting some weird color issues when printing from Lightroom or printing from Photoshop.)

I ran EDN color blocker and got an Opt LUT of HSB 340 (H),100(S),0(B) and Max LUT of 360,100,0.

I have never really figured out getting the EDN curve working well. But in the past I got some decent results with eyeballing a correction in monitor, inverting, applying Opt LUT color only, adding 20-30 intensity in the print setting.

After redoing some D-Max tests I have arrived at 6'30 exposure time under the Quans light.
I applied OptLUT to the inverted 256 wedge, and got the print below:

Screenshot 2025-11-04 at 2.41.47 PM.png


But the curve it generates after scanning the positive print of the 256 wedge looks really weird:
Screenshot 2025-11-04 at 2.42.31 PM.png


Patrick, I am having trouble following your suggestion:

"Print out a target that is 0-255. There are some on the internet. Then use it to establish a few parameters. Find your exposure (if you want max blue) by printing for the time that there is no difference between the edge of the Pictorico and the paper blue. Once you have established that printing time, you can look at all of the squares and figure out your printing range. Find where the shadow areas start to separate, and where the highlights do as well, and those are your end points. Hopefully you will still have some white otherwise your ink isn't dense enough. Once you have established your end points, put them in your curve or levels in Photoshop. You'll want to use output levels. Easier with a levels layer. Once you have your parameters set print a new target with the new parameters to make a curve. I've found the simplest way is to just use gamma, 1.8 to 2.2 works well usually for my Canon pigment printer. The higher the setting the brighter the print. I stopped using curves a while back. There is very little difference in the end print.That is all you have to do. Easy peasy. No complicated math or LUTs or anything else. Maybe I should start a website....."
 

MMH

Member
Joined
Dec 23, 2024
Messages
12
Location
New Jersey
Format
Hybrid
I made a negative on top using the EDN curve applied to the positive image (generated by a scan of my 256 wedge that had the Opt LUT color blocker applied to it) and adding the OptLUT color blocker to the inverted image.

The negative on bottom is just the EDN curve.

Screenshot 2025-11-04 at 2.51.33 PM.png


I end up with a flat print (EDN + OPT LUT) with no midtowns or a contrasty print (bottom, EDN curve only). Any thoughts?
 

Attachments

  • winslowscans.jpeg
    winslowscans.jpeg
    42.8 KB · Views: 23

koraks

Moderator
Moderator
Joined
Nov 29, 2018
Messages
25,601
Location
Europe
Format
Multi Format
I see no paper white in your print. When trying to linearize digital negatives, first make sure the process works consistently. How are your results with a Stouffer step tablet?
 

MMH

Member
Joined
Dec 23, 2024
Messages
12
Location
New Jersey
Format
Hybrid
I have not used a Stouffer step tablet. I just have the 101 and 256 files from easy digital negatives...
 

koraks

Moderator
Moderator
Joined
Nov 29, 2018
Messages
25,601
Location
Europe
Format
Multi Format
I understand; well, I'd recommend getting a step tablet, like the Stouffer T2115. It's the best investment one can make within the entire alt. process domain, IMO.
Lacking one, I'd start by masking around your digital/inkjet negative with something really opaque to UV (tinfoil works great) to verify the borders clear properly. I think you've got a truckload of staining or fogging going on, and that makes it impossible to linearize your negatives.
 

MMH

Member
Joined
Dec 23, 2024
Messages
12
Location
New Jersey
Format
Hybrid
I also think I am having some paper coating issues and I'm not sure how to fix. I am using Hahnemule Platinum Rag.
I use distilled water in a garment steamer and pre-steam the paper about 5 passes up and down on each side.
I then dip a soft bristle brush in distilled water, dab it some on paper towels, then dip into my sensitizer (I am using Photographers Formulary A and B).
I paint left to right starting at the top, dipping my brush back in to replenish about halfway down the paper.
When I get to the bottom I rotate the paper 90 degrees and work left to right, top to bottom again.
I spend about 60-70 seconds start to finish coating the paper. But I am seeing some white ish fibers in the print and some streaks.
Am I pressing the paintbrush down too hard? Should I be applying more sensitizer solution?


Screenshot 2025-11-10 at 9.45.07 AM.png
Screenshot 2025-11-10 at 9.49.35 AM.png
 

koraks

Moderator
Moderator
Joined
Nov 29, 2018
Messages
25,601
Location
Europe
Format
Multi Format
I use distilled water in a garment steamer and pre-steam the paper about 5 passes up and down on each side.
Why? I'd start by skipping this step. Cyanotype is the simplest brush-on sensitizer there is. Just brush it onto the paper; no preparation etc. required.
 

fgorga

Member
Joined
Aug 31, 2015
Messages
819
Location
New Hampshire
Format
Multi Format
Why? I'd start by skipping this step. Cyanotype is the simplest brush-on sensitizer there is. Just brush it onto the paper; no preparation etc. required.

Agreed!

If you are having trouble with paper absorbing sensitizer (which would be my guess for the "why") this is best dealt with by adding a small amount of surfactant. Most folks use a 10% (w/v) solution of Tween-20 for this although a few use PhotoFlo instead. That said, cyanotype is generally pretty easy to coat on most papers without the need for surfactants.

Two other thoughts...

Instead of dipping in sensitizer the brush multiple times, I would measure out the amount of sensitizer required for the desired print area and pour in in the middle of the image area. The brush is then used to move the senstizer around until it soaks into the desired area. You don't need significant pressure on brush as you should not be trying to 'force' the liquid into the paper.

Also, you state you are using a "soft bristle brush", does this brush have natural or synthetic bristles? The reason I ask is your comment about "white-ish fibers". Synthetic bristle brushes generally come in two varieties... brown or white. You want to use the brown variety; the white bristles are too hard/stiff for this application.

Lastly, if I were you, I would work out your methods using a less expensive paper than HPR. The only thing that might change (usually slightly) is the amount of senstizer needed for a given area. Once you have some experience you can switch back to HPR.
 

gbroadbridge

Subscriber
Joined
Nov 18, 2004
Messages
779
Location
Sydney, Australia
Format
Medium Format
I'd suggest forget using the colorchecker chart, and just get it working with the standard chart.

Also, as suggested above, try a cheaper paper such as Canson XL which gives excellent results for me.

I don't use HPR for cyanotypes at all.
 

MMH

Member
Joined
Dec 23, 2024
Messages
12
Location
New Jersey
Format
Hybrid
Thanks Frank and gbroadbridge for your replies!
I am using this brush with synthetic bristles:

Richeson Synthetic Watercolor Brush Series 9010 Flat Wash 1-1/2"​


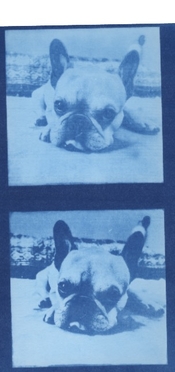
I did some additional tests yesterday with the Hahnemuhle Platinum Rag paper. First I made a print using the bristle brush on the front side of HPR paper (i.e., if I have the package with the label facing me, and I pull out a sheet from the top of the package, this would be the "label" side)
Screenshot 2025-11-11 at 8.56.17 AM.png


I then made a print using the bristle brush on the back side of HPR:
Screenshot 2025-11-11 at 8.57.01 AM.png


Same 6' exposure time under my Quans UV light, same gentle 2'30 water rinse, etc. But a huge difference in tones, especially in the highlights.

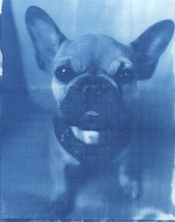
I then used a foam brush on the front side of HPR - this time no pre-steam treatment. And I just poured the sensitizer on the paper and worked it in across the paper. These are 7x9 inch prints. I used a total of 5 mL solution ( 2.5mL of A, 2.5 of B).

Same 6' exposure/rinse.

Screenshot 2025-11-11 at 9.00.11 AM.png


This got me a decent tonal range.

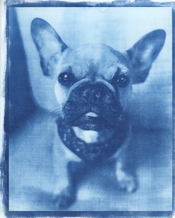
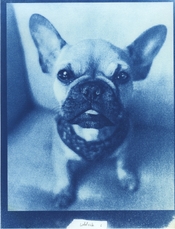
But in all of these, I am seeing lots of coating issues. I see artifacts / white fibers/ streaks.
e.g., white fiber artifacts (foam brush test)
Screenshot 2025-11-11 at 9.02.27 AM.png


streaks/some white fibers (bristle brush test)

Screenshot 2025-11-11 at 9.07.39 AM.png


"I'd suggest forget using the colorchecker chart, and just get it working with the standard chart."

-As for this comment. All of these prints were made using the OptLUT color block file applied to the inverted negative image. Mine is H340, S100, B0 (magenta color). This has generally allowed me to make a decent looking print with decent tonal ranges. I have never been able to actually get a good working EDN curve. Part of this may be due to the fact that sometimes I coated on the front of the paper, sometimes on the back, and I'm getting inconsistent results.
 

Attachments

  • BristlebrushbackHPRwithsteam.jpeg
    BristlebrushbackHPRwithsteam.jpeg
    333.5 KB · Views: 11
  • BristlebrushfrontHPRwithsteam.jpeg
    BristlebrushfrontHPRwithsteam.jpeg
    509 KB · Views: 14
  • FoamBrushFrontHPRnosteamlowres.jpeg
    FoamBrushFrontHPRnosteamlowres.jpeg
    519.8 KB · Views: 14

koraks

Moderator
Moderator
Joined
Nov 29, 2018
Messages
25,601
Location
Europe
Format
Multi Format
Try a different paper, would be my first & main suggestion. Looks like this particular paper doesn't play nice with the chemistry. You could try to fix that, but given the fact that there are so many papers around that work straight out of the box, I wouldn't bother.
 

nmp

Member
Joined
Jan 20, 2005
Messages
2,049
Location
Maryland USA
Format
35mm
As mentioned, you can't go wrong with Canson XL watercolor paper. It's one of those hard surface papers which can take a lot of abuse of brushing without disturbing the fibers. It does require T-20 (which I incorporate in the FAC solution itself.) I also found HPR having issues with limited testing I did. If I want an un-buffered paper, my preference is always going to be COT320.

Also, rod-coating can alleviate some of these problems - so that might be worth trying.
 

MMH

Member
Joined
Dec 23, 2024
Messages
12
Location
New Jersey
Format
Hybrid
Thanks Niranjan,
I ordered some Canson XL to try out.
How much T20 would you apply for an 8x10 print?
 

nmp

Member
Joined
Jan 20, 2005
Messages
2,049
Location
Maryland USA
Format
35mm
Thanks Niranjan,
I ordered some Canson XL to try out.
How much T20 would you apply for an 8x10 print?

OK. I checked my notes since I have not done any printing for a while - I misspoke above - I incorporate the T-20 in the Pot ferri, not FAC solution. The way I do is make a 0.1% solution of T-20 in dist.water (0.1g in 100 ml) and then use that to make the K Ferri solution. That way I don't have to worry about measuring out one more ingredient when I make the print and composition stays independent of the paper size. Conventional way is to make solution of T-20, say 10% and add a couple of drop of that to the A/B mixture before coating. In theory, you really don't need much to get the benefit of the surfactant - if my memory serves me T-20 reaches its CMC (critical micelle concentration) at around 0.06% (w/v) above which there is no change in surface tension. If too much is added, then that itself can produce artifacts.

:Niranjan.
 

MMH

Member
Joined
Dec 23, 2024
Messages
12
Location
New Jersey
Format
Hybrid
Glad I'm not the only one! Hopefully this will prevent others from wasting their time/$$$.
Interestingly, the only time I got semi-decent coating with HPR cyanotypes not showing those white fuzzy paper fibers was when I made leaf prints under the sun and left them exposed for ~1.5 hours.

I just tested some Canson XL yesterday and got very good preliminary results re coating/tonal range.
 
Photrio.com contains affiliate links to products. We may receive a commission for purchases made through these links.
To read our full affiliate disclosure statement please click Here.

PHOTRIO PARTNERS EQUALLY FUNDING OUR COMMUNITY:


Ilford ADOX Freestyle Photographic Stearman Press Weldon Color Lab Blue Moon Camera & Machine
Top Bottom