Perishable skills. A frustrating return to the darkroom. Advice needed.

Sombra

A
Sombra

  • 3
  • 0
  • 72
The Gap

H
The Gap

  • 5
  • 2
  • 87
Ithaki Steps

H
Ithaki Steps

  • 2
  • 0
  • 94

Forum statistics

Threads
199,010
Messages
2,784,573
Members
99,769
Latest member
Romis
Recent bookmarks
1

GregY

Member
Joined
Apr 12, 2005
Messages
3,439
Location
Alberta
Format
Large Format
Aparat, keep up the good fight. I believe printing is a skill like any other....similarly there is residual knowledge if you used to ski, golf or play a musical instrument. I'd try not to stress over the backlog of unprinted negatives. As mentioned, plan to make a few prints per session rather than a lot. Personally, I don't make contact sheets (haven't for decades)...spend some time looking at negatives on a light table. It's an invaluable skill to learn to read negatives. (& at current prices it saves paper for making prints). Choose a few, and make a few prints. If you're using small paper, forgo the tiny test strips and make 1/2 or full size test prints. As far as sitting or standing, i don't think it's necessarily a disadvantage to work sitting down. I used to have darkrooms with high ceilings but in my latest house, the darkroom has an 8' ceiling so i set my Beseler 45 and Durst 138 with a drop table for prints bigger than 16x20". Keep at it, i think you'll find some of your long buried skills will come back. I also think the longer the printing session the better. I also have a music system in my darkroom and listen while i'm working. It takes time to warm your brain up to working in the dark.
At the risk of sounding like a luddite, i have no idea who Nicholas Lindan is or what the print by numbers method is. In my experience, if you're using common papers and chemicals, the more prints you make on a regular basis, the more quickly your skills will return and advance. Best of luck.
 
Last edited:

runswithsizzers

Subscriber
Joined
Jan 19, 2019
Messages
1,762
Location
SW Missouri, USA
Format
Multi Format
You might see what photography classes are being offered by your local universities (I assume the Saint Paul area has more than one?). I was able to enroll in a b&w medium format class which was a great experience for me.

The university in my hometown offers a deal for us "seniors" which they generously define as age 62 plus. I am allowed to audit one class per semester with no tuition fee. I still have to pay for materials - not trivial - but you are doing that already.
 

VinceInMT

Subscriber
Joined
Nov 14, 2017
Messages
1,887
Location
Montana, USA
Format
Multi Format
There has been some good advise provided here and I can relate as I took a few years off about 30 years ago (career change, geographic change, kids, 2 houses, etc) but when I finally got back to it, I ignored the goal of printing something well but just went through the processes to re-establish a workflow. After some sessions it all started coming back, like muscle memory.

Related to this, as I dove back into the darkroom after that break, my big question was whether I could reconnect with the passion for photography that I’d had before. When I got into photography, I was in a place (mentally and physically) where I needed something to concentrate on rather than my life situation. The darkroom was like therapy and was as much a distraction as it was a challenging learning process and it blossomed quite quickly into a passion, one that I carried for decades. When I had to set aside, I didn’t really miss it as I thought I’d done all there was to do with it and had dived into newer things to learn elsewhere. When I attempted to rekindle it, it took more than one attempt to to get it back, as I was only relearning old stuff, but the passion came back when I realized I hadn’t done all there was to do with it and that has propelled me forward.
 
OP
OP
aparat

aparat

Member
Joined
Sep 5, 2007
Messages
1,177
Location
Saint Paul,
Format
35mm
I refuse to believe that anyone as systematic as you are will be stuck for long.

Thank you :smile:. I am actually trying to print "by the numbers" using the @Nicholas Lindan method. I made some progress last night. I have finished testing the new Ilford MGV emulsion and will plot the results later this evening. Once I changed lenses, I found it easier to dodge and burn from a seated position. I still have to align my enlarger, etc. It will probably be many weeks before I am able to make decent prints.
@runswithsizzers This is a great idea! Actually, my son is currently taking college photography classes this semester, and I hope to learn some new stuff from him. His class is moving at a really good pace, already making advanced projects. The most important thing is he's enjoying using film. I never expected that.

@VinceInMT Thank you for sharing your story. It makes me feel better. I do have the passion. I hope to use it to my advantage. I am really glad you were able to get back into photography. I think your story is probably pretty common among people our age. At some point, we need to take a break from things we enjoy to focus on the things that matter, like family, health, job, etc. But, hopefully, the passion is still there.
 
Joined
Jan 31, 2020
Messages
1,294
Location
Germany
Format
Multi Format
I know I've had bad, discouraging printing sessions when my mind was elsewhere, I was too tired or lacked the patience. As I don't have to print, I just no longer do when I'm not in the right place. This has been the case for a couple months now... but it will change at some point.
 
Joined
Oct 21, 2016
Messages
1,274
Location
Calexico, CA
Format
Multi Format
Advice? Like previously stated put some music and brew a big cup of coffee/tea/whatever brew you like. Enjoy the moment.

By the way, get a focus finder. It helps some with difficult negatives. The Meopta Opemus 6 I'm using has a focus "rangefinder" to help focus, but the focus finder can help too.

Marcelo.
 

DWThomas

Subscriber
Joined
Jun 13, 2006
Messages
4,605
Location
SE Pennsylvania
Format
Multi Format
I laid off the darkroom for a couple of decades and found two opposite factors at work. Knowing it had been a long time, I seemed to focus more attention to detail and read some old notes resulting in sometimes better prints than I remember doing in the past. But that was in between screwing things up as that muscle memory stuff got ahead of the brain and got settings and such out of sync. Fear not, it will come back.
 

snusmumriken

Subscriber
Joined
Jul 22, 2021
Messages
2,512
Location
Salisbury, UK
Format
35mm
Thinking about it, I haven’t yet stopped making rookie mistakes. Only a couple of weeks ago I exposed a full sheet of paper without stopping down the enlarger lens first. And many times I have made test strips with no MG filter under the lens. Or intended to repeat a print half a grade different but forgot to change the filter, so found myself staring in disbelief at a print that looked exactly the same as the last.

I bet I’m not the only one, either.
 

Sirius Glass

Subscriber
Joined
Jan 18, 2007
Messages
50,389
Location
Southern California
Format
Multi Format
Relax and take your time. Use Dextol developer stock for 2 minute development to eliminate the time variations. Use split grade printing to converge faster. Make a test strip for magenta at Grade 5. Once you have found the exposure, use that exposure and develop a test strip with the yellow filter at Grade 0 or 00. The you can go back to burning and dodging at those two exposures.
 
OP
OP
aparat

aparat

Member
Joined
Sep 5, 2007
Messages
1,177
Location
Saint Paul,
Format
35mm
I want to thank you all so much for your thorough and thoughtful comments and advice! I have benefited greatly. I continue to make rookie mistakes, such as not stopping down the enlarging lens after focusing, but, at the very least, I can now make a basic print. Swapping out the lens for the Rodenstock 105mm f/5.6 Rodagon helped as it gave me more room to work with under the enlarger.

I have tested the new Ilford Multigrade RC Glossy emulsion using the method by Darkroom Automation. A few years back, I searched for a suitable printing system, and I settled on Darkroom Automation. I chose it because it makes sense to me, which doesn't mean that it is better or worse than any other system. I just want to make that point because there are so many ways to make great prints.

I incorporated the method into my film and paper testing program. It generates an XSLT spreadsheet, with three embedded sheets and plots, containing all the data relevant to the system. This allows one to print by numbers, at least to some extent. I also wrote a conversion function for the Ilford EM10 darkroom meter. It's embedded into the spreadsheet file. I am unable to attach it here, but if you'd like it, let me know and I will send it to you by email (or other means).

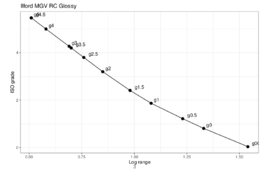
I am very impressed with the new emulsion. It has excellent blacks and a near-linear response to filtration, at least with my setup. Here's a plot. I skipped 4.5, so ignore it, please. All other filters are the Ilford under the lens filters, along with a condenser enlarger (Beseler 23C III). I added an extra stop of exposure for Grade 4 and 5.


ilfordMGVRCGlossyFinalISOGrade.png

And here are a few of my first prints. Please, excuse the shoddy quality. I still have a long way to go:


snusmumriken

Subscriber
Joined
Jul 22, 2021
Messages
2,512
Location
Salisbury, UK
Format
35mm
I also wrote a conversion function for the Ilford EM10 darkroom meter.

Is it possible that you have created a use for my redundant EM10? I refuse to change print exposure by changing aperture, so the device (bought as part of a job lot) never found a place in my methods. What does your function convert from/to?
 

Nicholas Lindan

Advertiser
Advertiser
Joined
Sep 2, 2006
Messages
4,248
Location
Cleveland, Ohio
Format
Multi Format
Is it possible that you have created a use for my redundant EM10?
To use the EM10 as an enlarging meter, rather than an enlarging comparator, it first needs to be calibrated.

The EM10's linear 0-100 scale needs to be converted to a stops scale. Placing the meter under the lens and noting the dial readings as the lens is stopped down will give a rough idea of the relation of the dial numbers to stops. Be sure to start from 1 stop down from full open - a lens' open aperture number is often optimistic, but stops from there tend to be pretty accurate. Better calibration can be had with a step tablet, be sure to hold the tablet patches right over the meter's sensor.

A calibration scale for one meter may or may not work for another meter. The EM10 isn't a precision instrument although plenty good enough for it's intended purpose.

A problem with the meter is that it uses an inexpensive 'audio taper' potentiometer. Think noisy/scratchy volume control on an old radio. Before calibration it would be a good idea to take the EM10 apart and spray some contact cleaner into the insides of the potentiometer and work it around. The potentiometer can fail and develop dead-spots. Replacement potentiometers are available from Digikey/Mouser/Newark/Farnell. Get a cermet or conductive plastic model, stay away from carbon - I don't have an EM10 anymore so I am not sure which pot will fit.
 

snusmumriken

Subscriber
Joined
Jul 22, 2021
Messages
2,512
Location
Salisbury, UK
Format
35mm
To use the EM10 as an enlarging meter, rather than an enlarging comparator, it first needs to be calibrated.

The EM10's linear 0-100 scale needs to be converted to a stops scale. Placing the meter under the lens and noting the dial readings as the lens is stopped down will give a rough idea of the relation of the dial numbers to stops. Be sure to start from 1 stop down from full open - a lens' open aperture number is often optimistic, but stops from there tend to be pretty accurate. Better calibration can be had with a step tablet, be sure to hold the tablet patches right over the meter's sensor.

A calibration scale for one meter may or may not work for another meter. The EM10 isn't a precision instrument although plenty good enough for it's intended purpose.

A problem with the meter is that it uses an inexpensive 'audio taper' potentiometer. Think noisy/scratchy volume control on an old radio. Before calibration it would be a good idea to take the EM10 apart and spray some contact cleaner into the insides of the potentiometer and work it around. The potentiometer can fail and develop dead-spots. Replacement potentiometers are available from Digikey/Mouser/Newark/Farnell. Get a cermet or conductive plastic model, stay away from carbon - I don't have an EM10 anymore so I am not sure which pot will fit.

Excellent, that’s really helpful, many thanks. I will follow all of that and hope the little thing finds a niche after all this time in a drawer!
 
OP
OP
aparat

aparat

Member
Joined
Sep 5, 2007
Messages
1,177
Location
Saint Paul,
Format
35mm
Is it possible that you have created a use for my redundant EM10? I refuse to change print exposure by changing aperture, so the device (bought as part of a job lot) never found a place in my methods. What does your function convert from/to?

Yes, @Nicholas Lindan is correct. The unit needs to be calibrated against a known device/source, such as the aperture of the enlarging lens or, better yet, another unit that is known to be properly calibrated, such as the Darkroom Automation Precision Enlarging Meter, which is what I used. Mine was just back from calibration/maintenance, so it should be as accurate as a factory-new unit.

I first created a model based on two EM10 units I have. Both were very close, which tells me that Ilford used the same calibration model, at least for some of these units. With the model, I then wrote a function that can convert the EM10 readings into logarithmic values (or stops). It can then be used with the Darkroom Automation system or any other printing-by-numbers system. No, it's not nearly as nice as the Precision Enlarging Meter itself, but it should do in a pinch, especially if you already own it. The system can get you very close to the required exposure values, including dodging and burning, but, at the end of the day, it's just an approximation - a really good one, but still, the final decisions are up to the individual printer. The mere knowledge of the system is no guarantee of a successful print, as my failed recent attempts prove.

Speaking of Darkroom Automation, I have been utterly impressed with their products for years, not just the hardware, but the entire system. It's simple but powerful, which is precisely what such a system should be like, in my opinion. They also provide ample documentation.
 

Tim Stapp

Member
Joined
Dec 21, 2012
Messages
557
Location
Big Rapids, MI
Format
4x5 Format
Advice? Like previously stated put some music and brew a big cup of coffee/tea/whatever brew you like. Enjoy the moment.

By the way, get a focus finder. It helps some with difficult negatives. The Meopta Opemus 6 I'm using has a focus "rangefinder" to help focus, but the focus finder can help too.

Marcelo.

Be careful what music you play in the darkroom.

This one will make really deep shadows and extreme highlights. One person, one voice and an eight octive range! https://video.search.yahoo.com/yhs/...4e572eac29e5856edb87dccc05e3911e&action=click
 

warden

Subscriber
Joined
Jul 21, 2009
Messages
3,051
Location
Philadelphia
Format
Medium Format
Thinking about it, I haven’t yet stopped making rookie mistakes. Only a couple of weeks ago I exposed a full sheet of paper without stopping down the enlarger lens first. And many times I have made test strips with no MG filter under the lens. Or intended to repeat a print half a grade different but forgot to change the filter, so found myself staring in disbelief at a print that looked exactly the same as the last.

I bet I’m not the only one, either.
It's like you had a camera in my darkroom following me. Same mistakes here, yes.
 

Codeman73

Member
Joined
Feb 18, 2023
Messages
11
Location
Sudbury, VT
Format
35mm
I agree with others. You can easily spot a great negative. Find a great negative that's also an in interesting image and work with that. Trying to beat a great print from a poorly exposed or composed image is adding a level of difficulty that can put a damper on your enthusiasm for the process.
 

Sirius Glass

Subscriber
Joined
Jan 18, 2007
Messages
50,389
Location
Southern California
Format
Multi Format
I agree with others. You can easily spot a great negative. Find a great negative that's also an in interesting image and work with that. Trying to beat a great print from a poorly exposed or composed image is adding a level of difficulty that can put a damper on your enthusiasm for the process.

Welcome to APUG Photrio!!
 
OP
OP
aparat

aparat

Member
Joined
Sep 5, 2007
Messages
1,177
Location
Saint Paul,
Format
35mm
Thank you all for your encouragement and very useful advice! I have been trying to print, working through my recent negatives. I pick the frames that look easy to print.

Question to y'all: I am finding it hard to see under my red filter safe lights, which leads to mistakes. I use red lights because I used to print a lot on Foma paper and the amber lights would fog it. Since I am currently printing exclusively on Ilford MG RC paper, can I switch to amber filters? They would allow me to see a lot better, if I remember correctly?

I work for short spells and still keep making rookie mistakes. Here are some of the most common ones from the past couple of sessions:
  • Forgetting to stop down the lens after focusing
  • Forgetting to swing over the filter under the lens after measuring light on the baseboard
  • Accidentally moving my flimsy easel, messing up composition - time for a new easel or fixing this one
  • Messing up composition due to me not seeing well in the dark
  • Picking the wrong filter from the box, also due to me not seeing well in the dark
  • Confusing dodging with burning - this one drives me mad
  • Accidentally burning in the wrong area of the print
  • Kinking a print while trying to lift it with my tongs out of the developer tray - this one hurts, as it can ruin a potentially good print
  • Dropping a print on the floor - only happened once, but it hurt
  • Putting the negative emulsion side up - I only did it once, but still, it sucks when it happens
  • Forgetting to dust the negative before putting it in the carrier
  • Failing to see a water drying mark on the negative before the print is dry - happened twice last night

Here are a few more from last night:
 

Sirius Glass

Subscriber
Joined
Jan 18, 2007
Messages
50,389
Location
Southern California
Format
Multi Format
Thank you all for your encouragement and very useful advice! I have been trying to print, working through my recent negatives. I pick the frames that look easy to print.

Question to y'all: I am finding it hard to see under my red filter safe lights, which leads to mistakes. I use red lights because I used to print a lot on Foma paper and the amber lights would fog it. Since I am currently printing exclusively on Ilford MG RC paper, can I switch to amber filters? They would allow me to see a lot better, if I remember correctly?

I work for short spells and still keep making rookie mistakes. Here are some of the most common ones from the past couple of sessions:
  • Forgetting to stop down the lens after focusing
  • Forgetting to swing over the filter under the lens after measuring light on the baseboard
  • Accidentally moving my flimsy easel, messing up composition - time for a new easel or fixing this one
  • Messing up composition due to me not seeing well in the dark
  • Picking the wrong filter from the box, also due to me not seeing well in the dark
  • Confusing dodging with burning - this one drives me mad
  • Accidentally burning in the wrong area of the print
  • Kinking a print while trying to lift it with my tongs out of the developer tray - this one hurts, as it can ruin a potentially good print
  • Dropping a print on the floor - only happened once, but it hurt
  • Putting the negative emulsion side up - I only did it once, but still, it sucks when it happens
  • Forgetting to dust the negative before putting it in the carrier
  • Failing to see a water drying mark on the negative before the print is dry - happened twice last night

Here are a few more from last night:


Gee, you are just like the rest of us after all.
 

MattKing

Moderator
Moderator
Joined
Apr 24, 2005
Messages
53,103
Location
Delta, BC Canada
Format
Medium Format
Question to y'all: I am finding it hard to see under my red filter safe lights, which leads to mistakes. I use red lights because I used to print a lot on Foma paper and the amber lights would fog it. Since I am currently printing exclusively on Ilford MG RC paper, can I switch to amber filters? They would allow me to see a lot better, if I remember correctly?

Yes you can switch to amber - more particularly, the Kodak OC filtered lights, or the Ilford or other equivalents.
You may also be able to use brighter red LED lights. I use those, and I can read a newspaper under safelight !
 

snusmumriken

Subscriber
Joined
Jul 22, 2021
Messages
2,512
Location
Salisbury, UK
Format
35mm
I use amber Ilford filters for MG - I think they are 902? The only thing is, on doing a safelight test, I found I had to turn them upwards to reflect off the (white) ceiling. Still plenty bright though.
 
Photrio.com contains affiliate links to products. We may receive a commission for purchases made through these links.
To read our full affiliate disclosure statement please click Here.

PHOTRIO PARTNERS EQUALLY FUNDING OUR COMMUNITY:


Ilford ADOX Freestyle Photographic Stearman Press Weldon Color Lab Blue Moon Camera & Machine
Top Bottom