Omega D-5500 rubber roller replacement help

A street portrait

A
A street portrait

  • 0
  • 0
  • 13
A street portrait

A
A street portrait

  • 0
  • 0
  • 24
img746.jpg

img746.jpg

  • 3
  • 0
  • 31
No Hall

No Hall

  • 1
  • 1
  • 37
Brentwood Kebab!

A
Brentwood Kebab!

  • 1
  • 1
  • 103

Recent Classifieds

Forum statistics

Threads
198,787
Messages
2,780,828
Members
99,703
Latest member
heartlesstwyla
Recent bookmarks
0

hflphoto

Member
Joined
Apr 30, 2015
Messages
8
Format
4x5 Format
First, let me say I am new to this group and look forward to being an active participant. I shoot exclusively 4X5 with an old Graphic View I. Maybe one day I can step up to a field camera and stop hauling this beast around, but for now I am quite pleased with it. I have a darkroom in my basement where I process and print B&W exclusively utilizing the BTZS protocols.

I have seen threads about how to replace the rubber rollers in an Omega D-5500, but I need help. First, I see in previous photos that the rod is threaded on the ends, but I can't see how the handles are attached. If I had a parts diagram it would definitely be a big help. Second, is there anything else I should know about? I'd really appreciate any help from anyone who has done this repair.
 
Last edited by a moderator:

ic-racer

Member
Joined
Feb 25, 2007
Messages
16,544
Location
USA
Format
Multi Format
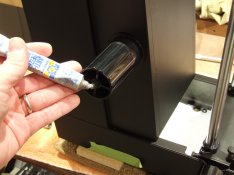
The end of the knob unscrews. It can be frozen in place and difficult to unscrew.
http://www.largeformatphotography.info/forum/showthread.php?35033-Omega-D5500-repair-parts

After the repair I put some anit-seize grease on the shaft so it comes apart easier in the future.
DSCF1785.jpg
 
OP
OP

hflphoto

Member
Joined
Apr 30, 2015
Messages
8
Format
4x5 Format
Thanks so much for your reply. I guess I'll try to break them loose with strap wrenches tomorrow.
 
OP
OP

hflphoto

Member
Joined
Apr 30, 2015
Messages
8
Format
4x5 Format
Well, I got the caps off, but apparently mine is different then yours. The handles are held in with press fit star washers and apparently the handles themselves are press fit onto the shaft. Question- did you take the head off of the column to do this repair? To be honest, the more I get into this, the more I'd like to toss it in the trash. Sadly, I have an Ilford 500 light source that I really like. I'll try more later, but I hate to take things apart without any kind of a diagram, especially when they involve springs! I fear I'll destroy the enlarger just trying to replace what should be considered wearable parts. Doesn't say much for Omega engineers!
 
Last edited by a moderator:
John Koehrer

Subscriber
Joined
Apr 3, 2004
Messages
8,276
Location
Aurora, Il
Format
Multi Format
Did it once. ROYAL PITA!
There are some good instructions online, maybe from KHB? Found them when I had finished messing around with it.
Ain't that the way?

I did remove the head just to get it out of my way and I clamped the CW spring to the chassis when I fooled with it.
That sucker's got some oomph to it.
 

ic-racer

Member
Joined
Feb 25, 2007
Messages
16,544
Location
USA
Format
Multi Format
Question- did you take the head off of the column to do this repair?

Did you see the link to the repair sequence in my post above?

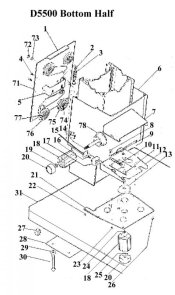
In terms of a parts diagram, this is the best on I have found:
d55chas3.jpg
 
Last edited by a moderator:
OP
OP

hflphoto

Member
Joined
Apr 30, 2015
Messages
8
Format
4x5 Format
Thanks to everyone for the help. To date I have ordered the replacement rollers from KLH (?) and am waiting for their delivery. So far, I have found that the end caps do indeed screw on. Mine were seized in place, the old different metals unite syndrome (brass and steel)! When I pulled the caps off, the press in fittings stayed on the shaft and were pretty much destroyed getting them off. I have ordered new ones, the minimum order being 25, so if anyone needs any, let me know. Otherwise they'll probably rot on my shelf. When they go back on, ic-racers comment about ant-seize is definitely warranted. I also ordered a gear puller like the one ic-racer has. I am a sucker for new and exciting cool toys! It is starting to make sense how everything goes, and as such the pics posted by ic-racer are making more sense. My next hurdle will be releasing the springs to remove the head from the post. I'm holding off hoping the replacement roller shaft will include more instructions. Any input on this will be appreciated. I admit that I am probably being overly cautious, but being retired on a fixed income, a new enlarger is not in the works, so I do not want to do something that cannot be repaired! Also, I have an Ilford 500 light source on it that I do like. Anyway, I will post more as things happen. Again, thanks to all who have taken time to reply with their helpful responses.
 

John Koehrer

Subscriber
Joined
Apr 3, 2004
Messages
8,276
Location
Aurora, Il
Format
Multi Format
I don't think releasing the springs is a good idea. Look around for the how-to online it's going to save
quite a bit frustration and blood.

The springs have quite a bit of tension and no good way to grip them.
 

ic-racer

Member
Joined
Feb 25, 2007
Messages
16,544
Location
USA
Format
Multi Format
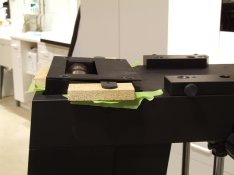
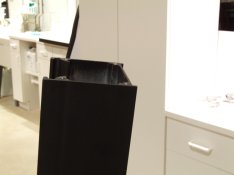
The springs stay attached to the head when the head is removed form the column. This is done by removing the top plate. I protect the top of the head from getting gouged by the top plate with some spacers as the springs are pretty strong. DSCF1753.jpg
 
OP
OP

hflphoto

Member
Joined
Apr 30, 2015
Messages
8
Format
4x5 Format
Thanks! That explains a lot! So as I get the new part I'll post more on my progress.
 
OP
OP

hflphoto

Member
Joined
Apr 30, 2015
Messages
8
Format
4x5 Format
Pulled the head off today. The rubber wheels were totally fragmented! Also pressed in the new threaded inserts into the outside handles. All looking good; just waiting for my cool new gear/wheel puller and new updated shaft. Thinking I might just have this thing knocked! Many thanks going out for all the excellent help. Sad thing is now that I know how to do this, I hopefully will never have to do it again.
 
OP
OP

hflphoto

Member
Joined
Apr 30, 2015
Messages
8
Format
4x5 Format
It lives! Finished the roller rebuild today and it works great! I must say for me purchasing the upgraded shaft with the much improved rollers was worth every cent. The folks at KHB Photografix did a beautiful job in fabricating this piece. If you use your enlarger much or intend to keep it a long time, I recommend this purchase. It's not that difficult a job once you figure out how to do it, but I would prefer to not have to do it again. With this upgrade I believe this will last many years. And if it does ever wear out, you can return it to have new rollers put on. Pretty cool stuff! Once again I'd like to thank everyone for their help, especially ic-racer. Don't know if I would have tried it without the support.
 

ToddB

Member
Joined
Jul 10, 2012
Messages
1,134
Format
Medium Format
I have the same enlarger, and the same problem.. I just push and pull the head manually. Work well that way.

Todd
 
OP
OP

hflphoto

Member
Joined
Apr 30, 2015
Messages
8
Format
4x5 Format
Whatever works for you is perfect, I'm sure. To me, having an enlarger worth probably around $1500 and a Ilford 500 head worth probably another $1000, it was worth the time and $170 investment to have it back to as new. If you ever do decide to do the upgrade, let me know and I can walk you through it. It's not difficult....once you do it!
 

gleaf

Member
Joined
Dec 9, 2012
Messages
273
Location
Kentucky
Format
Large Format
D5500 Rollers - Thank You

Have a D5500 stored after a almost free rescue pick up.
I am very appreciative of this thread.
Thanks to the OP and the contributors.
Time to examine the rollers on the acquisition.
All of the advance help seriously appreciated.:smile:
 
Photrio.com contains affiliate links to products. We may receive a commission for purchases made through these links.
To read our full affiliate disclosure statement please click Here.

PHOTRIO PARTNERS EQUALLY FUNDING OUR COMMUNITY:


Ilford ADOX Freestyle Photographic Stearman Press Weldon Color Lab Blue Moon Camera & Machine
Top Bottom