
A few years back, I read an article about introducing small notches into film holders so you could identify the filmholders by looking at the developed negative. Does anyone remember where this article was printed?
-
Welcome to Photrio!Registration is fast and free. Join today to unlock search, see fewer ads, and access all forum features.Click here to sign up
- Home
- Forums
- Analog Workflow Forums (100% Analog/Traditional)
- Analog Equipment
- Large Format Cameras and Accessories
You are using an out of date browser. It may not display this or other websites correctly.
You should upgrade or use an alternative browser.
You should upgrade or use an alternative browser.
notching film holders
-
A
- Thread starter photobackpacker
- Start date

Recent Classifieds
-
For Sale FS: Linhof Kardan Bi-System 4x5 Camera
- Started by B.S.Kumar
-
For Sale FS: Linhof Kardan Bi-System 5x7 Camera
- Started by B.S.Kumar
-
For Sale FS: Linhof Kardan Bi-System 8x10 Camera
- Started by B.S.Kumar
-
For Sale Contax G2 Body - Minty
- Started by davela
-
For Sale Bronica S-18 Extension Tube for SQ, SQ-A, SQ-B, SQ-Ai system
- Started by mweintraub
Forum statistics
I have no idea where the article was printed, but the concept is pretty simple. Just notch the flap at the bottom of each side of each film holder in a pattern that makes sense to you, and you'll be able to figure out which film was in which holder.
I use a system where notches on the left are counted as 10, one in the very middle is a 5, and notches on the right are single numbers. I can get up to 49 holder sides marked with this system using nothing more than a Dremel tool with a cutting disk. If I need to go beyond that number at some point, I'll just add a wider notch to the left hand edge to count as 50.
I use a system where notches on the left are counted as 10, one in the very middle is a 5, and notches on the right are single numbers. I can get up to 49 holder sides marked with this system using nothing more than a Dremel tool with a cutting disk. If I need to go beyond that number at some point, I'll just add a wider notch to the left hand edge to count as 50.
Mongo said:I have no idea where the article was printed, but the concept is pretty simple. Just notch the flap at the bottom of each side of each film holder in a pattern that makes sense to you, and you'll be able to figure out which film was in which holder.
page 278 in the book 'way beyond monochrome' by lambrecht and woodhouse. isbn o 86343 354 5
method uses marks filed from the sheetfilm holder so that they are exposed. consider it binary notation so that just a few notches can represent a number greater than the number of notches.
http://www.largeformatphotography.info/leaks.html
About half-way down the page there is a description of notching the holders.
About half-way down the page there is a description of notching the holders.
Dimitri said:http://www.largeformatphotography.info/leaks.html
About half-way down the page there is a description of notching the holders.
thanks for that - it is a tidy alternative to binary.
Thanks, Dimitri.
I just took my oldest filmholder and using an X-acto X-153 "v-shaped" gouge, I notched the sides. This worked really well for my Riteway holders and it produced a single "chip" that was easily removed. (I have enough trouble with dust as it is without using the dremel tool.) I will let you know how it works out.
I just took my oldest filmholder and using an X-acto X-153 "v-shaped" gouge, I notched the sides. This worked really well for my Riteway holders and it produced a single "chip" that was easily removed. (I have enough trouble with dust as it is without using the dremel tool.) I will let you know how it works out.
Get 3 needle files a round one a "v" shape one and a thin one. Think of of then as the roman numeral system. Thin file is "I","V" shape is five' round one is ten.
On the flap at the bottom of the holder, file in about a 1/16 of an inch with the proper file or files depending on the number you are putting on that holder.
On the flap at the bottom of the holder, file in about a 1/16 of an inch with the proper file or files depending on the number you are putting on that holder.
blaughn said:Thanks, Dimitri.
I just took my oldest filmholder and using an X-acto X-153 "v-shaped" gouge, I notched the sides. This worked really well for my Riteway holders and it produced a single "chip" that was easily removed. (I have enough trouble with dust as it is without using the dremel tool.) I will let you know how it works out.
Well done. I would never be able to do that (hand not that steady) and it would be difficult to remove the part along with a part of my finger and the associated blood stain.

However, I've been planing to notch a set of holders, not because I'm worried about any leakage, but more for numbering purposes.
As I said, I'm not that good with the gouging knife, so I'll be using my set of needle files to give V, U and square notches (1, 5, 10). I'm not very keen on the I notch since I could confuse it with the square one.
As for the dust and filings, if you start the motion from the holder and move outwards, then most of these should fall on the table and not inside the holder.
[gadget mode on/]
Just something that came to my mind now. Could make sence (and then again...
)If you are still worried about dirt getting in you can also use a welding iron (the one used for fine work). There is a gas operated kit (very cheap) that has something like 4 or 5 different tips (straight, round, knife edged, etc). All one has to do is let it heat up and then press it lightly against the inside of the flap. If done quickly it should not stick on or leave a raised edge.
Havent tried it , but I think I will on one holder and see how it goes. If it works OK, it should be faster than the needle files
[gadget mode off/]
I tried the soldering gun with some success. If you have one of those quick heat-up guns, on many of them you can replace the soldering tip. I used a stiff gauge of piano wire and made a pointed end that allowed very precise application. It worked well but the gouge worked better for me and was quicker.
Good Luck!!
Good Luck!!
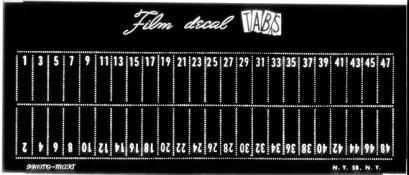
Film Decal TABS
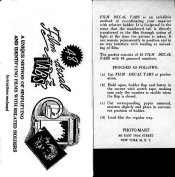
Rather than notching holders, I've used something else that seems to work really nice. They're called Film Decal TABS and were sold by a company called Photo-Mart in NYC. They were small numbers that you could glue into the recesses in most film holders (the Fidelity and Lisco holders have the needed recess). As this is an older item no longer made, I made copies of it using Ilford ortho film, and cut it up, keeping the original intact. I'm attaching a scan of the tabs, along with the envelope it came in, with the instructions.
-Mike
Attachments
Mike, thanks a lot for the idea!
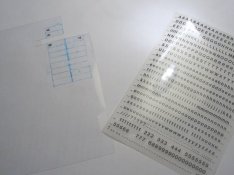
After seeing your system with film decal tabs, I decided to make something like that.
However, making copies using ortho/lith film was not very practical or easily available, so I opted for another system: I got a heavier transparency sheet (thicker than usual), some "Letraset" transfer lettering templates and followed the film decal tab idea. What I did was draw a grid on the transparency and just transfer the numbers from the transfer lettering "thingy"(TM)
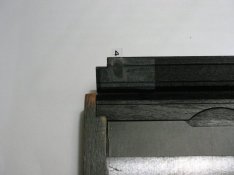
Everything was done in about an hour - and I marked two holders. The tabs are glued to the holders and secured with clear sticky tape.
Another (a bit cleaner) idea, which I might try later, is to use transparencies intended for laser printing - draw the tabs in a drawing program and just print those on the transparency, cut them up and use those... The laser transparencies I found are a bit thinner than the one I used here, though...
It sure is easier and cleaner than filing/carving the notches in holders, particularly if you have older wooden holders (think sawdust!)...
Anyway, the photos are attached.
After seeing your system with film decal tabs, I decided to make something like that.
However, making copies using ortho/lith film was not very practical or easily available, so I opted for another system: I got a heavier transparency sheet (thicker than usual), some "Letraset" transfer lettering templates and followed the film decal tab idea. What I did was draw a grid on the transparency and just transfer the numbers from the transfer lettering "thingy"(TM)
Everything was done in about an hour - and I marked two holders. The tabs are glued to the holders and secured with clear sticky tape.
Another (a bit cleaner) idea, which I might try later, is to use transparencies intended for laser printing - draw the tabs in a drawing program and just print those on the transparency, cut them up and use those... The laser transparencies I found are a bit thinner than the one I used here, though...
It sure is easier and cleaner than filing/carving the notches in holders, particularly if you have older wooden holders (think sawdust!)...
Anyway, the photos are attached.
Attachments
Sorry, I just use QuickLoads - each has a unique number.
roteague said:Sorry, I just use QuickLoads - each has a unique number.
I don't use cut film holders either, I mostly use Grafmatics which also number the sheets for you.
-Mike
Chris at Quality Camera in Atlanta told me to get a set of files designed to sharpen the teeth of chainsaws.
I believe he said they come in a set of 3: round, "V" and square, or something like that.
Next time I go into a hardware store I'll see what's available and report back.
Terry Thomas
Motion Picture Stills Photographer
Atlanta, Georgia USA
----------
See some of my recent stills here: www.psychopathia.com
The tab things that Mike shows work very well. I never purchased them how ever, they are very easy to make with litho film or transparancy stuff for ink jet printers.
| Photrio.com contains affiliate links to products. We may receive a commission for purchases made through these links. To read our full affiliate disclosure statement please click Here. |
PHOTRIO PARTNERS EQUALLY FUNDING OUR COMMUNITY:  |