I'd be interested to learn your reasoning for the degree of difficulty in B&W printing using both digital and darkroom techniques. That's not my experience and I have 10 years plus with digital and 36 years in the darkroom, both at a professional but admittedly not fastidious level.
Printing has been a passion all my life. I took my first photographs in 1961, 53 years ago. My father was a photographer, who worked for Life and Vogue, among many others in the 50's. I was 10 when I worked for him in his darkroom, developing E6 in tanks and making color prints. I went to school for photography, at Pratt Institute, where I got a BA and an MFA. I taught at The Cooper Union and at Parsons in NYC, and a few others. I learned large format in college in the mid 70's and I started printing in platinum after trying a lot of other alt processes. I was one of half a dozen or so people who started the resurgence of platinum. I started a business called Platinum Editions, where I printed, usually in platinum, for a lot of top photographers, including Richard Avedon. After all this time I have some well-formed opinions. I do love a great print, especially in black and white. I am certainly fastidious about it.
These days I've been enjoying making prints with an inkjet printer that are indistinguishable from a platinum print. It takes a careful choice of paper, and mixing one's one b&w inks. I'm also updating my platinum setup with a new 26-1K I just acquired. I think I can say, unequivocally, that making a great, museum level, black and white print takes a lot more doing than the same in color. I'm not talking about just knocking something out, I'm talking about a print that Frederick Evans might be happy with. It takes a lot of iterations, sometimes a very long time, to understand what the image needs to make it come alive.
Those who know me know that I am the Eiger at EigerStudios. I know a lot about scanning, I do scans for a living, on my Aztek Premier. I am all about quality.
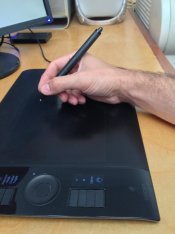
I would also question your advice to a beginner to get a Wacom in order to learn masking and curves. I think tablets, which have their own learning issues, are better introduced when someone has already learned the basics of doing the things they need to do in Photoshop (or any other graphics program) without a tablet.
You are certainly free to disagree, but I stand by this. I have been taught by my tools. I was informed by the extended tonal range of platinum, to see differently. I don't suggest people print on copy paper for a while until they get the hang of it. They won't, because the medium doesn't have the capability yo train. Masking and curves are the most important part of Photoshop for a photographer. I don't bother printing most images until there is a mask or two. I had someone very experienced show me the ropes when I first started. He refused to give me a second lesson until I got a tablet. It worked very well for me. I think he was right.
The question about quality is a key one. If all this person wants to do is make a print, hardly any of this is required. If he is taking snapshots of his family, then a few sliders in some program and he's fine. However, if he is interested in good printing, and a course of continual improvement that's another story...
Lenny


 :cool2:.that's good enough for me;save often losing your work is worse.