Negative is full of Spots

Free deckchairs

A
Free deckchairs

  • 1
  • 0
  • 15
River Eucalyptus

H
River Eucalyptus

  • 0
  • 0
  • 39
Musician

A
Musician

  • 3
  • 0
  • 72

Recent Classifieds

Forum statistics

Threads
199,257
Messages
2,788,702
Members
99,844
Latest member
MariusV
Recent bookmarks
2

djamaro

Member
Joined
Apr 13, 2020
Messages
11
Location
bern
Format
35mm
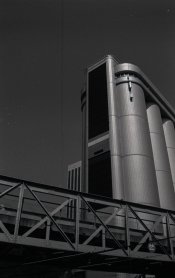
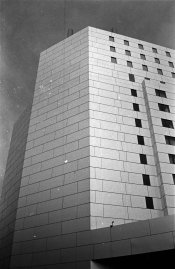
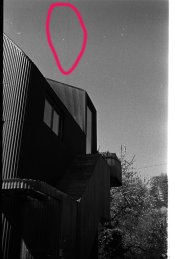
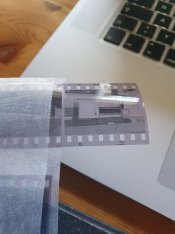
I just startet developing Kodak Tri-X 400 and i have so many Spots on the Image that its almost impossible to retouch. Also i feel that the light in the sky is not even.
Plus in every image i have a black stripe going thru the picture. This darker stripe apears also in the negative.
The film is shot at boxspeed.
I do a prewet for 5min, Rodinal for 7min, Stopbath with just Water, Kodak T-Max Fixer for 4min, Wash for 5min, Photoflo for 30sec.
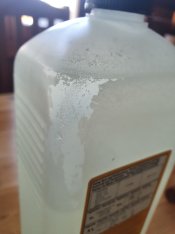
After the negative is dryed i also have a lot of wet marks on the negative.
Having a pretty ruff start to developing black and white.
 

Attachments

  • Image 11.jpg
    Image 11.jpg
    226.3 KB · Views: 1,117
  • Image 13-Bearbeitet.jpg
    Image 13-Bearbeitet.jpg
    420.8 KB · Views: 1,068
  • new.jpg
    new.jpg
    946.2 KB · Views: 1,875

Kodachromeguy

Subscriber
Joined
Nov 3, 2016
Messages
2,057
Location
Olympia, Washington
Format
Multi Format
Hi DJ, I think there are three sources of the spots:
1. Tiny bubbles on the film during development. Try thumping the film can on the counter to dislodge bubble when you start the pre-wash and the developer phases. These may be the perfectly round and white spots.
2. Flecks of dirt or crud in your water. Use fresh distilled water for all chemicals. These may be the irregular flecks.
3. Dust that settles on the wet film when drying. More irregular flecks. Use a clean bag or drying cabinet. Most homes are full of lint, dust, crud, hair, pollen, dandruff, and more.

The dark line: were these examples all vertical format compositions from a focal plane camera (as opposed to leaf shutter)? If so, then the line may be from the focal plane curtains not sealing properly before after exposure.

Good luck. We all go through this type of stuff occasionally.
 

John Bragg

Member
Joined
Nov 29, 2005
Messages
1,039
Location
Cornwall, UK
Format
35mm
Hi DJ, I think there are three sources of the spots:
1. Tiny bubbles on the film during development. Try thumping the film can on the counter to dislodge bubble when you start the pre-wash and the developer phases. These may be the perfectly round and white spots.
2. Flecks of dirt or crud in your water. Use fresh distilled water for all chemicals. These may be the irregular flecks.
3. Dust that settles on the wet film when drying. More irregular flecks. Use a clean bag or drying cabinet. Most homes are full of lint, dust, crud, hair, pollen, dandruff, and more.

The dark line: were these examples all vertical format compositions from a focal plane camera (as opposed to leaf shutter)? If so, then the line may be from the focal plane curtains not sealing properly before after exposure.

Good luck. We all go through this type of stuff occasionally.
What he said, also the black line can be from a squeegee blade and you may have some precipitation forming in your fix which causes silver crystals to adhere to the film and is well nigh impossible to remove. Is it fresh or do you share chems with anyone else ?
 
OP
OP

djamaro

Member
Joined
Apr 13, 2020
Messages
11
Location
bern
Format
35mm
Hi DJ, I think there are three sources of the spots:
1. Tiny bubbles on the film during development. Try thumping the film can on the counter to dislodge bubble when you start the pre-wash and the developer phases. These may be the perfectly round and white spots.
2. Flecks of dirt or crud in your water. Use fresh distilled water for all chemicals. These may be the irregular flecks.
3. Dust that settles on the wet film when drying. More irregular flecks. Use a clean bag or drying cabinet. Most homes are full of lint, dust, crud, hair, pollen, dandruff, and more.

The dark line: were these examples all vertical format compositions from a focal plane camera (as opposed to leaf shutter)? If so, then the line may be from the focal plane curtains not sealing properly before after exposure.

Good luck. We all go through this type of stuff occasionally.

Thanks for the good reply.

1. I do thump the can on the counter after every step cause i know of the bubbles. usualy i tap it like three times before putting down.

2. Yeah i mixed my chemicals with tap water. We have really clean water in switzerland so i was thinking i can use that. but for the rince tap water would be fine yes?

3. i will try my bathroom nexttime. dont have the space for a cabinet.

Yes they are all verticals from my new Leica M6 that i got from a guy two weeks a go. From the outside the cam looks new and he said he almost never used it.
 
OP
OP

djamaro

Member
Joined
Apr 13, 2020
Messages
11
Location
bern
Format
35mm
What he said, also the black line can be from a squeegee blade and you may have some precipitation forming in your fix which causes silver crystals to adhere to the film and is well nigh impossible to remove. Is it fresh or do you share chems with anyone else ?

Yeah i do use a squeege before i hang my negatives.

i bought the fixer 1 month ago and i just open the bottle. i just noticed that the liquid inside is not very clean and theres also stuff on the botom. the bottle expires in one month.
 

Attachments

  • 93220990_538144536845633_1061730277941837824_n.jpg
    93220990_538144536845633_1061730277941837824_n.jpg
    168 KB · Views: 148
  • 93705380_219273142638844_9114923554285027328_n.jpg
    93705380_219273142638844_9114923554285027328_n.jpg
    258.5 KB · Views: 147

koraks

Moderator
Moderator
Joined
Nov 29, 2018
Messages
23,521
Location
Europe
Format
Multi Format
White spots/specks: dust/crud on your film. Usual causes (I repeat some of the tings already said above):
* Dust settling onto film as it dries
* Dirt in wash water
* Specks of metallic silver in fixer becoming embedded into emulsion (filter fixer before re-use or mix fresh)
* Dust on film or scanner platen during digitization

Dark band:
* Usually associated with a scanner issue; e.g. on a flatbed scanner, contamination of the calibration area, or on the strip light source or sensor.
* Fluid dynamics during rotary processing; i.e. laminar flow instead of turbulent flow. Change rotation speed, tap tank to dislodge air bubbles.
* Film manufacturing defect (rare, but it happens)
It's not a squeegee band; those generally show up as sharp lines, somewhat wavy, and white instead of black on the positive.
Check the film itself to see if it is in fact an area of reduced density. If it's not visible on the film itself, it's a scanning artefact.

BTW: your film looks underexposed and possibly also underdeveloped judging by these scans.
 
OP
OP

djamaro

Member
Joined
Apr 13, 2020
Messages
11
Location
bern
Format
35mm
White spots/specks: dust/crud on your film. Usual causes (I repeat some of the tings already said above):
* Dust settling onto film as it dries
* Dirt in wash water
* Specks of metallic silver in fixer becoming embedded into emulsion (filter fixer before re-use or mix fresh)
* Dust on film or scanner platen during digitization

Dark band:
* Usually associated with a scanner issue; e.g. on a flatbed scanner, contamination of the calibration area, or on the strip light source or sensor.
* Fluid dynamics during rotary processing; i.e. laminar flow instead of turbulent flow. Change rotation speed, tap tank to dislodge air bubbles.
* Film manufacturing defect (rare, but it happens)
It's not a squeegee band; those generally show up as sharp lines, somewhat wavy, and white instead of black on the positive.
Check the film itself to see if it is in fact an area of reduced density. If it's not visible on the film itself, it's a scanning artefact.

BTW: your film looks underexposed and possibly also underdeveloped judging by these scans.


I see this line allready in the negatiive so it cant be the scaner.
this line appears in all 3 differnt films i used. Portra, Hp5 and tri-x

for development i used the times on massive dev chart that states 7min development with a dilution of 1+25

in the picture you see how the negative looks
 

Attachments

  • 93373793_268703647459747_1444217757263462400_n.jpg
    93373793_268703647459747_1444217757263462400_n.jpg
    271.4 KB · Views: 204

koraks

Moderator
Moderator
Joined
Nov 29, 2018
Messages
23,521
Location
Europe
Format
Multi Format
The negative looks rather thin, mostly due to underexposure. Then again, exposure is also a bit of a matter of taste, but personally, I like a bit (much) more shadow detail. Development looks OK.

Do you use a jobo/rotation processor? I've had a similar dark/low density band show up on some films as well when using one. It went away when I (1) developed the old-fashioned manual way using a paterson tank and (2) when I used a different developer (I got the problem with Pyrocat but it didn't manifest itself with XTOL for some odd reason). It's an elusive issue and I thought it was a film manufacturing defect until I had the same problem emerge with an entirely different film stock. Oddly the dark band was always in exactly the same place, suggesting it's associated with the fluid dynamics and the shape of the development reels.

Edit: BTW, I reported this thread with the question to move it to the B&W forum as this is not really about color. Don't freak out if your thread disappears in the color forum! :smile:
 

Agulliver

Member
Joined
Oct 11, 2015
Messages
3,582
Location
Luton, United Kingdom
Format
Multi Format
Try getting distilled or dionised water though I have always used tap water here in the UK and never had any issues at all. The irregular specks don't look like holes in the emulsion so they almost certainly are particles...either introduced during development or when drying. I often blow my negatives with an air blower after loading them into the negative carrier for my scanner. I also dry my films in the bathroom by hanging from the shower curtain rail...the relatively high humidity actually helps prevent dust and other particles.

It's worth checking all your chemicals to see if there are any particles or crud in them and filtering if necessasry. I have had little particles settle at the bottom of my developer and fixer in the past, if you shake up your chem bottles before use any particles which had settled will now be mixed through the liquid.
 

John Bragg

Member
Joined
Nov 29, 2005
Messages
1,039
Location
Cornwall, UK
Format
35mm
Yeah i do use a squeege before i hang my negatives.

i bought the fixer 1 month ago and i just open the bottle. i just noticed that the liquid inside is not very clean and theres also stuff on the botom. the bottle expires in one month.
Sounds like you found the culprit then. Ditch the exhausted fixer and replace with fresh in a pristine bottle. Just finish off with a final rinse in Photoflow after washing, NO SQUEEGEE, and vigorously shake the drips off before removing from the reel to hang up in a dust free environment (I use a shower cubicle). FWIW, look into using the Ilford washing method. Quick and very effective. Good luck.
 

David A. Goldfarb

Moderator
Moderator
Joined
Sep 7, 2002
Messages
19,974
Location
Honolulu, HI
Format
Large Format
Another moderator moved the thread to the B&W forum, and I removed the word "scan" from the title, since this is a film processing issue, not a scanning issue, which would have put it into the hybrid scanning forum.
 
OP
OP

djamaro

Member
Joined
Apr 13, 2020
Messages
11
Location
bern
Format
35mm
The negative looks rather thin, mostly due to underexposure. Then again, exposure is also a bit of a matter of taste, but personally, I like a bit (much) more shadow detail. Development looks OK.

Do you use a jobo/rotation processor? I've had a similar dark/low density band show up on some films as well when using one. It went away when I (1) developed the old-fashioned manual way using a paterson tank and (2) when I used a different developer (I got the problem with Pyrocat but it didn't manifest itself with XTOL for some odd reason). It's an elusive issue and I thought it was a film manufacturing defect until I had the same problem emerge with an entirely different film stock. Oddly the dark band was always in exactly the same place, suggesting it's associated with the fluid dynamics and the shape of the development reels.

Edit: BTW, I reported this thread with the question to move it to the B&W forum as this is not really about color. Don't freak out if your thread disappears in the color forum! :smile:

No i do it with the patterson tank by hand. so when the negative looks thin i should develop it for longer?

I have the Problem with the Stripe with color and black and white. the really messy picture just with black and white.
 
OP
OP

djamaro

Member
Joined
Apr 13, 2020
Messages
11
Location
bern
Format
35mm
Another moderator moved the thread to the B&W forum, and I removed the word "scan" from the title, since this is a film processing issue, not a scanning issue, which would have put it into the hybrid scanning forum.

Top, sorry for the wrong placement
 

koraks

Moderator
Moderator
Joined
Nov 29, 2018
Messages
23,521
Location
Europe
Format
Multi Format
No i do it with the patterson tank by hand. so when the negative looks thin i should develop it for longer?
Thin negatives can point towards insufficient exposure or insufficient development, or both. Going by the photograph in post #7, I would say that development is OK, but the images are underexposed.
This, of course, is not related to the problem with the dark band.

I have the Problem with the Stripe with color and black and white. the really messy picture just with black and white.
The messy problems with B&W combined with the very messy/sulfured-out fixer concentrate implies that it's worthwhile trying some fresh fixer first.

The dark band is a challenging problem. It doesn't look like squeegee damage to me; as I said before, squeegees tend to leave sharply defined scratches on the film that show up as white lines, usually not perfectly straight, on scans and prints. This is a softer, perfectly straight band that shows up as dark on the positive.
 
OP
OP

djamaro

Member
Joined
Apr 13, 2020
Messages
11
Location
bern
Format
35mm
Thin negatives can point towards insufficient exposure or insufficient development, or both. Going by the photograph in post #7, I would say that development is OK, but the images are underexposed.
This, of course, is not related to the problem with the dark band.


The messy problems with B&W combined with the very messy/sulfured-out fixer concentrate implies that it's worthwhile trying some fresh fixer first.

The dark band is a challenging problem. It doesn't look like squeegee damage to me; as I said before, squeegees tend to leave sharply defined scratches on the film that show up as white lines, usually not perfectly straight, on scans and prints. This is a softer, perfectly straight band that shows up as dark on the positive.


I just ordered new Fixer and will try it with that again.

Also i just sent my camera to Leica for a CLA.
 

koraks

Moderator
Moderator
Joined
Nov 29, 2018
Messages
23,521
Location
Europe
Format
Multi Format
I just ordered new Fixer and will try it with that again.

Also i just sent my camera to Leica for a CLA.
Sounds good. BTW, nothing indicates to me that your camera needs a CLA. If images come out underexposed, it's in 99.9% of the cases a problem with actually using the light meter/camera, and not a defective piece of equipment. The meter in the M6 is of a quasi-spot type (Canon calls this 'partial' metering) and in the kind of shots you have posted here, would easily be thrown off by reflections on shiny objects or light/white parts of the scene. It's not a fault of the camera; it's a matter of using it with an understanding of how it works and what its limitations are.
 
OP
OP

djamaro

Member
Joined
Apr 13, 2020
Messages
11
Location
bern
Format
35mm
Sounds good. BTW, nothing indicates to me that your camera needs a CLA. If images come out underexposed, it's in 99.9% of the cases a problem with actually using the light meter/camera, and not a defective piece of equipment. The meter in the M6 is of a quasi-spot type (Canon calls this 'partial' metering) and in the kind of shots you have posted here, would easily be thrown off by reflections on shiny objects or light/white parts of the scene. It's not a fault of the camera; it's a matter of using it with an understanding of how it works and what its limitations are.

I think it makes me sleep better when i now it got checked from leica cause i just bought it secondhand. yeah i kown how the lightmeter on the leica works but maybe i still meter wrong. a lot of times i do architecture like in the image you saw. how would you take the reading? different readings and then somewhere in the middle? or metering the ground?
 

koraks

Moderator
Moderator
Joined
Nov 29, 2018
Messages
23,521
Location
Europe
Format
Multi Format
different readings and then somewhere in the middle? or metering the ground?
Yeah, either of those approaches, whichever would work in a particular given situation:
* Meter some extremes and then average them, placing emphasis on the important shadows (when using negative film)
* Meter an important/crucial shadow area and base the exposure entirely on it, e.g. by underexposing that area -1/2 or -1.
* Choose a surface that seems to represent 'average'/'18% grey' and meter that. Out of the 3 options, this one is my least favorite as I find I tend to choose too light areas as 'grey'. It's a subjective thing/failure on my part.
 
OP
OP

djamaro

Member
Joined
Apr 13, 2020
Messages
11
Location
bern
Format
35mm
Yeah, either of those approaches, whichever would work in a particular given situation:
* Meter some extremes and then average them, placing emphasis on the important shadows (when using negative film)
* Meter an important/crucial shadow area and base the exposure entirely on it, e.g. by underexposing that area -1/2 or -1.
* Choose a surface that seems to represent 'average'/'18% grey' and meter that. Out of the 3 options, this one is my least favorite as I find I tend to choose too light areas as 'grey'. It's a subjective thing/failure on my part.

thanks for the tips
 

wahiba

Member
Joined
Mar 19, 2004
Messages
190
Location
Keighley, UK
Format
Analog
If you are reusing fixer as I do I suffered this problem and discovered it was possibly bits of silver in used fixer. On forum here I think. So I tried filtering fixer through a coffee paper filter in a plastic funnel. Worked. OK, still get odd dust or squeegee marks but on screen spotting solves them. I reckon marks needing spotting out have reduced by around 90% since I started filtering fixer.
 

Wallendo

Subscriber
Joined
Mar 23, 2013
Messages
1,409
Location
North Carolina
Format
35mm
I have had shutter-related streaking with a Leica IIIc I bought on eBay. This only was noticeable with TX400. After much investigation, i discovered that the streaking only occurred at high shutter speeds, which explained why I didn't see the problem with Fp4+. After having the shutter cloth replaced, the camera works great with no more bands.

If the streaking occurs in the same place on three different brands of film, I suspect the shutter is the issue causing the band. When you get the camera back, we will know for sure.

Are you using fresh film. There appears to be a little bit of fogging on the images edges, especially in the 2d photo you posted.. It reminds me of images I have gotten from old Tri-X, shutter issues or development issues could also be at fault.
 
OP
OP

djamaro

Member
Joined
Apr 13, 2020
Messages
11
Location
bern
Format
35mm
Ok guys. the cam is back from the cla. the guy said that the lightmeter was extremly off and it underexposed by a lot. they couldnt film test the cam but they pollished the inside and that should get rid of any streaks.
Meanwhile i filtered the fixer. used just one drop of photoflo at the end and stopped using the squeege.
the new result got rid of all the nasty stuff on the negative but the STREAK IS STILL THERE.
 

koraks

Moderator
Moderator
Joined
Nov 29, 2018
Messages
23,521
Location
Europe
Format
Multi Format
The streak has in my opinion two possible causes (out of a wider range of more improbable ones):
1. A a development-related issue
2. A scanning-related issue

You indicated before that #2 is ruled out because the streak is also visible in the negatives themselves; could you perhaps photograph an affected negative on a light box (or against a bright window) showing the defect in the film?

As to #1: how do you develop this film exactly? You gave some process specifications, but perhaps you can tell a bit more about equipment used etc. Some more details may help.

This is a very challenging one to troubleshoot however.
 
OP
OP

djamaro

Member
Joined
Apr 13, 2020
Messages
11
Location
bern
Format
35mm
i cant really give you more info about the developing prozess cause what i stated is all i do. here a negative that shows the streak.
 

Attachments

  • 94318677_278880259804399_7810178288659202048_n.jpg
    94318677_278880259804399_7810178288659202048_n.jpg
    513.4 KB · Views: 145
Photrio.com contains affiliate links to products. We may receive a commission for purchases made through these links.
To read our full affiliate disclosure statement please click Here.

PHOTRIO PARTNERS EQUALLY FUNDING OUR COMMUNITY:


Ilford ADOX Freestyle Photographic Stearman Press Weldon Color Lab Blue Moon Camera & Machine
Top Bottom