Minox shutter blades repair?

Lacock Abbey detail

A
Lacock Abbey detail

  • 0
  • 1
  • 10
Tyndall Bruce

A
Tyndall Bruce

  • 0
  • 0
  • 35
TEXTURES

A
TEXTURES

  • 4
  • 0
  • 61
Small Craft Club

A
Small Craft Club

  • 2
  • 0
  • 55
RED FILTER

A
RED FILTER

  • 1
  • 0
  • 47

Recent Classifieds

Forum statistics

Threads
198,905
Messages
2,782,818
Members
99,743
Latest member
HypnoRospo
Recent bookmarks
0
OP
OP
tjwspm

tjwspm

Subscriber
Joined
Dec 23, 2023
Messages
338
Location
Germany
Format
Sub 35mm
Duplicity of events.

My spare part Minox B (42 Euros) arrived last Friday. It is also very well preserved. I installed blades, springs and tensioning rod in the Minox A and it's working very well so far. All I had to do was readjust the spring on the tensioning rod that drives the image counter. Then this also worked.

Since I still have a not so good Minox B, I will probably install the missing parts from there into the new B. Let's see...
 
OP
OP
tjwspm

tjwspm

Subscriber
Joined
Dec 23, 2023
Messages
338
Location
Germany
Format
Sub 35mm
The Minox - designed to fit in one hand
Minox A IIIs F.jpg
 

qqphot

Subscriber
Joined
Jul 12, 2022
Messages
221
Location
San Francisco, CA, USA
Format
35mm RF
park.jpg


My parts camera seems to be working pretty respectably too. Will try some slow film today.

How difficult was it to access the spring and tensioning rod to get the frame counter working?
 
OP
OP
tjwspm

tjwspm

Subscriber
Joined
Dec 23, 2023
Messages
338
Location
Germany
Format
Sub 35mm
My parts camera seems to be working pretty respectably too. Will try some slow film today.
How difficult was it to access the spring and tensioning rod to get the frame counter working?
Very good image quality. Which film did you use?

Repairing the frame counter was relatively easy. However, I had to open the camera again and pull out the tensioning rod and blades again to get to the spring.
When assembled, the tensioning rod moves to the left when the camera is pushed together. Shortly before the end, the hook of the spring engages in a tooth gap and thereby rotates the toothed disc by exactly one division. The spring slides upwards through elastic deformation in order to be able to follow the tooth gap.
In order to restore engagement with the toothed washer, I had to bend the spring slightly upwards.

01.jpg

02.jpg
03.jpg
 
Last edited:

qqphot

Subscriber
Joined
Jul 12, 2022
Messages
221
Location
San Francisco, CA, USA
Format
35mm RF
Very good image quality. Which film did you use?

Repairing the frame counter was relatively easy. However, I had to open the camera again and pull out the tensioning rod and blades again to get to the spring.
When assembled, the tensioning rod moves to the left when the camera is pushed together. Shortly before the end, the hook of the spring engages in a tooth gap and thereby rotates the toothed disc by exactly one division. The spring slides upwards through elastic deformation in order to be able to follow the tooth gap.
In order to restore engagement with the toothed washer, I had to bend the spring slightly upwards.

View attachment 358616
View attachment 358617 View attachment 358618


Thanks! These are excellent illustrations! I was afraid of having to remove the toothed disc and focus knob and then deal with having to get all that reassembled without disturbing focus adjustment. This is much easier.


My sample picture was on Delta 100 developed in TMax dev, which is really not bad considering the tiny size of the negative. I'm trying some RPX25 today to see how that looks.
 

qqphot

Subscriber
Joined
Jul 12, 2022
Messages
221
Location
San Francisco, CA, USA
Format
35mm RF
bldg.jpg

I've had this new IIIs apart to clean it up and un-gunk the old lubricant etc. It seems to be overexposing and started leaving a strip of less exposure across the bottom of the frame. Not sure how that even happens with a shutter like this. But anyway, there's clear signs the shutter blades have seen some minor damage as they've got a bit of waviness, so I'll probably replace them as well as those of the other camera when blades are available. Still works, at any rate.

This is Rollei RPX-25 (which is supposed to be more or less the same as the old agfa APX25 but who knows) developed in TMax 1+9. Excuse my finger obstructing part of the lens :smile:
 
Last edited:
OP
OP
tjwspm

tjwspm

Subscriber
Joined
Dec 23, 2023
Messages
338
Location
Germany
Format
Sub 35mm
I was afraid of having to remove the toothed disc and focus knob and then deal with having to get all that reassembled without disturbing focus adjustment. This is much easier.
In fact, you don't even have to remove the cover. I took the pictures of an old Minox B that was completely open anyway.

By the way, how do you develop your Minox films? Do you have a Minox developing tank? And then how do you digitize the negatives?
 

qqphot

Subscriber
Joined
Jul 12, 2022
Messages
221
Location
San Francisco, CA, USA
Format
35mm RF
In fact, you don't even have to remove the cover. I took the pictures of an old Minox B that was completely open anyway.

By the way, how do you develop your Minox films? Do you have a Minox developing tank? And then how do you digitize the negatives?

I'm developing them using these reels: https://www.etsy.com/listing/1267661458/minox-8x11-film-dev-reel-paterson-fit

They're meant for a paterson tank (there's a jobo version too) but fit in steel cans too. They're absolutely great, easiest way I've found to load and process minox film. Very easy to load even long rolls into. Only possible issue is they're 3D printed and slightly porous so they stain a bit and probably need to be washed well.

To digitize, I cut the strips and wet-mount them on glass with a mylar overlay sheet, which holds them perfectly flat, then photograph them on a Skier Sunray light box (http://www.skier.com.tw/web/shop/shop_in.jsp?pd_id=PD1599466967388 - the light source is great but don't bother with the film carriers, they're junk) using a Sony A7r5 with a Sigma 70mm macro lens at about f/8, with an opaque plastic mask I cut out to do one frame at a time in the center of the digital camera's frame.

This gives about 3000 by 2000 pixels for a full minux frame, which is probably mostly enough. At 1:1 you can see the film grain is imaged pretty clearly even with fine grain films.

The wet mounting is kind of a pain but I do various other odd formats like 127 as well so everything's at hand anyway. And it completely eliminates any question of film flatness, and hides film scratches very well too, plus you can image the entire frame with borders.

After that I import them to lightroom, crop to the image borders, and use Negative Lab Pro to invert and save to tiff, and do minor cleanup and adjustment in lightroom.
 
OP
OP
tjwspm

tjwspm

Subscriber
Joined
Dec 23, 2023
Messages
338
Location
Germany
Format
Sub 35mm
I've had this new IIIs apart to clean it up and un-gunk the old lubricant etc. It seems to be overexposing and started leaving a strip of less exposure across the bottom of the frame. Not sure how that even happens with a shutter like this.
Yes, my Minox A also exposes one f-stop too long. Today I finished building my device for measuring Minox shutter speeds and I discovered that.

Maybe I'll start a new thread about the measurements...
 
OP
OP
tjwspm

tjwspm

Subscriber
Joined
Dec 23, 2023
Messages
338
Location
Germany
Format
Sub 35mm
If you are interested in measuring shutter speeds on Minox cameras, you will find a new post from me here:
 

qqphot

Subscriber
Joined
Jul 12, 2022
Messages
221
Location
San Francisco, CA, USA
Format
35mm RF
So I've just swapped the tensioning rod, springs, and shutter blades from a B into my IIIs with ruined springs. It mostly works, but I suspect there are small differences in the shape of the tensioning rod between the two models - when the camera is open, the shutter opening isn't perfectly centered in the case cutout. It's not enough to vignette, but it's visible, and with a little pressure it slips to half-closed, which it didn't with the original parts. (or i screwed something up reassembling, also possible)

The other thing I'm seeing is that this IIIs is out of focus at infinity. It's perfect at close distances measured with the chain, so I suspect there's some infinity stop misaligned or someth ing, rather than focus being wrong overall.I know these are not optimal for infinity but the other IIIs i have is much sharper at infinity while still being accurate up close.

inf.jpg 18inches.jpg
 
OP
OP
tjwspm

tjwspm

Subscriber
Joined
Dec 23, 2023
Messages
338
Location
Germany
Format
Sub 35mm
Can you upload a photo of the open shutter? As you know I also used these Minox B parts and the lens is completely visible.

As for the blurriness when set to infinity. Have you completely opened the camera housing? I mean whether you removed the control cover. If so, could it be that the distance adjustment wheel came loose? This happens easily if you don't hold on to it all the time. Then it loses connection to the lens and if you're unlucky, the focus setting is lost.
 

qqphot

Subscriber
Joined
Jul 12, 2022
Messages
221
Location
San Francisco, CA, USA
Format
35mm RF
Can you upload a photo of the open shutter? As you know I also used these Minox B parts and the lens is completely visible.

As for the blurriness when set to infinity. Have you completely opened the camera housing? I mean whether you removed the control cover. If so, could it be that the distance adjustment wheel came loose? This happens easily if you don't hold on to it all the time. Then it loses connection to the lens and if you're unlucky, the focus setting is lost.

It's possible, but as I mentioned the focus is very accurate at close distances, where depth of field is smaller and focusing is even more critical. If the distance wheel became uncoupled I think focus would be inaccurate at closer distances.

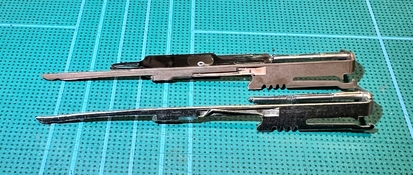
Sorry, I should have thought to take a picture before I put both tensioning rods back in the cameras they came from. But here is a picture of both tensioning rods side by side. The top is from the B, the bottom is from the IIIs. You can see they're shaped a bit differently, either by design or from wear. When I swapped them back, the IIIs shell opening aligns more exactly with the shutter opening again.
IMG_8876.jpg

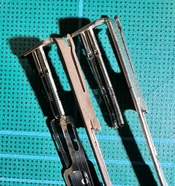
Also: just as a silly experiment, and because there's not much to lose, I decided to trim and reshape the stretched and non-working springs in the IIIs and try to put them back. They are originally 12mm long in relaxed state, and had stretched to 19mm. I cut them back to 12mm, shaped new ends, and reattached the blades. I certainly did not expect this to work at all, but surprisingly it did, and the shutter functions normally now. I can't imagine it will do so for long, but maybe it will last until April when I can get real replacements.
IMG_8879.jpg

Now I would like to figure out how to open and dismantle the B's exposure meter housing, as the camera is basically unused but the meter movement is jammed.
 
OP
OP
tjwspm

tjwspm

Subscriber
Joined
Dec 23, 2023
Messages
338
Location
Germany
Format
Sub 35mm
Congratulations!

That was certainly a very delicate work with the feathers. By the way, I think it will last a long time. I can't imagine what would wear out or break. The springs are extremely tough.

But it would be interesting to see what shutter speeds the camera has now. Can you measure that? Or better yet, do some exposure tests with film?
 

qqphot

Subscriber
Joined
Jul 12, 2022
Messages
221
Location
San Francisco, CA, USA
Format
35mm RF
I think the problem is that with a substantial fraction of the spring removed, the remaining part is being stretched too much, perhaps to the point of deformation or at least to where it's behaving less linearly. At any rate, exposure times seem to be fine, but there's an overexposed band across each frame, varying in intensity depending on shutter speed.

band.jpg

I didn't measure exposure time directly but the exposures were consistent and looked very close to film shot in the other camera with an intact shutter.

Maybe the shutter is dragging on something, or maybe the weird springs are causing a problem, but at any rate I'm not going to fiddle much further with this, I was amazed it worked at all. I'll wait until I can get real replacements. The focus is still not great on this camera, also, but I really don't want to take apart the focusing mechanism because I have no faith in being able to get it calibrated accurately afterward.
 
Photrio.com contains affiliate links to products. We may receive a commission for purchases made through these links.
To read our full affiliate disclosure statement please click Here.

PHOTRIO PARTNERS EQUALLY FUNDING OUR COMMUNITY:


Ilford ADOX Freestyle Photographic Stearman Press Weldon Color Lab Blue Moon Camera & Machine
Top Bottom