Minox shutter blades repair?

Recent Classifieds

Forum statistics

Threads
198,044
Messages
2,768,779
Members
99,542
Latest member
berznarf
Recent bookmarks
0

tjwspm

Member
Joined
Dec 23, 2023
Messages
314
Location
Germany
Format
Sub 35mm
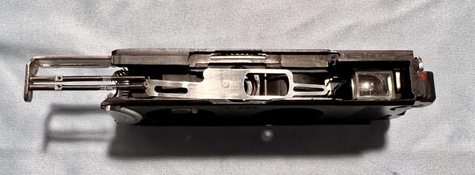
Does anyone have experience repairing a Minox shutter? I am in the process of changing the blades of a Minox A because they are blocked.
I opened the housing so that the guide of the blades is accessible. I was able to pull out the top blade, but the other one is stuck.

Does anyone have an idea how to get the blade out?
 
OP
OP
tjwspm

tjwspm

Member
Joined
Dec 23, 2023
Messages
314
Location
Germany
Format
Sub 35mm
Yes, of course 😊

IMG_20231228_173850.jpg

IMG_20231228_173944.jpg


As you can see in the second picture, I have already pulled out one blade using the tension spring. I can't do the second one. Even if I pull the spring harder, nothing moves.
 
Joined
Jul 31, 2012
Messages
3,315
Format
35mm RF
You have to get the screws out behind the two holes then take apart the channel they ride in.

Poke a hole in the blade to access the screws. When you take apart the channel be very careful with the tabs that are bent over which hold it together. Only bend them enough to get the blade out. You don't want to break them. Clean the inside of the channel as well since the blades are supposed to be run dry, no lube. If someone put lube in there and you don't clean it out then you will be right back where you started with jammed blades.

Hope that helps.
 

qqphot

Subscriber
Joined
Jul 12, 2022
Messages
200
Location
San Francisco, CA, USA
Format
35mm RF
I'm in the middle of trying to do this as well. I've got the blades out, but maybe you'll come to this problem next - I can't figure out which blade goes on top and how to attach the springs to them so they travel freely in the channels. They get stuck when the junction of spring and blade reaches the tube-shaped channel because it's not a smooth fit. The one time I've managed to get them to seem like they were ok, the blades didn't fully open when it fired. No physical damage to them though.
 
OP
OP
tjwspm

tjwspm

Member
Joined
Dec 23, 2023
Messages
314
Location
Germany
Format
Sub 35mm
I'm in the middle of trying to do this as well. I've got the blades out, but maybe you'll come to this problem next - I can't figure out which blade goes on top and how to attach the springs to them so they travel freely in the channels. They get stuck when the junction of spring and blade reaches the tube-shaped channel because it's not a smooth fit. The one time I've managed to get them to seem like they were ok, the blades didn't fully open when it fired. No physical damage to them though.

The blade with the engraved circle is the lower one, i.e. the one that points towards the lens.
Regarding your second question, do you mean this area?
P1070904.jpg
 
Last edited:
OP
OP
tjwspm

tjwspm

Member
Joined
Dec 23, 2023
Messages
314
Location
Germany
Format
Sub 35mm
qqphot,
the connection between spring and blade never leaves the channel. In the following pictures you can see the blades in the position when the shutter is cocked. After triggering, the blades slide to the left.
Lower blade, cocked position:
IMG_20231229_085811.jpg


Bothe blades, cocked position:
IMG_20231229_085919.jpg


As far as the connection between blade and spring is concerned, I took another picture through the magnifying glass. It's all tiny.
Spring - blade connection:
IMG_20231229_090415.jpg
 

qqphot

Subscriber
Joined
Jul 12, 2022
Messages
200
Location
San Francisco, CA, USA
Format
35mm RF
This info is really very helpful! Thank you very much for the photos, too. After some investigation it seems to me that the springs and blades are assembled correctly, and the channel in the guide is free of obstructions, but the springs are stretched out so that they aren't able to pull the blades the correct distance. This is the case even with the guide removed entirely. So I think the springs are just shot and need to be replaced.
 

Attachments

  • spring.jpg
    spring.jpg
    53.9 KB · Views: 48
OP
OP
tjwspm

tjwspm

Member
Joined
Dec 23, 2023
Messages
314
Location
Germany
Format
Sub 35mm
You have to get the screws out behind the two holes then take apart the channel they ride in.

Poke a hole in the blade to access the screws. When you take apart the channel be very careful with the tabs that are bent over which hold it together. Only bend them enough to get the blade out.

Patrick, thanks for the tip. I did it like this and now the damage looks like this (the damage to the right side only occurred when the screw was loosened):
P1080041.jpg P1080043.jpg

I have no idea how that could have happened. My first thought was that the eyelet hit the retaining pin. But I checked that. When pushed together, the pin only goes up when the eyelet is pushed over it correctly. I simulated that. This is the position when the pin comes straight up:
P1080044.jpg
 

guangong

Member
Joined
Sep 10, 2009
Messages
3,589
Format
Medium Format
I am not inclined to do repairs, but as a long, long time Minox user, I found this discussion fascinating. Although there are drawings of shutters, this is the first time I have seen actual photographs of the shutters. I am even more impressed by these cameras.
A camera store was at bus stop where I waited to go to university in mid 1950s. Minox camera’s were displayed in window, but as I remember, incredibly expensive compared to other cameras on display. These photos show why.
 
OP
OP
tjwspm

tjwspm

Member
Joined
Dec 23, 2023
Messages
314
Location
Germany
Format
Sub 35mm
I am not inclined to do repairs, but as a long, long time Minox user, I found this discussion fascinating. Although there are drawings of shutters, this is the first time I have seen actual photographs of the shutters. I am even more impressed by these cameras.
A camera store was at bus stop where I waited to go to university in mid 1950s. Minox camera’s were displayed in window, but as I remember, incredibly expensive compared to other cameras on display. These photos show why.

That's really a very long time!

I've been taking photos for over 50 years, but I've only had the Minox since the beginning of this year. It's fascinating to take photos with these tiny, precise cameras.
I also missed photos of the inner workings of the Minox shutter on the internet, so I recently made a photo documentation for myself. Maybe I'll upload it here if that's of interest.
 

popdoc

Subscriber
Joined
Jul 14, 2015
Messages
25
Location
Virginia
Format
Large Format
Once you’ve had a minox in your pocket, you’ll always have a minox in your pocket!

Shooting with them, and have provided some of my most favorite images, for 50 years!
 

qqphot

Subscriber
Joined
Jul 12, 2022
Messages
200
Location
San Francisco, CA, USA
Format
35mm RF
I've discovered that "MinoxDoc" still sells replacement shutter blades and springs (my blades are fine but the springs are destroyed, alas.) -- but the bad news is I contacted him today and he said he and his wife are vacationing and won't be home until April! I may look around for a broken camera as a parts source in the meantime.
 
OP
OP
tjwspm

tjwspm

Member
Joined
Dec 23, 2023
Messages
314
Location
Germany
Format
Sub 35mm
Lucky guy! The parts from Minoxdoc are relatively cheap, but shipping to Germany and customs costs more than the parts themselves.

I just got a cheap Minox B as a spare part. I will not only use the blades and springs but also change the guide plate because then I will have a unit that works overall.
 
OP
OP
tjwspm

tjwspm

Member
Joined
Dec 23, 2023
Messages
314
Location
Germany
Format
Sub 35mm
However, I'm still wondering what happened to my blades.
P1080043.jpg
I have a bad feeling about just replacing them and then immediately having the same damage again.
 
OP
OP
tjwspm

tjwspm

Member
Joined
Dec 23, 2023
Messages
314
Location
Germany
Format
Sub 35mm
Were both of the springs intact when you took it apart?

Don’t forget to save the bumpers that go inside the springs.

Yes, both springs were intakt and and hooked onto the tensioning rod and the blades. The bumpers were in the springs. But I will use blades, springs, bumpers, guide plate and even the tensioning rod from the spare parts camera (a Minox B) so that the whole unit stays together.


Before the damage happened, I had fired the shutter several times. Everything went perfectly. Then suddenly the camera could no longer be pushed all the way together. After that one blade was blocked.

Maybe the end of the blade was bent ever slightly and got stuck in the groove:
P1080043.jpg


But I'm not entirely convinced...
 
Last edited:

qqphot

Subscriber
Joined
Jul 12, 2022
Messages
200
Location
San Francisco, CA, USA
Format
35mm RF
So the same as me. Then you have the option of using also spare parts from a Minox B. At least here in Germany the B models are much cheaper than an A.

Yes - I guess it's somewhat easier here in the US just due to the volume. I've found more As than I expected, though naturally in either unstated or non-functional condition. I made an eBay "offer" on one for quite a low price (about the same as what untested Bs sell for) so we'll see what it looks like. Seller claims the shutter works at all speeds but focus is jammed. Maybe one or the other will be easier to make working.
However, I'm still wondering what happened to my blades.
View attachment 358280
I have a bad feeling about just replacing them and then immediately having the same damage again.

That looks as if maybe the shutter was cocked somehow without the blades moving all the way into position to be trapped by the actuating pins, and then it was opened and pushed closed a second time, forcing the ends of the blades into the extended actuating pins. I have no idea how that would happen, though - I guess it shouldn't be possible.

When repairing mine, assuming the donor's shutter is working, I'm inclined to replace the entire cocking slide, springs, and blades as a unit (and maybe even the channel assembly), because I don't feel great about hooking and unhooking the ends of the tiny springs without damaging them or bending the blades, or getting oils or grease on them.
 
OP
OP
tjwspm

tjwspm

Member
Joined
Dec 23, 2023
Messages
314
Location
Germany
Format
Sub 35mm
When repairing mine, assuming the donor's shutter is working, I'm inclined to replace the entire cocking slide, springs, and blades as a unit (and maybe even the channel assembly), because I don't feel great about hooking and unhooking the ends of the tiny springs without damaging them or bending the blades, or getting oils or grease on them.
Yes, that's exactly how I want to do it. Unhooking and hanging the springs in particular is a risk.
 
OP
OP
tjwspm

tjwspm

Member
Joined
Dec 23, 2023
Messages
314
Location
Germany
Format
Sub 35mm
That looks as if maybe the shutter was cocked somehow without the blades moving all the way into position to be trapped by the actuating pins, and then it was opened and pushed closed a second time, forcing the ends of the blades into the extended actuating pins. I have no idea how that would happen, though - I guess it shouldn't be possible.
I've tried it many times now. The actuating pins only come up when the blade eyelets are in the correct position. After installing it, I will try it out more often without the front panel. Then I can close slowly and carefully and see if the pins are working properly.
 

qqphot

Subscriber
Joined
Jul 12, 2022
Messages
200
Location
San Francisco, CA, USA
Format
35mm RF
Well, I received my $85 "parts" IIIs from ebay - it does have a good shutter, but it also has a good everything else - had a slight gumming up of the focus dial, but with that handled it's pretty much perfect so I guess I'll just use this one and wait for April to come around to get a replacement set of springs and blades from MinoxDoc and fix the other one too.

It arrived with a roll of original 40 asa (i think) agfapan in it, which i just developed along with my test roll of Delta 100. The old film is very densely fogged but seems to have a few salvageable frames, I'll see what I can pull off it.
 
Photrio.com contains affiliate links to products. We may receive a commission for purchases made through these links.
To read our full affiliate disclosure statement please click Here.

PHOTRIO PARTNERS EQUALLY FUNDING OUR COMMUNITY:


Ilford ADOX Freestyle Photographic Stearman Press Weldon Color Lab Blue Moon Camera & Machine
Top Bottom