Masking Ilfochrome

Barbara

A
Barbara

  • 1
  • 0
  • 66
The nights are dark and empty

A
The nights are dark and empty

  • 9
  • 5
  • 124
Nymphaea's, triple exposure

H
Nymphaea's, triple exposure

  • 0
  • 0
  • 58
Nymphaea

H
Nymphaea

  • 1
  • 0
  • 49

Recent Classifieds

Forum statistics

Threads
198,926
Messages
2,783,235
Members
99,747
Latest member
Richard Lawson
Recent bookmarks
0

uwphotoer

Member
Joined
Nov 22, 2008
Messages
59
Location
Piedmont, NC
Format
Multi Format
Here is what I have learned to do over the past 25 years of printing cibachromes.....

I now use an Ilford EM-10 and have learned to use it for metering the highlight of the slide (bright white with slight detail). I will always start new paper or chemistry (in my ICP-42) with the same 'standard' slide (grey card and color checker along with a grey scale.... you can add a flesh tone and other things but the grey card is most helpful. First you must get the density of the print right..... once that time is determined I never change the time.... Then I work on the color balance.... Once I get the color on that print perfect (using small test strips) I can change slides to something I want to print..... open the lens up.... focus and what not.... then find that highlight and meter with the EM-10, stopping the lens down till I get the green light on the EM-10..... not the print time is still the same..... even if I raise and lower the enlarger the time is the same.....

The only thing I need to do now is burn in the shadows.... sometime adding 2-4 times the print time for the highlights.... The prints look really good.
 

analogsnob

Member
Joined
Oct 22, 2008
Messages
112
Format
8x10 Format
Masking can be thought of as extremely accurate dodging and burning. With some transparencies it can be a toss up. I don't want to give the impression that everything I printed over 10 plus years of printing every day was masked -- it wasn't. But masking can enable printing of transparencies that cannot be printed any other way. In making very large or small prints for example burning quickly gets very hard and hard to repeat many times accurately.

The color correcting functions that I am shortly to get to are possible only through masking. Even digital printing cannot achieve equivalent results without extensive trial and error. Imagine having to match a tan, a brown and a green in the same print close enough for the client to walk in and place the swatches on the print before accepting it.

That said whatever works works. And I endorse the use of the em-10 we had one in each room plus spares- great things.
 

analogsnob

Member
Joined
Oct 22, 2008
Messages
112
Format
8x10 Format
Masking for color correction

The filters and dyes that are used in color reproduction are not perfect. Cyan in particular is dirty it transmits magenta and yellow it should stop and stops blue and green it should transmit, next in order is magenta and yellow is the best of the three. The result of this polution is that greens tend to darken and pick up cyan blues can darken and tans and browns can distort.

To compensate for this "cross talk" a mask made through a filter will selectively darken areas of its own color and lighten its compliment. You can also apply this technique to darken blue skys (using a #12 or #15 yellow just as in B&W) lighten fleshtones with a # 11 or lighten greens with a #33. single masks can help but when greens and blues and browns must match in the same print more is required.

To fully correct the majority of the hue shift errors three exposures and two masks are required. (Give or take highlight masks)

Exposing sequentially with red#29 green #61 and Blue #47b filters (adjusting exposure time with each to regulate color balance) and using a mask made through a #29 filter for the red and green exposures and switching to a mask made through a green #61 filter for the blue exposure will allow magentas, greens and blues to reproduce with great fidelity.

Anybody who has done dye transfer will recognize this regimen because thats where it originated. Making the masks is just a matter of making a chart for the filtered exposure just like the grey unfiltered one in an earlier post.

Balancing the three exposures on Ilfochrome ( and I do recommend the CPS1.k product because the masks do need to be about 25% and this material has the contrast to allow it) is accomplished by making exposures through the 21 step grey scale. One exposure through each filter.Place the strips side by side and line up the matching steps if the steps are all the same number make another test all on the same piece of paper it should be grey. If the steps don't match add or subtract a half stop of exposure time for every step difference.

For example if you make a test each color at 20 seconds and the first step you can see is red 4 green 1 blue off the chart but blue #1 about matches green step 6. That means red exposure needs to be reduced by 4-1 or 3 half stops or becomes 7.5 seconds, green is ok at 20 seconds and blue requires more exposure of 6-1 or 5 half stops (21/2) or 120 seconds.

Getting the right color balance is trial and error and gets easier with experience. To make the print requires a registered carrier and a firmly locked down enlarger. ours had extra braces on the neg stage and the lens stage and could be tighted down firmly. It was also braced to the wall and every surface around it was painted flat black.

The printing routine went like this. First exposure red with red filter mask, then green exposure (filter was changed and exposure was changed in the dark) with red filter mask filter and time changed for blue exposure carrier was unlocked and taken out of darkroom through the light lock where red filter mask was swopped for green filter mask. Carrier was locked back in enlarger for blue exposure. The material was on a vacume easel which was itself locked down.

Even with this involved procedure there were times when the residual error still had to be dealt with. Soft contrast transparencies were also a special case how to get 25-30%correction with only 10% headroom? The strange world of mid tone masks comming up.
 

analogsnob

Member
Joined
Oct 22, 2008
Messages
112
Format
8x10 Format
There is a better method for color balancing using tri color exposures. It was revealed to me as the Scott system. I have used it with great sucess with dupes Ilfochrome and c's.

change print by................................lighter......................................darker
............................................multiply all times by................multiply all times by
1/2 stop...........................................0.67.....................................1.5
1 stop.............................................0.50......................................2.0
11/2 stop........................................0.33......................................3.0
2 stops...........................................0.23......................................4.0

Color shift

Density shift.............................multiply primary in excess by.......OR............ multiply the other two primaries by
.10........................................................1.17...............................................................0.96
.20.........................................................1.36..............................................................0.86
.30........................................................1.58...............................................................0.80
.40........................................................1.85...............................................................0.74
.50.........................................................2.16..............................................................0.68

slight color change = 0.10
moderate color change = 0.20-0.30
major change = 0.40-0.50

Using sharper cut filters #70 red #98 green and #99 will give prints with greater saturation using #25 red #57 green and #46 blue will give somewhat less saturation.

I mentioned in and earlier post that yellow will darken a blue sky thats wrong a blue will darken a sky because there will be density in the mask which will hold back the filter color darkening it and lightening its compliment. It takes some clear thinking to keep this stuff strait. I worked with extensive notes otherwise it was too easy to get off on a wrong tangent. Its also been 5 years or more since I did this every day.
 

analogsnob

Member
Joined
Oct 22, 2008
Messages
112
Format
8x10 Format
I did it again, darn brain box leak'in oil again!:confused:

Using the Scott System in my last post for Ilfochrome you need to reverse the light dark directions. The math is unchanged.

Guess I spent too many of my formative years in the dark....:rolleyes:
 

Erik L

Subscriber
Joined
May 9, 2007
Messages
830
Location
Grand Junction CO
Format
8x10 Format
.

To control the masking process you have to know the dynamic range of your system. Different enlargers have different contrasts and lens flair is different as is darkroom conditions. To do this you need a 21 step grey scale (Kodak or Stouffer) it is a piece of film with 21 equal (about .15) steps of grey from clear to black. If you have the kodak you will thank yourself for numbering each step neatly at the edge with a fine point sharpie or india ink starting with the light end from 1 to 21. The Stouffer comes numbered. Put the grey scale in your enlarger and mask off any open space around the scale with developed out film (lith film exposed and developed in the light works great) or black paper. Make a print onto whatever material you are using so that as many steps show as possible. You are looking for the spot where the steps disapear on each end of the scale. Note the number of the last visible step dark and light. Read those steps on a densitometer and subtract the smaller from the larger and that is your dynamic range. For demonstration purposes I will use a dynamic range of 1.90 yours will be different.

Now to the mask. Set up to make a contact exposure. You need masking film I used to use Kodak Pan masking film which is no longer made Kodak says that Tmax 100 will work. You will also need dilute developer such as HC-110 mixed 1/2 oz per quart of water stop and fixer. Tray constant agitation at 68 degrees. It is important that you do everthing in a repeatable fashion! Make a series of exposures starting at 1 second and progressing at twice the previous ie: 1,2,4,8, 16 etc. process the film at 1 1/2 minutes at 68 degrees. You are looking for the exposure that gives a density of .35-.40 at step 21. When you find it note the exposure time that produced it and read step 1. Subtract the smaller from the larger, take that difference and divide by the density range which gives a percent (gamma). It will be around 15%. Repeat the procedure with a 51/2 minute development time. (These are Pan mask times you might have to "fish" a little for the Tmax times)

Armed with this data get a piece of graph paper. Place the gamma up the left side, the development time accross the bottom and exposure time up the right side. Place a mark at the point wherre the gamma and 11/2 minute dev time intersect do the same with the gamma at 51/2 min and draw a strait line between them. Now place a mark where the exposure time for 11/2 min time intersects with that time. Repeat with the exposure for 51/2 min and draw a dotted line between them. ( I will get an example up soon)

Now for the why of all this.......Lets say you have a transpaency (an almost white wall with a dark vase of flowers say) measure the density of the wall and the vase and when you subtract the smaller from the larger you get 2.45. From your test of dynamic range you know that anything more than 1.90 is trouble. Take the density range of the transparency 2.45 and subtract the dynamic range 1.90 giving a difference of .55 divide .55by the original density range of 2.45 you get about 21 %. Now to your chart. Place your finger at 21 gamma and run your finger to the right until it hits the solid line then down to the deveopment time required. Now move your finger up to the dotted line and then right to the exposure time. You now have the exposure and development time to give the exactly right mask for what you are printing.

We had a chart for each filter and exposure set up we used.

Next the highlight mask.......[/QUOTE]


If I may ask a question Analogsnob? I have found the density of my enlarger and I have found the .35 density of of the 21 step scale for 4 minutes and 7 minutes of development (my film is fp4 and these are the times I had that worked) I have read your post over and over and can't quite figure out how you find the gamma. Can you please explain what I have to do to get the gamma, I'm a little confused:smile: Treat me like a 1st grader and I'll be bound to understand it:smile:
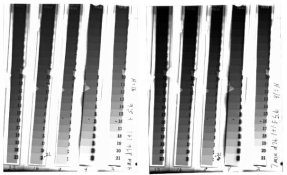
regards
Erik
 

analogsnob

Member
Joined
Oct 22, 2008
Messages
112
Format
8x10 Format
What you need to do is to find a %of density range of the original so if you subtract the density of step 21 from the density of step 1 in your test that difference is the mask density range. Dividing the mask density range by the density range of the original (step 1 minus step 21) (about 3.00) the result is a percent. That percent is what I here refer to as gamma as it is a rudimentary measure of the slope of the tone reproduction curve.

Hopefully by this afternoon I can get a few illustrations up to make this clearer.

Ilford always said FP-4 would work I will be interested in your results.
 

analogsnob

Member
Joined
Oct 22, 2008
Messages
112
Format
8x10 Format
Gotta watch me closely :rolleyes:the density range of the original is step 21 minus step 1 because you subtract the smaller from the larger.
 

analogsnob

Member
Joined
Oct 22, 2008
Messages
112
Format
8x10 Format
Ok I'm a photgrapher not a guru.(meaning I'm alittle thick) The dynamic range of your enlarger is the target. If the measured dynamic range of your enlarger is 1.90 or whatever if you encounter a transparency whose range is 2.45 (Kodachromes can approach 3.00) anything over your dynamic range will go black or white. Mid tones may also drift dark. Usually this is a bad thing in a print. By adding a mask which will cover up or add density to the lighter tones the desity range of the transparency the effectrive density range of the transparency is reduced.

But by how much? The difference between the density range of the transparency and the dynamic range divided by the density range of the transparency gives a percentage. This percentage represents the degree to which the transparency exceeds the available printable dynamic range OR IOW the required strength of the mask to make it print.
 

Erik L

Subscriber
Joined
May 9, 2007
Messages
830
Location
Grand Junction CO
Format
8x10 Format
Thanks Analogsnob,
In your experience do these numbers that I am getting seem correct or in the ballpark?
Enlarger contrast range with my paper is 2.04
My low contrast test of the 21 step scale at 4 minutes with fp4 is 1.34 44%
My high contrast test of the 21 step scale at 7 minutes with fp4 is 1.84 60%
My stouffer 21 step scale is 3.1
I am no where near the 15% you referred to above, have I done the math wrong? I'm trying to make the chart of gamma, development and exposure with these figures
to make accurate exposures and development of masks and I'm not confident that the numbers I have reached are correct.
I really appreciate your help!
Erik
 

analogsnob

Member
Joined
Oct 22, 2008
Messages
112
Format
8x10 Format
Erik I think you have done it right. The problem is that FP4 is a whole lot contrastier than Pan mask ever thought of being. You need to be able to get down to the 10-15% range. You could try diluting whatever developer you used to get here 1:1 and see where you fall. Pan mask wouldn't do 60% no matter how long you processed it.

You might have better luck with tmax 100. I've never tried it but kodak says it works. In my experience when decreasing development it kinda drops way off so from that I think it reasonable that it might work.

You also stop at 4 minuits, you might try dropping as low as 1minuit. Remember that 10% of a 3.0 density range is only .30 which means your mask dmax at that level is only.65 to .70.

Are you using the CPS1K or the CF1K?

Developing in a tray with constant agitation I don't think you need worry about unevenness with short process times (at least until you get below the induction time) also it is my experience that as long as agitation is constant all developer dilution does is reduce activity to make the developing time longer.

Keep swing'in slugger!
 

Erik L

Subscriber
Joined
May 9, 2007
Messages
830
Location
Grand Junction CO
Format
8x10 Format
Well it's good to know I did the math right:smile: I tried to develop for shorter times but I couldn't get the .35 in the # 21 step to show up until I did a longer development time. I'm using a jobo machine for repeatability of results and the paper I tested was the lower contrast clm.1m.

Do you think I can use the exposure/development graph chart with these numbers and be successful with the times and exposures it will give me? I would love to be able to read the density range of a tranny and just plot some numbers on a graph and get a perfect mask on the first try if possible:smile:

Below is a scan of my 2 different development test times, do they look alright? I know you can't read densities, but is the test valid looking or is it screwed up in some obvious way? I'm hoping and trying to build my confidence level to a point where I can stop second guessing myself and know that what I am doing is the right thing:smile:
Thanks alot analogsnob!!
Erik
 

Attachments

  • 21 step test.jpg
    21 step test.jpg
    60.9 KB · Views: 89

analogsnob

Member
Joined
Oct 22, 2008
Messages
112
Format
8x10 Format
Erik the chart will work but I fear you will need less development especially with a dynamic range over 2. The proof is in the printing if your contrast winds up low and your prints muddy you will need flatter masks. For what I was doing 25% was fairly common but I also routinely used 10-15%. Your 4 minuit test looks like what I took as a top end.

You might consider a tray process as that may be the only way to get low enough. Try reading some representative transparencies and figuring the required mask strength. If you get 40% +/- you're good to go but I think you will find you'll need somewhere close to 20%.

A mask should look thin and flat like you would hate to try and pull a print from it if you were printing B&W.

Once you get a working chart it will be good until the materials change.
 

analogsnob

Member
Joined
Oct 22, 2008
Messages
112
Format
8x10 Format
When very small masking corrections need to be made or when only the midtones need attention or when color correction only is desired there is a proceduare for handling the situation. It involves making a pre mask which is essentially a separation negative. This negative is bound with the transparency and a mask is made through the combination. If the premask is made to about 80% or so the density range of the transparency a mask with density primarily in the mid tones is obtained.

A mid tone mask can help give the correct "feel" to high key transparencies where range is not the problem rather the mid tones printing too light. The pre mask holds out the shadows and the highlights from the mask thus effecting only the mid tones.

The red saturation mask described earlier in this thread is an example of the color control that is possible. In between feeding my animals I am working on some illustrations that will help but it will take a little while.
 

Erik L

Subscriber
Joined
May 9, 2007
Messages
830
Location
Grand Junction CO
Format
8x10 Format
Analogsnob, Your responses greatly helped me! I ended up testing again and finally got into the 20% range with a 2 minute development time. I just wasn't giving enough exposure in my previous attempts. I 've got the chart made and I hope to take the guess work out of the process. Thank you very much, it is appreciated!!!
Erik
 

Robert Hale

Member
Joined
Aug 23, 2006
Messages
24
Format
ULarge Format
Herculene ?

Hi Analogsnob,

I am a bit late on finding this thread, I hope you are still watching !

Excellent information, thank you.

This herculene you have used, I do not know it, is it polyester draughting film ? the clear film that you have to cut because it won’t tear ? is it other wise known as Mylar. You used the clear version not mat one ?

Best Regards

Rob
 

analogsnob

Member
Joined
Oct 22, 2008
Messages
112
Format
8x10 Format
Yes it is herculene drafting film. We got it at the art store. I believe it was the matte version it looked white until you put an image up to it and then you could see the image through it. Kodak made something similar but herculene was better and cheaper. And yes it was impossible to tear which means it held our 1/16 inch reg pin holes nicely.

We also used to expose pan mask film through the base which served to get the mask silver that much closer to the transparency image( all emulsion sides going the same way) making registration more exact. Thats not possible with the substitutes today plus pan mask was made to be unsharp so extra layers of herculene could be called for now.
 

Robert Hale

Member
Joined
Aug 23, 2006
Messages
24
Format
ULarge Format
Thanks again.

Thanks Ananlogsnob,

That sounds just like Mylar ( polyester draughting film ). It would have a slight “tooth” to the matte side and slippery on the shiny side, which if you wet the matte side it become almost totally transparent.

The image from the tranny would have looked like the image on a ground glass of 4 x 5 or 8 x 10 ?

Did the Kodak product also have a matte finish ? sorry for so many questions but us newbees know so little and there is so much knowledge being lost as labs close down.

Thanks you for taking the time to write this all out.

Best Regards

Rob
 

analogsnob

Member
Joined
Oct 22, 2008
Messages
112
Format
8x10 Format
That sounds like the stuff. The kodak was a little thinner that the herculene and didn't diffuse quite as much.

I'm glad you all are finding it useful. I've got more but I've got to think it through to make it clear first.
 

Robert Hale

Member
Joined
Aug 23, 2006
Messages
24
Format
ULarge Format
Hi Analogsnob

Thanks and look forward to rest.

Appreciate all the typing.

Best Regards

Rob
 

analogsnob

Member
Joined
Oct 22, 2008
Messages
112
Format
8x10 Format
Localization

The concept of localization has one foot in masking and one foot in photocomposition. It requires a registered carrier and an easel with a translucent base and lights underneith and kodalith or similar line film.

The first isolation is for the shadows. The set up is like that of a highlight mask except the exosure to the line film is greater so that only the shadows are clear. The mask is used by making an exposure for the main part of the image at which time the shadow isolation mask is added to the carrier in the dark (or outside through the light trap) and a second shadow exposure given. This can be just additional exposure or with a different filtration to address different color in the shadows. It has the advantage of not reducing contrast within the shadow areas. If a complimentary mask is made the combination can be used to give two entirely different treatments to the shadows and the rest of the image.

This eases us into the concept of localization. To localize into an area other than the shadows starts with the making of a print on rc B&W paper of at least 11x14 (larger for fine or complex areas) useing the aformentioned translucent easel. The print should show the edges of the area to be localized nothing else is important in this print. The print is exposed on reg pins and the easel locked down. When the print is dry punch reg holes in a sheet of rubylith. Place the ruby on the pins with the print undernieth.Using a knife cut the outline of the area to be localized and remove the red film from that area. The area is usually something like a product a window or a sky.

Place the rubylith without the print on the easel pins and use the light underneith to expose a sheet of line film in the negative carrier. The propper exposure is the minimum exposure for maximum black. (make a series of exposures starting with an obvious grey and go up until the grey stops getting blacker, process about 21/2 minuits in D-11) The resulting line neg can be contacted to make a complimentary mask.

By switching the masks different color balances or exposures can given different parts of the image. The areas need a transition line to hide the handiwork ( a natural edge like the edge of a window, wall of a building or a horizon line etc)

Once made the isolation masks can be used to make a print film highlight. A print film highlight was originally made on vericolor print film 4111. I don't think they make it anymore but they do make dura clear a clear film processed in ra-4 chemistry its the clear cousin of duratrans display film. I see no reason why it shouldn't work. Anyway the print film highlight is made through the isolation mask and is just an area of color ( if a premask has been made it can be used to add color to a clouded sky by placing the isolator over the premask and exposing the color through the combination) If blue needs to be added to the print make the print film highlight through a yellow filter or the dichroics in the color head dialed up. You are looking for a very week area somewhere around .20 unless trial and error indicates more. The print film highlight is then bound with the transparency and printed.

These are some of the most delicate and time consuming masks that can be made because every trial needs to be tested on a strip of Ilfochrome and several trails will probably be needed to get it right. They can also get complicated the more isolated an area needs to be. (correcting the type color on a logo or sign for instance) Sometimes a grey compliment can be added to the area outside the localization to account for the added density of the print film highlight so the print can be made in one exposure as opposed to multiples. Colors can be corrected or color added to skys or bodies of water and color casts can be removed from snow.

The most complicated print I ever made involved 13 pieces of film in the carrier on top of the transparency including a contrast mask and the rest were isolated print film highlights and rebalances. It printed in one (long) exposure and matched (looked identical to the color swatches placed beside the print) a tan, a brown, a red, a magenta and a green (all longo colors). It needed to be made in one exposure because after approval we made 500 of them. Making the original print took 5 days.
 
Photrio.com contains affiliate links to products. We may receive a commission for purchases made through these links.
To read our full affiliate disclosure statement please click Here.

PHOTRIO PARTNERS EQUALLY FUNDING OUR COMMUNITY:


Ilford ADOX Freestyle Photographic Stearman Press Weldon Color Lab Blue Moon Camera & Machine
Top Bottom