MacGyvering a tempering bath for color development

Recent Classifieds

Forum statistics

Threads
198,721
Messages
2,779,898
Members
99,691
Latest member
Vlad @ausgeknipst
Recent bookmarks
0

madgardener

Member
Joined
May 28, 2011
Messages
406
Location
Allentown PA
Format
35mm
So I have developed my first roll of C-41 using my water bath and aquarium heater/water pump setup. For the most part I'm pretty satisfied with the results,but there are a couple questions about the way the film turned out. Specifically, some of the pictures have really bad grain, and the picture of the table saw seems to have a lot of something. Below is the link to the pictures and I would really appreciate some feedback and comments.

https://plus.google.com/u/0/photos

The pictures were taken with a "new"(to me) Maxxum 300xi, set to automatic with kodak max 400, in my mother-in-law's house and basement of random things.
 

clayne

Member
Joined
Sep 4, 2008
Messages
2,764
Location
San Francisc
Format
Multi Format
Could you post the photos here? That google link is prompting me for a login.
 

madgardener

Member
Joined
May 28, 2011
Messages
406
Location
Allentown PA
Format
35mm
I've been trying to post a few photos here but I need to find a way to shrink the size. APUG keeps telling me that my file size is too large for processing.

I developed some more rolls yesterday, giving this batch of chems, 5, 24 exposure, and 1 roll of 36. One of rolls is some stuff I bought off the web 2 years ago (Memories, which is fuji), and that roll came out very light, almost to the point of not being able to see anything at all. The rolls of Kodak came out and seem to look pretty good.

I'll be scanning later today.

The temperatur
 

madgardener

Member
Joined
May 28, 2011
Messages
406
Location
Allentown PA
Format
35mm
I've been trying to post a few photos here but I need to find a way to shrink the size. APUG keeps telling me that my file size is too large for processing.

I developed some more rolls yesterday, giving this batch of chems, 5, 24 exposure, and 1 roll of 36. One of rolls is some stuff I bought off the web 2 years ago (Memories, which is fuji), and that roll came out very light, almost to the point of not being able to see anything at all. The rolls of Kodak came out and seem to look pretty good.

I'll be scanning later today.
 

davedm

Member
Joined
Apr 7, 2012
Messages
122
Format
35mm
So I have developed my first roll of C-41 using my water bath and aquarium heater/water pump setup. For the most part I'm pretty satisfied with the results,but there are a couple questions about the way the film turned out. Specifically, some of the pictures have really bad grain, and the picture of the table saw seems to have a lot of something. Below is the link to the pictures and I would really appreciate some feedback and comments.

https://plus.google.com/u/0/photos

The pictures were taken with a "new"(to me) Maxxum 300xi, set to automatic with kodak max 400, in my mother-in-law's house and basement of random things.

You have mistakenly posted incorrect link. This will direct people to their own albums. To share any of your album, point your cursor to the title of the album and right-click > copy link and post it here. Also make sure you have set viewing permissions to public for that album.

Or use the option to share via link (see: https://support.google.com/plus/answer/1407859)
 
OP
OP
chuck94022

chuck94022

Member
Joined
Jan 11, 2005
Messages
869
Location
Los Altos, C
Format
Multi Format
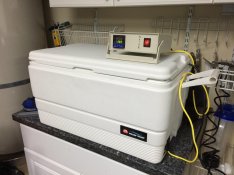
Revisiting this topic, I relocated back to the USA from China. I didn't want to bring back the fully assembled water bath, so I removed the essential components that would work on the USA power grid (110v versus 220v power), and started over. This also allowed me to improve some aspects of the system.

Here is what I didn't like about the original bath:

1) I used a cheap plastic storage tub from a local home supply store in Beijing. It had no insulation. On the positive side it was very cheap and very simple to work with. But insulation is very important with this device.

2) I felt spatially constrained. My jugs competed for floor space with the heater, pump, and temperature sensor. Also, I felt I wouldn't have room for E6, or even for a non-blix based C-41, with my dip-and-dunk setup. Wouldn't be a problem for daylight tank (patterson) processing, but for my large format I like doing a lights out dip and dunk, and that takes a lot of floor space.

3) When using the bath as a sous vide cooker, the bags of food would float into the heater. I worried the heater would melt open the bags or something else tragic.

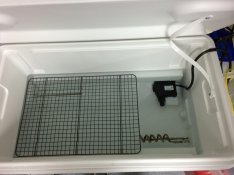
I just finished rebuilding my system in the US. I used an Igloo Marine 70 qt cooler. The cooler has enough depth that I was able to place the heater, pump, and sensor at the bottom of the cooler, and create a rack above for tanks, using the full inside dimension of the cooler. I used the PID controller from China, which takes 110v with no problem. The temperature sensor similarly works fine (it doesn't depend on wall power). The immersion pump actually worked when I plugged it into 110v power, though it is only rated for 220. It also sounded like crap, so I don't think it survived the move very well. So I replaced it with a new, similar pump.

The heater and temperature sensors are mounted in through holes. I used 3" squares of plastic from Tap Plastic to mount the devices, and heavily sealed it all with clear silicone sealant. The pump was simply mounted in a corner on its side, with a plastic block holding it stable, while allowing it to be removed (in case it burns out, which they tend to do). The output blows directly onto the heater.

I like this setup. It is more roomy, it is insulated, and it has a drain at the bottom that my previous one didn't have.

Here are a couple of photos:

waterbath.jpg

waterbath1.jpg
 

Wayne

Member
Joined
Jul 8, 2005
Messages
3,584
Location
USA
Format
Large Format
Make? Model?


I use a microprocessor controlled water bath I bought off ebay for $20. the tank it roughly 20" x 20" and 6" deep. I can set it for 105 degrees for E6 and it holds that temp within a quarter of a degree. .
 

Wayne

Member
Joined
Jul 8, 2005
Messages
3,584
Location
USA
Format
Large Format
and only $200 for the controller alone? :smile: I don't think MacGyver has that kind of money.


I wonder if a circulating pump would prevent the problem Lamar reports re: temperature drift?

I was all ready to develop my first C-41, or so I thought, till I realized my aquarium heater wont get me there. I've been trying to MacGyver my titanium ViaAqua aquarium heater but haven't had success. Even after maxing out the trim screw it can't maintain 103, and the adjusting post that the knob attaches to has an internal stop that I'm afraid to mess with. Being only 75 watt I'm not sure its powerful enough anyway. I need an alternative, cheap and fast. My chems are already mixed. :sad:


I use this controller
http://www.newark.com/omron-industr...ontroller-temp-1-16-din-100-240vac/dp/58T9504

with this solid state relay so I can have it switches on and off very rapidly

http://www.newark.com/crydom/d2425/...rydom Top Seller&MER=PSPSO_S_C_Crydom_93K7541

I use them only because I have them on hand. A great number of others will work fine. Pricing about the same for simple one. Or you can buy the one that the OP used.

 
OP
OP
chuck94022

chuck94022

Member
Joined
Jan 11, 2005
Messages
869
Location
Los Altos, C
Format
Multi Format
and only $200 for the controller alone? :smile: I don't think MacGyver has that kind of money.


I wonder if a circulating pump would prevent the problem Lamar reports re: temperature drift?

I was all ready to develop my first C-41, or so I thought, till I realized my aquarium heater wont get me there. I've been trying to MacGyver my titanium ViaAqua aquarium heater but haven't had success. Even after maxing out the trim screw it can't maintain 103, and the adjusting post that the knob attaches to has an internal stop that I'm afraid to mess with. Being only 75 watt I'm not sure its powerful enough anyway. I need an alternative, cheap and fast. My chems are already mixed. :sad:


Wayne, go on Amazon and search for an immersion water heater. They are used to heat small pots or cups of water for tea, typically. They have a handle and a curled wire that is immersed. You can get them for less than $20, and they are rated at as much as 1200 watts or even more. Pay attention to the voltage though - some on Amazon are 250v/6 amp devices, you don't want them. And those are more expensive. These latter devices are typically replacement heaters for hot water heater tanks. You can tell these by the lack of a handle, and instead a threaded base. Those are typically 250v devices, but if you find a 110 v device and can fabricate the threaded receiver socket, it would be a more "professional" solution than the little immersion heater.
 

Wayne

Member
Joined
Jul 8, 2005
Messages
3,584
Location
USA
Format
Large Format
Oh..nevermind. There are dozens of these on ebay in various makes and models. They look very nice; the trick will be getting a good one cheap.


Make? Model?
 

Wayne

Member
Joined
Jul 8, 2005
Messages
3,584
Location
USA
Format
Large Format
Those might work but would require a separate temperature control which I am incapable of MacGyvering without specific (and very simple) instructions.
Don't let my tampering with the ViaAqua lead you to believe I have even a smidgeon of electrical knowledge. I know not to bring a toaster into the bathtub, and that's about it.


Wayne, go on Amazon and search for an immersion water heater. They are used to heat small pots or cups of water for tea, typically. They have a handle and a curled wire that is immersed. You can get them for less than $20, and they are rated at as much as 1200 watts or even more. Pay attention to the voltage though - some on Amazon are 250v/6 amp devices, you don't want them. And those are more expensive. These latter devices are typically replacement heaters for hot water heater tanks. You can tell these by the lack of a handle, and instead a threaded base. Those are typically 250v devices, but if you find a 110 v device and can fabricate the threaded receiver socket, it would be a more "professional" solution than the little immersion heater.
 
OP
OP
chuck94022

chuck94022

Member
Joined
Jan 11, 2005
Messages
869
Location
Los Altos, C
Format
Multi Format
Those might work but would require a separate temperature control which I am incapable of MacGyvering without specific (and very simple) instructions.
Don't let my tampering with the ViaAqua lead you to believe I have even a smidgeon of electrical knowledge. I know not to bring a toaster into the bathtub, and that's about it.

Wayne, the PID controller is actually very simple to work with. If you buy one with an integrated solid state relay, and you buy a PT100 temperature probe, and you buy one of those immersion heaters that I mentioned, here is what you have to do:

1. Clip the plug off the power cord of the immersion heater. That will expose two wires. Strip the insulation off those wires, and connect them (probably a screw type connection on the PID) to the relay outputs.

2. Connect the three wires that come off the temperature probe (two will be one color, the other will be a different color. Mine is black-black-red) to the PID to the probe inputs.

3. If the PID doesn't come with a power cord, buy one from your local store, or (better!) scavenge one from some discarded electronic junk in your attic, and connect the wires to the PID power input terminals (also probably a screw-type connection).

That's it for the electrical connections, it is dirt simple.

Of course, I didn't mention that you probably want to get some sort of plastic box and mount the PID controller inside it, so that the bare wires coming off the back aren't exposed. But that's extra credit for you to figure out...


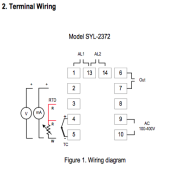
Here is a typical PID controller, very similar (maybe identical) to the one I have: http://www.auberins.com/index.php?main_page=product_info&products_id=237

You can probably find one similar, but cheaper, on *bay or Amazon. You might even find one already in a box, or with the PT100 probe included. PT100 probes are also easy to find on *bay or Amazon.

Here is the connector diagram for the controller linked above:

SafariScreenSnapz002.png

As you can see, for this controller, in my instruction 1 above, you'd connect the heater wires to pins 6 and 7 (in no particular order).
For instruction 2 above, you'd connect the two same-color wires to pins 3 and 4, and the different color wire to pin 5. For instruction 3 above, you'd connect your power cord to pins 9 and 10 (again in no particular order). The "pins" are probably little screws that you unscrew, put the wire under, and screw down tight.

Easy! The only caution I would give. Don't plug in the power until everything is fully connected and you have assured that no stray copper strands from any of the cords cross over and touch any other pin. And once plugged in, don't touch any of the pins or bare wires! Ouch!

Edit: If you can't be bothered with a separate box, here's the MacGyver solution: wrap the entire PID controller from front to back (keeping the display visible) with electrical tape, making sure the back of the controller is covered with a layer or two of tape, and continue wrapping for a few inches down the length of wires. It will be a little messy from tape glue if you ever have to unwrap it, but you won't.

Tools needed for all the above: a screwdriver, wire cutter, and wire stripper. The latter two can be done with a sharp knife, but you can get a cutter/stripper from Radio Shack for not much cash and it will make things cleaner.

Edit 2: One more thing (ok, is this McGyver or Columbo?) : The PID controller's LEDs emit light and will affect your film if you are doing a lights-out process like dip and dunk. I simply cover the face of the PID with aluminum foil when doing that sort of process. The foil is light tight and simple to remove.
 
Last edited by a moderator:
OP
OP
chuck94022

chuck94022

Member
Joined
Jan 11, 2005
Messages
869
Location
Los Altos, C
Format
Multi Format
On that previous post: I just used that particular PID device as an example of using a PID. Note however, that particular PID specifies that it can only handle 300 watts of output. This limits the wattage of the heater you use. When you select a PID, either find one with a built in SSR that handles the amount of heater wattage you'll use, or get a smaller heater, or use a PID with a separate relay that can handle more power (the PID output, instead of connecting to the heater, will connect to the relay. The relay will connect to the power cable and to the heater. It will also have easy to connect screw-type connectors, so no soldering will be necessary, and the connections would be as simple as the instructions I gave above.
 

Wayne

Member
Joined
Jul 8, 2005
Messages
3,584
Location
USA
Format
Large Format
Thanks for the instructions. I'm a bit too wary of my electrical skills to attempt that right now, but maybe in the future.

I discovered that with pliers I could turn my aquarium heater control post past the stop. Problem solved! Or so I thought. It actually didn't make a bit of difference. I was left with only two choices-try to force the trim screw past its stop, or put it back together before I ruined a perfectly good heater that serves me very well for B&W. I chose the latter.

I think my next step will be to try a Wallly Mart heater which we already know can be MacGyvered up over 100. If that doesn't work I'll revisit the home-brew idea.

But what I would like is a simple control with a probe, that I can plug my existing metal heater into without having to hard wire it. Then I could just leave the heater's probe out of the water and let the controller's probe turn it on and off. I'd gladly pay a few extra bucks not to have to wire one myself. But I don't want to pay 75 or 100.
 

Wayne

Member
Joined
Jul 8, 2005
Messages
3,584
Location
USA
Format
Large Format
Well I got one (a small water bath) pretty cheap; now I just have to wait for it to arrive and find out if its a any good. :smile: I see more of these in my future.

Oh..nevermind. There are dozens of these on ebay in various makes and models. They look very nice; the trick will be getting a good one cheap.
 

Old-N-Feeble

Member
Joined
Feb 22, 2012
Messages
6,805
Location
South Texas
Format
Multi Format
You got all that hooked up to a GFCI?
 

Old-N-Feeble

Member
Joined
Feb 22, 2012
Messages
6,805
Location
South Texas
Format
Multi Format
Don't you just ground it via the uninsulated lead?
 

grahamp

Subscriber
Joined
Mar 2, 2004
Messages
1,706
Location
Vallejo (SF Bay Area)
Format
Multi Format
What is the room temperature? With an open-topped and uninsulated tub, there will be an effective limit on how warm the water can be compared the environmental temperature. It may be that the heater does not have the power to raise the temperature enough and compensate for heat losses.

Drop a litre or so of hot water into the tub. That should push the temperature above the set point and shut off the heater. When it cools, the heater should come on, and at that point you will be able to see if the heater can match the loss.
 

eng1er

Member
Joined
Aug 19, 2008
Messages
105
Format
Multi Format
What is the wattage of the heating element and what is the volume of water in the bath?
 

Nodda Duma

Member
Joined
Jan 22, 2013
Messages
2,685
Location
Batesville, Arkansas
Format
Multi Format
Your SSR might be limiting current to the heater coil. Check the amperage rating of the SSR compared against the required amps for the heater. Or compare power: output voltage of SSR times amps. Compare to power required for heater.
 

trythis

Member
Joined
Sep 26, 2013
Messages
1,208
Location
St Louis
Format
35mm
Your SSR might be limiting current to the heater coil. Check the amperage rating of the SSR compared against the required amps for the heater. Or compare power: output voltage of SSR times amps. Compare to power required for heater.

If thats the case, you would just need a relay rated at 12 or 20 amps or so.
 

eng1er

Member
Joined
Aug 19, 2008
Messages
105
Format
Multi Format
What is the wattage of the heating element and what is the volume of water in the bath?

Without this info, I have to make some assumptions. Let's say that heating element is 200w and you've got three gallons of water in the bath. With 100% efficiency (which you don't have due to heat loss, voltage drop and fluctuation, etc.), it would take 4 minutes to heat that volume 1 deg. C. I doubt your heat loss is out pacing that rate. What's puzzling is that you say it's holding right at 20 C. To me that suggests something amiss with the configuration of the PID. Make sure that the PID is set up for the type of temp probe you are using: RTD vs thermocouple (of which there are several types). If it's a thermocouple, make sure the + and - are connected correctly. Most RTDs these days are three-lead, but if you have a two-lead RTD make sure you're connecting the leads to the correct terminals. That PID will have a several menus of settings, one of which might be an SV limit. Study the manual carefully, PIDs have gotten very cheap but they're quite complex.
 
Photrio.com contains affiliate links to products. We may receive a commission for purchases made through these links.
To read our full affiliate disclosure statement please click Here.

PHOTRIO PARTNERS EQUALLY FUNDING OUR COMMUNITY:


Ilford ADOX Freestyle Photographic Stearman Press Weldon Color Lab Blue Moon Camera & Machine
Top Bottom