Large Format Seiko Shutter Repair

Recent Classifieds

Forum statistics

Threads
199,029
Messages
2,784,918
Members
99,780
Latest member
Theb
Recent bookmarks
0
Joined
Sep 18, 2021
Messages
22
Location
Toronto
Format
4x5 Format
Hello everyone

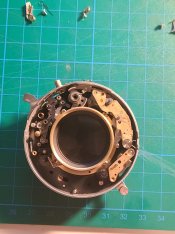
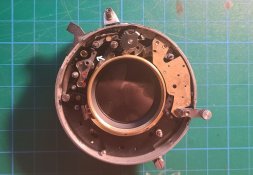
I have receently got a Seiko shutter labelled "LS 25" that was listed as poor condition and I was wondering if anyone was familiar with it. The diaphram does not open when I try to fire it, so I'm taking some time to dissassemble, clean, and lubricate it. I'm running into trouble because unlike compur shutters, not much is written about Seiko repairs.

From here does anyone know what assembly comes off next?
 

Attachments

  • 20211015_231857.jpg
    20211015_231857.jpg
    1 MB · Views: 555
OP
OP
Joined
Sep 18, 2021
Messages
22
Location
Toronto
Format
4x5 Format
I have. The Mamiya related guide helped me through the issues with the diapragm opening problem but the issue with bulb remains. I can't seem to find where any sort of bulb lever interfaces with either the cocking ring or the cam ring.

Here are some images of the shutter fully assembled without the cam ring, with the cam ring, and with the cam ring set to B.

I just can't find the bulb lever (or mechanism)
Seiko 0 No Cam Ring.jpg
Seiko 0 Cam Ring.jpg
Seiko 0 Cam Ring in Bulb Position.jpg
 

Mamiya_Repair

Advertiser
Joined
Feb 7, 2019
Messages
223
Location
Nevada
Format
Medium Format
The shutter speed cam ring has a cutout that allows the bulb lever (which is held inward toward the shutter by the shutter release lever) to move toward the outside of the shutter housing when set to B. Your third photo shows the correct setup for B operation. If you are not getting B then you have an issue with the lever underneath the B lever (likely a spring problem) and it is not latching the blade opening ring. The B lever is making contact with the top right of the shutter release lever.
 
OP
OP
Joined
Sep 18, 2021
Messages
22
Location
Toronto
Format
4x5 Format
Hmmmm. If the B lever is part #736-0164 there may be a problem because I don't have it! Here's the shutter cocked sans the cam ring.

If the part I mentioned is the B lever then I have a second shutter I recieved with the lens that does have it and I can work from there.

Shutter Cocked No Cam Ring.jpg

Exploded View.jpg
 

Mamiya_Repair

Advertiser
Joined
Feb 7, 2019
Messages
223
Location
Nevada
Format
Medium Format
Part 736-0164 is not the B contact lever. You do have the lever in place, I can see it in all your photos. It is making contact with the upper part of the shutter release lever (this is the lever that you press to release the shutter). It is part 730-4514.
 
OP
OP
Joined
Sep 18, 2021
Messages
22
Location
Toronto
Format
4x5 Format
Forgive me if I'm wrong but part 730-4514 is to the right of the release lever. 110-1041 looks to be at top left of the shutter release lever. I may be getting this confused though as this is only the second shutter I've worked on
 

shutterfinger

Member
Joined
Feb 25, 2013
Messages
5,020
Location
San Jose, Ca.
Format
4x5 Format
If you have not removed the levers, cleaned and lubed them, then do so as flushing does not clean the gunk build up inside the pivots.
I soak a round wood toothpick with TriFlow oil then run the oiled toothpick into the pivot hole in the lever and turn a few turns to lube the lever pivot.
 
OP
OP
Joined
Sep 18, 2021
Messages
22
Location
Toronto
Format
4x5 Format
Everything is nice, clean and lubricated with both TriFlow and the grease you linked me to when I was repairing the compur shutter.
 
OP
OP
Joined
Sep 18, 2021
Messages
22
Location
Toronto
Format
4x5 Format
To ensure it's not my error I'll post my assembly steps here

1. Put 730-2021 on its post
20211017_224747.jpg
2. Put 730-4510 on its post
20211017_224901.jpg
3. Put 730-4514 on its post with its spring in position with 730-2021
4. Put 730-4527 on its post with the spring in position with 110-4518
20211017_225326.jpg
 

shutterfinger

Member
Joined
Feb 25, 2013
Messages
5,020
Location
San Jose, Ca.
Format
4x5 Format
Too much oil will make levers sluggish. The wrong screw can cause binding. Over tightening of the correct screw can cause binding. A weak or mis attached spring can cause improper movement. I've had Synchro Compur levers bind with the correct screw properly tightened cause binding, I had tho leave them 1/8 to 1/4 turn loose with thread locker on the threads to hold them in position. They had been over tightened by a previous person causing a .0005 crushing of the mount post.
Cock the shutter with the cover off. Hold the cocking lever then press the shutter release. Slowly allow the cocking lever to operate then stop at the B position and see what is causing the B lever from engaging by moving the lever and other operating parts with a fine probe.
 

roamandclick

Member
Joined
Oct 22, 2021
Messages
13
Location
Edgartown, Massachusetts
Format
Multi Format
Thank you so much for posting your progress with your Seiko shutter, this has been super helpful and encouraging! Is it back to being fully operational?

I'm currently trouble-shooting one with an unresponsive preview lever. The shutter blades are kind of stuck in an "almost open" position, with absolutely no movement when engaging the lever in and out. The shutter cocking lever also has restricted travel (and I don't want to force it!).
seikoshutter_edited.jpeg

As you stated, there's really no reference material out there for this model, I have a copy of the "#0 Seiko Shutter for Mamiya" Service Manual from learncamerarepair.com in addition to other helpful and informative service manuals for Copal and Compur Shutters, and I've been immersing myself in youtube videos to become a little more familiar with general shutter assembly and mechanics.

I successfully reset the pin in the Diaphragm Ring, as the aperture was unresponsive previously and everything was smooth sailing for a few weeks until the preview lever issue!

Any tips, guidance or advice you (or anyone else!) can offer based on your recent experience would be awesome, as I'm a little hesitant to fully open this guy up having no real shutter repair experience of my own. It's such a beautiful and clean shutter and the cost of sending it out to be serviced would greatly outweigh what I initially paid for it, plus I think it'll be an interesting (and frustrating!) project to take on myself!
 

shutterfinger

Member
Joined
Feb 25, 2013
Messages
5,020
Location
San Jose, Ca.
Format
4x5 Format
I successfully reset the pin in the Diaphragm Ring, as the aperture was unresponsive
How did you do this?
Any tips, guidance or advice you (or anyone else!) can offer based on your recent experience would be awesome,
seikoshutter_edited.jpeg remove the screw at the green arrow , its about 1 mm long. Unscrew the ring counting the number of turns to remove it, record for future reference. Several notches have scratches so this ring has been off before. If too loose the speed ring will have up down movement and might allow a pin from the mechanism to come out of its slot, too tight will make the speed setting hard to turn and the shutter hard to cock.
With the notched ring removed the black cover will lift off then the speed ring will lift off. Set the speed ring to B or T before removing and note its reference to the cocking or trip lever. Once the speed ring is off take another picture of the shutter and post it here. Do not turn the shutter face down as a part or screw may fall out.
 
OP
OP
Joined
Sep 18, 2021
Messages
22
Location
Toronto
Format
4x5 Format
Thank you so much for posting your progress with your Seiko shutter, this has been super helpful and encouraging! Is it back to being fully operational?

I still haven't figured out B yet! I took some time away from working on it but I'm back now.
 
OP
OP
Joined
Sep 18, 2021
Messages
22
Location
Toronto
Format
4x5 Format
I started rebuilding the other Seiko 0 I got with the lens and it's pretty different on the inside. There's no flash sync so it's very empty inside and easier to work on IMO. I now see how B is enaged. Part 730-2028 is rotated counterclockwise and latches on to the blade actuating ring. I'm not sure if it's spring pressure from 110-1012 that rotates it or from being pushed by 730-2010. perhaps if someone knows they could clarify.
 

Attachments

  • Inked20211022_235315_LI.jpg
    Inked20211022_235315_LI.jpg
    256.4 KB · Views: 154
OP
OP
Joined
Sep 18, 2021
Messages
22
Location
Toronto
Format
4x5 Format
the cost of sending it out to be serviced would greatly outweigh what I initially paid for it, plus I think it'll be an interesting (and frustrating!) project to take on myself!

I was quoted about $200 CAD locally and I only paid $32 for 2 shutters and the glass - just the cost of shipping because of the condition.

It's just tricky work and I understand why the price is so high for servicing but it does make a great little project
 

roamandclick

Member
Joined
Oct 22, 2021
Messages
13
Location
Edgartown, Massachusetts
Format
Multi Format
From your photo, I see oil residue on the shutter blades and this might be what is causing the blades to stick.

That's kind of where this all began haha! I noticed some residue and light debris on the shutter blades so I was ever-so-gingerly swabbing the blades in the closed position with Naphtha and a Q-Tip. After evaporation, I began engaging and disengaging the preview lever to rework the blades and then suddenly the blades halted in the position pictured, the lever still moves normally but the blades remain inanimate...
 

roamandclick

Member
Joined
Oct 22, 2021
Messages
13
Location
Edgartown, Massachusetts
Format
Multi Format
How did you do this?

It was actually quite easy (and certainly boosted my confidence in attacking the larger task at hand!), however, it did take a few tries...

On the back of the shutter, I removed the three screws noting their exact location as well as a tiny copper "shim" that is seated beneath one of the screws. This allowed me to lift off the Diaphragm Setting Ring and there's a minuscule brass pin with "hips" that act as a spacer I imagine while connecting the Diaphragm Setting Ring and the Diaphragm Control Ring. The diameter of the pin on either side of the "hips" is slightly different as is the length from where they protrude to the ends of the pin. It can be forced to fit either way I imagine, but I lightly tried seating both ends separately in the hole in the Control Ring to see which way seemed to be the best fit. I then carefully aligned the corresponding hole in Setting Ring as I placed it back onto the assembly and replaced the screws. It worked briefly, but it kept unseating from the Control Ring below, because I could see it was seated fine in the Setting Ring. After a few more attempts, disassembly and reassembly with similar results, against my better judgement, I carefully applied a micro-dot of CA glue on one edge of the pin where it meets the Control Ring and upon drying and reassembly it worked perfectly and I reigned triumphant! I would never recommend even storing glue anywhere near a shutter but I was feeling out of options at the time as a replacement pin is pretty much out of the question...

I hope that answers your question, let me know if you'd like some pictures!
 

roamandclick

Member
Joined
Oct 22, 2021
Messages
13
Location
Edgartown, Massachusetts
Format
Multi Format
remove the screw at the green arrow , its about 1 mm long. Unscrew the ring counting the number of turns to remove it, record for future reference. Several notches have scratches so this ring has been off before. If too loose the speed ring will have up down movement and might allow a pin from the mechanism to come out of its slot, too tight will make the speed setting hard to turn and the shutter hard to cock.

Thanks so much for this! I appreciate the details such as noting the number of turns when unscrewing the Scalloped Retaining Ring, this is great stuff, I can't thank you enough!

I may not be able to get to it tomorrow, but in the next few days I will certainly follow your instructions and post a picture for your inspection and further guidance!
 
Photrio.com contains affiliate links to products. We may receive a commission for purchases made through these links.
To read our full affiliate disclosure statement please click Here.

PHOTRIO PARTNERS EQUALLY FUNDING OUR COMMUNITY:


Ilford ADOX Freestyle Photographic Stearman Press Weldon Color Lab Blue Moon Camera & Machine
Top Bottom