Large Format Seiko Shutter Repair

In the Vondelpark

A
In the Vondelpark

  • 0
  • 1
  • 27
Cascade

A
Cascade

  • sly
  • May 22, 2025
  • 3
  • 1
  • 24
submini house

A
submini house

  • 0
  • 0
  • 51
Diner

A
Diner

  • 5
  • 0
  • 95
Gulf Nonox

A
Gulf Nonox

  • 10
  • 3
  • 119

Forum statistics

Threads
197,819
Messages
2,764,948
Members
99,481
Latest member
chopfalne
Recent bookmarks
0

roamandclick

Member
Joined
Oct 22, 2021
Messages
13
Location
Edgartown, Massachusetts
Format
Multi Format
I still haven't figured out B yet! I took some time away from working on it but I'm back now.

It's probably beneficial to step away for a little while in an effort to maintain sanity... Please continue to keep us updated with your progress!

I was quoted about $200 CAD locally and I only paid $32 for 2 shutters and the glass - just the cost of shipping because of the condition.

YIKES! I bought a few not-so-great ones with the intent to piecemeal one or two functioning shutters together. My research regarding LF Shutter Repairs has pointed me towards FLUTOTS on more than one occasion, website advertises $140 for a CLA which is not awful, but I'd still opt for the do-it-yourself option personally.

Does your shutter have an mxv adjustment?

It does, with a green notched lever...
 
OP
OP
Joined
Sep 18, 2021
Messages
22
Location
Toronto
Format
4x5 Format
website advertises $140 for a CLA which is not awful, but I'd still opt for the do-it-yourself option personally

Yeah, with shipping that's about on par with my local option

It does, with a green notched lever...

That's the other one I have, it's a bit more complex than the model without the MXV adjustment, but to resolve your issues with the stuck blades and cocking is fairly straightforwards.

work slowly and take lots of detailed photos
 

shutterfinger

Member
Joined
Feb 25, 2013
Messages
5,020
Location
San Jose, Ca.
Format
4x5 Format
M sync fires the flash 15 to 17 milliseconds before the shutter reaches full open to allow the flash bulb to reach 2/3 of its maximum output which is usable light.
F sync fires the flash 5 milliseconds before the shutter reaches full open.
X sync fires the shutter when the shutter reaches full open.
The self timer mechanism is used for the flash delay.
 

roamandclick

Member
Joined
Oct 22, 2021
Messages
13
Location
Edgartown, Massachusetts
Format
Multi Format
That's the other one I have, it's a bit more complex than the model without the MXV adjustment, but to resolve your issues with the stuck blades and cocking is fairly straightforwards.

work slowly and take lots of detailed photos

What does the faceplate look like on the current shutter you're working on (the one without the MXV adjustment)? Or do you know the Model?

Thank you for the advice and encouragement, much appreciated my friend!
 
OP
OP
Joined
Sep 18, 2021
Messages
22
Location
Toronto
Format
4x5 Format
M sync fires the flash 15 to 17 milliseconds before the shutter reaches full open to allow the flash bulb to reach 2/3 of its maximum output which is usable light.
F sync fires the flash 5 milliseconds before the shutter reaches full open.
X sync fires the shutter when the shutter reaches full open.
The self timer mechanism is used for the flash delay.

Thanks for the primer! Since there are no delay mechanisms in one of my seikos would that mean that it works only in X sync?
 

shutterfinger

Member
Joined
Feb 25, 2013
Messages
5,020
Location
San Jose, Ca.
Format
4x5 Format
I still haven't figured out B yet! I took some time away from working on it but I'm back now.
Seiko #0.jpg

If I had your shutter in hand I could figure out the Bulb operation. I would start by removing A, disconnecting the main cocking spring at D then position the cocking lever C at Bulb and move B inward as it will be with the cam ring in place. You should now be able to see what is blocking the Bulb lever or is incorrectly installed preventing it from operating.
 
OP
OP
Joined
Sep 18, 2021
Messages
22
Location
Toronto
Format
4x5 Format
I tried running through the motions without any springs or tension and it honestly seems like the small spring attatched to A, which pulls on 730-2028 (the B lever) when the shutter fires is weak or tired because while it does move the B lever to latch onto the blade actuating ring it doesn't have enough 'bite' to hold it while it tries to return to the normal position under tension.

Hopefully I'm wrong but at least for now I can't see any other reason why the B position doesn't hold in place
 

Attachments

  • A.png
    A.png
    1.9 MB · Views: 93

roamandclick

Member
Joined
Oct 22, 2021
Messages
13
Location
Edgartown, Massachusetts
Format
Multi Format
Once the speed ring is off take another picture of the shutter and post it here.

Okay, removed Faceplate, Speed Ring and Speed Cam as per your helpful instructions and without issue... they were all stuck together by a fairly decent amount of residual lubricant and grime. Inside seemed pretty dirty too but not as much oil.
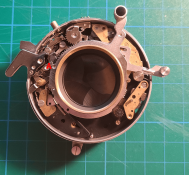
image0.jpeg
Figure 1

Upon initial (and completely untrained) inspection, with my fingers softly applying pressure to the Cocking Lever and Ring and pushing/pulling the Preview Lever in and out, I couldn't ascertain any immediate cause of issue but it was clear that the end of the lever was suppose to be pulling or pushing another component in order to open and close the Shutter Blades and in it's current state, it wasn't connected to anything.
image1.jpeg
Figure 2

image2.jpeg
Figure 3

I know I should've waited for further instruction, but curiosity got the best of me and I carefully unhooked the Cocking Spring from it's post and removed the Cocking Lever/Ring so I could have a better vantage... Behind the downward bent crook end of the Preview Lever Arm (figure 3) where the red arrow is pointing, there is a knob of sorts that controls the shutter blades (it's not visible in these pictures and I apologize for that, but I assure you, it's there!). There are (at least) two other components in that immediate area that all feel like they should connect to each other in some form or another. After some careful observation and experimenting with the tweezers to see how the parts moved and reacted, (during this bout of fiddling and inspection the shutter blades snapped closed!), I surmised what I thought to be the proper alignment of each piece in relation to each other.

The trick was that the shutter had to be cocked for me to be able to line everything up and properly lay in the end of the Preview Lever. I'm sure there is an easier and more proper way approach this, but what I ended up doing was carefully placing the Cocking Lever/Ring slightly back into place paying attention to it's fit in relation to the other components, while doing this I was also presetting the Preview Lever making sure everything was lined up and ready to go. I then cocked the shutter and finagled the Preview Lever Arm into place, I'll be honest, it took multiple attempts and a fair amount of trial and error. Taking the Cocking Lever/Ring off and starting again several times.
image3.jpeg
Figure 4

After realigning the Cocking Pinion teeth to coincide properly with the teeth on the Cocking Lever/Ring, I cocked and fired the shutter multiple times and observed the movements (and sounds), everything seemed to be in order. I tested the Preview Lever by carefully pulling it out and pushing it back in, the blades were opening and closing properly! Time to button her up! I swabbed and cleaned the excess oil and dirt from the Speed Cam, Speed Ring and Faceplate before carefully setting them back into place, rotating the Speed Cam and Speed Ring in unison to make sure all the contacts were aligned in their channels. Faceplate, Retaining Ring (noting the number of turns) and Retaining Screw back in place, I took a deep breath and held it as I cocked the shutter, fired it... SUCCESS! I cocked it again to now check the Preview Lever action... Success again! After several more cockings and firings at different speeds to be sure everything was in order I let out a long-winded sigh of relief.
image4.jpeg
Figure 5

I'd like to eventually open this bad girl up again for some cleaning and very light lubricating... any suggestions or advice based on the images above? I was thinking of pulling the Speeds Escapement out and giving it a bath in alcohol, spraying non-residue electrical contact cleaner in and over the rest of the shutter mechanism(s) then applying a few dots of oil to the gear pins in the Speeds Escapement before placing it back in the assembly...

Thank you again for your words of advice, guidance and encouragement! Much appreciated!
 

roamandclick

Member
Joined
Oct 22, 2021
Messages
13
Location
Edgartown, Massachusetts
Format
Multi Format
Also, if anyone is interested, I've found the beautiful exploded view schematics and accompanying parts list(s) for the Synchro-Compur Shutter Service Manual via learncamerarepair.com to be an indispensable visual reference. Different shutter, but enough similarities to gain a better understanding of the parts and mechanisms, especially for a completely green novice like me!
 
OP
OP
Joined
Sep 18, 2021
Messages
22
Location
Toronto
Format
4x5 Format
roamandclick you have no idea how much you've just helped me

First of all congrats on your first repair!

I was reviewing your images and this caught my eye

Spring.jpg

The spring from 730-1010 AND the release lever are on the B lever providing tension!

Since the individual who sold me my shutters tried to fix it and couldn't I got them both partially disassembled so I never had a reference image to work from but yours is the way it's supposed to be

B now works on both of my shutters :smile:
 

shutterfinger

Member
Joined
Feb 25, 2013
Messages
5,020
Location
San Jose, Ca.
Format
4x5 Format
tried running through the motions without any springs or tension and it honestly seems like the small spring attatched to A, which pulls on 730-2028 (the B lever) when the shutter fires is weak or tired because while it does move the B lever to latch onto the blade actuating ring it doesn't have enough 'bite' to hold it while it tries to return to the normal position under tension.
http://www.deansphotographica.com/machining/projects/springs/springs.html
I don't have a lathe but a drill with locking chuck or vise grips on a drill bit works.

Good going guys!
 

roamandclick

Member
Joined
Oct 22, 2021
Messages
13
Location
Edgartown, Massachusetts
Format
Multi Format
B now works on both of my shutters :smile:

OH MAN! That's awesome! I'm honored to have inadvertently aided your endeavor! A day of triumph for us both!

I hear you on the lack of reference, myself being a bit of a tenderfoot in this particular realm, it's immensely helpful to have any form of discernible documentation to work from. Guidance from others like yourself and shutterfinger and maybe a fair amount of finger crossing has been pretty rewarding I'd say.

I have another Seiko LS1 with a sticky shutter that I'll address later this week, the adventure continues!

http://www.deansphotographica.com/machining/projects/springs/springs.html
I don't have a lathe but a drill with locking chuck or vise grips on a drill bit works.

Great link! This is fantastic!
 
Photrio.com contains affiliate links to products. We may receive a commission for purchases made through these links.
To read our full affiliate disclosure statement please click Here.

PHOTRIO PARTNERS EQUALLY FUNDING OUR COMMUNITY:


Ilford ADOX Freestyle Photographic Stearman Press Weldon Color Lab Blue Moon Camera & Machine
Top Bottom