Jobo ATL-2 rebuilding project

Bullring

A
Bullring

  • 5
  • 2
  • 80
Corrib river, Galway

A
Corrib river, Galway

  • 4
  • 0
  • 109
Double S

A
Double S

  • 7
  • 2
  • 134

Recent Classifieds

Forum statistics

Threads
199,524
Messages
2,792,750
Members
99,934
Latest member
Donalro
Recent bookmarks
0
Joined
Jan 1, 2020
Messages
44
Location
Milwaukee, WI
Format
Medium Format
I am in the process of rebuilding a Jobo ATL-2 that I stubbornly purchased from someone who should NEVER be allowed to own any photo lab related equipment. This rebuild is truly a project but my intentions are to hopefully persevere.

I owned several ATL-2s through the years and I have a soft sport for them in the lab. I only wish Jobo was still producing these Auto Labs as new and parts would not be a monumental search or a price gouge when the part is found. I have had some luck with finding parts though and my background helps with the tearing down and now the reassembly. I have had to replace several discreet components and repair cut circuit traces but I now have a some life in the unit. Some important tests are ahead before I run a test roll of film.

I am always on the hunt for any ATL-2 machines and components that may still be out there.

Fred.
 

Doug Richardson

Subscriber
Joined
Oct 20, 2016
Messages
176
Location
Germany/USA
Format
Multi Format
Knock on wood, mine is still running strong. Great machine. I really wish the new ones would have to auto lift feature. Great to see others out there still being used. I will be following this thread in case I need parts in the future.
-Doug
 

138S

Member
Joined
Dec 4, 2019
Messages
1,776
Location
Pyrenees
Format
Large Format
I am in the process of rebuilding a Jobo ATL-2 that I stubbornly purchased from someone who should NEVER be allowed to own any photo lab related equipment. This rebuild is truly a project but my intentions are to hopefully persevere.

I owned several ATL-2s through the years and I have a soft sport for them in the lab. I only wish Jobo was still producing these Auto Labs as new and parts would not be a monumental search or a price gouge when the part is found. I have had some luck with finding parts though and my background helps with the tearing down and now the reassembly. I have had to replace several discreet components and repair cut circuit traces but I now have a some life in the unit. Some important tests are ahead before I run a test roll of film.

I am always on the hunt for any ATL-2 machines and components that may still be out there.

Fred.

I'm rebuilding an ATL 2500+

I'm making a totally new electronics for it (Arduino Mega + ESP-32 web interface),

Attached (bottom) there is the state machine pdf design that will control it. https://www.photrio.com/forum/attac...5/?temp_hash=50a07aa8b7633f2d8b11a4e024acd3d9

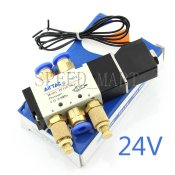
I supress the pneumatic distributor with the malta cross by using an array of six air valves. Bye bye distributor :smile:

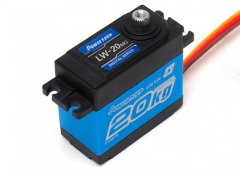
I'm to control the output nozzle with a servo. I replace all plastic tubes by silicone tubes, I place a pressure sensor just after the air pump to check pressurization in the active bottle, this would diagnose pressurization an lack of liquid. I also place a flow meter for the rinse water.

All materials are cheap and reliable, Arduino/Marlin/Prusa style.

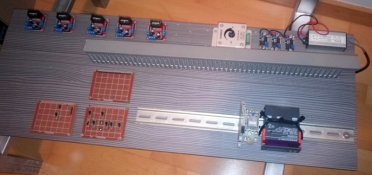
By now I understand well all sensors and actuators. Now I'm making a "test bed" to make the process manually with switches to "feel the machine" later I'll implement the control in the Mega/ESP-32 and finally I'll make a decent electric cabinet for it. I'm to place the air pump and the valves in the cabinet, so the all control will be outside of the machine for easy service.

Goal is to have a reliable machine that has to be very easy to service.

I know absolutely nothing about the original electronics, I stripped it the very first day, but I know quite well all sensors and actuators it has, if you have any question.

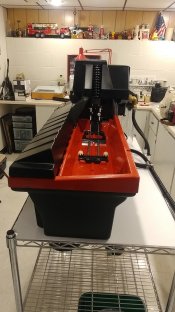
This is the "test bed" for the electronics:

IMG_20200102_160549.jpg

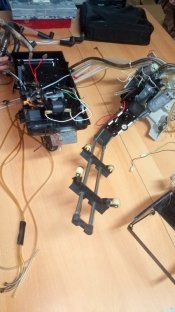
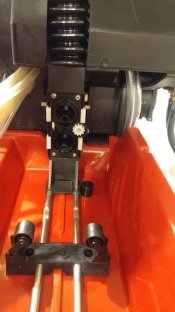
A disassembled ATL 2 is a quite scaring thing !

IMG_20191130_175638(1).jpg


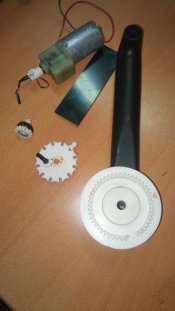
This is the reason because that machine was retired, a hidden broken sprocket that failed intermitently...

IMG_20191130_181820.jpg
 

Attachments

  • ATL FLOW - MAIN CONTROL.pdf
    260.9 KB · Views: 953
Last edited:
OP
OP
Joined
Jan 1, 2020
Messages
44
Location
Milwaukee, WI
Format
Medium Format
Fred, if you're ever in the West Michigan area I have an ATL2+ (non working) free for the taking.
Good morning Tim.. I can use all the parts I can get my hands on.. Thank you.. If you could get in touch with me at fred53185-mail3@yahoo we can try to work something out.. Again.. A HUGE Thank you.
 
OP
OP
Joined
Jan 1, 2020
Messages
44
Location
Milwaukee, WI
Format
Medium Format
I'm rebuilding an ATL 2500+

I'm making a totally new electronics for it (Arduino Mega + ESP-32 web interface),

Attached (bottom) there is the state machine pdf design that will control it. https://www.photrio.com/forum/attac...5/?temp_hash=50a07aa8b7633f2d8b11a4e024acd3d9

I supress the pneumatic distributor with the malta cross by using an array of six air valves. Bye bye distributor :smile:

I'm to control the output nozzle with a servo. I replace all plastic tubes by silicone tubes, I place a pressure sensor just after the air pump to check pressurization in the active bottle, this would diagnose pressurization an lack of liquid. I also place a flow meter for the rinse water.

All materials are cheap and reliable, Arduino/Marlin/Prusa style.

By now I understand well all sensors and actuators. Now I'm making a "test bed" to make the process manually with switches to "feel the machine" later I'll implement the control in the Mega/ESP-32 and finally I'll make a decent electric cabinet for it. I'm to place the air pump and the valves in the cabinet, so the all control will be outside of the machine for easy service.

Goal is to have a reliable machine that has to be very easy to service.

I know absolutely nothing about the original electronics, I stripped it the very first day, but I know quite well all sensors and actuators it has, if you have any question.

This is the "test bed" for the electronics:

View attachment 237317

A disassembled ATL 2 is a quite scaring thing !

View attachment 237318


This is the reason because that machine was retired, a hidden broken sprocket that failed intermitently...

View attachment 237320

You defiantly have your hands full.. I have been making forward progress with my ATL rebuild by taking it apart right down to the last stainless screw... I have hopes that I was able to find all the discrete PCB component parts that needed to be repaired along with all the mechanical components that were broken and the extensive damage to the heat exchanger. The heat ex-changer in the water bath holds water regardless of how hard one try's to drain it because of the spiral configuration and this heat exchanger definitely sat in a freezing-thawing environment for considerable time. Almost every coil had ruptures in the coils so working out an acceptable way to make the repairs to it and still keep the functional purpose of the exchanger was a little time consuming. I also rebuilt the air manifold the same gear was damaged. The answer was to carefully add material back to the damaged gear area and then to hand cut the gear teeth back in by hand. I also needed to fashion the star indexing component. I just took my time and a couple of beers at the end of the day.

I am no longer afraid of this processor. I have now repaired nearly every mechanical component either by hunting the web for parts or making my own then putting them back together.

The big plus was the help from you guys with where to start looking for information. I been able to compile a fairly comprehensive repair manual and when I figure where the information came from I will post the information. I had cleared out my history so I am having some issues remembering where the information all came from because it was from many locations.

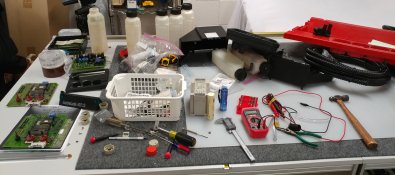
The picture is the processor starting to go back together…

Everyone have a GREAT week …
 

Attachments

  • WorkBench Parts - email.jpg
    WorkBench Parts - email.jpg
    1.2 MB · Views: 834

138S

Member
Joined
Dec 4, 2019
Messages
1,776
Location
Pyrenees
Format
Large Format
You defiantly have your hands full.. I have been making forward progress with my ATL rebuild by taking it apart right down to the last stainless screw... I have hopes that I was able to find all the discrete PCB component parts that needed to be repaired along with all the mechanical components that were broken and the extensive damage to the heat exchanger. The heat ex-changer in the water bath holds water regardless of how hard one try's to drain it because of the spiral configuration and this heat exchanger definitely sat in a freezing-thawing environment for considerable time. Almost every coil had ruptures in the coils so working out an acceptable way to make the repairs to it and still keep the functional purpose of the exchanger was a little time consuming. I also rebuilt the air manifold the same gear was damaged. The answer was to carefully add material back to the damaged gear area and then to hand cut the gear teeth back in by hand. I also needed to fashion the star indexing component. I just took my time and a couple of beers at the end of the day.

I am no longer afraid of this processor. I have now repaired nearly every mechanical component either by hunting the web for parts or making my own then putting them back together.

The big plus was the help from you guys with where to start looking for information. I been able to compile a fairly comprehensive repair manual and when I figure where the information came from I will post the information. I had cleared out my history so I am having some issues remembering where the information all came from because it was from many locations.

The picture is the processor starting to go back together…

Everyone have a GREAT week …

Me also I was planning an overhaul like that you made, but that unit had a surprise inside: a mouse nest. Many tenant mice populated that ATL, it had to be high population to make such level of destruction. They liked a lot 1st developer as the tube nearly disapeared, but it looks that color developer was not suiting their taste :smile:

A cleaver decision would have been throwing it miles away... so next step was a car washing station job, I nedded 3 hot washing rounds and several "cillit bang" bottles to remove the mice odor, last washing was made on totally disassembled parts. Before starting with the Karcher the new electronics development had been decided and I did play no attention in the scrapping of the boards. I saw too many cables there...

Now I can operate every actuator manually, and I plan to make a manual test processing soon, next step will be coding the firmware for the arduino. That retrofit is a nice project.
 
OP
OP
Joined
Jan 1, 2020
Messages
44
Location
Milwaukee, WI
Format
Medium Format
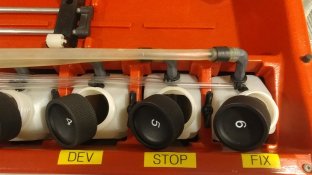
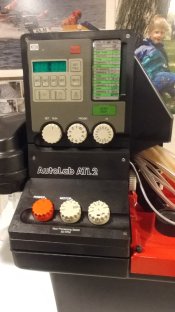
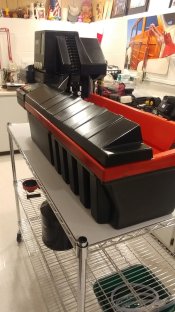
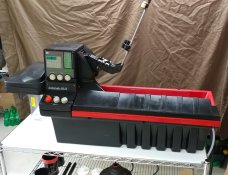
An update as to my rebuild project of the Jobo ATL-2 processor. IT LIVES once again! It is fully functional. All the damage has been repaired with specialized plastic epoxy, all the damaged circuit boards are back into spec, and it is QUIET and has been processing film without any issues so far.

It was a searching process but I found parts as far away as the Netherlands and as close as my own back yard. I remembered a sales/service tech I use to work with when I had a one-hour photo center when I reached out to him to ask a question he just so happened to have a complete Jobo ATL-2 service manual and was kind enough to borrow it to me to work with… Attached are a few photo’s of the completed project. I am now working with a group of students from my local community and it is once again doing what it does best.. consistency with processing.
Tanks 4-5-6.jpg Controll panel 1.jpg Front angle with bottle cover.jpg Full front upper angle 2.jpg Full length from waterbath end.jpg Tank hookup 1.jpg Tanks 4-5-6.jpg Controll panel 1.jpg Front angle with bottle cover.jpg Full front upper angle 2.jpg Full length from waterbath end.jpg Tank hookup 1.jpg
 

Doug Richardson

Subscriber
Joined
Oct 20, 2016
Messages
176
Location
Germany/USA
Format
Multi Format
Nice work. Glad to see that it back in top condition. Any chance did you make a copy of the service manual? Willing to share? Also, any chance that you can show how the drainage attachment is connected to the unit. Mine came with it not connected and am curious how it attaches.
Thanks in advance.

-Doug
 
OP
OP
Joined
Jan 1, 2020
Messages
44
Location
Milwaukee, WI
Format
Medium Format
Nice work. Glad to see that it back in top condition. Any chance did you make a copy of the service manual? Willing to share? Also, any chance that you can show how the drainage attachment is connected to the unit. Mine came with it not connected and am curious how it attaches.
Thanks in advance.

-Doug
I will get back in touch with the service guy who has the manual to see if I can make a copy of it.. I had promised to not copy it and I didn't but I can reach out to him again.. we are in lock down here in Wisconsin at the present time.

What do you mean by the drainage attachment? I can photograph mine but it is all assembled at the present time but I have gotten so good at removing covers from the processor if I have a better understanding of your question I can get a better picture for you. Stay safe and healthy.
 
Joined
Mar 31, 2020
Messages
5
Location
48062
Format
4x5 Format
Indeed. Either way at least it won't end up as scrap. Those stories are more heartbreaking than anything Hollywood could ever make.
 
OP
OP
Joined
Jan 1, 2020
Messages
44
Location
Milwaukee, WI
Format
Medium Format
It sounds like he is very interested if he's willing to drive 6 hours each way. I don't have the heart to tell him that the ferry cuts it in half!

Just joking Fred.

Hi Tim.. joking taken in good stride.. I am looking forward to the drive with the hope of being able to find any public restrooms as necessary along the drive which means even sleazy truck stops may have to do .. I was a step ahead of you with checking out the possibility of taking the Lake Express Ferry but the cost is $$$$$$$$$$$$$$ which got an "OH MY GOD.. THAT MUCH??" response out of me as opposed to the days drive for just $$. Here in the Milwaukee area I have recently purchased gas for as little as $.79 cents per gallon and the fact that I've got PLENTY of free time on my hands these days... I am looking forward to meeting up with you soon..
 

Tim Stapp

Member
Joined
Dec 21, 2012
Messages
557
Location
Big Rapids, MI
Format
4x5 Format
LOL. We took the ferry to Milwaukee a couple years ago when my wife had to go there for training. She hates Chicago traffic, plus her employer paid for it. Win/win for me :smile:.
 

gregory belle

Member
Joined
Dec 10, 2017
Messages
22
Location
Reno
Format
Multi Format
That's awesome that you got your atl2+ working.

I have a question.

I just turned on my jobo, after emptying and refilling the water bath, and was met with the 5 code, which is the water tempature sensor. If you have any ideas on how to reset, or fix this, I would love some advice

Thanks in advance!
 

138S

Member
Joined
Dec 4, 2019
Messages
1,776
Location
Pyrenees
Format
Large Format
which is the water tempature sensor.
No idea about ATL2+ electronics or error codes, as I striped the original electronics and making a DIY one arduino based.
But let me mention next: If your poblem is the sensor or the involved wiring:

> Sensor placement: the water circulation pump has a propeller taking water and delivering it in the drum bed, the temp sensor is inside the casing that has the propeller.
> Tere is a black plastic box that contains the drum rotation 24V DC motor and the 220V AC (in my case) motor of the circulation propeller, that box contains the Temp sensor wiring, that wiring is easy to locate because it has a trimming resistor to adjust the temperature, also it can be useful to know about that trimming resistor as it can be useful to adjust temperature measurement.
> That black box also contains the connections for the heating elements.

In my case, that black box had been penetrated by water and some connections (heating elements) were rusted.
 

manellin

Member
Joined
May 12, 2020
Messages
2
Location
Milan
Format
Medium Format
No idea about ATL2+ electronics or error codes, as I striped the original electronics and making a DIY one arduino based.
But let me mention next: If your poblem is the sensor or the involved wiring:
.
Hello If I understood correctly than your arduino solution is going to replace totally the Atl2+ electonics?
If so are you willing to sell it eventually?
Best regards
 

138S

Member
Joined
Dec 4, 2019
Messages
1,776
Location
Pyrenees
Format
Large Format
Hello If I understood correctly than your arduino solution is going to replace totally the Atl2+ electonics?
If so are you willing to sell it eventually?
Best regards

I never considered to sell it commercially as a retrofit, but I was planning to publish the project. If you want when develpoment is completed and tested I would tell it to you.

It's a really cheap hardware, as it is explained in post 3 (https://www.photrio.com/forum/threads/jobo-atl-2-rebuilding-project.172119/#post-2240228) I removed the rotating valve distributor which I replace with 6 acuarium type solenoid valves, I'm also to move the exhaust nozzle with a RC type servo.

The idea is removing all complexities to make an easy to diagnose simplified system that holds all original functionallity. All new electronics will be in a separated cabinet, the processor itself will only contain the sensors and actuators but no logic. The separated cabinet also contains the original air pump that pushes chem from the bottles to the drum.

For the moment I'm able to control manually everything from a control board with switches, like if it was a CPE2, next step is implementing the control flowchart in an Arduino, first I use a Laptop to specify the processing program in the arduino IDE and sending a new firmware, next step would be making a Web interface with an ESP-32 arduino and placing an physical LCD screen to edit parameters for every step of stored programs.
 

manellin

Member
Joined
May 12, 2020
Messages
2
Location
Milan
Format
Medium Format
Hello thanks,
I had already read your post and was extremely courious, when it is done I'll be extremely grateful for the picture and details of the solenoid valves and the exhaust movement with rc servo.
Best regards and good luck
 

138S

Member
Joined
Dec 4, 2019
Messages
1,776
Location
Pyrenees
Format
Large Format
Hello thanks,
I had already read your post and was extremely courious, when it is done I'll be extremely grateful for the picture and details of the solenoid valves and the exhaust movement with rc servo.
Best regards and good luck

https://www.ebay.com/itm/DC24V-Sole...595726?hash=item210f89958e:g:B-wAAOSwjMJXCvIV

s-l1600.jpg $12.99


https://hobbyking.com/en_us/power-h...829&indexName=hbk_live_magento_en_us_products
133690.jpg 22€

This one make 20kg·cm, which is 2kg at 10cm, a robust one, and it has to move the nozzle alone without the rotary valve.
 
OP
OP
Joined
Jan 1, 2020
Messages
44
Location
Milwaukee, WI
Format
Medium Format
That's awesome that you got your atl2+ working.

I have a question.

I just turned on my jobo, after emptying and refilling the water bath, and was met with the 5 code, which is the water tempature sensor. If you have any ideas on how to reset, or fix this, I would love some advice

Thanks in advance!

Good morning Gregory.. Sorry for the delay in reaching out to you but I finally have a few minutes to get myself on line here... I have experienced the issue you are describing of a non function temp sensor with one of the two sensors not being seen by the processor but I experienced it early into a repair / rebuild. Right now I am up to both of my elbows in rebuilding 2 challenging Jobo ATL's. One ATL-2 PLUS and the other is an ATL-3000 with plenty of issues but I am making headway with both. I expect to start the reassembly of both processors by next week as I am waiting on a few discreet parts (memory back-up and voltage regulator IC's).

Regarding your issue with the temp sensor. It is in the same chamber as the impeller for the water pump bath and the connection is on the main interface board with the markings of ST6 WA which is located on the top right side. It will take some disassembly but once you understand the disassembly process it is actually fairly easy to get to. Here is how I would proceed before tearing into the processor.
1. Drain the processor again and let it sit for a day or so and while sitting unplug the processor from the power outlet. It is rare but the sensor could have gotten water inside because it is just a simple thermal-couple encased in heat shrink tubing. Possibly the heat shrink leaked a little.. I am presuming this is an ATL-2 or 2 Plus so after you let it sit dry for a day or so turn the processor on and let the autolab fill the processor. It is rare but I had a control board get stupid and with a power reset (unplug .. let sit .. re-energize) and allowing the autolab to go thru its own start-up sequence it self corrected my issue. I just shook my head because it was like rebooting a PC or MAC.
2. If that fails go to the Jobo site at http://www.jobo-usa.com/manuals and look under BULLETINS and download Bulletin #B017 and that will get you started to getting to the circuit board area where the connections are located. Once inside the processor check for corrosion or any broken wires associated with the temperature probe of which I have seen both. If nothing is evident with any of the connections then you can swap the water bath and chemical sensor plug on the PC board around to see if the error code follows from the water bath to the chemical bath. Both the water bath and chemical sensors on the ATL-2 series are the same configuration and that will give you a definitive answer. If that is the case you can contact Omer Hecht at CATLABS who is a U.S. supplier of parts for the Jobo processors or I may have a work around with an after market sensor I am working on but I am not overly sure of the compatibility yet.

Hope this helped even a little... Fred
 
Photrio.com contains affiliate links to products. We may receive a commission for purchases made through these links.
To read our full affiliate disclosure statement please click Here.

PHOTRIO PARTNERS EQUALLY FUNDING OUR COMMUNITY:


Ilford ADOX Freestyle Photographic Stearman Press Weldon Color Lab Blue Moon Camera & Machine
Top Bottom