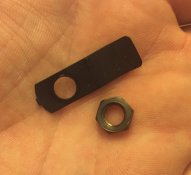
Is this a part to a speed graphic?

Thirsty

D
Thirsty

  • 0
  • 0
  • 238
Cowboying up in Kiowa.

Cowboying up in Kiowa.

  • 1
  • 0
  • 327
Cowboying up in Kiowa.

Cowboying up in Kiowa.

  • 1
  • 0
  • 320
Cowboying up in Kiowa.

Cowboying up in Kiowa.

  • 1
  • 0
  • 312
Cowboying up in Kiowa.

Cowboying up in Kiowa.

  • 1
  • 0
  • 321

Recent Classifieds

Forum statistics

Threads
199,376
Messages
2,790,582
Members
99,889
Latest member
MainCharacter
Recent bookmarks
0

Eminuss

Member
Joined
Feb 28, 2016
Messages
19
Location
Us
Format
Medium Format
I just got an anniversary speed graphic in the mail. I found this part in the bed. I've looked at the diagrams in two different manuals and didn't see anything like this. Does anyone know off the top of their head?
 

Attachments

  • image.jpeg
    image.jpeg
    342.2 KB · Views: 191

Ian Grant

Subscriber
Joined
Aug 2, 2004
Messages
23,283
Location
West Midland
Format
Multi Format
Yes it's the small release plate and nut off the bottom of the front standard that allows front shift. The nut also locks the screw bolt that adjusts the front standard lock. It's vibrated loose in transport.

Just slide the standard off the front of the track and you'll see where it fits.

Ian
 
Last edited:
OP
OP

Eminuss

Member
Joined
Feb 28, 2016
Messages
19
Location
Us
Format
Medium Format
Hi shutterfinger and thanks for replying. Last night I extended the bellows and painted them to cover the pin holes. I'm going to let it rest for a couple days to dry before I move them around to peer under it. I'll let you know what I find when I look. Thanks again!
 
OP
OP

Eminuss

Member
Joined
Feb 28, 2016
Messages
19
Location
Us
Format
Medium Format
Will do! I don't know if I'm going to tear it all the way down but I will most likely take it apart into its major components for a bit of tlc. Will for sure be replacing bits of leather and glueing a bit of wood that broke. It's looking to be a fun relaxing project.
 
OP
OP

Eminuss

Member
Joined
Feb 28, 2016
Messages
19
Location
Us
Format
Medium Format
I took the curtain out. SOOO much corrosion throughout the setting plates. Cleaning all that out now. Being copper I guess I shouldn't be surprised. Maybe I will be taking this apart all the way.
 

shutterfinger

Member
Joined
Feb 25, 2013
Messages
5,020
Location
San Jose, Ca.
Format
4x5 Format
I hope you're not like the kid on Graflex.org that wanted to service his Graflex SLR. He was given instructions to use a pin punch and a support block to drive out the taper pin on the H lever to mirror shaft which is necessary to remove the wind plate. (The H lever is used to reset the mirror.) He tried to use a nail instead and when that failed he used a diamond bit in a Dremel and ground the ends of the pin off enlarging the pin holes in the H lever then wanted to know how to reattach the H lever.

The semi common mistake on a Speed Graphic from introduction to the Pacemaker is to twist the tension roller shaft off trying to remove the tensioning knob.
 
OP
OP

Eminuss

Member
Joined
Feb 28, 2016
Messages
19
Location
Us
Format
Medium Format
Oh that tension knob was a bugger! Id give it a try every 15 minutes or so. i read that it needs a lot of torque to take off but I'd back off when my flimsy wrench started to twist. Eventually it came off but it took a real long time and many many attempts.

I hope I'm not like that kid either. Though I probably am. Lol.

My paint job on the bellows did nothing for the thin fabric. But I used plastidip on the curtain and it worked fantastically. I might have to try that on the bellows tomorrow.
 

shutterfinger

Member
Joined
Feb 25, 2013
Messages
5,020
Location
San Jose, Ca.
Format
4x5 Format
Hold knob 26354 with slip joint pliers and remove snail 24496 then unscrew knob 26354 from the shaft. If you did not remove the snail first you got lucky.

Golden Heavy Body Acrylic Artist Paint #1040 carbon black or Tulip washable ebony fabric paint will patch pin holes in either the bellows or curtain with low build up. The artist paint diluted up to 50% with water painted on in 2 or 3 thin coats works best. Paint the inside of the bellows, not the outside.

The bellows are attached to the case with 1/4 inch long 18 gauge wire brads, no longer available anywhere. Bond the bellows to the case if they are removed and reinstalled/replaced.
 
OP
OP

Eminuss

Member
Joined
Feb 28, 2016
Messages
19
Location
Us
Format
Medium Format
It was the removing of the tension snail lock nut from the snail that was giving me the headache.

It turns out that tulip paint is what I am using on the bellows. I didn't try painting the inside. I'll try it out.

I'm waffling on removing the bellows. The manual says there's 20-some tiny nails and I don't think I'm up to the challenge of finding them all.
 
Photrio.com contains affiliate links to products. We may receive a commission for purchases made through these links.
To read our full affiliate disclosure statement please click Here.

PHOTRIO PARTNERS EQUALLY FUNDING OUR COMMUNITY:


Ilford ADOX Freestyle Photographic Stearman Press Weldon Color Lab Blue Moon Camera & Machine
Top Bottom