In Praise of Ektar 100

What is this?

D
What is this?

  • 0
  • 1
  • 13
On the edge of town.

A
On the edge of town.

  • 7
  • 4
  • 146
Peaceful

D
Peaceful

  • 2
  • 12
  • 305
Cycling with wife #2

D
Cycling with wife #2

  • 1
  • 3
  • 110

Recent Classifieds

Forum statistics

Threads
198,274
Messages
2,772,192
Members
99,588
Latest member
svd221973
Recent bookmarks
0

Zygomorph

Member
Joined
Jan 12, 2011
Messages
41
Location
Brooklyn NY
Format
Med. Format RF
There are tons of comments online that dump on Ektar, so I thought I'd write up a little something to keep people from being unreasonably discouraged from using it. I too was initially worried that it was too unwieldy in the color/exposure department for my tastes. But the last few frames I've worked with have given me superb results... such that I've taken to exclaiming "F--- Yeah, Ektar!" which I think is the best way to describe the nature of this film.

NB I scan my negs as positives and do all reversals and balancing manually in Photoshop.

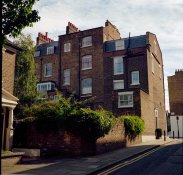
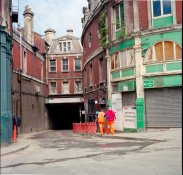
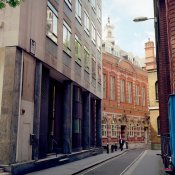
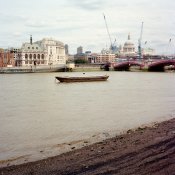
I think the most important thing to realize is that it's not Portra. The colors are naturally much bolder and it looks its best and most natural with quite a steep contrast curve. Therefore, the choice of a neutral tone in a given scene is that much more important, especially when there is a mixture of elements in direct sunlight (yellowish) and open shade (bluish). In these cases, I have had a better time neutralizing for the shaded areas as a starting point, and subsequently working with the resulting (BOLD) colors in the midtones and highlights. Obviously, this is not an issue for scenes that are flatly lit.

I have included an example of each scenario. Each has been printed at 11 inches across with outrageous detail and sharpness with little to no visible grain at handheld distances. Both photos are with a Mamiya 6, 75mm lens, handheld, scanned with a calibrated (important!) Artixscan 120tf and edited in the ProPhotoRGB colorspace.

treeTrimmingPerthAU.jpg

londonCornerUK.jpg
 

jernejk

Member
Joined
Jul 5, 2010
Messages
213
Format
35mm
Ektar is my color film of choice. Very vivid colors, good contrast and even reasonable skin tones.

etkar.jpg
 

Pioneer

Member
Joined
May 29, 2010
Messages
3,872
Location
Elko, Nevada
Format
Multi Format
I agree. For me Ektar has turned out to be a great film. I have found Ektar to be a great choice when I know most of my work is outdoors and concentrated on scenic situations without a lot of people involved. But even when people are in the picture it still handles the skin tones a lot better than Fuji Velvia does. I do prefer to use Kodak Portra (160 or 400) whenever I am working indoors, with flash, and with people.

As far as scanning is concerned, I am a long way from a pro but I have noticed that both Ektar and Portra scan a lot better for me in medium format. They are a bit touchier to work with in 35mm. I do scan the negatives but I haven't tried scanning them as a positive and then reversing them later. Of course you need to understand that I am only using a little Epson V500 with Silverfast AI to do my scanning, so my experience may not be the norm for most people on this forum.
 

Xanderrrrrr

Member
Joined
Nov 4, 2012
Messages
2
Might want to reconsider working in ProPhoto... They haven't quite worked out that color science yet, plus there's no printer, or screen that can touch that gamut yet, so really, the only thing you're doing by scanning, or working in that space if for printing it years down the line when they supposedly work it out. Your colors look pretty whack, actually.
 

EASmithV

Member
Joined
Aug 22, 2008
Messages
1,984
Location
Virginia
Format
Large Format
Yes, medium format scans a lot sharper than 35mm... Because it's larger. Especially on flatbeds, if you zoom into the same area, the unsharpness will be evident, but its less evident with a larger film.
 

I.G.I.

Not sure I would sing praise for Ektar... I switched to film recently, and still in the process of probing the different film options to get an idea what to expect. I did the mistake (IMHO) to shot it at box speed, and as a result shades often got blotchy in lurid blue hues. Only later did I realise that many treat it as ISO 50 film; that's what I intend to do with my next roll. So far my impression is of somewhat fantasy land colour palette which is not necessarily a bad thing - I jumped ship because I find film a more aesthetic medium, often rendering more suggestive/evocative results.

Bellow is a shot taken with 35mm Pentax gear; commercial lab processed; scanned at home as a negative on a KM Scan Dual IV with the KM scanning utility; no PP bar resize and convert to RGB for the web. This is only my second roll of colour film (no to mention still getting to know one another with the Pentax camera, and the temperamental KM) so have mercy for the novice...:wink:
 

Attachments

  • twilight0012.jpg
    twilight0012.jpg
    143.7 KB · Views: 131

rbultman

Member
Joined
Sep 1, 2012
Messages
411
Location
Louisville,
Format
Multi Format
It's somewhat difficult to tell but the colors look ok on my monitor. The filename has 'twilight' in it? Was this taken at twilight? Would an ND gradient filter have helped darken the sky? Looks to me like the sky is a little blown out while the foreground is a little underexposed.
 

I.G.I.

Yes, it was taken at twilight: metered w/o filter, and then w/ Blue 1.5 and graduated blue over the lower part of the image - I wanted a bit more drama in this "vast" expanse of water (it occupy more or less half of the frame) and see for myself how it works. Sure, grad ND could've darkened the sky, but then the church belfry would've turned too obviously "graduated"
 

I.G.I.

It's somewhat difficult to tell but the colors look ok on my monitor. The filename has 'twilight' in it? Was this taken at twilight? Would an ND gradient filter have helped darken the sky? Looks to me like the sky is a little blown out while the foreground is a little underexposed.

Before the Ektar, my first ever roll of film was Portra; and now even a cursory comparison between the two shows how strange and uncanny is the Ektar's palette... I mean in a sophisticated way, not the garish out of whack hyper-saturated colours that are sometimes referred as "nice" and "Velvia"-like.
 
OP
OP

Zygomorph

Member
Joined
Jan 12, 2011
Messages
41
Location
Brooklyn NY
Format
Med. Format RF
^^^ Agree. I'm going to post more examples here in just a bit, with a description of my "printing" process, lest my colors continue to be described as "whack". (I leave the calibration of your workstation entirely up to you.)
 
OP
OP

Zygomorph

Member
Joined
Jan 12, 2011
Messages
41
Location
Brooklyn NY
Format
Med. Format RF
These are two examples of Ektar 100, with 100% pixel crops. One has neon colors, the other does not. The one of the workmen was somewhat of a grab shot, so as it is far from critically sharp, you may have an easier time distinguishing the grain quality of the film from the scene itself. Normally I would crop and do some perspective control on these types of architectural shots, but for you, I show all my warts ;-)

Tech and process as follows:

Camera: Mamiya 6, 75mm lens, box speed.

Processing: nothing fancy (Print Space NYC).

Scanner: Microtek 120tf, dry mounted in the stock holders.

Scan software: Uggy SilverFast in Positive mode, HDR, tagged with scanner input profile generated with SilverFast-provided IT8 target and software. 2x sampling, 16 bits/channel @ 4000 dpi and with the analog exposure set to the default "10" in the Silverfast settings. (I have no idea what these numbers mean (aside from "higher = longer exposure") but you can also set exposure times for each of the R, G, and B channels if you're a S/N ratio weenie and don't want to properly profile your scanner...)

Post Processing: Photoshop CS2. Invert > Convert to working space (ProPhoto). Levels layer: set black point (whether to the film leader or something in the scene is a matter of discretion; I find that with Ektar--moreso than with Portra--it can make a HUGE difference); set white point manually for each channel by holding the Option key and edging it down so that only the leader, dust (ha ha, no but really), and/or specular highlights are clipped; adjust master Gamma for a pleasing brightness; set neutral midtone by clicking gray-ish things until it looks approximately right, and tweaking the individual color Gammas manually; resize 1000px across, bicubic resampling, convert to sRGB, 8 bits, save as JPEG quality level 11.

To clarify the above process: these photos were "printed" from a raw scan of the negative, which was tagged with the scanner profile and converted to ProPhoto. Using ONLY a Levels layer, I set a black point, a white point, and balanced color. (Color balancing may also include some fine tweaking of the black and white points if I notice any casts in shadows or highlights.) I converted to sRGB/8bits in order to save as a JPEG to show all you folks on the intertubes. I believe that the process outlined above is a good starting point for anybody who wishes to work with color negative film digitally, and I also believe that it comes as close as possible to characterizing the innate qualities of a particular emulsion.

Furthermore, the above process is relatively FAST, and much of it can be automated since it is such a simple process. It gives consistent, repeatable results: it leverages the fact that Kodak engineered their film to respond reasonably linearly to light (duh). If you want to be super-archival, you should save your raw neg scans with your scanner profile embedded; that way, you can choose different working spaces or conversion methods later on.

If you have any other questions or concerns, please ask politely and I'll be happy to respond.
 

Attachments

  • gravity_33_01_PP1.jpg
    gravity_33_01_PP1.jpg
    968.2 KB · Views: 100
  • gravity_33_01_S1.jpg
    gravity_33_01_S1.jpg
    809.8 KB · Views: 113
  • gravity_33_04_PP1.jpg
    gravity_33_04_PP1.jpg
    881.8 KB · Views: 118
  • gravity_33_04_S1.jpg
    gravity_33_04_S1.jpg
    725.9 KB · Views: 120
OP
OP

Zygomorph

Member
Joined
Jan 12, 2011
Messages
41
Location
Brooklyn NY
Format
Med. Format RF
Here are a few more using the method outlined above: only using a levels layer in Photoshop. Quick and dirty, these are by no means finished products. Forgive me any slight color casts...!

In case you couldn't tell, these are all from my trip to London in the summer of 2011. They were all taken within the span of about 4 or 5 hours straddling high noon, so no golden hour stuff here.

Ektar 100: gets it done.
 

Attachments

  • gravity_33_08_S1.jpg
    gravity_33_08_S1.jpg
    819.5 KB · Views: 81
  • gravity_35_01_S1.jpg
    gravity_35_01_S1.jpg
    723.6 KB · Views: 92
  • gravity_35_12_S1.jpg
    gravity_35_12_S1.jpg
    777.5 KB · Views: 102
  • gravity_35_06_S1.jpg
    gravity_35_06_S1.jpg
    739.4 KB · Views: 106

Les Sarile

Member
Joined
Aug 7, 2010
Messages
3,419
Location
Santa Cruz, CA
Format
35mm
Been using Kodak Ektar 100 since November 2008 and I consider it a very good film and very easy to work with.

This one is an automatic scan (Coolscan+Nikonscan) and automatic stitch of four frames (Microsoft ICE)

large.jpg

Link to larger version -> Kodak Ektar 100 Watson Mill Park


This one is about a 30 minute exposure of Kodak Ektar 100(Pentax LX + SMC28mm f2.8 in aperture priority mode)

large.jpg

Link to larger version -> Kodak Ektar 100 Hoover Dam at Night


This is another auto scan and stitch job of 9 frames - portrait orientation.

large.jpg

Link to larger version -> Kodak Ektar 100 McCarran D gate


What is unfortunate about scanning Kodak Ektar 100 - any negatives really, is that there are no standards for scanning it and you can't just verify it visually like slides. Heck, even the Shutterbug magazine review of Kodak Ektar 100 mischaracterized it's qualities too due to their poor workflow.
 
OP
OP

Zygomorph

Member
Joined
Jan 12, 2011
Messages
41
Location
Brooklyn NY
Format
Med. Format RF
Very nice stuff, Les! Is that supposed to be some sort of weird salamander/axolotl creature in the last picture??? It already gives uncannily sharp pictures at medium format, but stitched together as you've done, it looks like very expensive digital...!!! ;-)

I agree that it is unfortunate it is often mischaracterized due to many things. From what I recall, it often gets printed quite oddly by automatic photolabs, with that eerie cyan/purple cast.

I have no idea where Kodak stands right now, or where they're going as a business given their Ch. 11 status, but if they wanted to solidify and extend an amateur film user market, they should really put out more literature on hybrid workflow best practices, probably would have cost them nothing. They also SHOULD have made a decent, affordable film scanner while they still owned all that technology, but whatEVER.

I believe my modest proposal for a workflow above does in fact establish a sensible baseline for scanning any C41 negative (or positives, for that matter), both practically and analytically speaking. However, you get great results with automated scans, and I'm not discounting that. Ultimately, we should care about the picture, not the film or the tedious, artless process.

But I think that the nature of this and other forums requires that we strive to discuss the materials with as little "woo" as possible; that is, up to a certain point, there is NO "knack", no art to scanning and inverting C41 film. (My photography professor said as much about C41 processing; "There's very little art to it; just take it to a professional lab." And yet... here we are! ;-) Film is a high-performance chemical machine, going into other machines, characterizing it mathematically on well-established models, and so forth. It needs to be treated and discussed as such, especially since a hybrid workflow introduces many more variables that did not exist in wet darkrooms. Fortunately, almost all of these variables have been accounted for, mainly by the ICC, and I really hope people getting into scanning film spend some time empowering themselves with color science...!
 

Les Sarile

Member
Joined
Aug 7, 2010
Messages
3,419
Location
Santa Cruz, CA
Format
35mm
Correct, depending on your scanner and software, you need to determine what will give you the best results. Often times, there are those who mistake "neutral" scanning with "default settings" scanning. Not so with some scanner/software/film/scene combinations.

BTW, my buddy capture what I consider a particularly spectacular portrait with Kodak Ektar 100 in the link below. If it asks for a password, the password is spelled out in the top of the page. Hover over the image and select "O" and you can see the full res scan of the it.

Kodak Ektar 100 portrait
 

Lamar

Member
Joined
Dec 22, 2008
Messages
375
Location
Georgia, USA
Format
35mm
Ektar takes some work with the tone curves to get a scan looking proper. You need to tweak the red, green, & blue curves separately and in most cases the curves will not be linear. You also need to be careful not to underexpose Ektar. Shooting at box speed is fine as long as you make sure you compensate for bright clouds, haze, etc which can cause your meter to over-respond. I used to lean on the + side when I shot it but the more I pay close attention to my exposure the better for me ISO 100 works.

A couple of examples:
20121117-02%20Kodak%20Ektar%20NF%20Scan-121117-0016-L.jpg


20111113-01_004_Kodak-Ektar-100-L.jpg


20130406-01%20Ektar%20FTn%20Scan-130409-0007-L.jpg


20130416-01%20Ektar%20Ftn%20Scan-130417-0005-XL.jpg


20130416-01%20Ektar%20Ftn%20Scan-130417-0011-L.jpg
 

I.G.I.

Ektar takes some work with the tone curves to get a scan looking proper. You need to tweak the red, green, & blue curves separately and in most cases the curves will not be linear. You also need to be careful not to underexpose Ektar.

All very true - at least in my case using Minolta software. The auto exposure get it right most of the times, and it's okay; but using manual exposure and adjusting the individual channels is where things get that "little bit extra"...
 

I.G.I.

Somebody opined elsewhere that Ektar might not be the best choice for a sunny day. Today I checked a developed roll, and as it happens some of the shots were taken under sunny cloudless sky. There is something candy and infantile about the purity and lucidity of the colours as if they were taken from a Disney fairy tale. Perhaps the Disney style, consciously or not, inspired Kodak designers?

Contrapunto0035.jpg
 

I.G.I.

After having shot a few rolls Portra, Ektar, and Fuji Pro I have to admit am hopelessly seduced by Ektar... Portra now looks to me boring by comparison; and Fuji while looking interesting doesn't work very well with my scanner software (Minolta) - on auto exposure almost everything looks ghastly cold, and the greens especially are peculiar and unpleasant; I had a hard time with the curves to bring some joy to my mind's eye. In contrast everything is easy and pleasurable with Ektar, even the night shots or under mixed lighting; but the most surprising thing to me is the fact that while colours are definitely on the lush side they remain remarkably close to the original hues (as far as I can trust my memory).

Hbh_0049.jpg
 
Photrio.com contains affiliate links to products. We may receive a commission for purchases made through these links.
To read our full affiliate disclosure statement please click Here.

PHOTRIO PARTNERS EQUALLY FUNDING OUR COMMUNITY:


Ilford ADOX Freestyle Photographic Stearman Press Weldon Color Lab Blue Moon Camera & Machine
Top Bottom