I'm a Teen Looking to Learn to Develop B&W Film

Recent Classifieds

Forum statistics

Threads
199,026
Messages
2,784,850
Members
99,779
Latest member
Deezfluffybutternutz
Recent bookmarks
0
OP
OP
alphanikonrex

alphanikonrex

Member
Joined
Dec 28, 2009
Messages
45
Format
35mm
Here's a quick scan I did of a shot I took today:

Dead Link Removed

I think I over-developed, all my images are on the high-key side...ah well. The next batch will definitely be better!
 

Ektagraphic

Member
Joined
Feb 3, 2009
Messages
2,927
Location
Southeastern
Format
Medium Format
That is awesome! Especially for your first roll! Over-development or development at a higher temperature results in very high contrast negatives.....
 

clayne

Member
Joined
Sep 4, 2008
Messages
2,764
Location
San Francisc
Format
Multi Format
Just a bit over-exposed to my eyes. You'd be surprised how much detail is still there. Highlights compress.
 

clayne

Member
Joined
Sep 4, 2008
Messages
2,764
Location
San Francisc
Format
Multi Format
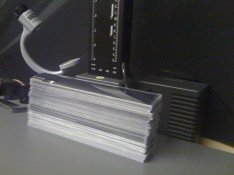
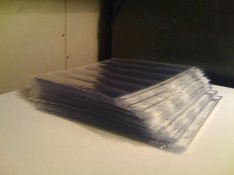
Also, the aforementioned sleeves, or basically - the ones you want look like this:

attachment.php

Polyester fold-flap sleeves.

attachment.php

Which are stored in these (Printfile Ultima sleeve pages).

Under no means should you use the generic album pages that one slides negatives into. They screw up negatives and are not inert like polyester.

The polyester sleeves will of course have dust around - and that's not something you can avoid. However since you are *never* sliding a negative against another surface the dust is not difficult to remove once the negatives are out of the sleeve. The only surfaces that slide together are the outside of the poly-sleeve and the album pages. Printfile makes all sizes all the way up to 4x5 and above.

This is probably more than you need to know right now - but it's best to do it earlier rather than later (which will suck if you have to transfer a bunch of album-sleeved negatives to fold-flaps).


Attachments

  • IMG_1130.jpg
    IMG_1130.jpg
    30.2 KB · Views: 129
  • IMG_1177.jpg
    IMG_1177.jpg
    22.4 KB · Views: 126

fschifano

Member
Joined
May 12, 2003
Messages
3,196
Location
Valley Strea
Format
Multi Format
I don't know how you scanned these negatives, but a quick trip through Photoshop Elements with a levels adjustment brought out this:
 
OP
OP
alphanikonrex

alphanikonrex

Member
Joined
Dec 28, 2009
Messages
45
Format
35mm
Thanks everyone! :D

And clayne, thanks for the info...I should look into those, as I would HATE to have to move the negatives after the fact. Currently I found some old empty Costco 1 Hour Photo sleeves (I think the films they originally came with are in an album!), but there's barely enough for more than 3 rolls I think.

I don't know how you scanned these negatives, but a quick trip through Photoshop Elements with a levels adjustment brought out this:

Ahh, levels adjustment...I just tried to use the exposure adjustment but the results didn't come out as well.

Hehe—"quick scan" as in "run through an ordinary scanner" :wink:
 

fschifano

Member
Joined
May 12, 2003
Messages
3,196
Location
Valley Strea
Format
Multi Format
You're agonizing over how to store your negatives. I use plain old ordinary #10 business envelopes. Use a pencil to write the pertinent information right on the envelope. Will hold strips of 6 35 mm negatives. Are they archival? No, but I have negatives stored this way for years and they're fine and dandy. A plus? No dust getting stuck in those tight plastic sleeves and they're inexpensive.
 
Last edited by a moderator:

keithwms

Member
Joined
Oct 14, 2006
Messages
6,220
Location
Charlottesvi
Format
Multi Format
RE: levels adjustment... careful! You can easily convince yourself, incorrectly, that your negs are optimal when they are not. I can tell you that I have almost unprintable negs that still scan decently. For example, I have a set of negs that were overexposed by ~8+ stops... they are literally black to the eye. Black. I overexposed them that severely because I simply forgot to put an IR filter in place, duh :wink: Anyway the negs are black and yet... off the scanner they don't look half bad, just grainy. I also have thin negs that scan fairly decently. As for tone curve, that is something scan software can manipulate like buts, so don't fall into the trap of using that as a crutch.

N.b. b&w neg materials do not reach anywhere near the kind of DMax that challenges today's scanners; many film scanners were designed to deal with severe DMax ~4 from slide films like velvia, that is what people mostly wanted to scan when ciba/ilfochromes became so expensive. So... even a crappy b&w neg can be scanned quite decently. They may look grainy and the tonality may suck but you'd be absolutely amazed how much info is in the crappiest b&w negs. Ask me how I know this :wink: I was scanning negs for a year or so before I was optically printing them. It wasn't until I started printing that the whole loop closed and I realized the need to think optimize the whole process.

So... to make a long story short, I agree that auto levels adjustments on your scanned negs will indeed make them look better, but not necessarily for the right reason.

This is where meeting an experienced photographer is handy... he/she will be able to glance at the negs and say yea or nay very quickly. If he/she cannot judge by eye (it takes a good deal of experience) then he/she will probably do a quick contact print and issue a verdict immediately, or use a densitometer. Some people do it scientifically, with a step wedge etc. You might look at "beyond the zone system" (BTZS) to see what some people do. I don't do that, but I do believe it is important to get as close to optimal negs right at the outset, it'll save you a ton of work later on. Hear me now believe me later :wink:

Anyway, again, just know that getting a scannable/printable neg is not the same thing as getting an *optimal* neg. Don't be afraid of that or take it as a negative comment, it's really just a little bit further you need to go before you have everything nailed down. Do take time to be happy with what you've accomplished so far, it is going to pay off very soon. Congrats on your results this far. APUG is collectively proud of you!
 

sly

Subscriber
Joined
Nov 12, 2006
Messages
1,675
Location
Nanaimo
Format
Multi Format
I've got all my negatives, except the large format ones, in those sleeve pages. The older ones are in glassine (an onion skin paper kind of stuff) and anything this century, more or less, in the plastic. I've got negatives going back to the 1970's. I've had old negatives that are unprintable because they weren't fixed and washed properly, but dust in the sleeves scratching them is not something I've ever noticed. At one point I was using the envelope idea, but once I had hundreds of rolls it was just too hard to find any negative that wasn't on the last few rolls. I now store a contact sheet with each roll so I can easily identify the contents.
As you progress, learn the craft, and find your vision you'll probably not want to use these early negatives, I wouldn't worry about what kind of protection they're in right now. Take a look around at various storage options, and the price on them, talk to others and mine APUG and eventually choose something that suits you and your pocket.
 

srs5694

Member
Joined
May 18, 2005
Messages
2,718
Location
Woonsocket,
Format
35mm
RE: levels adjustment... careful! You can easily convince yourself, incorrectly, that your negs are optimal when they are not. I can tell you that I have almost unprintable negs that still scan decently. For example, I have a set of negs that were overexposed by ~8+ stops... they are literally black to the eye.

I happen to have an example of this sort of thing online, in this sample on Flickr. It was taken with some old Soviet color print film, ~16 years past date. The negatives are very dense and it's hard to tell where frames start and stop on the roll; yet I managed to pull images off the roll via my scanner. (They aren't good images by typical measures, but that was never my intention when I bought the film....) In fact, I nearly threw my first test roll in the trash based on my eyeball inspection of the negatives. I was shocked that I got any images off it at all. This was one of the first, and I mis-cut some of the frames on that roll because they were so hard to spot by eye.

Of course, if your negatives are that far off optimal, chances are you could tell they're not right even without experience. You should be able to easily tell what the image is on the negative by eyeball inspection. Depending on the film, the lightest parts should be anywhere from nearly transparent to something less than fully transparent but still easily seen through, and the darkest parts should be dark but not so dark that you can't see through it at all. (One rule of thumb is that you should be barely able to read newsprint through the darkest parts of a negative.) As Keith suggests, you can take your negatives to an expert (try a photo shop). If you're living in a small town with no suitable experts nearby, you could try shooting a roll of Ilford XP2 Super and having it processed in C-41. This film is designed for C-41 processing (the same as is used by most color print films), but the results closely resemble normal processing for B&W films. XP2 Super has a bit of a purple tinge to the base, but otherwise it's pretty similar in appearance to conventional B&W films.
 

fschifano

Member
Joined
May 12, 2003
Messages
3,196
Location
Valley Strea
Format
Multi Format
The levels adjusment I made to his scan was definitely not automatic. It took a little bit more than that. Auto levels was a disaster. Adjusted the black and white points, then moved the midrange around a bit till it looked ok. Finally adjusted the white point output downward a few points until the brightest highlights only just showed some tonality. I've found that you really need to do this to get anything to look halfway decent when scanned.

I know this is APUG, and discussions of this sort are generally frowned upon around here. Hybridphoto would maybe be a better place. But the fact is, without some sort of digital intervention, there would be no images here.
 

keithwms

Member
Joined
Oct 14, 2006
Messages
6,220
Location
Charlottesvi
Format
Multi Format
Frank, I understand what you did. It's not an issue of me looking down on what you did or on scanning in general, I assure you! But just to be clear, you did manipulate the tone curve.

Again, the issue I wished to assert is that scanners have a rather amazing Dmax-Dmin range, because they were intended to handle slides as well as neg materials. As a result, one can have very thin or very thick negs and get decent (not great, but decent) scans.... even if the neg is far, far from optimal. That's all I'm sayin' :wink:

Bottom line: a neg that is optimal for scanning is not necessarily optimal for traditional printing, and vice versa. If I know I will be scanning then I use a pyro developer or a chromogenic film. If I know I will be printing optically then I much prefer xtol or such. So output method affects dev choice and film choice and exposure too. N.b. by "optimal" I mean as good as it could/should be. Ad of course people's opinions of "optimal" will vary.

Anyway let's try to stay on point for the O.P.s benefit :wink: It's not an analogue vs. scan debate. That's not at all what I intended to start.
 
OP
OP
alphanikonrex

alphanikonrex

Member
Joined
Dec 28, 2009
Messages
45
Format
35mm
I by no intentions think that this is the "optimum" negative...not in the least. The whole purpose of the leveling was to get some sort of usable image out of the films. When I work with my d-word gear I'll chase after optimum results even when a quick adjustment later on the computer can "solve" the problem. That's just not me.

Besides, that was a silly little scan that I did just to see a positive of my hard work (pun intended :D ).

From the moment I saw the images I didn't feel they were optimal negatives anyway...at first I thought that all I got was pitch black rectangles! (As a result of this I sort of lost hope and skimped on washing out the fixer a little...shhh :wink: ) Of course, the images did indeed come out, much to my surprise at that point, but in my opinion they are definitely on the over-exposed side. Or, "not optimal" as you would say.

At least that's what I think. I need to find someone with experience to look them over...I think the photography teacher at the high school may be the one to go to.

As for storage...bah. I've only developed one roll anyway, and it's in some sort of storage, so that's all that matters for now. When things start getting more interesting I'll probably get more serious about storing my negatives. (Sort of like doing back-ups with a computer...my first d-word photos are lost somewhere [I think I have some sort of idea of where they may be?] while my latest are in a dual-drive mirrored-RAID setup AND on DVDs.)

Thanks again everyone for all the help and encouragement! :D
 

voretaq7

Member
Joined
Jun 10, 2010
Messages
9
Format
35mm
It definitely sounds like your negatives are over-exposed (or over-developed). You didn't say if you used any of the "adjustments" from the Sprint website, but if you did try without them (or try the D76 1:1 times for your film) - I personally think Sprint's suggested adjustments are a bit aggressive...

You could also do a quick calibration shoot (set yourself up somewhere with nice controlled lighting & shoot 1-2 shots at each shutter speed you have available & process normally: Some will be thin, some will be insanely dense, & somewhere in the middle will be ones that are "just right"). Based on that you can tweak either your shooting or your development process to give optimal results.
 
OP
OP
alphanikonrex

alphanikonrex

Member
Joined
Dec 28, 2009
Messages
45
Format
35mm
I didn't do anything complicated or "out-of-the-ordinary" at all—this is my first roll we're talking about here! I just followed the time/temperature guide on the Sprint instructions. The only thing is that I think I might have been a couple of °F too high, which would be the cause for the over development. Otherwise I did my best to follow their times accurately.

I could do a calibration shoot, but I'd much rather keep on shooting and developing in the real world (rather than in a controlled situation) and see how my results come out...
 

fschifano

Member
Joined
May 12, 2003
Messages
3,196
Location
Valley Strea
Format
Multi Format
Oh yeah. Temperature control is important. A few degrees too high for your development time can send the contrast through the roof. Do yourself a favor, If you don't already have a good thermometer, get one. I use those cheap kitchen digital thermometers, and most of them have been within a few tenths of a degree of each other and my calibration thermometer. This last one I got is a full degree low, but that's ok. I use a Paterson Color Thermometer as my calibration standard. It may not be as good as a full fledged lab thermometer, but it doesn't carry a hefty price tag either and it's more than good enough.
 
OP
OP
alphanikonrex

alphanikonrex

Member
Joined
Dec 28, 2009
Messages
45
Format
35mm
Wait...temperature affects contrast? :confused:

So let me get this straight:
What would happen if I lengthened development time? Shortened it? (Without changing temperature)
What would happen if I raised the temperature? Lowered it? (Without changing development time)

Thanks.

And I got a thermometer, but it arrived a day late. I'm not sure how accurate it is, but then again, how bad could it really be? I suppose I'll find out.
 

MattKing

Moderator
Moderator
Joined
Apr 24, 2005
Messages
53,106
Location
Delta, BC Canada
Format
Medium Format
Wait...temperature affects contrast? :confused:

So let me get this straight:
What would happen if I lengthened development time? Shortened it? (Without changing temperature)
What would happen if I raised the temperature? Lowered it? (Without changing development time)

Thanks.

And I got a thermometer, but it arrived a day late. I'm not sure how accurate it is, but then again, how bad could it really be? I suppose I'll find out.

All the following should be qualified with the words "within reasonable limits".

1) Lengthening development time increases contrast;
2) Increasing temperature increases contrast;
3) Shortening development times decreases contrast;
4) Decreasing temperature decreases contrast.

As for your thermometer, there are two issues:

a) is it accurate; and
b) is it consistent.

As long as the thermometer is reasonably close to accurate, the more important issue is whether or not it is consistent.
 
OP
OP
alphanikonrex

alphanikonrex

Member
Joined
Dec 28, 2009
Messages
45
Format
35mm
Thanks Matt...

So then the cause of me getting over-exposed negatives is simply because my camera meter is giving me over-exposed readings? Because if that's the case it's a relatively easy fix, I'll just spin the ISO dial a third of a stop or two up.
 

MattKing

Moderator
Moderator
Joined
Apr 24, 2005
Messages
53,106
Location
Delta, BC Canada
Format
Medium Format
Are you asking about over-exposure, or are you asking about over-development?

They are two different things! Even if to the inexperienced eye they might at first glance look superficially similar.

Again, all the following should be qualified with the words "within reasonable limits".

1) If you give the film too little exposure, the dark parts of the scene will result in parts of the negative that are too transparent or "thin". In addition, the light parts of the scene will result in parts of the negative being less "thick" than they could be;

2) If you give the film too much exposure, the dark parts of the scene will result in parts of the negative that are thicker than they need to be. In addition, the light parts of the scene may result in parts of the negative being thicker than they should be.

Note that when you are concerned with exposure, you are paying most of your attention to the darker parts of the scene, and thinner parts of the negative, and you are not particularly concerned with contrast.

When considering development:

3) If you give the film too little development, the parts of the negative relating to the dark parts of the scene won't be strongly affected, but the parts of the negative relating to the light parts of the scene will be less "thick" than they should be, resulting in low contrast negatives and dull prints;

4) If you give the film too much development, the parts of the negative relating to the dark parts of the scene won't be strongly affected, but the parts of the negative relating to the light parts of the scene will be more "thick" than they should be, resulting in high contrast negatives and prints with loss of details in the highlights.

Note that when you are concerned with development, you are paying most of your attention to the mid-range and lighter parts of the scene, and thicker parts of the negative. You are mostly concerned with contrast.

For clarity, I would emphasize that you really cannot correct under-exposure by increasing development. All you can do is make a low contrast under-exposed image look a bit better.

So what you need to do is adjust your exposure to get the right amount of negative density in the darker parts of the scene and adjust your development to get the right amount of negative density in the mid-range and bright parts of the scene.

Hope this helps.
 
OP
OP
alphanikonrex

alphanikonrex

Member
Joined
Dec 28, 2009
Messages
45
Format
35mm
Yes Matt, that's a big help. I had the misconception that you compensated for over or under exposure (pushing/pulling) by adjusting developing time, but as you clarified all that does is change the contrast to make for a better under/over-exposed negative. I was asking about over-exposure and over-development as I thought they were directly related, but now I know otherwise.

So now my real question is do I have an exposure problem, a developing/contrast problem, or no problem whatsoever? If I compared these to color negatives that I've had developed in the past would that be of any help to me? Thanks so much for your help Matt.

The thing is I on close inspection I don't really feel the film fits into any of your categories, yet they still feel like they are on the over exposed side to me...
 

MattKing

Moderator
Moderator
Joined
Apr 24, 2005
Messages
53,106
Location
Delta, BC Canada
Format
Medium Format
This site might help you assess your negatives:

http://www.ephotozine.com/article/Assessing-negatives-4682

You can try comparing them to properly exposed colour negatives, but that isn't really ideal right now because when you are starting out, the built in orange mask makes it harder for you to make the comparison.

When it comes to assessing negatives, having someone at hand who is more experienced to help you and give you advice is really helpful, especially if they can show you examples.

It is a little bit like swimming or riding a bicycle. At first it seems impossible, but after a little while, you wonder why you thought it was difficult. :smile:
 
OP
OP
alphanikonrex

alphanikonrex

Member
Joined
Dec 28, 2009
Messages
45
Format
35mm
Thanks Matt.

So I checked out that site, and from my best judgement I'd say that my negatives are definitely over-developed, and perhaps over-exposed as well. When I finish my currently roll, which I'm exposing normally, I'll be more careful with temperature, and see what I get...then I'll be able to easily find out if I have an exposure problem as well and take it from there.

Of course, I wouldn't mind an expert's eye either.

Oh, and I compared my negatives to ordinary color negatives, and I can certainly tell that mine are not "optimum".

Thanks for the encouragement, I'm sure that I'll get this with a little patience and experimenting!
 

srs5694

Member
Joined
May 18, 2005
Messages
2,718
Location
Woonsocket,
Format
35mm
As for comparing your own negatives to a standard, you could try shooting a roll of Ilford XP2 Super. This is a B&W C-41 film, so it can be processed by a minilab. The negatives look a lot like normal B&W negatives, unlike Kodak's nearest equivalent film, which has the same sort of orange mask as color negatives. That said, there are personal preference and other idiosyncratic issues in development, so you might find that Ilford XP2 negatives aren't quite exactly like what you'd most like to see in your own conventional B&W negatives. They should be in the same ballpark, though.

Another Web page you might find useful is a two-part series on finding the best speed setting to use for your film:

http://www.halfhill.com/speed1.html
http://www.halfhill.com/speed2.html

In the process of doing this, you'll settle upon the optimum development time, as well as the optimum speed to set your meter.
 
OP
OP
alphanikonrex

alphanikonrex

Member
Joined
Dec 28, 2009
Messages
45
Format
35mm
Thanks srs5694, I might resort to either of those options...

I did a quick test which proves that my F2 Photomic meter over exposes by a stop, but I'm not sure if it's legitimate.

I took my D300 and set it to ISO400 and Center-Weighted Metering. I mounted my Ai-converted 55mm ƒ/1.2 on it and took a meter reading off a grey card in different lighting scenarios. I did the exact same thing on my F2 with its own 55mm ƒ/1.2, and the meter readings I got on it were consistently 1 stop over exposed compared to my D300. This might be the solution to my exposure problem, but I'm not 100% sure, as I do know that d-word ISO's aren't necessarily "correct". I may set the F2 to ISO800 though on my next roll to see how my results come out...
 
Last edited by a moderator:
Photrio.com contains affiliate links to products. We may receive a commission for purchases made through these links.
To read our full affiliate disclosure statement please click Here.

PHOTRIO PARTNERS EQUALLY FUNDING OUR COMMUNITY:


Ilford ADOX Freestyle Photographic Stearman Press Weldon Color Lab Blue Moon Camera & Machine
Top Bottom