ILEX SHUTTER QUERIES

Orlovka river valley

A
Orlovka river valley

  • 0
  • 0
  • 32
Norfolk coast - 2

A
Norfolk coast - 2

  • 2
  • 1
  • 37
In the Vondelpark

A
In the Vondelpark

  • 4
  • 2
  • 116
Cascade

A
Cascade

  • sly
  • May 22, 2025
  • 6
  • 5
  • 96
submini house

A
submini house

  • 0
  • 0
  • 74

Recent Classifieds

Forum statistics

Threads
197,829
Messages
2,765,132
Members
99,484
Latest member
Webbie
Recent bookmarks
0

tonyowen

Member
Joined
Nov 21, 2015
Messages
157
Location
Anglesey, UK
Format
Multi Format
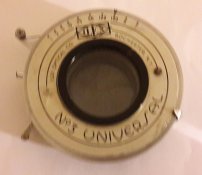
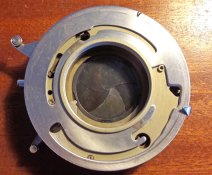
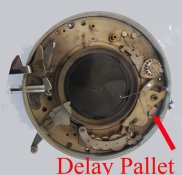
I’ve an Ilex #3 Universal shutter with speed 1s to 1/150s plus B and T.

However the speeds are way off. I tested them with a computer microphone and the Audacity program.

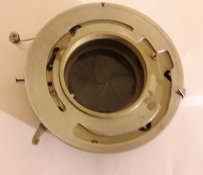
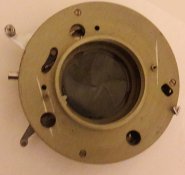
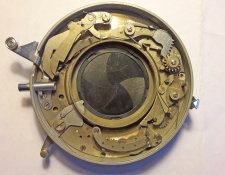
Does anyone know of a safe, simple procedure that could be used to clean any grot out of the mechanism to see if that improves the range of speeds available?

Googling the general Ilex problem it seems that Isopropyl alcohol is recommended as a flushing medium without recourse to ac complete strip down. But some say that the shutter blades would suffer!!!!!

Yes, I know I could send if for a CLA.

And

Yes I could use the (now) available speeds


Secondly, is there a way of fitting an electronc flash connector to this shutter.


Any responses would be welcome

Regards

Tony
 

BAC1967

Subscriber
Joined
Oct 30, 2014
Messages
1,422
Location
Bothell, WA
Format
Medium Format
I know some will tell you to send it to a professional for proper servicing and lubrication. The flush removes whatever lubrication that was there and doesn't replace it with anything. But if you're like me, cheap, a flush with Ronsonal lighter fluid is better than Isopropyl alcohol. Open it up, make sure the shutter blades are closed and the iris is closed as far as it will go. Flush it so that the fluid runs away from the center to avoid getting it on the blades. Do this outside or where there is plenty of ventilation. Some blades have a coating that will be removed by the fluid plus you could flush junk into them that will make them stick. I have done this on the same shutter and it works great now. It doesn't get heavy use so the lack of lubrication is not a major concern for me.
 

Dan Fromm

Member
Joined
Mar 23, 2005
Messages
6,798
Format
Multi Format
Some, not all, Ilex shutters have plastic blades. Naptha will attack them. And Ilex shutters were made to run dry.
 

jim10219

Member
Joined
Jun 15, 2017
Messages
1,632
Location
Oklahoma
Format
4x5 Format
Ronsonal (naphtha) is what I use too. I've never had an issue with it attacking any plastic. If the aperture blades are paper, you'll want to remove them first. I've had a few old lenses with paper apertures coated in something like resin or varnish. Those will get eaten by naphtha. Also, remove the lens elements, of course. I usually do a complete CLA, with a tear down and re-lube, so I generally avoid the wash method. But if I'm not in the mood to do a complete tear down and rebuild, I'll strip the shutter down just far enough to expose the gears, drown it in Ronsonal, and then use an orbital hand sander to vibrate the container to help break up the goo. From there, I let it soak for an hour, hit it with the sander again, and then pull it out to dry for a few hours. Then I'll usually drop a few dabs of lube on the places that need it and call it good. It all depends on the shutter, it's value, it's complexity, and my amount of free time.

If you don't know what to lube or what types of lube to use, then you're better off not lubing anything. Another thing to consider, and this is what I do with my compound shutters, is to measure the actual time they take and make a chart to keep with the shutter. If it works consistently, but is just a bit off, that's probably the easiest way to "fix" it. Or put some masking tape over the dial with the measured times marked on it.
 

Old-N-Feeble

Member
Joined
Feb 22, 2012
Messages
6,805
Location
South Texas
Format
Multi Format
Don't use any lube in an Ilex shutter. Cleaning is easy enough. Adjustments are relatively easy also.
 
OP
OP

tonyowen

Member
Joined
Nov 21, 2015
Messages
157
Location
Anglesey, UK
Format
Multi Format
Thank you all, I'm aware of the possibility of the blades being plastic and I might check with a very small magnet - which will only prove they are/are not ferrous.
I'm thinking towards taking off the cover and using a dry air "spray-duster" to see what dust/crud can be blown away..
Cheap I'm not, but I'm always prepared to ask before making what could be an unnecessary expenditure - especially as the shutter works albeit the speeds are awry.
regards
Tony
 

shutterfinger

Member
Joined
Feb 25, 2013
Messages
5,020
Location
San Jose, Ca.
Format
4x5 Format
Ilex shutters use hard rubber blades. Shade tree jister Rosinal flush will damage it.
Whlie designed to run dry the polished surfaces are likely worn and will run smoother and faster with a trace of oil on the pivots and a trace of light weight grease on sliding parts.
Its your equipment maintain or destroy it as you see fit.
 

johnnyh

Member
Joined
Aug 20, 2009
Messages
42
Location
Left
Format
Medium Format
Ilex shutters use hard rubber blades. Shade tree jister Rosinal flush will damage it.
Whlie designed to run dry the polished surfaces are likely worn and will run smoother and faster with a trace of oil on the pivots and a trace of light weight grease on sliding parts.
Its your equipment maintain or destroy it as you see fit.
^ +1
I don't know about Ilex specifically, but my experience with aged Compurs, AGC family (Prontors ...), Epsilons agrees with the above recommendation.
For what it's worth, I use isopropyl alcohol which is not too aggressive.

Not wanting to be discouraging, even after CLA, a shutter with that age of springs inside may not achieve the nominal marked fastest speeds (did they ever ? - I've found the same with a more recent unused old stock in original packaging that had never been fitted to a camera). But as you calibrate them you at least know what they are and can mentally adjust by whatever Stop or fraction thereof is appropriate. Good luck !
 
OP
OP

tonyowen

Member
Joined
Nov 21, 2015
Messages
157
Location
Anglesey, UK
Format
Multi Format
. Another thing to consider, and this is what I do with my compound shutters, is to measure the actual time they take and make a chart to keep with the shutter. If it works consistently, but is just a bit off, that's probably the easiest way to "fix" it. Or put some masking tape over the dial with the measured times marked on it.
Don't use any lube in an Ilex shutter. Cleaning is easy enough. Adjustments are relatively easy also.
Sorry about the delay in responding but ..........
"jim10219 - I agree, but my situation is that the speeds consistent BUT are not just slow (or fast) they are all over the places.
For 1s thru 1/150s settings I've got 1.5s, 1s , 0.75s, 1/2s, 1/4s, 1/4s, 1/5s and 1/100s respectively [but nothing in the 1/10s thru 1/50s range]
Old-N-Feeble - do you have any more info regarding adjustments
regards
Tony
 

jim10219

Member
Joined
Jun 15, 2017
Messages
1,632
Location
Oklahoma
Format
4x5 Format
That sounds to me like one of the springs may be worn out. There's often a second spring that helps with the fastest speeds, so that may be why it suddenly jumps up from the slower speeds to hit 1/100. So perhaps the main spring has just lost some of it's springiness. About the best you can do is replace it, if that's the cause. There is a way to re-temper the spring by removing it and exposing it to heat, but that's delicate work because you have to reach a specific temperature and cool it down at a specific rate. It's not easily done without the proper tools and know how, of which I have neither. Doing it wrong can cause the spring to become overly fragile and break, or soft and not hold any tension. I tried once. I broke the spring. I won't attempt that again.

Of course, make sure everything is nice and clean fist, and that there's no oil in the gears. The wrong kind of oil, or too much oil, can slow a shutter down. Especially if it's not meant to have oil in the first place. And don't just clean the gears, but also around the shutter blades and the dial they're attached to. Gunk can build up there and slow the thing down. But make sure to take lots of pictures as you tear it down because the blades usually have to go back together in the same order for them to work. And be sure the keep them in order once removed so you know what went where. It's a long and delicate process if you have to go that far down into a shutter. It's doable, but for most people, it's not worth the effort. I like working on stuff like this, so it's a treat to figure out how everything works. But it can be a real headache, especially if it's your first time.
 

shutterfinger

Member
Joined
Feb 25, 2013
Messages
5,020
Location
San Jose, Ca.
Format
4x5 Format
That sounds to me like one of the springs may be worn out.
There are many levers and mechanisms involved in speed timing and if not moving smoothly will result in erratic speeds.
Aa.jpg
Bb.jpg

Delay timing controls speeds from 1 second through 1/100 - 1/125, booster spring aids for faster speeds.
http://pheugo.com/cameras/index.php?page=acme2
 
Last edited:
OP
OP

tonyowen

Member
Joined
Nov 21, 2015
Messages
157
Location
Anglesey, UK
Format
Multi Format
There are many levers and mechanisms involved in speed timing and if not moving smoothly will result in erratic speeds.Delay timing controls speeds from 1 second through 1/100 - 1/125, booster spring aids for faster speeds.
http://pheugo.com/cameras/index.php?page=acme2

Thanks for the information, but I'm slightly confused over some of the contents of the Daniel R Mitchell link you gave me. My confusion relates to the speed selection/operating mechanism. The second image refers to "Speed setting cam" I can see the cam tracks but cannot see any pin that follows or is driven by the cam. On the eighth image it refers "One of the screws is only visible when the speed selector pin is in the position shown in this picture." But I cannot identify the speed section pin - which I assume is set (somehow) by the Speed setting cam in the second image.
Any clarification would be welcome
regards
Tony
 

shutterfinger

Member
Joined
Feb 25, 2013
Messages
5,020
Location
San Jose, Ca.
Format
4x5 Format
My confusion relates to the speed selection/operating mechanism.
Cc.jpg
Aa.jpg

One of the screws is only visible when the speed selector pin is in the position shown in this picture.
There are actually 3 pins involved in setting the speed, A which is part of the main cocking lever which operates the Bulb and Time levers, B the delay gearing movement lever which limits how far the delay gearing travels as determined by the speed selecting ring, and C the delay pallet tension which is also set by the speed selector ring and it determines how fast the delay gears run once the shutter is released.
All 3 should jusr protrude into the speed selector ring/cam and not go above it. A 50% to 75% engagement or the cam thickness is all that is needed, 100% of the thickness may drag on the face plate once installed.
Different techs use different terms and manufacturers sometimes use different terms for the same function which can be confusing when just starting out.
Be sure to take pictures as you remove parts as they aid greatly in reassembly.
 
OP
OP

tonyowen

Member
Joined
Nov 21, 2015
Messages
157
Location
Anglesey, UK
Format
Multi Format
Different techs use different terms and manufacturers sometimes use different terms for the same function which can be confusing when just starting out..

Thank you - I guess it is a language problem. As a (retired) manufacturing engineer I know what I mean by cams and cam followers and what I could see didn't match my expectations; especially with all of the various cut-outs that could be partial cams.. Hence better to check than assume.
regards
Tony
 
OP
OP

tonyowen

Member
Joined
Nov 21, 2015
Messages
157
Location
Anglesey, UK
Format
Multi Format
Dear Shutterfinger
I've attached three images of 'my' Ilex shutter. The positions of A, B, & C actuators are [I believe} in the relative same positions as those on your image.. My shutter operates in reverse to those of your image ie counter clockwise from T >B @ 1/150 >>>> 1s. The three actuators/followers/whatever all seem to be in contact with their respective cam and move (freely) accordingly. So not certain what is causing the speed problem. I have not removed the cover to examine the mechanism.
Any comments/observations/suggestions welcome.
regards
Tony
 

Attachments

  • ilex#1.jpg
    ilex#1.jpg
    1 MB · Views: 239
  • ilex#2.jpg
    ilex#2.jpg
    1.1 MB · Views: 232
  • ilex#3.jpg
    ilex#3.jpg
    877.3 KB · Views: 228

jimgalli

Subscriber
Joined
Sep 7, 2002
Messages
4,232
Location
Tonopah Neva
Format
ULarge Format
Tony, you've had lots of helpful responses. I use a product sold at the Napa auto parts stores called Dead Link Removed. It's a liquid used by tire folks to clean the area where the patch will go. It leaves no residue and does not attack phenolic shutter blades. It can leave a bit of dirt that gets washed out behind to wipe up with a Q tip. You can pull up the MSDS if you're curious what the agents are in it.

For these Ilex shutters, I just take the front off and give the escapement mechanism a bath along with other moving parts. Air dry with canned air gently. Lube things that are on axles and that move against each other. The little gear surface in the cocking mechanism and some of the levers on axles. I do not lube the escapement. It runs dry. Have had wonderful success.

Don't be afraid to take the front off. This shutter doesn't have springs and ball bearings that are going to jump out and hide in the berber. That's about all there is to it. The little tab that gets placed at different places in the long cam that makes the speeds can be bent to make either more or less. Hey this is American alarm clock technology at it's best. Amazing little machines, some of them nearing their hundredth birthday and still purring along happily.
 

shutterfinger

Member
Joined
Feb 25, 2013
Messages
5,020
Location
San Jose, Ca.
Format
4x5 Format
Tony, you've had lots of helpful responses. I use a product sold at the Napa auto parts stores called Dead Link Removed. It's a liquid used by tire folks to clean the area where the patch will go. It leaves no residue and does not attack phenolic shutter blades. It can leave a bit of dirt that gets washed out behind to wipe up with a Q tip. You can pull up the MSDS if you're curious what the agents are in it.
The shutter in question uses Hard Rubber shutter blades. Naphtha and its derived products will destroy the shutter blades.

Tony,
the levers may seem to operate OK but its likely they don't move smoothly or consistently.
If you don't want to fully disassemble it get an ultrasonic cleaner off ebay, they run $30-$40 on ebay in the U.S. ( https://www.ebay.com/itm/iSonic-D38...302953&hash=item5445a23f52:g:fb4AAOSwzgBY4yh- similar to mine) Mine has a 5 minute (300 second timer) that can be adjusted for shorter times. Get a pint of 90% Isporoply Alcohol, pour the alcohol into the ultrasonic, remove the cover in your picture #3 exposing the internal mechanism, place face (internal mechanisms) down in the ultrasonic cleaner and run 3 to 5 cycles. The alcohol will start to warm after 2 -5 minute cycles in succession. Allow the alcohol to cool completely between cycles as it will cause paint to peel off when warm. Warm alcohol may soften the shutter blades but cold alcohol will not.
Although designed to run dry the shutter will run smoother with a drop of light weight oil on the pivots and a trace of grease on spring contact areas and surfaces where parts slide over each other. Drop=about the size of a straight pin point; trace=a light sheen, touch a cotton swab to light weight lithium grease, wipe the movement area with the grease end, wipe a second time with the clean end.

With all parts removed from the top of the main plate the shutter blade controller should float, ie the blades move with the weight of a 1/4 inch 6mm down feather touching the controller. I'm betting yours does not, it likely takes a gram of pressure to move.

B revisted.jpg

common labels for the parts. Place blade controller onto the bottom side of the main plate, starting at position 1 which varies by shutter, usually close to the cocking lever, place a shutter blade in correct orientation and continue in a counterclockwise direction until all blades are in place then install the blade caps in the same manner. Pay careful attention to starting point and assembly order when disassembling and reassemble in the same order. Place blade controller retainer over the blades and controller (it only fits one way) then install the retainer cover. This is the point where the controller with blades should float.
 
Last edited:

jimgalli

Subscriber
Joined
Sep 7, 2002
Messages
4,232
Location
Tonopah Neva
Format
ULarge Format
The shutter in question uses Hard Rubber shutter blades. Naphtha and its derived products will destroy the shutter blades.
WRONG. Do some research before you fear monger. I've cleaned many of these ilex shutters with this product. If you took the time to look it up you'd see it's tri-chloroethylene which may be too toxic for the butterflies out there but it has worked well for me.
 
OP
OP

tonyowen

Member
Joined
Nov 21, 2015
Messages
157
Location
Anglesey, UK
Format
Multi Format
IGo enjoy your Bourbon or Scotch/QUOTE]

Don't know about the Bourbon or Scotch, but I'm going to require some spirit to tackle this one.

I've taken the case off and am faced with a lot of springs and levers - which are similar to, but not quite the same, as the ACME 2.
Two more images, one of the inside and the other of installed cam plate. But this time at the T setting. - whereas ilex#2 was Tat 1/150s.
At least I know why the cable release does not work - it cannot active anything.
Thanks for all of your input at least I'm now more knowledgeable than before I started this thread..
regards
Tony
 

Attachments

  • ilex#4.jpg
    ilex#4.jpg
    432.6 KB · Views: 153
  • ilex#5.jpg
    ilex#5.jpg
    498.6 KB · Views: 203

jimgalli

Subscriber
Joined
Sep 7, 2002
Messages
4,232
Location
Tonopah Neva
Format
ULarge Format
I do not support using such a toxic chemical in cameras.
Go enjoy your Bourbon or Scotch under the shade tree while you inhale that product.
Have your burial policy paid up also.

Don't tell my wife. She'll raise the death payment on the life insurance again. This is fear mongering and you know it. If you worked in industry with vats of that stuff, day in and day out; that's one thing, but to squirt a little bit in a shutter in a nicely ventilated space a couple times a year? Really?? I get weary of all the safety basis fear mongering on the internet. Not based in reality.
 

shutterfinger

Member
Joined
Feb 25, 2013
Messages
5,020
Location
San Jose, Ca.
Format
4x5 Format
This is fear mongering and you know it. If you worked in industry with vats of that stuff,
There were still a few aerosol cans of that stuff around when I entered the equipment repair industry. Even small quantities encountered infrequently do harm, the extent may vary from individual to individual. Toxic crap is toxic crap in any quantity.

ilex#4.jpg
A release lever arm that slides inside the cable release tube. Round tipped cable release may slip to one side or arm may be bent.
B bulb and time levers
C main cocking arm
D delay timing - controls speeds 1 second through 1/100
E delay pallet
F shutter blade opening lever

Should be safe to cock and release shutter in this state although you may have to manually move the T lever to get the shutter to close.
Release and remove B&T lever spring then the B&T levers.
Release the main cocking lever spring then remove the main cocking lever
Release the springs on delay pallet E then remove the associated parts.
Remove delay gearing D
Keep each assemblies parts separate from others and clean separately.
Assembly is reverse of removal.
Delay gearing in the #2, other sizes similar
Dd.jpg
 
Last edited:
OP
OP

tonyowen

Member
Joined
Nov 21, 2015
Messages
157
Location
Anglesey, UK
Format
Multi Format
Hi Shutterfinger,
I've followed your instructions but cannot remove the delay pallet.
I've juggled, lifted, pushed and pulled (all lightly) but to no avail
Both springs are disconnected and the screw is removed - see attached image
Any and all help welcome
regards
Tony
 

Attachments

  • ilexquery01.jpg
    ilexquery01.jpg
    140.9 KB · Views: 270

shutterfinger

Member
Joined
Feb 25, 2013
Messages
5,020
Location
San Jose, Ca.
Format
4x5 Format
Release the delay gearing lever from the pallet assembly or remove the delay gearing first. Some parts fit on their shafts with .0001 (.002mm) or less clearance. To slide off they must be lifted evenly as the slightest tilt will jam them. Sometimes turning it upside down and giving a tap against the work table will dislodge the part other times a drop or two of penetrating oil left for an hour or two is needed.
Does the plate pivot on the shaft?
 
Photrio.com contains affiliate links to products. We may receive a commission for purchases made through these links.
To read our full affiliate disclosure statement please click Here.

PHOTRIO PARTNERS EQUALLY FUNDING OUR COMMUNITY:


Ilford ADOX Freestyle Photographic Stearman Press Weldon Color Lab Blue Moon Camera & Machine
Top Bottom