how to test enlarging lens? (apo-componon 4.5/90)

Diner

A
Diner

  • 1
  • 0
  • 45
Gulf Nonox

A
Gulf Nonox

  • 6
  • 2
  • 49
Druidstone

A
Druidstone

  • 7
  • 3
  • 102
On The Mound.

A
On The Mound.

  • 1
  • 0
  • 59
Ancient Camphor

D
Ancient Camphor

  • 6
  • 1
  • 72

Forum statistics

Threads
197,801
Messages
2,764,694
Members
99,479
Latest member
macmmm81
Recent bookmarks
1
Joined
Mar 18, 2005
Messages
451
Location
Toronto
Format
Medium Format
Interesting thread here. I've read in the past that enlarger lenses used wide open is optimal. Obviously this assumes glass carrier, aligned enlarger, etc... I've never found it to be true. This is with more than a few 6-element lenses, and a few APOs. I consistently found that the sharpest prints were made 1 or 2 stops down. Without exception, the worst results came from a lens full stopped down - I'd change bulbs or switch to a longer lens before using my lenses at f16 or f22.

I make my judgements using test negatives for the appropriate format. This one is for 35mm:
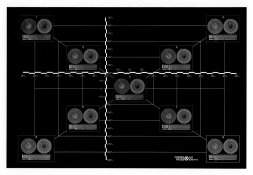
Testnegativ 09 1000px.jpg

Close up of detail:

Testnegativ-09-close-up.jpg

If you make prints with something like this, you'll see right away where your lens fails or shines, it's as clear as day.

I find wide open, the corners suffer. That's not to say I won't use my lens wide open, that's foolish. Like Bob says, for a mural print, or a lith print, I'll often use it wide open. The extra light is absolutely worth the trade off. I had a few mural rolls of Fotokemika Emaks paper - man was that stuff slow! One of the slowest papers I remember using. So am I going to stop down two stops if I've already got a 6 minute exposure time? Probably not.

Going back to the test negative above. In real world applications, an actual photograph, the differences in aperture (with the exception of fully closed down) are pretty slight. I'll try and stick to the sweet spot, but will use whatever aperture gives a useful exposure time.

To the OP, I wonder about the quality of the actual negative in question, not the lenses and alignment? I've got plenty of negatives that absolutely fail when making a 30-40 X enlargement. I shoot handheld on Tri-X, sometimes wide open on my Rolleiflex. They're great for a 10 X enlargement, really beautiful, but you can't make a mural out of every one. I think it takes a special negative to make a tack sharp 30-40 X enlargement. I've had people want murals printed from obviously out of focus 35mm negs; I remember telling them I could make a decent 5x7 and that's it, and suggested re-shooting. If you're really fussy, I would say using a tripod is probably a must. I hate tripods.

Good luck!
 
OP
OP

chris77

Member
Joined
Jan 11, 2015
Messages
708
Location
Paris
Format
Medium Format
Interesting thread here. I've read in the past that enlarger lenses used wide open is optimal. Obviously this assumes glass carrier, aligned enlarger, etc... I've never found it to be true. This is with more than a few 6-element lenses, and a few APOs. I consistently found that the sharpest prints were made 1 or 2 stops down. Without exception, the worst results came from a lens full stopped down - I'd change bulbs or switch to a longer lens before using my lenses at f16 or f22.

I make my judgements using test negatives for the appropriate format. This one is for 35mm:

attachment.php


Close up of detail:

attachment.php


If you make prints with something like this, you'll see right away where your lens fails or shines, it's as clear as day.

I find wide open, the corners suffer. That's not to say I won't use my lens wide open, that's foolish. Like Bob says, for a mural print, or a lith print, I'll often use it wide open. The extra light is absolutely worth the trade off. I had a few mural rolls of Fotokemika Emaks paper - man was that stuff slow! One of the slowest papers I remember using. So am I going to stop down two stops if I've already got a 6 minute exposure time? Probably not.

Going back to the test negative above. In real world applications, an actual photograph, the differences in aperture (with the exception of fully closed down) are pretty slight. I'll try and stick to the sweet spot, but will use whatever aperture gives a useful exposure time.

To the OP, I wonder about the quality of the actual negative in question, not the lenses and alignment? I've got plenty of negatives that absolutely fail when making a 30-40 X enlargement. I shoot handheld on Tri-X, sometimes wide open on my Rolleiflex. They're great for a 10 X enlargement, really beautiful, but you can't make a mural out of every one. I think it takes a special negative to make a tack sharp 30-40 X enlargement. I've had people want murals printed from obviously out of focus 35mm negs; I remember telling them I could make a decent 5x7 and that's it, and suggested re-shooting. If you're really fussy, I would say using a tripod is probably a must. I hate tripods.

Good luck!


Hello Marco.
Thanks for your interesting post.

the negative in question was shot on tripod using cable release, mirror lock-up, in fact its just a page from a journal.
but i made shure its tack sharp (mamiya rz67, 110mm lens).
so what i did was to get focus on the center (grain focused)
and then i moved the negative in the glass carrier to get this sharpest portion of the neg to the corner of the projection.
thats what i came up with, testing corner sharpness on different fstops.

and i do agree with you, especially going as large as 25x, the difference between f4.5, f5.6 and f8 was a big one!
f11 seems even a tad sharper, but with a loupe.
but as others have mentioned, this might also be due to imperfect alignement - trust me, i did my best :wink:

gonna test within reasonable limits tonight (15x).

nice day.
 

RobC

Member
Joined
Nov 5, 2007
Messages
3,880
Location
UK
Format
Multi Format
Rob
All I can rely on is real world practical evaluation and I have found that once its focused its not getting any sharper by stopping down. If you are
grain sharp on the paper - and if the print looks grain sharp - this is all I can hope for.

Bob, closing down past the lens sweet spot will improve things but only if your negative is not flat and/or your alignment is out of whack. If those are correct then you don't need any DoF at all since the negative is in a single plane with depth of emulsion thickness only. But if its slightly out, then the extra DoF you gain by closing down a stop or two can bring it all back into focus but at the cost of additional diffraction, so not as sharp as it would be if it were correctly aligned. The wider you can keep the aperture the better. Except that fully wide may introduce other aberations so you need to find the sweet spot. Each lens will have its own sweet spot. It looks to me from the MTF for the componon HM 4.5/90 that the sweet spot will be somewhere from F5.6 to F8. I doubt F5.6, more likely a bit more but by F8 it should be fine. But this is all theory. Real world may differ.
 

Bob Carnie

Subscriber
Joined
Apr 18, 2004
Messages
7,731
Location
toronto
Format
Med. Format RF
I guess this is where some of my anal thinking comes from, as since 1980 ( Jones and Morris Mural Enlarging) I have only used well aligned enlargers, with glass and APO lenses. I am forgetting the good older days when I printed colour portraits with no glass, and if the enlarger was out well It added a nice Bokeh on the edges . Very few wedding portraits were sharp on the corners ( by intention)
So all my comments are based on not knowing any better for all these years.

just for the record I do close the lens down at least one stop for lenses 150mm and larger and two stops for medium format and 35mm lenses, but not for DOF reasons but rather time considerations.
I actually use three wattage bulbs, 75w , 150w, and 250w on my Omegas so that I can get the sweet spot in print exposure of between 8 seconds and 20 seconds, but that is a whole other topic.

Bob, closing down past the lens sweet spot will improve things but only if your negative is not flat and/or your alignment is out of whack. If those are correct then you don't need any DoF at all since the negative is in a single plane with depth of emulsion thickness only. But if its slightly out, then the extra DoF you gain by closing down a stop or two can bring it all back into focus but at the cost of additional diffraction, so not as sharp as it would be if it were correctly aligned. The wider you can keep the aperture the better. Except that fully wide may introduce other aberations so you need to find the sweet spot. Each lens will have its own sweet spot. It looks to me from the MTF for the componon HM 4.5/90 that the sweet spot will be somewhere from F5.6 to F8. I doubt F5.6, more likely a bit more but by F8 it should be fine. But this is all theory. Real world may differ.
 

Old-N-Feeble

Member
Joined
Feb 22, 2012
Messages
6,805
Location
South Texas
Format
Multi Format
CAVEAT: I have no practical experience with enlargements beyond 20x24 with 4x5 film.

I've researched this extensively and came to the conclusion that probably the only way to get good results at very high magnification is with a special purpose lens such as a Rodagon-G or a G-Componon.

Some folks have indicated that a fast sharp taking lens will work fine. For extreme enlargements, some people claim a taking lens should be reversed and others say it shouldn't. I've never read of any results with such other than those trying process lenses and those are optimized for 1:1 so the results were about the same as or inferior to typical enlarging lenses. If you have access to a modern multicoated 100-120mm lens such as an Apo Symmar or similar then maybe you could try it both reversed and turned normally. I'd try it wide open and closed one stop.

EDIT: The reason I suggest a longer-than-normal lens is due to the close proximity of the optic to the film so you may need a bit more coverage to avoid distortion at the corners.
 
Last edited by a moderator:

ic-racer

Member
Joined
Feb 25, 2007
Messages
16,500
Location
USA
Format
Multi Format
Marko is on the right track with test negatives but most people use the Peak 1 and a grainy negative and observe it in 'real time' as you focus and stop down. You don't have to wait to make a print to get results. Results should be the same with both methods.
 

RobC

Member
Joined
Nov 5, 2007
Messages
3,880
Location
UK
Format
Multi Format
Another thing to remember when you are doing this kind of testing is that in a typical subject with a normal film, say Delta 100, you are unlikely to ever get more than 70-100 lp/mm resolution in the negative except in extreme cases. For simplicity of maths we'll call it 80 lp/mm. If you enlarge that 40X that will give you 2 lp/mm in the print. That will look pretty mushy from close distance. You need to be a fair distance from the print to make an assessment of print sharpness which you should remember when doing your tests.

To get high resolution at close print veiwing distance you would probably need 320 lp/mm in the negative with a 40X enlargement (that gives a little margin for error). I doubt you would ever get near to that except in a very carefully managed studio setup with the correct film.

In short, close inspection of print can mislead you into thinking something is wrong when in reality your exepectations of what is possible are beyond the capability of the system you are using.
 
OP
OP

chris77

Member
Joined
Jan 11, 2015
Messages
708
Location
Paris
Format
Medium Format
Since both diffraction and de-focus can wreak havoc in projection printing, the view-camera focusing method of Hansma can be adapted to the enlarger.
Focus the enlarger by moving the head on the column; this is like focusing the view camera with the rear standard. Focus on the center of the image and note where the column is. Then focus on any other part of the negative that may be out of plane or affected by curvature. Do this without touching the focus knob, by moving the enlarger head. Then set the head to the point exactly half-way between the extremes. This will optimize your depth of field at any aperture.

If you want, you can actually calculate the aperture to get it all in focus based on the focus spread (based on view camera focus equation of Hansma).

N = 20/(1+M) * square root of 'dv'

N = Aperture number
20 = user dependent constant (circle of confusion 0.15mm for me)
M = magnification
'dv' = millimeters of focal depth measured on the enlarger column (between your high focus and low focus points).

hmm. thanks !
very scientific indeed..
 
OP
OP

chris77

Member
Joined
Jan 11, 2015
Messages
708
Location
Paris
Format
Medium Format
Another thing to remember when you are doing this kind of testing is that in a typical subject with a normal film, say Delta 100, you are unlikely to ever get more than 70-100 lp/mm resolution in the negative except in extreme cases. For simplicity of maths we'll call it 80 lp/mm. If you enlarge that 40X that will give you 2 lp/mm in the print. That will look pretty mushy from close distance. You need to be a fair distance from the print to make an assessment of print sharpness which you should remember when doing your tests.

To get high resolution at close print veiwing distance you would probably need 320 lp/mm in the negative with a 40X enlargement (that gives a little margin for error). I doubt you would ever get near to that except in a very carefully managed studio setup with the correct film.

In short, close inspection of print can mislead you into thinking something is wrong when in reality your exepectations of what is possible are beyond the capability of the system you are using.

very well explained.
i am aware of that and my expectations were low for 40x a bit higher for the 25x and now arriving at 15x i do expect grain sharpness at close distance throughout the image.

until today i have been working (as much as i could) on alignement (negative stage - lens stage)
i got it as perfect as possible with my enlarger without using laser technology..

i am gonna scratch some film tonight and then truth will be spoken :smile: about how the apo componon beats the componon-s ... or not... :wink:
 

DREW WILEY

Member
Joined
Jul 14, 2011
Messages
13,764
Format
8x10 Format
If you're doing anything rightl, the Apo should beat the hell out of the S. But everything I've read so far sounds medieval to me. This is
somewhat academic, because any 6x7 neg enlarged that much will be basically mush anyway, if the print is viewed close at all. Neither lens is really engineered for huge enlargements.
 
OP
OP

chris77

Member
Joined
Jan 11, 2015
Messages
708
Location
Paris
Format
Medium Format
If you're doing anything rightl, the Apo should beat the hell out of the S. But everything I've read so far sounds medieval to me. This is
somewhat academic, because any 6x7 neg enlarged that much will be basically mush anyway, if the print is viewed close at all. Neither lens is really engineered for huge enlargements.


hmm. really difficult to discover the value of your post.

and yes, at 15x the apo beats the componon-s..
 
OP
OP

chris77

Member
Joined
Jan 11, 2015
Messages
708
Location
Paris
Format
Medium Format
final results...

so here is what i did yesterday.

15x magnification of a piece of unexposed, undeveloped film (size 6x7) scratched with a nail (x shape) from corner to corner.

componon-s @ between f8 and f11
vs.
apo componon hm @ f8

i do not have a scanner anymore, so no use in asking for pictures. wouldnt be easy to capture anyway.

the apo is - no surprise - a bit shaper, a bit better contrast.
this is, in the corners, visible to the eye.
in the center it is less obvious.

the alignement of negative and lens stage was taken good care of, playing with differences of 1/10th of milimeters here and there.. at some point i was wondering about the fine borderline between perfectionism and becoming neurotic :wink:

the durst m800 is a good enlarger, but for even finer and more steady tuning i would/will need a better, more precise enlarger. any recommendations for 6x7 ?
the negative stage called setoneg is a bit tricky to be perfectly aligned, especially when the head is tilted.
maybe because mine has been used for many years (by a professinal photographer) and things are a tiny bit "loose"..

thats about all, folks. thanks for following this thread.
thanks again for all the good advice!
interesting community here..

have a nice weekend!
 

RobC

Member
Joined
Nov 5, 2007
Messages
3,880
Location
UK
Format
Multi Format
Durst M805. They are rare and expensive becasue they were very good and people hold onto them. I would get a condensor setup if you're doing big enlargements.

I don't know the M800 personally but on my L1200 and Modular 70 the neg holder is retained in place by springs which could be re-bent to hold the neg holder more tightly if necessary.

Or consider an L1200 if you have the space for it. I never tried mine horizontal. My Modular 70 which is much much smaller would probably work just as well horizontally.
 

DREW WILEY

Member
Joined
Jul 14, 2011
Messages
13,764
Format
8x10 Format
You're only as good as your weakest link. All kinds of variable have to be pinned down to make a realistic test. But you need to do these anyway, if you expect to optimize print sharpness. Not only do all your planes have to be perfectly parallel, but your lens optically centered,
you glass negative carrier truly flat, with the film fully compressed, the paper target itself tightly held on a true flat surface, preferably via
vacuum. Test film should be appropriate (fine scratch marks in the corners help). We could go on and on. At correct magnification ranges,
that Apo lens should be distinctly superior in detail, microtonality, and contrast to the Componon S, when utilized a recommended optimal
f-stops. But for high magnifications, you need something like Rodagon G or certain apo process lenses to do an ideal job.
 

DREW WILEY

Member
Joined
Jul 14, 2011
Messages
13,764
Format
8x10 Format
Forgot the enlarger itself. Even for something as small as 6x7 I use a fully bolted down classic industrial-style Durst 138 5x7 (inch) enlarger. Making big enlargements from small film is tricky because the slightest vibration will spoil the sharpness. You can make do with lighter equipment, but would have to move as gracefully as a cat in the darkroom. When I used to do horizontal projections, I installed the enlarger
on a heavy hardwood cabinet atop precise floor rails.
 
OP
OP

chris77

Member
Joined
Jan 11, 2015
Messages
708
Location
Paris
Format
Medium Format
dear all..

couldnt help it (after returning the apo because of tiny imperfection in the coating)
so.. i gave the mamiya sekor z 110 another shot.
its the main taking lens that i use on my rz67 proII.

same setup, 15x enlarging the same scratched filmstrip, again at f8..

and...

it beats the apo! :cool:

sharper, finer resolution...

dont know what to say.

so.. just to let you know.

exposure time was 35 instead of 50 seconds
vibrations did not play a role here.
it is simply sharper.

made my day :smile:

good night
 

RobC

Member
Joined
Nov 5, 2007
Messages
3,880
Location
UK
Format
Multi Format
which only goes to show that if you can't test and get consistant results from one test to the next, you'll never know which is/was really the best.
 
OP
OP

chris77

Member
Joined
Jan 11, 2015
Messages
708
Location
Paris
Format
Medium Format
which only goes to show that if you can't test and get consistant results from one test to the next, you'll never know which is/was really the best.

i totally disagree.
my tests on 15x where very consistent and precisely executed.
the other tests before on 40x and 25x were less valuable, and at that moment the enlarger was not yet "perfectly" aligned.
by crosschecking the new results blind i came to find that i did a pretty good job.

but in general i agree with you, that only consistent testing, changing 1 thing at a time and patience are needed to get there..

didnt mean to say that the sekor z lens is generally sharper, most likely not.
but at 15x it outperforms the two others.
 

MattKing

Moderator
Moderator
Joined
Apr 24, 2005
Messages
52,149
Location
Delta, BC Canada
Format
Medium Format
If you tried the RZ or RB 140mm macro, it would probably perform even better, because it would be working closer to the magnification it was designed for, and because it would be able to take advantage of its "flat field" optimization.
 
OP
OP

chris77

Member
Joined
Jan 11, 2015
Messages
708
Location
Paris
Format
Medium Format
If you tried the RZ or RB 140mm macro, it would probably perform even better, because it would be working closer to the magnification it was designed for, and because it would be able to take advantage of its "flat field" optimization.

exactly what i am thinking :smile:
its the lens i am planning to buy since some time.
now i have one more good reason..
 

jjphoto

Member
Joined
Oct 9, 2010
Messages
402
Location
Melbourne, A
Format
Multi Format
*_*, can you please elaborate on the method you used to test the Mamiya 110 lens, specifically how did you mount it in the enlarger and ensure that it is indeed parallel to the film plane?

When you said it is 'sharper' do you mean it is simultaneously sharper across the entire print, ie in the centre and the corners, or is it only sharper in the centre or the corners, but not both at the same time?
 
OP
OP

chris77

Member
Joined
Jan 11, 2015
Messages
708
Location
Paris
Format
Medium Format
*_*, can you please elaborate on the method you used to test the Mamiya 110 lens, specifically how did you mount it in the enlarger and ensure that it is indeed parallel to the film plane?

When you said it is 'sharper' do you mean it is simultaneously sharper across the entire print, ie in the centre and the corners, or is it only sharper in the centre or the corners, but not both at the same time?

attachment.php

rear lenscap mounted to the durst lens plate..


cant say if it is sharper in the center as well, but in the corners it is.
at the same time resoulution might still be higher in the apo lens.
but sharpness is higher in the sekor lens.
differences can only be judged with a loupe imho, not visible to the bare eye..
 

Attachments

  • mount.jpg
    mount.jpg
    76.6 KB · Views: 173

ic-racer

Member
Joined
Feb 25, 2007
Messages
16,500
Location
USA
Format
Multi Format
Yes, if your working distance for the enlargement is like 3 to six feet, a conventional camera lens should work great. Cheaper than a high magnification enlarger lens.
 
Photrio.com contains affiliate links to products. We may receive a commission for purchases made through these links.
To read our full affiliate disclosure statement please click Here.

PHOTRIO PARTNERS EQUALLY FUNDING OUR COMMUNITY:


Ilford ADOX Freestyle Photographic Stearman Press Weldon Color Lab Blue Moon Camera & Machine
Top Bottom