-
Welcome to Photrio!Registration is fast and free. Join today to unlock search, see fewer ads, and access all forum features.Click here to sign up
You are using an out of date browser. It may not display this or other websites correctly.
You should upgrade or use an alternative browser.
You should upgrade or use an alternative browser.
How is the look achieved in a print?
-
A
- Thread starter Roy Keane
- Start date


Recent Classifieds
-
Want to Buy Clean Zeiss Ikon ZM
- Started by NortheastPhotographic
-
Want to Buy WTB FM3a Black
- Started by samuelphoto
-
For Sale FS: Lomo LC-Wide, 35mm point and shoot w/ 17mm f/4.5
- Started by dirkfletcher
-
For Sale SPRING CLEANING! (doing some deep cleaning)
- Started by dirkfletcher
-
Sold Kodak Step Tablets
- Started by Jon Shiu
Forum statistics
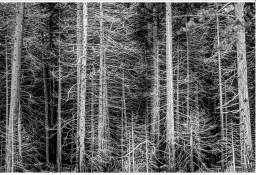
There is an old stone wall/fence in the foreground, so probably on the edge of something.
...It doesn't look like a very difficult print to make at all.
Then again, it could be the result of a master printer wrestling any number of problematic areas into a Fine Print.
I would try this: not too high speed film, measure the light on the first tree, normal development, printing grade 5, so the background gets black, maybe a little dodging on the trees, maybe not, burning grade 0, till the trees get where you want them.
Another fairly straight print - it is the light:

OP
OP
I remember when this series was featured in a magazine years ago (pretty sure it was View Camera magazine but I’ve since tossed all my magazines so I can’t say for certain). He was using a 4x5 Walker XL. Andrew and Doremus are both correct. At least at the time, they were fairly straight forward in terms of exposure. No artificial light, and no complicated stuff like masking. If this particular image is of that vintage it was most likely made in the same way. If he has since moved into digital/hybrid and this is a newer image or print maybe some extra processing is going on.
One way you get this sort of look is to shoot in relatively low ambient light (dusk for example) and increase negative/print contrast.
Here is what I suggest if you want the right answer: contact him and ask. On several occasions I’ve contacted photographers who’ve made strong impressions on me with questions - sometimes seemingly mundane technical questions. They’ve always been happy to answer.
Great advice. I'll contact him and let you know if he says anything
I think it's just the work of a photographer who knew when to be there, how to expose the film, how to develop the film, and how to make a print.
Despite all the posts so far, I don't think there's anything at all mysterious about this photograph (still really effective, though!).
It's a typical low-contrast scene with the contrast increased by development, paper grade, post, etc. Lighting was flat and soft, shadows were dark. The shadows get placed low or printed through to keep them dark. Maybe a little dodging and/or bleaching of the bright tree trunks. I don't think there was burning at the top; it looks like light fall-off from the lens to me or maybe just didn't get dodged/bleached. Really, anyone who learned the basics of the Zone System knows how to do this.
Doremus
I also agree with Doremus. There are no shadows, so this was done on an overcast day. Highlights (the front tree) were placed probably zone 6, maybe slightly more, which pushes everything towards the darker side, i.e., the other trees at zone 5 and 4. Lens wasn't full open, but not stopped down that much, so the combination of a medium/shallow depth of field (a 4x5 format, for example, would still get a lot of details out of the tree trunks) with the zone placement would explain the dark background.
Development time might have been extended to increase contrast.
I believe there is burning throughout the lower front - the rocks and grass -, making the trees pop out a little more.
I may be totally wrong, of course. I wasn't there.

I agree with Doremus. It's a combination of the light, and expansion development. I like to work in situations like this and occasionally use some light bleaching with weak ferricyanide to bring up the high tones, if needed. The picture below did not require any bleaching since the foreground trees stand in front of a cedar grove, which are always very dark.

It has already been said that this was not artificially lit, and some indications of the evidence. Those of us who have attempted lighting of large subjects outdoors, and who may have some experience studying Hollywood-budget ($$$$$) lighting for such scenes, can readily concur. The experimenting to be done in such cases as this image presents involve testing out the methods covered by Ansel Adams and any number of others, regarding exposure, film development, and printing. A demonstration, or proof of principle, can be done without forest. Try making some portraits of a subject of average Caucasian complexion in front of dark shrubbery or some other moderately dark background on a heavily overcast day or after sundown, under very flat light. Normal exposure and development will yield a "flat" image with a limited tonal range and little local contrast. a stop or two less exposure with appropriate compensation in the film development with increase the overall range and local contrast.
a stop or two less exposure with appropriate compensation in the film development with increase the overall range and local contrast.
This is in line with Mortensen (https://unblinkingeye.com/Articles/Mortensen/mortensen.html).
"In a nutshell, Mortensen’s method is one of slightly underexposing a subject with a very low brightness range and giving very full development to the resulting negative."
I'd agree with a few comments and I don't personally think that it was that difficult to achieve.
First off right time of day and a bit of strong flash, followed maybe by a tiny bit of over development of the film.
Then print heavy on a grade 4 to 5 paper and to finish, a bit of localised bleaching back to bring the front tree(s) forward a bit by brightening the highlights on them.
But as said, the most direct route would be you trying to contact the photographer. You can only try.
Terry S
Upon further inspection...a couple more possibilities:
1) The photographer used pin registered sharp and unsharp masking techniques. This allows for almost grain for grain dodging/burning and could brighten the foreground trees intricate branches (especially the branch near the top on the left) without having any effect on the background.
2) After reading The New Zone System Manual by White, Zakia, and Lorenz, I started thinking differently about the Zone System and began massaging the 'rules'.
When photographing subjects in soft light, or in deep forests on heavy overcast days, I would have an adjusted for reciprocity law failure exposure of 2.5 to 7 minutes. Instead of adjusting exposure further and reducing development as is the ‘usual case’ I'd leave the exposure and give the negative normal development.
What this did was leave all the dark tones where they were, while the mid and higher tones (which are typically not that bright under such conditions) kept piling on more exposure.
Worked great in subdued light and with subjects of low contrast range. Guesstimating, I'd say anything on Zone IV would move to V, anything on V would move to VI 1/2 more or less, depending on how long the exposure was.
I called them my reciprocity law bonus exposures. What was failure to a sensitometrist (zone V not staying at zone V) was a bonus to me!
Last edited:
- faberryman
- Deleted
I made a similar image in Yosemite in the late afternoon. The trees are dead; hence the white bark. Notice that the branches are white too and bereft of needles. The photographer made a very nice print to emphasize the inherent contrast. Here is a low res scan from my negative for comparison. I made my final print in platinum/palladium.
Attachments
Last edited:
- Joined
- Jun 21, 2003
- Messages
- 29,810
- Format
- Hybrid
7D Gamma INFINITY!This is in line with Mortensen (https://unblinkingeye.com/Articles/Mortensen/mortensen.html).
"In a nutshell, Mortensen’s method is one of slightly underexposing a subject with a very low brightness range and giving very full development to the resulting negative."
 . POW!
For those who think something similar can be achieved using flash, how much flash power would it take to cover a scene that wide at that distance, and still get the fall off in the shadows? Would it be possible with a (or a couple of) common 60GN on-camera flashes, or would something much more powerful be required? Or, would you set the shutter on bulb in the dark and do multiple pops until you've covered the area?
I feel that there's at least some possibility that artificial lighting was inolved, due to that band of exposure across the lower part of the nearest trees. It strikes me as consistent with a light souce centered above the camera.
I feel that there's at least some possibility that artificial lighting was inolved, due to that band of exposure across the lower part of the nearest trees. It strikes me as consistent with a light souce centered above the camera.
Last edited:
Mostly concur, apart from the burning part on the top half; I think considerable burning was done on all 4 corners in fact. Also I suspect he burned the edges right from the center tree to the very edge to highlight that single central tree.It's a typical low-contrast scene with the contrast increased by development, paper grade, post, etc. Lighting was flat and soft, shadows were dark. The shadows get placed low or printed through to keep them dark. Maybe a little dodging and/or bleaching of the bright tree trunks. I don't think there was burning at the top; it looks like light fall-off from the lens to me or maybe just didn't get dodged/bleached.
No flash, no painting with light, no odd magic. Just a pretty straightforward negative and some very basic printing technique. Very nicely done; it shows that the technique doesn't have to be complicated to have a compelling result.
The lighting conditions are perfectly typical for the edge of a spruce forest on a dull day as others have also remarked.
It's funny to see how people seem to have to drag anything but aliens and UFOs in to explain this kind of print.
It’s not the same quality of the Paul Hart photo, but this is a shot of a woodland scene I came across last week looking for interesting places to shoot with my Mamiya 330.

Doremus Scudder
Member
Paul Hart mentions working at twilight with long exposures. Reciprocity failure likely also plays a role in achieving the deep blacks in the shadows.
Best,
Doremus
Best,
Doremus
| Photrio.com contains affiliate links to products. We may receive a commission for purchases made through these links. To read our full affiliate disclosure statement please click Here. |
PHOTRIO PARTNERS EQUALLY FUNDING OUR COMMUNITY:  |