Help with Rolleicord 1a type 3 pleaseI

River Eucalyptus

H
River Eucalyptus

  • 0
  • 0
  • 29
Musician

A
Musician

  • 2
  • 0
  • 60
Your face (in it)

H
Your face (in it)

  • 0
  • 0
  • 63
A window to art

D
A window to art

  • 3
  • 0
  • 57

Recent Classifieds

Forum statistics

Threads
199,256
Messages
2,788,669
Members
99,844
Latest member
MariusV
Recent bookmarks
0

EdColorado

Member
Joined
Feb 7, 2009
Messages
506
Location
Loveland, Co
Format
Multi Format
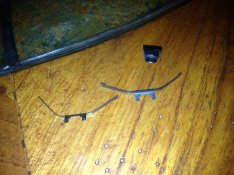
I have a mostly complete Rolleicord 1a type 3 here and need some help determining how the focusing screen mounts in place. Anybody have a nice exploded view diagram for the focusing screen area of this model Cord? The camera came to me with a small parts envelope containing three pieces that look like they culd be used for retaining the screen. Picture below... Anyone know how this goes together? I don't have the screen but can get one, but first want to know if I have everything else I need to put this back together.

Thanks much!

Ed
Rcord parts.jpg
 

shutterfinger

Member
Joined
Feb 25, 2013
Messages
5,020
Location
San Jose, Ca.
Format
4x5 Format
Google search- Rolleicord service manual= http://www.kyphoto.com/classics/repairmanuals.html
at the bottom of the list is a Rolleiflex Service manual that covers the vast majority of Rolleiflex TLR's. The first two cameras covered in the manual are the Rolleicord VA and Rolleicord VB. If they are not an exact match they will be very similar as all models are a variation on a theme with most differences on the internal working of the camera. The pieces you pictured are a viewscreen/ground glass retaining springs. They look over curved for the application. Use needle nose pliers and reform the arms at the center frame bend. The bend should be about half of what it currently is but wait until you have the replacement screen and are installing it to reform the springs.
 
OP
OP

EdColorado

Member
Joined
Feb 7, 2009
Messages
506
Location
Loveland, Co
Format
Multi Format
Thank you Shutterfinger. I have that repair manual but didn't see what I wanted. Looking again I do see that the model 3.5 has spring clips. I'll pull the hood and see if I can figure where these go...
Are you able to say if I'm missing anything for mounting the screen or is it just the two clips? How bout that third part in the picture, any idea about where it would go? It was in the parts envelope with the spring clips so I'm thinking perhaps it has to do with screen mounting.
 
OP
OP

EdColorado

Member
Joined
Feb 7, 2009
Messages
506
Location
Loveland, Co
Format
Multi Format
Got it figured out. All I need is the new screen. Figured out the forward clips mounting pretty quickly, but it took a bit of looking to see that the unknown part in my picture is the hood opening latch, which is held in place by the other screen retaining clip. The spring clip holds the hood latch in place, and supplies the tension to keep the latch locked. The latch in turn retains the spring clip so it will retain the focusing screen. Lovely, simple design.
 

shutterfinger

Member
Joined
Feb 25, 2013
Messages
5,020
Location
San Jose, Ca.
Format
4x5 Format
I'm not familiar with Rolleicord/Rolleiflex but am familiar with schematics and exploded views in manuals. I missed the 3rd piece, the latch. Oops!
I figured it to be a simple mechanical design so a similar diagram is all one usually needs to figure out the one they have in hand.

Enjoy your camera.
 

gone

Member
Joined
Jun 14, 2009
Messages
5,504
Location
gone
Format
Medium Format
Don't feel bad, I had trouble locating that hidden latch myself. These types of clips are fiddley to install the first time, but every time after that gets easier. I bought a cut down Mamiya screen from Rick Oleson once, and it worked great, The screens are easy to cut down yourself too.

http://rick_oleson.tripod.com/index-175.html
 
OP
OP

EdColorado

Member
Joined
Feb 7, 2009
Messages
506
Location
Loveland, Co
Format
Multi Format
I'm not familiar with Rolleicord/Rolleiflex but am familiar with schematics and exploded views in manuals. I missed the 3rd piece, the latch. Oops!
I figured it to be a simple mechanical design so a similar diagram is all one usually needs to figure out the one they have in hand.

Enjoy your camera.

Yep, you getting me to look at that manual again got me going. Seeing where the 3.5's clips mount led to me seeing how they fit my 1a. Simple and clean once I figured it out.
 
OP
OP

EdColorado

Member
Joined
Feb 7, 2009
Messages
506
Location
Loveland, Co
Format
Multi Format
Don't feel bad, I had trouble locating that hidden latch myself. These types of clips are fiddley to install the first time, but every time after that gets easier. I bought a cut down Mamiya screen from Rick Oleson once, and it worked great, The screens are easy to cut down yourself too.

http://rick_oleson.tripod.com/index-175.html

Already ordered the screen from him Momus, thanks! While there I went ahead and ordered the one I need for my C3 beater project too. Its been on the bench waiting for me to order the screen for a couple months now.

This C3 is sort of a Rat Rod of the camera world. Bare metal, torn leather, dented sides pounded out to where things work. It was one of those that I just couldn't toss out. It had lived a tough life I guess and just had to be fixed. The frustrating thing was I got it all together and working fine and then while adjusting the screen I dropped it. Shattered like the ground glass it was...
 

frank

Member
Joined
Dec 6, 2002
Messages
4,359
Location
Canada
Format
Multi Format
Got it figured out. All I need is the new screen. Figured out the forward clips mounting pretty quickly, but it took a bit of looking to see that the unknown part in my picture is the hood opening latch, which is held in place by the other screen retaining clip. The spring clip holds the hood latch in place, and supplies the tension to keep the latch locked. The latch in turn retains the spring clip so it will retain the focusing screen. Lovely, simple design.

Ah, I see you got it.

I did this just a few days ago with a new Oleson screen.
 
OP
OP

EdColorado

Member
Joined
Feb 7, 2009
Messages
506
Location
Loveland, Co
Format
Multi Format
Does the Rolleicord use any kind of shims to adjust the height of the viewfinder, to adjust focus? I'm thinking along the lines of the paper shims used by Mamiya on the C3 and other fixed screen TLR's
 

frank

Member
Joined
Dec 6, 2002
Messages
4,359
Location
Canada
Format
Multi Format
Yes. You can shim the entire viewfinder, or you can shim the focus screen in the viewfinder. Depending on which direction you need to go.
 

frank

Member
Joined
Dec 6, 2002
Messages
4,359
Location
Canada
Format
Multi Format
You can flip the screen as well if that helps. I check at the closest focusing distance, as that's where a focusing error is most obvious.
 

shutterfinger

Member
Joined
Feb 25, 2013
Messages
5,020
Location
San Jose, Ca.
Format
4x5 Format
Mount the camera on a sturdy tripod, point at a test subject. Place a temporary ground glass on the film plane rails as the film will be when making exposures. Use a loupe and focus the test subject on the ground glass. Now position the view screen so that it matches the film plane focus and secure. Test subject distance will not matter but the critical focus of each at the same distance will. News print or a map flat against a wall 6 to 8 feet away make a good target. A piece of glass or clear rigid plastic cut to fit the film plane rails then covered on one side with strips of transparent tape that does not overlap makes a good temporary ground glass, the sticky side of the tape faces the lens.

Heavy copier/printer paper may be better for shim thickness. Card stock is about .014 inch thick, #20 bond paper is about .008 inch thick. Sometimes you only need .001 to .002 inch thick shims.
 
Last edited by a moderator:
Joined
Jan 14, 2003
Messages
4,924
Location
San Francisco
Format
Multi Format
Mount the camera on a sturdy tripod, point at a test subject. Place a temporary ground glass on the film plane rails as the film will be when making exposures. Use a loupe and focus the test subject on the ground glass. Now position the view screen so that it matches the film plane focus and secure. Test subject distance will not matter but the critical focus of each at the same distance will. News print or a map flat against a wall 6 to 8 feet away make a good target. A piece of glass or clear rigid plastic cut to fit the film plane rails then covered on one side with strips of transparent tape that does not overlap makes a good temporary ground glass, the sticky side of the tape faces the lens.

Heavy copier/printer paper may be better for shim thickness. Card stock is about .014 inch thick, #20 bond paper is about .008 inch thick. Sometimes you only need .001 to .002 inch thick shims.

How do you do this when the tripod mount is on the bottom of the camera which is also the back cover that you must remove to access the film plane as you describe?
 

Fixcinater

Member
Joined
Dec 11, 2008
Messages
2,500
Location
San Diego, CA
Format
Medium Format
You use the plate/sheet film back, of course! :smile:
 
Joined
Jan 14, 2003
Messages
4,924
Location
San Francisco
Format
Multi Format

shutterfinger

Member
Joined
Feb 25, 2013
Messages
5,020
Location
San Jose, Ca.
Format
4x5 Format
How do you do this when the tripod mount is on the bottom of the camera which is also the back cover that you must remove to access the film plane as you describe?
If your tripod head plate is large enough just sit the camera with the back removed onto the tripod platform.
A piece of plywood can be cut to make a slot for the camera to sit in and attached to the tripod head. 1/4-20 threaded inserts for wood are readily available at hardware stores for less than $1.
 
Photrio.com contains affiliate links to products. We may receive a commission for purchases made through these links.
To read our full affiliate disclosure statement please click Here.

PHOTRIO PARTNERS EQUALLY FUNDING OUR COMMUNITY:


Ilford ADOX Freestyle Photographic Stearman Press Weldon Color Lab Blue Moon Camera & Machine
Top Bottom