• Welcome to Photrio!
    Registration is fast and free. Join today to unlock search, see fewer ads, and access all forum features.
    Click here to sign up

Help identifying Omega enlarger (getting my first 4x5 enlarger Xmas day!)

Ellis Island 1976

H
Ellis Island 1976

  • Tel
  • Jan 26, 2026
  • 2
  • 2
  • 13
Facades

A
Facades

  • 2
  • 0
  • 37

Recent Classifieds

Forum statistics

Threads
201,971
Messages
2,832,960
Members
101,037
Latest member
Equula
Recent bookmarks
2

Ian C

Member
Allowing Ads
Joined
Feb 8, 2009
Messages
1,306
Format
Large Format
Short Focal Length Lenses on Omega D5/D6

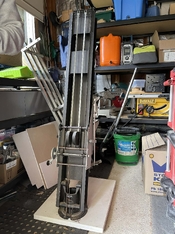
The D5 and D6 enlargers use a long, tapered bellows. The previous 4” x 5” models had short bellows a and used various lens cones to add distance to position the lens at the approximate correct distance to obtain focus. Then the bellows allow enough adjustment to fine-tune the lens position for correct focus.

The D5 and D6 did away with the lens cones, but this inadvertency created another problem. When the longer bellows are fully closed, the solidly stacked bellows prevents relatively short focal length lenses from being placed at the close distance from the negative necessary for focus.

For example, I cannot use most 50 mm lenses (most often used for 35 mm negatives) for prints of 8” x 10” or larger. I’ve talked with other D5 and D6 owners who face the same limitation.

Other enlargers, such as the DII and D2 use non-tapered bellows that provide sufficient space to install a recessed lens mount partially inside the bellows. These places sort focal length lenses much closer to the negative to allow focusing.

But the D5 and D6 bellows tapers down to a small lens board receiver, making a recessed lens board impossible for the outside diameter of most 50 mm and shorter lenses. It isn’t generally practical to use my D5XL for enlarging 35 mm or smaller negatives. Further down I discuss an exception for a particular lens of small outside diameter.

Other owners claim that they can do so, but only by compressing the bellows (and possibly cracking them at the folds). Too, this can temporarily spring the front of the lens board receiver apart. That will pivot the lens axis to aim it slightly towards the column, misaligning the lens axis and spoiling the focus from front to back.

The D5 and D6 are excellent enlargers for medium format through 4” x 5” negatives. When I need to enlarge 35 mm and smaller films, I use a practical-sized enlarger specifically designed for the purpose.

Adding to this confusion is the fact that Omega lists many lens mounts and negative carriers specifically intended for the D5 and D6 for 35 mm and smaller films. I’ve long wrestled with this problem. I can only speculate.

Here is a partial list of D5/D6 negative carriers that, to me, make no sense because using the appropriate focal length lens to focus is impossible.

423-301, Disc format
423-303, Minox format
423-302, 16mm format (5/16"x7/16")
423-300, 110 format
423-353, 126 Instamatic format
423-304, 35mm Half Frame format
423-352, 35mm Full Frame [Focus possible with a particular lens as explained below]

Here are the lens mounts from the KHB Photographix site:

http://www.khbphotografix.com/omega/LensMountD5.htm

I later acquired a Schneider Componon 1:4/50 #11 291 736. This is a small lens. It uses the M25 x 0.5 mm pitch mounting thread and its outside diameter is small enough that it fits inside the Omega 421-115 RECESSED lens mount. This is the only lens and mount combination that I’ve found that allows the use of a 50 mm lens on the D5/D6 enlargers.

The majority of 50 mm enlarging lenses use 39 mm Leica thread and their outside diameters are simply too large to fit inside any recessed lens mount. This is an old lens and not commonly found in good condition in this era.

Here are the only two recessed lens mounts intended for 50 mm lenses on the D5/D6 enlargers per the list on the KHB site:

421-114 Recessed Oval Plate for 25/35mm Omegaron (use with 421-105) M32.5 x 0.5 mm pitch

421-115 Recessed Oval Plate for 28mm Componon (use with 421-105) M25 x 0.5 mm pitch

Here is the full list of lens mounts and the slide-in plates they mount on for the D5/D6 given on the KHB Photographix site.

http://www.khbphotografix.com/omega/LensMountD5.htm

The same table recommends using the 421-056 flat plate with attached 39 mm Leica flange for 50 mm Componon-S lenses. You’d have to first mount the 421-105 slide-in plate into the slide-in receiver at the bottom of the bellows. Then use the two thumbscrews to attach the 421-056 to the slide-in plate.

The only problem with this is that, even with the bellows fully closed, the lens is too far from the negative to focus a meaningful-sized projection. It might be possible to make a 5” x 7” or smaller print [small prints require the lens farther from the negative], but nothing larger, at least with my D5XL.

My advice, unless you can obtain a Schneider Componon 1:4/50 in good condition and use it with the Omega 421-115 lens plate and 421-105 slide-in lens plate, you should look for an enlarger purposely designed for 35 mm enlarging for that format. Note that this combination requires the two-step mounting procedure described above, because with the lens, mount, and plate, when assembled, will stick up preventing inserting the slide-in plate into the receiver.
 
Last edited:

Ian C

Member
Allowing Ads
Joined
Feb 8, 2009
Messages
1,306
Format
Large Format
Regarding Post #25, Short Lenses on the DII/D2 Enlargers:

I have a recessed 421-021 Leica-thread lens mount for short lenses that allows enlarging small format films on the DII & D2 enlargers. The short bellows are generously sized laterally, allowing deep recessed mounts, either from Omega, or you can make them to suit. This is fairly easy if you start with a flat plate.

Here is the Omega 421-021 Flat Mount with recessed cup (for 39mm threaded Leica camera lenses) to fit the DII & D2 enlargers.

https://www.ebay.com/itm/336269413978?_skw=omega+d2+lens+cones&itmmeta=01KCEF19DDQ5KQQ460F14K1Y3F&hash=item4e4b380e5a:g:VqUAAeSwtQhpCkOV&itmprp=enc:AQAKAAAA8FkggFvd1GGDu0w3yXCmi1caBb/KLucCGlYCAZ5EHgOjJ9kP0LqDtACef13CYJ6JOH1KZ5S2kheGnzNcIX7/Kg8WHUJx6lWRDH+9yRCfyzCJSVPqynqRXVMEWNBp7xVz8+Viu9+8lK1QZznD67y1DyiYOnXUN21w3P6bH3i31hjj/cT7t69Joh6NznbqjsIAWQIkDc4RTS6T9NDTU70DkQ1ym6P7w--U7cLp/EVQLSzmvB/WQFTiNW2ZoxGwhiCjnQ68v7NeTelScL7/vDFyUR01V7Y7hMR/2AtZvxxbktAnUrrVy61scnU7hYiw90AeQw==|tkp:Bk9SR-yWhc_jZg
 

Paul Howell

Subscriber
Allowing Ads
Joined
Dec 23, 2004
Messages
10,128
Location
Scottsdale Az
Format
Multi Format
That doesn't sound like a reference to a D5XL - which:
1) does not offer auto-focus; and
2) does not use lens cones.
I think you may be thinking of the D4.

Might have been special order but the Air Force had D5 with single bellows and cones and AF rails, which were swapped out later for color heads.
 

MattKing

Moderator
Moderator
Joined
Apr 24, 2005
Messages
55,285
Location
Delta, BC Canada
Format
Medium Format
FWIW, I used a 60mm lens with my D6 when I printed from 35mm lenses.
The long column on these enlargers means that this adaptation rarely causes an issue.
 

mwdake

Member
Allowing Ads
Joined
Aug 25, 2007
Messages
794
Location
CO, USA
Format
Multi Format
Thank you Ian! That's super helpful. It's kind of amazing that new parts are still obtainable.

I don't quite have it in my hands yet but that's very helpful to confirm the model number. As far as I understand, the lamphouse can be changed out for a Dichroic colour head if desired instead of the b&w condenser head, is that correct? I plan to mostly do b&w but want to consider colour in the future.

I will go and read the pdfs :smile: Thank you for the help!

I don’t think anyone answered your question about swapping the lamphouse for the dichroic head, so…
Yes you can swap the head but to use the dichroic head you need the arms that hold the head to the chassis; they are different sizes, lengths, for each type of head.

I did this on one of the D5s I had until recently.
 
OP
OP
Dandelion

Dandelion

Member
Joined
Apr 25, 2022
Messages
15
Location
Nimbin, NSW, Australia
Format
Large Format
You can make negative carriers yourself from pieces of mat board. To be able to print the rebates on 4x5 negatives i made one and included a sheet of glass, onto which the negative is put: gravity keeps it in place. You have to be careful not to move the negative when using a self constructed negative carrier like this, but otherwise it works just fine. Also: when printing rebates on a 4x5 you are at the maximum negative size of the enlarger takes and you have to be careful not to clip any of the corners.

A second remark is about printing smaller size negative. I am not sure about the D5, but my D2V forces me to use a 75mm lens (or longer) when printing 35mm negatives on 13x18 and smaller paper, the crunching of the bellows not allowing the use of a 50mm lens, which would be the preferred focal length.

Great advice, thank you! I'll get to making some homemade ones :smile: I was sent further photos of the enlarger itself.. here's the rear of it at least.
 

Attachments

  • c5b64422-dde0-47ed-ac12-adeab0d3443f.jpg
    c5b64422-dde0-47ed-ac12-adeab0d3443f.jpg
    268.1 KB · Views: 48

Pieter12

Member
Allowing Ads
Joined
Aug 20, 2017
Messages
8,224
Location
Magrathean's computer
Format
Super8
You can make negative carriers yourself from pieces of mat board. To be able to print the rebates on 4x5 negatives i made one and included a sheet of glass, onto which the negative is put: gravity keeps it in place. You have to be careful not to move the negative when using a self constructed negative carrier like this, but otherwise it works just fine. Also: when printing rebates on a 4x5 you are at the maximum negative size of the enlarger takes and you have to be careful not to clip any of the corners.

A second remark is about printing smaller size negative. I am not sure about the D5, but my D2V forces me to use a 75mm lens (or longer) when printing 35mm negatives on 13x18 and smaller paper, the crunching of the bellows not allowing the use of a 50mm lens, which would be the preferred focal length.
And you have no problem with the negative buckling under the heat from the lamp?
 

Huub

Member
Allowing Ads
Joined
Dec 4, 2007
Messages
256
Format
4x5 Format
And you have no problem with the negative buckling under the heat from the lamp?

Not with Ilford and Kodak film. For thinner material like the good old Polaroid P55 i use a different negative carrier to prevent just that.
 

Lee L

Member
Joined
Nov 17, 2004
Messages
3,287
Format
Multi Format
There will be diagrams on the inside of the door for the adjustable condenser. It will tell you which rails the condenser goes on for the focal length of the enlarging lens you are using.
 

Beevo

Subscriber
Allowing Ads
Joined
Sep 26, 2023
Messages
126
Location
Tempe, AZ
Format
Multi Format
You can make negative carriers yourself from pieces of mat board. To be able to print the rebates on 4x5 negatives i made one and included a sheet of glass, onto which the negative is put: gravity keeps it in place. You have to be careful not to move the negative when using a self constructed negative carrier like this, but otherwise it works just fine. Also: when printing rebates on a 4x5 you are at the maximum negative size of the enlarger takes and you have to be careful not to clip any of the corners.

A second remark is about printing smaller size negative. I am not sure about the D5, but my D2V forces me to use a 75mm lens (or longer) when printing 35mm negatives on 13x18 and smaller paper, the crunching of the bellows not allowing the use of a 50mm lens, which would be the preferred focal length.

I needed an odd sized carrier for my D2 (110 can you believe it?)

I designed and laser cut them from 1/8" acrylic.

Layout Key.JPG

Bill
 
Last edited:

Pieter12

Member
Allowing Ads
Joined
Aug 20, 2017
Messages
8,224
Location
Magrathean's computer
Format
Super8
I have use 3D printed ones before, they work fine, too. And they seem to be readily available on eBay at reasonable prices.
 
OP
OP
Dandelion

Dandelion

Member
Joined
Apr 25, 2022
Messages
15
Location
Nimbin, NSW, Australia
Format
Large Format
Hey everyone! Thanks for the feedback. Here are some photos of the progress so far.

I cleaned it up after xmas and have sinced adjusted it and filed out the 6x7 negative carrier for a bordered look. I've since printed one image with this carrier.

@Ian C thank you for the wealth of information! Luckily I don't shoot 35mm so I have no intention to enlarge it - just 6x7 and 4x5 for me, and one day 8x10 to contact print.

I've noticed so far that with the moveable condensing lens in the correct (top most) position for a 135mm lens it seems to have quite noticeable corner falloff with my 135mm lens. However, when I remove it completely I get even illumination (which it only recommends for 150mm and up).

20260109_155453.jpg
 
OP
OP
Dandelion

Dandelion

Member
Joined
Apr 25, 2022
Messages
15
Location
Nimbin, NSW, Australia
Format
Large Format
Hey @Huub that's great to know. Have you had issues with Newton rings at all?

@mwdake Thank you for the answer re: cold head. It would be great to get one eventually to try colour (I've only ever done b&w).

20260109_152912.jpg
20260109_152924.jpg
 
Last edited:
OP
OP
Dandelion

Dandelion

Member
Joined
Apr 25, 2022
Messages
15
Location
Nimbin, NSW, Australia
Format
Large Format
Today I'm working on making a 4x5" full sheet carrier with two sheets of 5x7" glass and painters masking tape. Here is an example of the filing results / first print from the 6x7 carrier.

20260109_155852.jpg
20260109_155904.jpg
20260109_155918.jpg
 
OP
OP
Dandelion

Dandelion

Member
Joined
Apr 25, 2022
Messages
15
Location
Nimbin, NSW, Australia
Format
Large Format
Nice looking enlarger.
Thank you! I'm so so happy! Photography and darkroom printing is my greatest passion in life and to get to finally do this is a dream come true. I've been trying to get into a living situation to have the space to do this for a few years now.

I just had a fresh box of Ilford MGFB semi-matt warmtone arrive, and a local guy named Phil has has offered to sell me a huge collection of paper which will be a big help.

This is my bathroom/laundry space I am using with a standard ventilation fan that bathrooms utilise. I set it up and tear it down each time I use it, the enlarger stays where it is though. I am currently taping a safe light and clock to the wall :tongue:

I have an El-Nikkor 80mm f5.6, Rodenstock Rodagon 135mm f5.6, and a Schneider Comparon 150mm f5.6 (but it's not very clean). A great starting place.

When able I plan to get a local cabinet maker to build me a new base board at the XL dimensions so I can print larger. For now this one is doing the job for smaller prints.

20260109_164216.jpg

20260109_163855.jpg

20260109_164051.jpg
 

mshchem

Subscriber
Allowing Ads
Joined
Nov 26, 2007
Messages
16,082
Location
Iowa City, Iowa USA
Format
Medium Format
Looks like a really nice space. That's really all you need for now, you have a nice sink, a place for your trays. Looks great!
 

Don_ih

Member
Allowing Ads
Joined
Jan 24, 2021
Messages
8,625
Location
Ontario
Format
35mm RF
It all looks excellent. You'll be all set for a long time.
 

Beevo

Subscriber
Allowing Ads
Joined
Sep 26, 2023
Messages
126
Location
Tempe, AZ
Format
Multi Format
Thank you! I'm so so happy! Photography and darkroom printing is my greatest passion in life and to get to finally do this is a dream come true. I've been trying to get into a living situation to have the space to do this for a few years now.

I just had a fresh box of Ilford MGFB semi-matt warmtone arrive, and a local guy named Phil has has offered to sell me a huge collection of paper which will be a big help.

This is my bathroom/laundry space I am using with a standard ventilation fan that bathrooms utilise. I set it up and tear it down each time I use it, the enlarger stays where it is though. I am currently taping a safe light and clock to the wall :tongue:

I have an El-Nikkor 80mm f5.6, Rodenstock Rodagon 135mm f5.6, and a Schneider Comparon 150mm f5.6 (but it's not very clean). A great starting place.

When able I plan to get a local cabinet maker to build me a new base board at the XL dimensions so I can print larger. For now this one is doing the job for smaller prints.

View attachment 415388
View attachment 415389
View attachment 415390

Nice setup. About 25 years ago I commandeered our spare bedroom and built the wet sink in the closet after removing the sliding doors. Built shelving above the sink area and installed a laundry tub sink just to the right of the opening.

Bill
 

Kino

Subscriber
Allowing Ads
Joined
Jan 20, 2006
Messages
7,969
Location
Orange, Virginia
Format
Multi Format
Nice setup! Just be sure to keep that dryer vent well cleaned and sealed to the outside!
 

Huub

Member
Allowing Ads
Joined
Dec 4, 2007
Messages
256
Format
4x5 Format
I've noticed so far that with the moveable condensing lens in the correct (top most) position for a 135mm lens it seems to have quite noticeable corner falloff with my 135mm lens. However, when I remove it completely I get even illumination (which it only recommends for 150mm and up).

I have the same experience with my 135mm Rodagon and print with the condensor removed. Even then there seems to be some light fall off, so I often burn in the corners a bit. Negatives that I shot with my 58mm Super Angulon and to a lesser extend with the Nikon 75mm don't need this, as they have enough 'natural' fall off to compensate for the fall off the enlarger produces.
 

Sirius Glass

Subscriber
Joined
Jan 18, 2007
Messages
50,836
Location
Southern California
Format
Multi Format
Congratulations! Enjoy your growing darkroom. Next find a print washer.
 
OP
OP
Dandelion

Dandelion

Member
Joined
Apr 25, 2022
Messages
15
Location
Nimbin, NSW, Australia
Format
Large Format
Hey everyone! Thank you for the kind words - It is a great space, I have everything I need at least. I've been printed a lot this week, and had a session sepia toning some prints. Here are some images.

I created a custom 4x5" full sheet carrier using two sheets of 5x7" glass and Scotch Blue masking tape. It works surprisingly well. Here is the projection and a toned print.

@Huub Thanks for the tip - I'm going to make a single masked sheet of glass to use with the Zebra dry glass plates I'm shooting (and I hope to get some J Lane plates soon!).

@Beevo that's cool. I think it's more important to do it than to wait for the perfect space hey.

I absolutely need a print washer @Sirius Glass you're right. My huge limitation right now is washing 2 prints at a time in a tray with flowing water and drilled holes in one side. I am considering saving up for one of these by UnderRedLight on Etsy or Ebay: https://www.etsy.com/au/shop/UnderRedLight

I'm currently using the Ilford below lens multigrade filter kit, but I think it would be better to get the 6x6" filters to go in the condensing lens drawer.

I just paid $180 AUD to a guy named Phil in Katoomba, NSW today. He's shipping me 30kg of darkroom paper of various sizes. Lots of paper on the way for a great price!

20260111_142301.jpg
20260112_094626.jpg
VideoCapture_20260112-094945.jpg
 
OP
OP
Dandelion

Dandelion

Member
Joined
Apr 25, 2022
Messages
15
Location
Nimbin, NSW, Australia
Format
Large Format
I needed an odd sized carrier for my D2 (110 can you believe it?)

I designed and laser cut them from 1/8" acrylic.

View attachment 415405
Bill

Wow it's great to see the design! My family business is laser cutting so I grew up around it. I don't see my family much to bother them for small jobs, but I can really appreciate nice machining.

I see there is someone selling Omega D 3D printed carriers on Etsy which is cool... they make one for glass plates too.
 
Photrio.com contains affiliate links to products. We may receive a commission for purchases made through these links.
To read our full affiliate disclosure statement please click Here.

PHOTRIO PARTNERS EQUALLY FUNDING OUR COMMUNITY:


Ilford ADOX Freestyle Photographic Stearman Press Weldon Color Lab Blue Moon Camera & Machine
Top Bottom