Hasselblad auxiliary shutter repair

Paris

A
Paris

  • 1
  • 0
  • 84
Seeing right through you

Seeing right through you

  • 3
  • 1
  • 128
I'll drink to that

D
I'll drink to that

  • 0
  • 0
  • 107
Touch

D
Touch

  • 1
  • 2
  • 104
Pride 2025

A
Pride 2025

  • 1
  • 1
  • 134

Forum statistics

Threads
198,374
Messages
2,773,795
Members
99,602
Latest member
RockvilleMMF
Recent bookmarks
0

yashima

Member
Joined
Jan 21, 2016
Messages
36
Format
Medium Format
Hi everyone,

Another mishap with the Hasselblad.

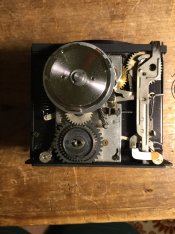
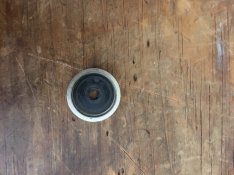
There is some issue with the auxiliary shutter of my 500cm, the lower flap does not close tightly. I had done this repair many years ago, and decided to give it another go this time. I remembered the auxiliary shutter was controlled by a spring inside a gear, on the top left of the camera, and it might just need a clean and rewind (please see photos). Unfortunately for me, when I opened the cover, the spring jumped out right away, and I did not get the chance to take the photos of how it was arranged.

Everything is clean now however I'm unsure how and which direction I should rewind the spring inside the gear. If anyone has tried this before, or have a photo of the arrangement of the spring, I'd deeply appreciate it.

Thank you.
 

Attachments

  • IMG_0156.JPG
    IMG_0156.JPG
    883.5 KB · Views: 1,376
  • IMG_0157 2.jpg
    IMG_0157 2.jpg
    1.1 MB · Views: 1,369

sissysphoto

Member
Joined
Jun 6, 2018
Messages
191
Location
charlotte nc
Format
Traditional
Oh lord, the dreaded Hasselblad coiled spring. Before I answer your question, please show me a photo of the damper ring. If you do not have one, then I will tell you to send it to Odess. I'm not being snooty. I just don't want to waste both our time on a bad repair job. If you decide to put that spring back in, good luck. The chances are extremely high that you will destroy it in the process. At any rate whatever you do, do NOT allow the camera works to cycle backwards, even a little, or you will destroy another spring you cant even see, and the camera will be a paperweiight. Please, may I see a photo of your damper ring that is supposed to sit on top of that gear? Thank you.
 

sissysphoto

Member
Joined
Jun 6, 2018
Messages
191
Location
charlotte nc
Format
Traditional
Since I don't know the serial number of your camera I will ask you if you have a part number 3 in the his diagram. If you don't then send the camera to odess.
 

sissysphoto

Member
Joined
Jun 6, 2018
Messages
191
Location
charlotte nc
Format
Traditional
I hope the OP and others will forgive my percieved tone in answering him. I could write a book about repairing that camera, and the spring in question is the one camera repair of all that gives me nightmares. And for all I could tell him about the repair he is undertaking, it would be for naught. When the lower door especially is giving the problem described, then the camera has reached what I use to call stage 3 (of 3). It is time for a professional. And one of Odess' caliber. As for rewinding that spring at home, the chances are extremely high that the spring will be destroyed, and parts availability is extremely short to nil. I cannot stress strongly enough to send the camera and parts to a professional. Besides, there are other repairs that need being done. as a matter of course.
 

phass

Member
Joined
Nov 27, 2014
Messages
57
Location
US
Format
Multi Format
Hi Yashima, I wound this spring on my c/m, I used Y-shaped diy tool to hold the body of spring down. Hope this helps.
Cheers.
525frm.jpg
 

sissysphoto

Member
Joined
Jun 6, 2018
Messages
191
Location
charlotte nc
Format
Traditional
Excellent. Learn something new every day. I'd love to see a picture of this home made tool. Good work.
 
OP
OP

yashima

Member
Joined
Jan 21, 2016
Messages
36
Format
Medium Format
Hello sissysphoto, no problem at all. I appreciate all the warning. Here is a photo of the damper ring. Any advice? Thank you.

Hello Phass, thank you! Very very neat work! Any advice how I should proceed with winding the spring? And when do I know it has been tighten enough?
 

Attachments

  • IMG_1453.JPG
    IMG_1453.JPG
    950 KB · Views: 636

sissysphoto

Member
Joined
Jun 6, 2018
Messages
191
Location
charlotte nc
Format
Traditional
Its been 3 years since my last Hasselblad repair. When you buy the spring as a new or NOS part, it comes coiled inside a little washer sort of doughnut, prewound. And you use (i fabricated) a little push plunger to push it into position. Naturally since the spring was factory wound, it simply caught the outer spring end at the proper place in the outer gap and that was it.
As further words of discouragement for doing this repair, what are you going to do about the 3 foam pads behind the mirror? They surely need replacing. And without them your focus accuracy is terrible. Then if you do replace them, you've still lost your 71.40mm chassis length. So once again, focus accuracy is off.
Even if you do get the spring back in, your problem will come back sooner than later. I've been through all this, believe me. I practically locked myself in my little house like a prisoner or a hermit for 2 years with about 20 Hasselblads and studied them. One thing I learned. Odess has access to parts and we do not. And the chances are extremely high you will destroy that spring. What I would do if I were you would be to put all the screws in their proper screw holes 2 or 3 turns so a repairman will have them. Then ship the camera disassembled to him. Send him a neat well-ordered shipment and he will probably not charge you for trying to forensically repair your repair.
A properly serviced Hasselblad is a dream. An improperly serviced or neglected one is a piece of junk. You're better off with a Brownie.
 
OP
OP

yashima

Member
Joined
Jan 21, 2016
Messages
36
Format
Medium Format
Hi sissyphoto,

Thanks for the warning. I'm not sure how this repair is related to the foam pads behind the mirror? They are still in good condition as far as I can see.

Now that I'm here, I would like to attempt the repair. If I fail and I will send it to a technician, and I think the cost would not be significant more than if I send it in now. I would appreciate your advice how I should go on about winding the spring and any potential pitfalls?
 

sissysphoto

Member
Joined
Jun 6, 2018
Messages
191
Location
charlotte nc
Format
Traditional
Good luck. Write the other poster about his homemade tool. In all the hasselbads I've worked on I've only been able to re install that spring successfully once. Maybe he knows something I don't. Remember to pack the hub with grease. As for the 3 foam pads, you can't see them. They are behind the mirror between it and the metal backing plate. Like all foam it deteriorates. The result is that focus accuracy is off, and to a more distressing degree than you imagine. Because of that the only thing you have working for you with all that perfect Zeiss glass is depth-of-field. A Hasselblad is either perfect or a glorified Brownie. Theyre kind of like an old Jaguar. One of those fine pieces of craftsmanship, and so elite, it can spend half its life in the shop.:smile:
 

Theo Sulphate

Member
Joined
Jul 3, 2014
Messages
6,489
Location
Gig Harbor
Format
Multi Format
... what are you going to do about the 3 foam pads behind the mirror? They surely need replacing. And without them your focus accuracy is terrible. Then if you do replace them, you've still lost your 71.40mm chassis length. So once again, focus accuracy is off.
...

Just out of curiosity, since I have no intention of disassembling a Hasselblad, how do changing the mirror pads affect the chassis length?

I've seen this 71.40mm reference before - isn't it just the distance between the mount and the rear of the camera? How does that ever change? Clearly, there's something I don't understand.

Theyre kind of like an old Jaguar. One of those fine pieces of craftsmanship, and so elite, it can spend half its life in the shop.:smile:

Now that I understand!
 

sissysphoto

Member
Joined
Jun 6, 2018
Messages
191
Location
charlotte nc
Format
Traditional
Theo, in order to replace the mirror pads, the rear panel of the chasis has to be removed, or at least that was the only way I was able to access them. But remember, I was self taught and had no specialty tools. I was able to fabricate a few basic tools or jigs, but nothing like guys like Odess has. He can probably replace the pads working through the lens hole in the front. But I had to take the back off the chassis so the mirror would come withit so I could do the job. Naturally that forced me to work to once again restore my 71.40 chassis length. A heart surgeon can replace a heart valve through a little bitty hole in the chest. I would need to cut the heart out and put it up on the workbench to do it. But I could do tests, and with those tests I discovered just how bad focus accuracy can be with bad pads. From that point on I made pad replacement part of every Hasselblad body I opened.
I did tests. Exhaustive tests only a compulsive osbsessive would do. I was never such a mental case before I got mixed up with Hasselblads. Anyway, I was able to get a 1957 Hasselblad to focus with an accuracy down to less than 1/8 inch wide open, by both the printed lens scale, a groud glass I fabricated, and the film. All 3 were dead on with the other. 1/8 inch or less at 3 feet, wide open. A Hasselblad can do it, if you want to make it do it. Before I replaced those pads on that body and others, a Hasselblad with bad pads is a Brownie. I preach the gospel of mirror pads.
 

phass

Member
Joined
Nov 27, 2014
Messages
57
Location
US
Format
Multi Format
Hello sissysphoto, no problem at all. I appreciate all the warning. Here is a photo of the damper ring. Any advice? Thank you.

Hello Phass, thank you! Very very neat work! Any advice how I should proceed with winding the spring? And when do I know it has been tighten enough?

I can tell you how I handle this spring.
Lubricate the spring bed. Clean spring with lighter fluid. Put the rubber gloves on (to prevent slipping) and wind the spring tight with you fingers. At this point (if you have strong fingers to hold the spring long enough) you can count the number of spins you made. It's better to have more spins than less (you always can unwind later if doors slam too hard.) Now put the the hook that on periphery your winded spring into notch on the spring bed and carefully lay down the winded spring putting the internal hoock in its place. I do not remember exactly, but you can un-hoock the periphery end of this spring if you need to unwind it, and make sure you pushing hard enough on the spring so it won't spin out of control.
When you done with this spring, you may need to check the space between the shutter-doors before they completely closed - it should be around 5 mm according the manual that I found online. To adjust this gap you will need to hold the shiny disc that you can see in left upper corner of my pic with pliers and carefully push /pull the respective shutter door to get 5 mm gap. Make sure you push/pull along whole door otherwise the the doors gap won't be even.
I hope this will help you to revive your camera
Cheers.
 

phass

Member
Joined
Nov 27, 2014
Messages
57
Location
US
Format
Multi Format
Excellent. Learn something new every day. I'd love to see a picture of this home made tool. Good work.
It's nothing fancy. I cut Y shape from the flexible piece of plastic.
Cheers
 
OP
OP

yashima

Member
Joined
Jan 21, 2016
Messages
36
Format
Medium Format
I can tell you how I handle this spring.
Lubricate the spring bed. Clean spring with lighter fluid. Put the rubber gloves on (to prevent slipping) and wind the spring tight with you fingers. At this point (if you have strong fingers to hold the spring long enough) you can count the number of spins you made. It's better to have more spins than less (you always can unwind later if doors slam too hard.) Now put the the hook that on periphery your winded spring into notch on the spring bed and carefully lay down the winded spring putting the internal hoock in its place. I do not remember exactly, but you can un-hoock the periphery end of this spring if you need to unwind it, and make sure you pushing hard enough on the spring so it won't spin out of control.
When you done with this spring, you may need to check the space between the shutter-doors before they completely closed - it should be around 5 mm according the manual that I found online. To adjust this gap you will need to hold the shiny disc that you can see in left upper corner of my pic with pliers and carefully push /pull the respective shutter door to get 5 mm gap. Make sure you push/pull along whole door otherwise the the doors gap won't be even.
I hope this will help you to revive your camera
Cheers.

Thank you very much Phass. Just to clarify, what do you mean by the "internal hook"? Do you mean the hook at the centre of the spring? Do we put the hook at the central of the spring in place first, and then wind the hook on the periphery around it? I'm still a little unclear by this bit. And how does the Y shape tool help with your work? Really appreciate your help.

@sissyphoto: Will let you know the outcome!
 
Last edited:

phass

Member
Joined
Nov 27, 2014
Messages
57
Location
US
Format
Multi Format
Thank you very much Phass. Just to clarify, what do you mean by the "internal hook"? Do you mean the hook at the centre of the spring? Do we put the hook at the central of the spring in place first, and then wind the hook on the periphery around it? I'm still a little unclear by this bit. And how does the Y shape tool help with your work? Really appreciate your help.

@sissyphoto: Will let you know the outcome!

The internal hook is in the center of spring.
I've put the periphery hook first if I remember my steps correctly but you can try inverted order. I winded spring before putting it in bed.
I would use your fingers to hold spring down when you are placing/hooking it, this way you feel/control the spring better. Y tool helps to pevent spring to jump off of its bed when you are redy to close dumper. Hope this'll help.
Cheers.
 
OP
OP

yashima

Member
Joined
Jan 21, 2016
Messages
36
Format
Medium Format
Hi everyone,

I managed to rewind the spring successfully and put everything back together again. Unfortunately the problem is not resolved, and I realised the problem might not be this spring.

@phass:
The problem with my camera is: The upper door close fully with good tension, however the lower door does not close fully (even though when you push it, there's good tension behind). I think it has something to do with what the gap between the two door that you talked about, rather than the spring. When I turn the knob (on top of the gear for the spring), both door moves together however there's always 1cm gap between them. And when the upper close close, the lower door stops, 1cm away from being fully close. When I turn the knob further, the lower would close.

I tried to hold the small shiny disc you described to adjust the door, however there seems quite a lot of resistant doing so and I dont want to force it. Any further advice for me please?


For anyone who is interested in the original problem, if your auxiliary shutters are jammed or sluggish and without good tension, I encourage to attempt rewind the spring. It can be quite fiddly however not overly technical to do. I did it before reading Phass method (put the outer hook in place first), and I put the central hook in place first. I used two fingers on one hand to hold part of the spring that has been winded into the gear, and use the other hand to wind the outer hook around it. Its quite fiddly however there's not many things that can go wrong. If it jumps out you can just try again. It took me a few tries. Good luck.
 
Last edited:

John Koehrer

Subscriber
Joined
Apr 3, 2004
Messages
8,275
Location
Aurora, Il
Format
Multi Format
Way back when. I was repairing cameras, the shop I worked in wasn't specialized so I had the chance to work on only a few Hasselblads
but the method phass used is the same we used in the shop. Care and patience helps.
Regarding the shutter, I've seen several that the blades had actually slipped on their axle and had to be repositioned. Obviously
not an approved fix.
 

sissysphoto

Member
Joined
Jun 6, 2018
Messages
191
Location
charlotte nc
Format
Traditional
Way back when. I was repairing cameras, the shop I worked in wasn't specialized so I had the chance to work on only a few Hasselblads
but the method phass used is the same we used in the shop. Care and patience helps.
Regarding the shutter, I've seen several that the blades had actually slipped on their axle and had to be repositioned. Obviously
not an approved fix.
Actually the upper door is notorious for being moved on it's axle during a jam and attempt to wind. Repositioning that door is perfectly described in the repair manual. As for the earlier reference to repositioning the lower door, I disagree. He stated he did that because of his spring pressure being lowered because the doors snapped too strongly. Before lowering the spring taughtness, he should have packed the hub with grease, which would have reduced the strong action somewhat. The original 1957 C had a piston and cylinder providing the dampening. The last models of CM's had a sort of washer with a nylon type of insert to provide dampening. The original piston was the smoothest most vibration free model but required routine maintenance. We need to bear in ming that there are a lot of bodies out there that have had their dampers removed by unknowing repairmen. Sooner or later those cameras rear doors will crack at their axle.
 

sissysphoto

Member
Joined
Jun 6, 2018
Messages
191
Location
charlotte nc
Format
Traditional
Congrats on the spring installation. I'm speaking from 3 year old memory but I believe the upper door might have moved in it's axle, which makes it appear the lower door is out of position. Moore often than not, this is the case. As for moving the upper door on it's axle, hold the silver round thing on the end with pliers and spread the fingers out on your right hand up near the axle and push and pray. Keep tinkering till you're happy. Youre learning.
 

phass

Member
Joined
Nov 27, 2014
Messages
57
Location
US
Format
Multi Format
Congrats on your progress. As other members metioned you may need to move lover door and start from checking that this coil spring was not drowned in grease that may restrict it's movement. I agree that joints that move lover door may need some liquid oil. Good luck.
 

Theo Sulphate

Member
Joined
Jul 3, 2014
Messages
6,489
Location
Gig Harbor
Format
Multi Format
It's amazing how Hasselblad chose this complex approach with the rear baffles which requires complicated mechanisms and calibrations. I look at the RB67 and admire its simplicity and reliability, both in how it solves this problem and in its capabilities.

I know this isn't helpful, sorry.

I have numerous Hasselblads, so I can empathize.
 
Photrio.com contains affiliate links to products. We may receive a commission for purchases made through these links.
To read our full affiliate disclosure statement please click Here.

PHOTRIO PARTNERS EQUALLY FUNDING OUR COMMUNITY:


Ilford ADOX Freestyle Photographic Stearman Press Weldon Color Lab Blue Moon Camera & Machine
Top Bottom