It seems to me if the hood is good for the 60, it will be a tad short for the 80. Compendium (bellows) shade would be the solution for the 80.
-
Welcome to Photrio!Registration is fast and free. Join today to unlock search, see fewer ads, and access all forum features.Click here to sign up
- Home
- Forums
- Analog Workflow Forums (100% Analog/Traditional)
- Analog Equipment
- Medium Format Cameras and Accessories
You are using an out of date browser. It may not display this or other websites correctly.
You should upgrade or use an alternative browser.
You should upgrade or use an alternative browser.
Hard shadow on hasselblad negatives
-
A
- Thread starter Dr Dik
- Start date


Recent Classifieds
-
For Sale Canon RF 600mm f11, RF 100-400 Lenses
- Started by Jon Shiu
-
For Sale Fujifilm MAXIMA Glossy RA-4 Paper; Packs of 16x20 Sheets
- Started by Aidan Sciortino
-
Sold 1924 Carl Zeiss Jena 150mm f4.5 Lens in dial Compur
- Started by Jon Shiu
-
Found Plastic 5x7 film holders (Fidelity, Lisco)
- Started by blee1996
-
Want to Buy WTB: Digital timer for an enlarger
- Started by Terrence Brennan
Forum statistics
Sirius Glass
Subscriber
One does not purchase a Hasselblad to save money and clutter, Mr. Glass. One purchases a Hasselblad to have the best. Where's my Grey Poupon?
Dr. Dik needs a hood that fits his lens precisely.

And I told him how to do it. Now if he chooses not to cut back a 60mm/80mm lens hood or get a compendium lens hood, that is his problem. Besides there are other brown mustards that are much better than Grey Poupon.
It seems to me if the hood is good for the 60, it will be a tad short for the 80. Compendium (bellows) shade would be the solution for the 80.
Except for the “For Hasselblad” knock-offs, I’ve never seen a genuine Hasselblad combination shade for 60-80mm focal length. Feel free to correct me if I’m wrong as Hassy shades seem not too well documented.
I’ve seen genuine Hasselblad 80mm focal length shades. The only combination shade I’m aware of is the genuine Hasselblad 150-250 shade. {AUTHOR’s EDIT: see GLS’ correction, below} I’m only referring to Bay60 fixed shades.
The OP seems to already well know that a compendium is the best solution for this problem unless a compact shade option is required. I use fixed shades a lot and compendium for more critical applications.
Last edited:
Sirius Glass
Subscriber
Except for the “For Hasselblad” knock-offs, I’ve never seen a genuine Hasselblad combination shade for 60-80mm focal length. Feel free to correct me if I’m wrong as Hassy shades seem not too well documented.
I’ve seen genuine Hasselblad 80mm focal length shades. The only combination shade I’m aware of is the genuine Hasselblad 150-250 shade. I’m only referring to Bay60 fixed shades.
The OP seems to already well know that a compendium is the best solution for this problem unless a compact shade option is required. I use fixed shades a lot and compendium for more critical applications.
I think my 60mm/80mm lens hood is a knock off.
Hasselblad 150-250 shade
The genuine one is 100-250.
The genuine one is 100-250.
You are correct. Pardon my typo.
There is also a Bay60 Hasselblad 38-60 combo hood. I'm assuming mine is genuine but who knows. It does say Hasselblad Sweden on it though.I’ve seen genuine Hasselblad 80mm focal length shades. The only combination shade I’m aware of is the genuine Hasselblad 150-250 shade. {AUTHOR’s EDIT: see GLS’ correction, below} I’m only referring to Bay60 fixed shades.
Denis OLIVIER
Member
Hi to all 
Thanks for the post, I feel less alone!
I have exactly the same problem, only on both sides (left and right).
This is a "brand new" 503 CW, boxed.
I have several 500 CM bodies and lenses, all the corresponding hoods, different backs and didn't noticed this before.
It's not the scanner, I have different medium format cameras without such an issue.
Of course, this is more noticeable on a brighter, texture-free area.
I've changed seals, use hoods, put black tape on the slide slot, paint some parts with black mat paint etc. I still figure out how to fix this.
Last edited:
Scott Micciche
Subscriber
I painted my rollers with a matte paint and also re-did the edges of the film gate, in the event a shiny spot had caused the marks. I rarely see them now. I never had these lines with my 2000 fc/m, so I assumed the internal coatings were better.
Have you tried a couple of frames with the lens cap on the lens and also with the body cap on with no lens?
Hi to all
Thanks for the post, I feel less alone!
I have exactly the same problem, only on both sides (left and right).
This is a "brand new" 503 CW, boxed.
I have several 500 CM bodies and lenses, all the corresponding hoods, different backs and didn't noticed this before.
It's not the scanner, I have different medium format cameras without such an issue.
Of course, this is more noticeable on a brighter, texture-free area.
I've changed seals, use hoods, put black tape on the slide slot, paint some parts with black mat paint etc. I still figure out how to fix this.
View attachment 340314View attachment 340315View attachment 340316View attachment 340317View attachment 340318View attachment 340319
Have to negate variables.
First question is whether you see it in the film itself before scanning? You mentioned it was not a scanner issue so I take it the answer is "yes".
Second, you have other backs and bodies so I would repeat what you used here, but keep notes and switch backs, bodies etc. Try to "A" and "B" it until you narrow it down. I have 3 V series bodies (503CX, 501CM, and a 2000FCW) and about 6 backs. I have never had these exposure lines on anything I have shot.
Good luck because this is frustrating I'm sure.
Sirius Glass
Subscriber
Hi to all
Thanks for the post, I feel less alone!
I have exactly the same problem, only on both sides (left and right).
This is a "brand new" 503 CW, boxed.
I have several 500 CM bodies and lenses, all the corresponding hoods, different backs and didn't noticed this before.
It's not the scanner, I have different medium format cameras without such an issue.
Of course, this is more noticeable on a brighter, texture-free area.
I've changed seals, use hoods, put black tape on the slide slot, paint some parts with black mat paint etc. I still figure out how to fix this.
View attachment 340314View attachment 340315View attachment 340316View attachment 340317View attachment 340318View attachment 340319
Those dark areas are from the film clamp on the film back. They are supposed to be there.
Those dark areas are from the film clamp on the film back. They are supposed to be there.
This just keeps going round and round. The marks shown in his post are not from any clamp, and are not supposed to be there. If they exist on the negative, something is happening to yield a density difference in the live area. I have asked the OP to inspect the film itself to clarify the cause, and rule out something related to scanning.
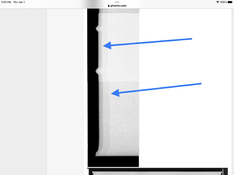
The blue arrows highlight what the OP is concerned about.
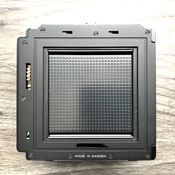
The second shot is a back with dark slide pulled. The only things there are the 1-pressure plate (which is in back of the film), 2-frame edges which define the live area.
There is nothing there which would create the marks noted.
Attachments
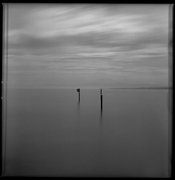
The example shots in post #108 show a bright sky, which is consistent with the diagnoses earlier in this thread that scattered or out of frame bright light is bouncing around in the film chamber and casting extra light on the film, except for a small area at the edges shadowed by the film gate. Look for any reflective surfaces inside the film chamber, and use a more tightly framed hood to cut down on out-of-frame light.
Sirius Glass
Subscriber
The example shots in post #108 show a bright sky, which is consistent with the diagnoses earlier in this thread that scattered or out of frame bright light is bouncing around in the film chamber and casting extra light on the film, except for a small area at the edges shadowed by the film gate. Look for any reflective surfaces inside the film chamber, and use a more tightly framed hood to cut down on out-of-frame light.
It sounds as though the interior needs non reflective flocking[?] added.
OMG... The best first thing people can do with this sort of problem is take a few minutes and read the rest of the thread from the beginning to see what has already been proposed and/or rejected as the likely cause and solution.
Good theory but the thing is, this shadow can appear on both sides of the negative and extends beyond where the film clamp grips the film. Very irritating.
This would confuse me too. Luckily, I never had this with any of my 501s or any of my acks. Dave Odette should know what this is from!
Posts #62 and #76 above provide the most plausible explanation of what is going on. There is most likely some unwanted light reflecting off the interior of the camera body which is causing the film gate to cast a shadow on the edge of the film. If that is right, the likely best way to minimise the problem is to minimise internal reflections. Use a hood, be mindful of strong light sources, etc. One issue, however, is that the deteriorating palpas coating on the inside of most 501s and 503s is now often no longer matte black but starts to become a sort of light grey colour. I suspect this may be introducing a new potential source of diffuse internal reflection in these bodies.
Denis OLIVIER
Member
Hi,
this is not solved for me
On the photo for test, no bright light here. The hood was on.
Currently the body is serviced in France's largest maintenance department.
I speak with them, they need to do further tests.
They speak about the film type (I use several ones, so no), and maybe also the plate's pressure, which is possible when you see the dark part on top left not aligned with bottom right.
In progress...
Attachments
Sirius Glass
Subscriber
Hi,
this is not solved for me
On the photo for test, no bright light here. The hood was on.
Currently the body is serviced in France's largest maintenance department.
I speak with them, they need to do further tests.
They speak about the film type (I use several ones, so no), and maybe also the plate's pressure, which is possible when you see the dark part on top left not aligned with bottom right.
In progress...
Yes further tests are needed. There is no obvious cause.
Those are some weird ass shadows, have not seen those before … all 4 sides with islands.Hi,
this is not solved for me
On the photo for test, no bright light...
Are you sure these are not scanning artifacts? How are the negatives masked? Multiple layers of glass? Can we see a picture of the negative taken on a light table, or just uniformly light from behind?
Don't overestimate this factor. The light was bright enough to make a photo, it's bright enough to cause artefacts - you exposed longer or with a wider aperture to account for the low light, so exposure will be sufficient for the artefact too.no bright light here
IMHO this looks like I would expect internal reflections of light that comes in through the lens to look, the solution beside the hood is better blackening/flocking/baffles or whatever.
| Photrio.com contains affiliate links to products. We may receive a commission for purchases made through these links. To read our full affiliate disclosure statement please click Here. |
PHOTRIO PARTNERS EQUALLY FUNDING OUR COMMUNITY:  |