getting a usable negative from instant peel apart film

Field #6

D
Field #6

  • 2
  • 0
  • 31
Hosta

A
Hosta

  • 7
  • 3
  • 54
Water Orchids

A
Water Orchids

  • 3
  • 1
  • 42
Life Ring

A
Life Ring

  • 2
  • 0
  • 34
Fisherman's Rest

A
Fisherman's Rest

  • 9
  • 2
  • 67

Recent Classifieds

Forum statistics

Threads
197,902
Messages
2,766,633
Members
99,500
Latest member
Neilmark
Recent bookmarks
1

amuderick

Member
Joined
Jan 13, 2007
Messages
279
Format
Large Format
Recently on the Flickr Polaroid forum it has been discovered that the black backing on Fuji peel-apart films can be removed by applying household bleach. The result is a film negative.

Eagerly looking for a Polaroid 665 replacement, I gave it a try.

The FP-100C color film works really well. The negative is sturdy. The film has a purplish mask. Using hybrid techniques, I was able to recover the image with very surprising quality. Being able to recover a color negative is very exciting and new!

The FP-3000B film has a reflective backing so things don't work there. Reflective scanning using hybrid technique does work.

The FP-100B film reveals a clear film base and a negative image. There are two problems that I am hoping the geniuses on APUG can help me with.

First, the negative is very thin. The density on the negative is minimal. Does anyone have any ideas on how to improve this (timing before peeling, temperature, chemical treatment, intensifiers, etc)?

Second, there appears to be solarization in parts of the negative. Some places on the negative have a much more dense reddish hue. I'm not sure how to get rid of this where it is undesireable. Also, I am hoping this can be tamed and used to increase density.

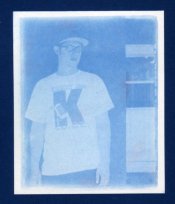
Ideas are appreciated. Or, maybe you have a better idea? I am looking to take a photo, get a negative immediately, and make a cyanotype as part of a 1 hour science demonstration. Thanks!
 

keithwms

Member
Joined
Oct 14, 2006
Messages
6,220
Location
Charlottesvi
Format
Multi Format
I lift the fp100c emulsions without bleach... just boiling water.

Anyway, to improve density, why not just adjust exposure. Recall that with type 55, it was quite common to expose differently for the neg than for the positive.

Not sure about the solarization, I haven't seen it. Is it an effect of the bleach? Maybe you could try throwing the neg in some fix.

If you have an hour, how about just doing an in-camera cyanotype.
 
OP
OP

amuderick

Member
Joined
Jan 13, 2007
Messages
279
Format
Large Format
@keith, I am not lifting the emulsion off the print...just removing the black backing from the negative so I have a usable negative image for enlarging/scanning/contact printing. The bleach never touches the negative emulsion -- I tape it face down to glass to protect it while I'm rubbing off the backing. I did adjust exposure...2 stops overexposure gives a very light print but the negative is still very thin.

In camera cyanotype is cool but I am looking to take 10-20 portraits and have each person develop their own along a production line.

Thoughts and comments appreciated.
 

Photo Engineer

Subscriber
Joined
Apr 19, 2005
Messages
29,018
Location
Rochester, NY
Format
Multi Format
The image will be thin due to the fact that it has about 1/3 of the dyestuffs needed for a film negative. It is intended for a reflective support, so you are kinda stuck there.

Also, silver halide and silver metal will be present in this image and will probably gradually obscure it unless bleached and fixed.

PE
 

keithwms

Member
Joined
Oct 14, 2006
Messages
6,220
Location
Charlottesvi
Format
Multi Format
@keith, I am not lifting the emulsion off the print...just removing the black backing from the negative so I have a usable negative image for enlarging/scanning/contact printing.

Oh okay, but what I call an emulsion lift is really easy for the fp100c. You just throw the whole thing in boiling water, the emulsion comes off, you dry it, and then you can treat that as a (slightly thin) slide. I've put the fp100c emulsion in an enlarger and gotten good results.
 
OP
OP

amuderick

Member
Joined
Jan 13, 2007
Messages
279
Format
Large Format
@photo-engineer, There is dye in the B&W film? Is that what is creating the reddish solarization?

I am speaking specifically about the B&W material -- FP-100B which is equivalent (sort-of) to old Polaroid 664 film (B&W ISO 100). Why is it that a Polaroid 665 negative can be so dense but the FP-100B negative is so thin.

Thanks for your tips and knowledge.

@keith, that is a cool trick. That might work for my demo. I will experiment there. But isn't the resulting print a negative since your negative is really a positive? Thanks!
 

eli griggs

Member
Joined
Nov 15, 2005
Messages
3,830
Location
NC
Format
Multi Format
Would a selenium bath increase the density of the images on this type of film?
 

Photo Engineer

Subscriber
Joined
Apr 19, 2005
Messages
29,018
Location
Rochester, NY
Format
Multi Format
There should be no dye in the B&W film, but there will be retained silver and silver halide. OTOH, they may incorporate a small quantity of acutance dye and AH dye to sharpen the image. This might be a possibility.

PE
 
OP
OP

amuderick

Member
Joined
Jan 13, 2007
Messages
279
Format
Large Format
PE, I tried your suggestion of bleaching and fixing the color negative. It definitely had an effect. I'm not sure it was a good one though. ;-) The film base was cleared dramatically of the purple color that casts the negative. However, the removal of the silver seems to have made things a bit thin. I will have to try some shots that are more overexposed in an attempt to keep the dye on the negative side.

I am also going to try dropping the B&W negative in some HC-110 to see what happens. If all the developed silver moved to the print, then I would want to develop the remaining halide right? That is a half-thought through concept. So, let me know if I am way off. I'll post what happens.
 

Photo Engineer

Subscriber
Joined
Apr 19, 2005
Messages
29,018
Location
Rochester, NY
Format
Multi Format
I mentioned the reason for the thinness in a previous post here. Reflection print materials use about 1/2 to 1/3 the dyestuffs that transmission materials do. This is because the white reflective back just about doubles the dye density achieved by a given amount of dye.

PE
 
OP
OP

amuderick

Member
Joined
Jan 13, 2007
Messages
279
Format
Large Format
Yes, and now I can see that is very true. I guess the 'bleach bypass' adds density because the silver is in there too.

Any ideas on improving the density of the B&W negative? Over/under exposure? Over/under develop time? Redevelopment? Other?

Thanks!
 

frontdrive34

Member
Joined
Dec 3, 2008
Messages
40
Location
Sydney, Aust
Format
Instant Films

keithwms

Member
Joined
Oct 14, 2006
Messages
6,220
Location
Charlottesvi
Format
Multi Format
Any ideas on improving the density of the B&W negative? Over/under exposure? Over/under develop time? Redevelopment? Other?

Thanks!

Just quick ideas: try developing longer than usual (probably won't help), and you might also warm the positive/negative package a bit while developing, I am thinking a warm, moist towel.
 

Photo Engineer

Subscriber
Joined
Apr 19, 2005
Messages
29,018
Location
Rochester, NY
Format
Multi Format
Just quick ideas: try developing longer than usual (probably won't help), and you might also warm the positive/negative package a bit while developing, I am thinking a warm, moist towel.

Backwards!

The colder or shorter transfer will leave more dye behind in the negative.

PE
 
OP
OP

amuderick

Member
Joined
Jan 13, 2007
Messages
279
Format
Large Format
I am very pleased with the results I get in color. All my dyes are happy.

I am specifically interested in a way to improve the density of my B&W negative...from Fuji FP-100B film. I am looking for a Polaroid 665 replacement.

It appears that the silver negative in the color film is fairly dense (and the negative itself is more durable). Is there a way of removing the dyes but leaving the silver image? Kind of a reverse bleach? Maybe that would work? Then I would get a B&W negative to work with.
 

geoferrell

Member
Joined
Feb 18, 2008
Messages
81
Location
McKee, KY 40
Format
Medium Format
I've tried the FP-3000B b/w materials and used the peel away part as a negative that I've scanned and inverted and then used for a print with varied results. I've experimented with the FP-100C in making image transfers that give inconsistent but interesting results. Using the backing to get a negative type materials could provide an art type look.
 
OP
OP

amuderick

Member
Joined
Jan 13, 2007
Messages
279
Format
Large Format
I really want to be able to make on-the-spot cyanotypes in a demonstration setting. I need a negative with the required density to do it.
 

Akki14

Member
Joined
Feb 2, 2007
Messages
1,874
Location
London, UK
Format
4x5 Format
I really want to be able to make on-the-spot cyanotypes in a demonstration setting. I need a negative with the required density to do it.

How are you intending on drying these rapidly? I was hanging around with a fuji FP3000B user last week and he said the goop side takes 1-2 hours to dry. I don't see how you can do a whole class rapidly in only an hour AND make cyanotypes.
 
OP
OP

amuderick

Member
Joined
Jan 13, 2007
Messages
279
Format
Large Format
Drying depends on ambient humidity. I have experimented with using a hair dryer and also a handheld fan. Both work well and quickly. If you are in a dry climate, they will dry in a minute or two. In 100% humidity...2 hours could be reality.

Also, The FP-100C (color) version dries MUCH more quickly than the B&W version.
 
OP
OP

amuderick

Member
Joined
Jan 13, 2007
Messages
279
Format
Large Format
Here is where it stands:

1) Overexpose FP-100C (color) by 1-2 stops. Wash goop away and dry in plain water.
2) Tape flat to glass and apply a paper towel wet with household bleach (Clorox) to backing. Backing will dissolve away.
3) Place in my contact print frame with a sheet of Lana Aquarelle hot press watercolor paper coated with Ware's New Cyanotype emulsion.
4) Expose 80 minutes under 45 W of fluorescent blacklight (sunlight equivalent is probably 5-10 minutes)
5) Develop in mildly acidic water with final rinse in dilute solution of Hydrogen Peroxide.

This is the result attached. This is the best result I have obtained. FP-100B negatives were much too thin and the contrast was even less. FP-100C negatives with bleach/fix or just fix gave worse results.

As you can see, the image is way underexposed. The film itself appears to have a strong UV blocking layer. Further exposure improves shadow density but highlights suffer accordingly.

Ideas appreciated.
 

Attachments

  • test print from fp-100c negative.jpg
    test print from fp-100c negative.jpg
    38.3 KB · Views: 385
Photrio.com contains affiliate links to products. We may receive a commission for purchases made through these links.
To read our full affiliate disclosure statement please click Here.

PHOTRIO PARTNERS EQUALLY FUNDING OUR COMMUNITY:


Ilford ADOX Freestyle Photographic Stearman Press Weldon Color Lab Blue Moon Camera & Machine
Top Bottom