Fuji GF670 focus issue

Service Entrance

A
Service Entrance

  • 1
  • 1
  • 30
Trash and razor wire

A
Trash and razor wire

  • 1
  • 0
  • 21
Bicycles chained

Bicycles chained

  • 0
  • 0
  • 18
Tubas in the Park

A
Tubas in the Park

  • 1
  • 0
  • 19
Old Oak

A
Old Oak

  • 0
  • 0
  • 28

Recent Classifieds

Forum statistics

Threads
197,855
Messages
2,765,797
Members
99,488
Latest member
colpe
Recent bookmarks
0

epines

Member
Joined
May 7, 2013
Messages
10
Format
Medium Format
I recently got a barely-used GF670 (bought new in January). I love it, but it may have a focus issue. Here's the story:

To check the rangefinder's accuracy, I focused on a single point from multiple distances, starting about 12 meters away and working my way to about 1 meter. I aligned the rangefinder image as carefully as possible each time, of course. Shot everything at f/3.5. Well, the first half of the shots are a bit soft where I focused and sharp about 3-4 meters behind; very disappointing. But the second half are sharp where I focused. Is it possible that the rangefinder could be accurate at close distances but off at farther distances? Or, if it's accurate at any distances, is it necessarily accurate at all distances? I'm not sure if I missed focus, or if there's a problem.

After seeing those first test results, I shot the same test again, at f/4. Focusing very carefully again. And -- same results. Which makes me think there's an issue with the camera.

If that's the case, is this a repair any decent repair place can do? (I live in L.A.) Or does it need to go to fuji?
 
Joined
Mar 18, 2005
Messages
4,942
Location
Monroe, WA, USA
Format
Multi Format
I purchased my GF670 new. When it arrived the rangefinder was off. I have read that this is not unusual for this camera. I realigned it myself by driving to an overlook and using the vertical lines of a multistory hospital building located 4+ miles away on a line. Setting this to be infinity seemed to do the trick. My pictures are now all sharp. Although admittedly I have not performed a critical focus test. But so far there does not seem to be a need.

Before sending it off I would try selecting a target much further away than 12 meters, then calibrating to that as infinity. Then see how close the intermediate distances are to correct. I would also not expect absolute perfection from any camera. Normal stopping down should cover any minor discrepancies.

Ken
 
OP
OP

epines

Member
Joined
May 7, 2013
Messages
10
Format
Medium Format
Thanks for the reply, Ken. I'm definitely aware of not expecting perfection from any camera -- I've been using a Hassy and a Rollei TLR for 10-12 years. Both are great, both have shortcomings. But I do expect focusing accuracy, and I don't want to rely on stopping down. Handheld shooting in low light (at wide apertures, obviously) is one of the things I like best about this camera.

Questions:

- Before recalibrating, when you set the lens at infinity, could you tell that it was off? Meaning, did the split images (of the building 4 miles away) not align?

- How did you realign / recalibrate the rangefinder?

Thanks again,
ethan
 
Joined
Mar 18, 2005
Messages
4,942
Location
Monroe, WA, USA
Format
Multi Format
Correct, the split images did not align. They were noticably off. The sense was that the focusing ring would have needed to turn a little further beyond its infinity stop in order to bring them into proper alignment.

The recalibration was pretty standard. Underneath the hotshoe mount there are three visible adjustment screw heads. The one on the right sits higher than the other two. I adjusted the middle set screw until the hospital images were perfectly horizontally aligned. Meaning, when I rotated focus to the infinity stop, the vertical lines of the building clearly snapped into sharp alignment.

Getting to these screws can be a bit baffling the first time. One must first slide the flat silver spring tensioner plate off toward the rear. There is a microscopically small pry-off slot in the front edge of the circular black plastic piece that contains the round metal flash contact. A very small, flat jeweler's screwdriver blade is needed to initially lift the tensioner plate for removal by sliding it over that contact. After that, it's pretty obvious, with four small Phillips head screws holding the shoe itself to the top plate. Once the shoe is removed, the adjustment screws inside the top plate will be easily seen.

If you try this, a few words of caution. You will need a very small diameter extended screwdriver blade to reach the adjustment set screw. I had to purchase a separate precision set just to find one with a long enough reach. It must also be very narrow, otherwise you can't also see into the hole to properly set the blade.

And once properly set into the screw head slot, you must be careful not to press down with any force. Although I can't see the entire mechanism through the hotshoe, my sense has been that this adjustment screw seems to itself be located on a moving part. I could be wrong, but that's how it feels. I've noticed that if I press down even slightly, without even rotating he screw itself, the patch alignment is severely altered. Usually for the worse.

It's a very delicate adjustment. At least for me. Once you get close, it then becomes a series of gentle trial-and-error final attempts until you finally hit that perfect alignment.

Hope this helps.

[Edit: If anyone else out there has also attempted to adjust their own GF670 rangefinder, I'd love to hear your details. Especially any knowledge as to whether those set screws are indeed mounted on moving parts.]

Ken
 
Last edited by a moderator:
OP
OP

epines

Member
Joined
May 7, 2013
Messages
10
Format
Medium Format
Ken -- this is great. I may ultimately just send it to Fuji. I'm fairly mechanically adept, but I'm not sure I want to be messing around with something delicate about which I know nothing. I'm keeping your post on record though. Really appreciate it.

And for anyone else out there reading this thread, don't let it dissuade you from buying the camera. Everything you've read is true. It's light, portable and well-made. The shuttter is nearly silent. The viewfinder is large and bright. And the 80mm focal length is just about perfect on 6x7, in my opinion.
 
OP
OP

epines

Member
Joined
May 7, 2013
Messages
10
Format
Medium Format
To complete this thread, here's what happened: I sent the camera to Fuji. It's still under warranty, so service was free. They sent it back with this note: "I checked the RF and focus. Camera checks to factory specs. I had several people look at the film that was sent under a loupe and light box. The test shots sent are not a good way to check RF and focus." That's it. No details on what's wrong with the test shots, or what would have been a better way to check RF and focus. I'm going to try and shoot a side-by-side test with someone else's gf670.
 

benjiboy

Subscriber
Joined
Apr 18, 2005
Messages
11,952
Location
U.K.
Format
35mm
I'm surprised if you aren't the original buyer of the camera that Fuji honoured the warranty because in my experience of working in camera stores for more than twenty years the guarantee on new equipment is only applicable to the original purchaser, and is not transferable to subsequent owners.
 
OP
OP

epines

Member
Joined
May 7, 2013
Messages
10
Format
Medium Format
Yep -- they were fine with it. It's a one-year warranty, and all they needed was the receipt showing the serial number and date of purchase.

I've managed to disassemble my Arca Swiss 6x9 ground glass and fit the glass to the back of the GF670. Going out to do another focus test.
 

MaartenS

Member
Joined
Jun 4, 2017
Messages
2
Location
Amsterdam
Format
Med. Format RF
Correct, the split images did not align. They were noticably off. The sense was that the focusing ring would have needed to turn a little further beyond its infinity stop in order to bring them into proper alignment.

The recalibration was pretty standard. Underneath the hotshoe mount there are three visible adjustment screw heads. The one on the right sits higher than the other two. I adjusted the middle set screw until the hospital images were perfectly horizontally aligned. Meaning, when I rotated focus to the infinity stop, the vertical lines of the building clearly snapped into sharp alignment.

Getting to these screws can be a bit baffling the first time. One must first slide the flat silver spring tensioner plate off toward the rear. There is a microscopically small pry-off slot in the front edge of the circular black plastic piece that contains the round metal flash contact. A very small, flat jeweler's screwdriver blade is needed to initially lift the tensioner plate for removal by sliding it over that contact. After that, it's pretty obvious, with four small Phillips head screws holding the shoe itself to the top plate. Once the shoe is removed, the adjustment screws inside the top plate will be easily seen.

If you try this, a few words of caution. You will need a very small diameter extended screwdriver blade to reach the adjustment set screw. I had to purchase a separate precision set just to find one with a long enough reach. It must also be very narrow, otherwise you can't also see into the hole to properly set the blade.

And once properly set into the screw head slot, you must be careful not to press down with any force. Although I can't see the entire mechanism through the hotshoe, my sense has been that this adjustment screw seems to itself be located on a moving part. I could be wrong, but that's how it feels. I've noticed that if I press down even slightly, without even rotating he screw itself, the patch alignment is severely altered. Usually for the worse.

It's a very delicate adjustment. At least for me. Once you get close, it then becomes a series of gentle trial-and-error final attempts until you finally hit that perfect alignment.

Hope this helps.

[Edit: If anyone else out there has also attempted to adjust their own GF670 rangefinder, I'd love to hear your details. Especially any knowledge as to whether those set screws are indeed mounted on moving parts.]

Ken


Hi Ken, i know this is an old thread, but i hope you can still help me. I tried to calibrate my gf670 rangefinder because it was not as sharp anymore. Now i think i did something wrong or touched something, because the image in the rangefinder patch is way off and i can't get it closer / merge.
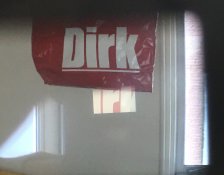
I made a photo with my phone trough the finder to show what i mean. It's not high quality but you'll see the square rangefinder patch is way under the subject/letters IRK. Do you know what this is? Is it one of the screws that i need to turn? I really appreciate if you can give me some advice. Thanks, Maarten Schröder
 

Attachments

  • IMG_2903.JPG
    IMG_2903.JPG
    582.8 KB · Views: 236

Xuco Martin

Member
Joined
Mar 15, 2013
Messages
39
Location
Madrid Espa
Format
Medium Format
The proper distance to start calibrating the telemeter would be the minimum of focus that I think is a meter and a half from there is a medium distance and shortly is already constituting the infinite, in his ring of focus should see indications of those distances Which will coincide with the parallel images if those objects are at the distance indicated in the focus ring of the camera, luck and a greeting from Madrid

la distancia apropiada para empezar a calibrar el telemetro seria, la minima de enfoque que creo que es un metro y medio apartir de hay una distancia media y al poco ya se consige el infinito, en su anillo de enfoque deveria ver indicaciones de esas distancias las cuales deven coincidir con las imagnes paralelas si esos objetos estan a la distancia indicada en el anillo de enfoque de la camara, suerte y un saludo desde madrid
 

MaartenS

Member
Joined
Jun 4, 2017
Messages
2
Location
Amsterdam
Format
Med. Format RF
The proper distance to start calibrating the telemeter would be the minimum of focus that I think is a meter and a half from there is a medium distance and shortly is already constituting the infinite, in his ring of focus should see indications of those distances Which will coincide with the parallel images if those objects are at the distance indicated in the focus ring of the camera, luck and a greeting from Madrid

la distancia apropiada para empezar a calibrar el telemetro seria, la minima de enfoque que creo que es un metro y medio apartir de hay una distancia media y al poco ya se consige el infinito, en su anillo de enfoque deveria ver indicaciones de esas distancias las cuales deven coincidir con las imagnes paralelas si esos objetos estan a la distancia indicada en el anillo de enfoque de la camara, suerte y un saludo desde madrid

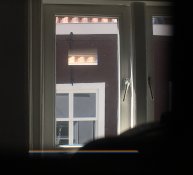
Thank you for your reply. I will try this distance. But my problem is that the rangefinder patch won't merge with the subject. Normally i would take it to a camera store, but i am going to travel soon and i really want to bring this camera. On internet i could only find horizontal calibration. Then i found this thread and signed up. I have added another picture attached to show what i mean. You'll see i focus on a brown wall outside my window..but instead i see the orange/roof tiles in the middle. When i turn the focus ring it just moves from left to right, so the actual problem: the rangefinder patch thinks it is focussed on the orange roof instead of the wall. If someone has a solution or advice for this it would really help me. Maybe know which screw i have to turn. Thanks in advance, Maarten Schröder
 

Attachments

  • IMG_2906.jpg
    IMG_2906.jpg
    669.5 KB · Views: 205

Scott Micciche

Subscriber
Joined
Jan 20, 2017
Messages
312
Location
Chattanooga, Tennessee
Format
Multi Format
I have found you cannot apply too much pressure to the left and center adjustment screws or the mechanism can be jammed low, causing your vertical focus issue. Have you adjusted using the left adjustment screw a bit to recover the vertical alignment? There might be quite a bit of trial-and-error in doing this. When I received my GF670, it was off a bit vertically and drove me nuts, but a few turns in small amounts finally locked it nice and crisp.
 

Bormental

Member
Joined
Mar 1, 2020
Messages
622
Location
USA
Format
Multi Format
Scott, I know this is an old thread, but since you mentioned it. Which screw does the vertical alignment? The large one on the right does not appear to do anything (I tried). It's tightened to the max (clockwise) on my camera and making it more loose doesn't change anything. I decided not to touch the rightmost screw (the middle one is what I touched, to adjust the horizontal alignment).

So.. is it the left screw that does vertical alignment?
 

Scott Micciche

Subscriber
Joined
Jan 20, 2017
Messages
312
Location
Chattanooga, Tennessee
Format
Multi Format
Scott, I know this is an old thread, but since you mentioned it. Which screw does the vertical alignment? The large one on the right does not appear to do anything (I tried). It's tightened to the max (clockwise) on my camera and making it more loose doesn't change anything. I decided not to touch the rightmost screw (the middle one is what I touched, to adjust the horizontal alignment).

So.. is it the left screw that does vertical alignment?

There 3 screws (actually, 4, there is a body length adjustment, but it is under the cover). If you look down with a good light, you'll see the two smaller screws, one is vertical. I cannot remember which screw, but I believe it is the screw on the left.
 
Photrio.com contains affiliate links to products. We may receive a commission for purchases made through these links.
To read our full affiliate disclosure statement please click Here.

PHOTRIO PARTNERS EQUALLY FUNDING OUR COMMUNITY:


Ilford ADOX Freestyle Photographic Stearman Press Weldon Color Lab Blue Moon Camera & Machine
Top Bottom