Follow up on contrast in printing

Camel Rock

A
Camel Rock

  • 3
  • 0
  • 36
Wattle Creek Station

A
Wattle Creek Station

  • 4
  • 0
  • 39
Cole Run Falls

A
Cole Run Falls

  • 2
  • 2
  • 31
Clay Pike

A
Clay Pike

  • 4
  • 1
  • 32

Forum statistics

Threads
198,938
Messages
2,783,523
Members
99,752
Latest member
Giovanni23
Recent bookmarks
0

markbarendt

Member
Joined
May 18, 2008
Messages
9,422
Location
Beaverton, OR
Format
Multi Format
agreed but if you are using roll film with subjects of different SBRs then you need a strategy/methodolgy that works for all shots on the roll.
This is why almost everything I shoot is shot at box speed and developed normally.

If I was in Jessestr's position though, where 90% of my work needed grade 5 paper, I'd adjust my normal film development parameters to where I was able to use grade 2 or 3 as my norm.
 

Sirius Glass

Subscriber
Joined
Jan 18, 2007
Messages
50,380
Location
Southern California
Format
Multi Format
I too shoot everything at box speed without any problems but I have only doing that for 60 years.
 

RobC

Member
Joined
Nov 5, 2007
Messages
3,880
Location
UK
Format
Multi Format
This is why almost everything I shoot is shot at box speed and developed normally.

If I was in Jessestr's position though, where 90% of my work needed grade 5 paper, I'd adjust my normal film development parameters to where I was able to use grade 2 or 3 as my norm.
I suggested in earlier topic that if he's in studio and whole roll of film is used in studio, to revert to using box speed. If he's out doing landscapes I'd use calibration for 10 stops range but thats just me.
 

markbarendt

Member
Joined
May 18, 2008
Messages
9,422
Location
Beaverton, OR
Format
Multi Format
I suggested in earlier topic that if he's in studio and whole roll of film is used in studio, to revert to using box speed. If he's out doing landscapes I'd use calibration for 10 stops range but thats just me.
Yep.
Per Ilford:
" Note Development times may need adjusting to suit individual processing systems and working practices. If an established system is producing good results, adjust the recommended development times until the desired contrast level is obtained. Development times in other manufacturers’ developers are included for your convenience, and are only a general guide. Other manufacturers can and do change their product specifications from time to time, and the development times may change as a result. "
 
OP
OP

Jessestr

Member
Joined
Mar 31, 2014
Messages
399
Format
35mm
agreed but if you are using roll film with subjects of different SBRs then you need a strategy/methodolgy that works for all shots on the roll.

Some people just use manufacturers recommended dev, temp time, expose for shadows and deal with contrast when printing. But as I have repeatedly stated, thats fine if SBR is 6 or 7 or more stops but its not fine if SBR is only 3 or 4 or 5 stops becasue you really won't have as much highlight negative density as you need which causes printing difficulties.

And what exactly does make printing easier if the highlight density is okay? I'd like to know the reason/logical connection behind this.

Yep.
Per Ilford:
" Note Development times may need adjusting to suit individual processing systems and working practices. If an established system is producing good results, adjust the recommended development times until the desired contrast level is obtained. Development times in other manufacturers’ developers are included for your convenience, and are only a general guide. Other manufacturers can and do change their product specifications from time to time, and the development times may change as a result. "
Always thought of increasing dev. time as a last resort... but seems like the most normal thing on earth having read numerous of comments now..
So I have plenty of negatives that will print well on grade 2, most need higher contrast because I know it's a flat scene or I sometimes shoot iso 400 film at 800 and don't compensate for this in processing.. Have done this quite a lot for my indoor series. So that's why I have thin negatives that require more contrast... Wish I knew back then so I could have increased development time. I think I finally found out what was wrong :smile: And I'm really thankful for your help everyone!

Now I'm back at the beginning of understanding the zone system in relation with printing... :smile:
 

Sirius Glass

Subscriber
Joined
Jan 18, 2007
Messages
50,380
Location
Southern California
Format
Multi Format
Always thought of increasing dev. time as a last resort... but seems like the most normal thing on earth having read numerous of comments now.

Develop the paper until the paper has gotten to the desired state. The development time is not important; the resulting print is.
 

RobC

Member
Joined
Nov 5, 2007
Messages
3,880
Location
UK
Format
Multi Format
And what exactly does make printing easier if the highlight density is okay? I'd like to know the reason/logical connection behind this.
I explained this in earlier topic.
(there was a url link here which no longer exists)

what have you been exposing for, shadows, highlights or midtones on your earlier negatives. And assuming you were using ISO speed and manufacturers recomended development, how much were you adjusting metered zone to place it where you thought it should go? i.e. if you were metering a zone 3 how much were you closing down? Or if you were metering a highlight, how much were you opening up? And what was the SBR of these subjects? Or were you using an incident meter? Did you make notes so you know what you did with each shot? always a good idea to make notes when you are learning so you can work out what went wrong.
 
Last edited:
OP
OP

Jessestr

Member
Joined
Mar 31, 2014
Messages
399
Format
35mm
Develop the paper until the paper has gotten to the desired state. The development time is not important; the resulting print is.

Weren't they speaking about the dev time of the film and not the paper?


I explained this in earlier topic.
(there was a url link here which no longer exists)

what have you been exposing for, shadows, highlights or midtones on your earlier negatives. And assuming you were using ISO speed and manufacturers recomended development, how much were you adjusting metered zone to place it where you thought it should go? i.e. if you were metering a zone 3 how much were you closing down? Or if you were metering a highlight, how much were you opening up? And what was the SBR of these subjects? Or were you using an incident meter? Did you make notes so you know what you did with each shot? always a good idea to make notes when you are learning so you can work out what went wrong.

Rob, you are a hero !! I had so much information to proces that I forgot about that post :smile:!! Now I understand.

To answer your questions. I never put anything in zone 3 or zone 7. I only used to check for portraits where I want the background to fade out in black. So I could check if the subject was close enough to the light source.
I always metered a part of the skin and put in in zone 6 (opening one stop), or at least the part of the skin that I wanted to be in zone 6. Is that a bad workflow? I did not take notes, so I don't know the SBR.

I found it very difficult to get consistent negatives with the spotmeter because the skin is so variabele, some have darker or lighter skin, the shadows casts by the light make the skin look like zone 5 or even zone 4... And it was hard to actually think how it would turn out. Maybe there's a better way to meter a portrait... I don't know.. never read anything about it.
 

RobC

Member
Joined
Nov 5, 2007
Messages
3,880
Location
UK
Format
Multi Format
for studio portraiture I would use an incident meter with flat disc. Place it on the lightest side of the face in the subject and point it directly at the main light source which will give you your exposure. Then on the shadow side point it at the shadow side lighting which may just be a darkened studio or secondary light source. This will give you your lighting ratio from light side of the face to dark side which shouldn't be more than two stops but you'll need to play with shadow side lighting to find what gives the degree of facial contrast you like. A reflector comes in handy for adjusting this.
You will get more consistent results with portraits if you use same technique for every shot with an incident meter.
I would always use ISO speed and standard dev to start out with. Then you will get an idea if your metering is consistent and whether the contrast/lighting ratios you are using are what you want. You have total control over the lighting ratios so play with those and NOT development or ISO/EI speed so you have consistent speed and dev. Getting studio exposures is not about playing with dev and/or film speed, its about playing with lighting ratios to fit the film.
Again, get a reflector, which are cheap, to control lighting ratios unless you have a secondary lightsource (strobe/flash) to control shadow side lighting.

And get a good book on studio lighting. Someone will recommend one or twenty.

for starters read: http://www.sekonic.com/united-kingd...les/studio-lighting-understanding-ratios.aspx
 
Last edited:

markbarendt

Member
Joined
May 18, 2008
Messages
9,422
Location
Beaverton, OR
Format
Multi Format
I always metered a part of the skin and put in in zone 6 (opening one stop), or at least the part of the skin that I wanted to be in zone 6. Is that a bad workflow? I did not take notes, so I don't know the SBR.

I found it very difficult to get consistent negatives with the spotmeter because the skin is so variabele, some have darker or lighter skin, the shadows casts by the light make the skin look like zone 5 or even zone 4... And it was hard to actually think how it would turn out. Maybe there's a better way to meter a portrait... I don't know.. never read anything about it.
The problem you describe here is the problem an incident meter solves. It eliminates the guessing about which tone is which zone.
 
OP
OP

Jessestr

Member
Joined
Mar 31, 2014
Messages
399
Format
35mm
I meter a zone 7 or 8 and expose for it in the knowledge that I will have a decent negative density for it. Zone 7 is full textural detail ust before it starts to become blown out.
For a model I might meter for a zone 6, 7 or 8 depending on skin colour and highlighting on the face. So the brightest part of forehead maybe zone 7. But if face is under the shadow of a hat then I might just put face on zone 6 or even zone 5 depending on how much shadow or exactly where I wanted the face to be.
Zone 7 or 8 is a good choice you have it in your subject because it will put that zone a sufficiently high negative density. But only if you have calibrated your dev and/or know where it will be.
If you are using box ISO speed and manufacturer recommended dev, then you will get a useable 7 stops of range so treat each zone as 0.7 of a stop instead of 1 stop. So to place something on zone 7 then you meter a zone 7 and open up 1.4 stops or 1 1/2 stops ( a tad of extra exposure won't hurt.
If you have calibrated dev as I suggested for for 10 stop range then meter zone 7 and open up 2 stops.

The next person will tell you to always meter and expose for a shadow and a lot of people do this and have no problems. But if using box speed and manufacturers recommended times, you can't meter a zone 3 and close down two 2 stops becasue you'll be too far in the shadows. You would need to close down only 1 1/2 stops at box speed and manufacturers recommended dev, temp and times.

So it all depends on what you've calibrated for and your SBR. But exposing for a highlight will always put your neg highlight density close to where you want it regardless of SBR. And that makes printing easier.

Rob, just few more questions to be totally clear about the exposing/developing part.

1st question
If the SBR is 5, darkest on grade 3 and lightest on grade 7. I still need to meter on the highlights right? So only meter on shadows at SBR > 10 (black to white)

2nd question
If my SBR < 10 and I expose for the highlights, can I still use the increase development trick?
As far as I know right now, that isn't necessary anymore right? It's either expose for shadows and adjust dev time OR print at higher grades OR expose for the highlights and print at a slightly higher grade?

3rd question
About the 10 SBR calibration, you mean this right? (there was a url link here which no longer exists)

I think if I get these answered I'm pretty much satisfied with what I got to know. Really interesting to talk about and learn to understand the whole process. Not easy though.

The problem you describe here is the problem an incident meter solves. It eliminates the guessing about which tone is which zone.

I've been experiecing more thin negatives with my incident meter. Could be my fault though.
 

markbarendt

Member
Joined
May 18, 2008
Messages
9,422
Location
Beaverton, OR
Format
Multi Format
I've been experiecing more thin negatives with my incident meter. Could be my fault though.
On those "thin" negatives is the shadow detail you want to print well defined?
 

RobC

Member
Joined
Nov 5, 2007
Messages
3,880
Location
UK
Format
Multi Format
Rob, just few more questions to be totally clear about the exposing/developing part.

1st question
If the SBR is 5, darkest on grade 3 and lightest on grade 7. I still need to meter on the highlights right? So only meter on shadows at SBR > 10 (black to white)

2nd question
If my SBR < 10 and I expose for the highlights, can I still use the increase development trick?
As far as I know right now, that isn't necessary anymore right? It's either expose for shadows and adjust dev time OR print at higher grades OR expose for the highlights and print at a slightly higher grade?

3rd question
About the 10 SBR calibration, you mean this right? (there was a url link here which no longer exists)

I think if I get these answered I'm pretty much satisfied with what I got to know. Really interesting to talk about and learn to understand the whole process. Not easy though.


I've been experiecing more thin negatives with my incident meter. Could be my fault though.

1. yes
2. no
3. yes

BUT as I said in previous post, if you are doing studio work then stick with ISO speed and manufacturers dev and use incident meter.
If you are out doing landscapes, then calibrate to 10 stop range and the answers to 1,2 and 3 are as given.

And if you really want to use 10 stop calibration in studio then you can if you are using a spot meter (but it would be better to use incident meter in studio without 10 stop calibration).
 
OP
OP

Jessestr

Member
Joined
Mar 31, 2014
Messages
399
Format
35mm
1. yes
2. no
3. yes

BUT as I said in previous post, if you are doing studio work then stick with ISO speed and manufacturers dev and use incident meter.
If you are out doing landscapes, then calibrate to 10 stop range and the answers to 1,2 and 3 are as given.

And if you really want to use 10 stop calibration in studio then you can if you are using a spot meter (but it would be better to use incident meter in studio without 10 stop calibration).

I've only done few studio work. Always working with available light. Checked with my color lab and I will do the speed test with a densitometer.
Thanks all for the great talk and information!
 

MattKing

Moderator
Moderator
Joined
Apr 24, 2005
Messages
53,034
Location
Delta, BC Canada
Format
Medium Format
I'm going to suggest an experiment for you.

Using test strips, make a print of a section of your image that contains the highlight areas that you are most interested in. If possible, include some important mid-tones as well.

Adjust the exposure and contrast to make the test strip area look exactly the way you want it to. Don't do any burning or dodging on the test strip. Make sure that the test strip is fully developed.

Now print the whole image using the exact settings you used for the acceptable test strip.

If you can, post a scan of the whole print, along with your impressions about the areas of the print that are outside the test strip area. Include the details about what contrast setting you used, as well as the print times.
 
OP
OP

Jessestr

Member
Joined
Mar 31, 2014
Messages
399
Format
35mm
I'm going to suggest an experiment for you.

Using test strips, make a print of a section of your image that contains the highlight areas that you are most interested in. If possible, include some important mid-tones as well.

Adjust the exposure and contrast to make the test strip area look exactly the way you want it to. Don't do any burning or dodging on the test strip. Make sure that the test strip is fully developed.

Now print the whole image using the exact settings you used for the acceptable test strip.

If you can, post a scan of the whole print, along with your impressions about the areas of the print that are outside the test strip area. Include the details about what contrast setting you used, as well as the print times.

Alright. I'll post it when it's dry. I just printed two images this afternoon. One that printed easy at grade 2, but personal taste wanted grade 3.
Another one neg that was very thin (I'll show this one when it's dry). I did a few test exposures, had to get to grade 5, and increased the exposure time to get "ok" blacks. I knew that was going to happen when I saw the negative... Wish I knew it back then, then I could have metered better as there was enough SBR (at least tonal difference...) just underexposed I guess.. :sad: 
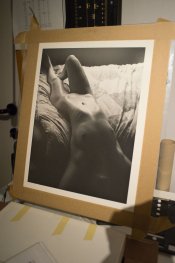
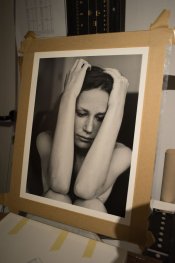
So I had to get the highlights ok which made the shadow detail get little grainy and not too black. Also toned the final print with Moersch Selenium toner 1+20 for 1 minute.

I first had f16 12.7 seconds, but the blacks where not black enough so I increased the exposure as my grade was 5 already, sacrificing a bit of highlights, but it still looks well.
The final print settings were f16 - 18 seconds at grade 5 with Moersch ECO 1+15 @ 3 minutes on Adox MCC

Will post when it's dry...
 

markbarendt

Member
Joined
May 18, 2008
Messages
9,422
Location
Beaverton, OR
Format
Multi Format
Another one neg that was very thin (I'll show this one when it's dry). I did a few test exposures, had to get to grade 5, and increased the exposure time to get "ok" blacks.

Regardless of the work and compromises you had to make, did you get the detail you wanted in the shadows?
 

MattKing

Moderator
Moderator
Joined
Apr 24, 2005
Messages
53,034
Location
Delta, BC Canada
Format
Medium Format
OP
OP

Jessestr

Member
Joined
Mar 31, 2014
Messages
399
Format
35mm
Regardless of the work and compromises you had to make, did you get the detail you wanted in the shadows?
Funny thing is that I wanted the shadows to fade away. But yes, the print turned out much better then the scan I had from it.

Please post the test strip as well.
I will :smile: I'll make some notes so you can see what I did etc
 

markbarendt

Member
Joined
May 18, 2008
Messages
9,422
Location
Beaverton, OR
Format
Multi Format
Funny thing is that I wanted the shadows to fade away. But yes, the print turned out much better then the scan I had from it.

If the shadow detail you wanted was available to print, the film wasn't really underexposed was it?

Given the use of grade 5 paper and the acceptable shadow detail available, I'd say that development was the reason for the thin negative not the incident meter.
 

RobC

Member
Joined
Nov 5, 2007
Messages
3,880
Location
UK
Format
Multi Format
If the shadow detail you wanted was available to print, the film wasn't really underexposed was it?

Given the use of grade 5 paper and the acceptable shadow detail available, I'd say that development was the reason for the thin negative not the incident meter.
But could have been very short SBR.
 

HiHoSilver

Member
Joined
Sep 7, 2015
Messages
2,170
Format
Multi Format
'Just saying the quality & care of the input here is phenomenal. Bravo, gents.
 
OP
OP

Jessestr

Member
Joined
Mar 31, 2014
Messages
399
Format
35mm
I'm going to suggest an experiment for you.

Using test strips, make a print of a section of your image that contains the highlight areas that you are most interested in. If possible, include some important mid-tones as well.

Adjust the exposure and contrast to make the test strip area look exactly the way you want it to. Don't do any burning or dodging on the test strip. Make sure that the test strip is fully developed.

Now print the whole image using the exact settings you used for the acceptable test strip.

If you can, post a scan of the whole print, along with your impressions about the areas of the print that are outside the test strip area. Include the details about what contrast setting you used, as well as the print times.

There you go :smile: The 6 teststrips are from the difficult neg. Started with 1 stop exposure, then 1/3, then printed it, I think I then increased contrast to grade 5, still not good, then I changed the exposure up a 1/3rd, still not good. Then I did 1/3rd more and looked "ok". After developing and selenium toning it turned out quite well.

The other print was done in almost no time, 1 test strip (I failed the one in the middle). Used one specific exposure, the 4th on the strip. And turned to grade 3 for personal taste.
 

Attachments

  • apug_tests-1.jpg
    apug_tests-1.jpg
    73.5 KB · Views: 148
  • apug_tests-2.jpg
    apug_tests-2.jpg
    94.5 KB · Views: 133
  • apug_tests-3.jpg
    apug_tests-3.jpg
    89.3 KB · Views: 111
  • apug_tests-4.jpg
    apug_tests-4.jpg
    86.1 KB · Views: 124

RobC

Member
Joined
Nov 5, 2007
Messages
3,880
Location
UK
Format
Multi Format
have you done a safelight test?
How close to printing easel is the safelight?
What colour is safelight shroud/cover?

And how long are you leaving print in dev for?

And which paper and which dev and its dilution.
 
Last edited:
Photrio.com contains affiliate links to products. We may receive a commission for purchases made through these links.
To read our full affiliate disclosure statement please click Here.

PHOTRIO PARTNERS EQUALLY FUNDING OUR COMMUNITY:


Ilford ADOX Freestyle Photographic Stearman Press Weldon Color Lab Blue Moon Camera & Machine
Top Bottom