Follow up on contrast in printing

Camel Rock

A
Camel Rock

  • 3
  • 0
  • 36
Wattle Creek Station

A
Wattle Creek Station

  • 4
  • 0
  • 39
Cole Run Falls

A
Cole Run Falls

  • 2
  • 2
  • 31
Clay Pike

A
Clay Pike

  • 4
  • 1
  • 32

Forum statistics

Threads
198,938
Messages
2,783,523
Members
99,752
Latest member
Giovanni23
Recent bookmarks
0

Jessestr

Member
Joined
Mar 31, 2014
Messages
399
Format
35mm
Recently I've started a topic about being not too happy with my contrast in my prints. Since then I've been looking for explanations.

I got rid off my analyzer and went back to test strips. I also found out that my new paper developer (Moersch eco 4812) is much less contrasty then my previous developer (Adotol NE). The Moersch developer yields much more shadow separation but seems harder to full blacks. My agitation technique for film developing wasn't right.

However, I think I have misunderstood a basic principle.
I always read, that if you can print your negative at grade 2... it's a perfect negative. So most of the time I have to print at grade 4 (for an indoor portrait series, only shot with available window light). Today I even had to print at grade 5 and the blacks I got still wasn't near the blacks I wanted to go, but after all the print seems allright.

Today, I read an article about contrast in your print. I began to think that my negatives were badly developed or exposed because I had to print it at a higher grade. But that doesn't seem true or am I wrong here?
So it's basically, if your negative holds 10 zones of information, it would print well at grade 2? But, if you have less then then, you just need a higher grade... and that doesn't mean the negative is bad?

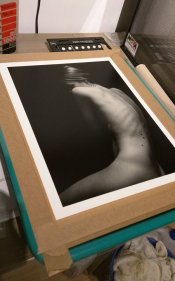
In the attachment you can find a print I made today on Adox MCC, I had to print it on grade 4, so the texture still visible of the couch she is lying on, would disappear. But having to print it at grade 4 doesn't make the negative or print bad? ... At least I hope that would solve my issues :smile: As I'm wondering why I always have to print at higher grades..
 

Attachments

  • print_grade4.jpg
    print_grade4.jpg
    70.5 KB · Views: 228
Last edited:

MattKing

Moderator
Moderator
Joined
Apr 24, 2005
Messages
53,034
Location
Delta, BC Canada
Format
Medium Format
There is no attachment.
 

ic-racer

Member
Joined
Feb 25, 2007
Messages
16,552
Location
USA
Format
Multi Format
The amount negatives are developed has nothing to do with how many stops of information can be recorded. If you print on grades 4 and 5 and are not happy, then when why have you not increased development of your negatives?
 

Sirius Glass

Subscriber
Joined
Jan 18, 2007
Messages
50,380
Location
Southern California
Format
Multi Format
As ic-racer said, since you are consistently printing on grade 4 you need to increase your development time by 10% to 15%. Adjust the development time so that the typical print is grade 2 or grade 2.5. Get the printing time for the highlights at grade 2 or 2.5 and then increase the grade to get the dark parts correct. See pages 23 to 34 in Ralph Lambrecht's Way Beyond Monochrome, second edition.
 
OP
OP

Jessestr

Member
Joined
Mar 31, 2014
Messages
399
Format
35mm
As ic-racer said, since you are consistently printing on grade 4 you need to increase your development time by 10% to 15%. Adjust the development time so that the typical print is grade 2 or grade 2.5. Get the printing time for the highlights at grade 2 or 2.5 and then increase the grade to get the dark parts correct. See pages 23 to 34 in Ralph Lambrecht's Way Beyond Monochrome, second edition.

Makes sense, however. I checked my picture library (scans - not prints) and I see myself adding contrast, and decreasing blacks and schadows (so they get darker) quite often. As I shot 90% of the time in the same situations in the last two years, I don't have many other negatives to look at. However, when I check outside pictures with decent subject brightness range, I don't have to add contrast... So I should do some test prints on those negatives and see if they print well on grade 2...

It's probably the situation for the series I've worked on the last two years. ALWAYS inside, and window light... This won't give a full 10-stop brightness range I guess? If I knew back then I would have increased the development time with 15% ...

It's hard to master.. as they are so many variables. I changed my enlarger, chemical brand and paper type... So it's much different then before. I have to get used to it, and make sure that my negatives are developed well enough.
 

Gerald C Koch

Member
Joined
Jul 12, 2010
Messages
8,131
Location
Southern USA
Format
Multi Format
Also check that you are developing prints to the time specified by the developer. Pulling prints too soon will prevent getting maximum blacks. Check that your thermometer is correct. You might also look into developing prints to completion. There are several threads on APUG which describe what to do.

Scans can be very misleading. To get any useful information all auto-correction controls must be turned off otherwise the software will correct any problems that would be shown in a wet print.
 
Last edited:

MattKing

Moderator
Moderator
Joined
Apr 24, 2005
Messages
53,034
Location
Delta, BC Canada
Format
Medium Format
Contrast and Subject Luminance Range are only partially related.

You should use film development adjustments, print exposure adjustments and print contrast adjustments to make the highlights and mid-tones appear the way you want them to, on the paper and with the contrast filter(s) you prefer.

You should use burning and dodging (sometimes with different contrast filters) to make the shadows appear the way you want them to.
 

RSalles

Member
Joined
Aug 29, 2013
Messages
142
Location
RS - Brazil
Format
4x5 Format
I would suggest you print base + fog of the negative you're working with at grade #2 till arriving at absolute black and go further from that in terms of exposure time.
The basic approach is a good starting point: print a series of step-tablets until you have consistent texture in the the highlights (Zone VIII) and take a look at the shadows: if it's too dense, decrease contrast, if it's dull or just dark gray, where you know - looking to the negative - that the area has nothing but base + flog, in this case increase contrast.
Contrast increase will have a side effect of losing highlights detail also- you'll shorten the gray scale there too - so keep this in mind,

Cheers,

Renato
 
Joined
Oct 15, 2009
Messages
231
Location
Stockholm, Sweden
Format
Multi Format
I'm not sure what has been written in this earlier, but some thoughts:
  • Is your enlarger properly setup? If you have variable condensors, if they are wrong they will reduce contrast...
  • How is your (enlarger) lens? Very dirty?
  • If you are constantly printing on grade 4-5 you are either under developing and/or under exposing
  • Development time, I use Moersch ECO 4812 at 1+14, my Adox MCC is wonderful at the recommended development time (180 s)
  • All printing problems are not solved by development, some contrast issues can be solved by dodging/burning
Not sure if it is of any help, but good luck!
 

Huub

Member
Joined
Dec 4, 2007
Messages
250
Format
4x5 Format
It's probably the situation for the series I've worked on the last two years. ALWAYS inside, and window light... This won't give a full 10-stop brightness range I guess? If I knew back then I would have increased the development time with 15% ...

It is not unusual to adjust the developing time of your negatives to the subject contrast. Outdoor situations in sunlight might ask for a shorter different development time then soft indoor light, so even when your outdoor negatives might print well on grade 2, the development time for this indoor situation might requier a much longer time - 10 to 15% longer sounds like a good starting point.

Also remember that creating pictures is not about brightness ranges or any other theory but about getting the results we want.
 

Neal

Subscriber
Joined
Dec 3, 2004
Messages
2,020
Location
Chicago, West Suburbs
Format
Multi Format
I would like to second the comment by Huub. Getting the subject contrast right is key to a photo with a strong subject.

Neal Wydra
 

markbarendt

Member
Joined
May 18, 2008
Messages
9,422
Location
Beaverton, OR
Format
Multi Format
However, I think I have misunderstood a basic principle. I always read, that if you can print your negative at grade 2... it's a perfect negative.

Yes, I do think you've misunderstood.

So it's basically, if your negative holds 10 zones of information, it would print well at grade 2? But, if you have less then then, you just need a higher grade... and that doesn't mean the negative is bad?

First, the width of a zone doesn't necessarily equal 1 f-stop when you spot meter a scene.

A window light portrait like your example probably doesn't cover anywhere near 10-stops of luminance, maybe 5 f-stops from black to white, but in Ansel's world there are still actually 11 zones (0 through X). So roughly 5/11th's of an f-stop wide. If you are outside 10 or 11 stops of luminance is very possible so outside 11/11 or 1:1 is very possible.

In Ansel's world a short scale scene (5-stops in this example) suggested expansion (extra film development) to fit the scene onto the paper and get a "perfect negative" for grade 2 paper.

An 11-stop scene in angel's world got less film development so that the longer scale scene would fit on the paper.

In the real world grade 5 paper isn't a sin, don't sweat the exact number if it works it's fine, but it does sound like that for 90% of your work your extra film development would make your life easier.
 
OP
OP

Jessestr

Member
Joined
Mar 31, 2014
Messages
399
Format
35mm
I'm not sure what has been written in this earlier, but some thoughts:
  • Is your enlarger properly setup? If you have variable condensors, if they are wrong they will reduce contrast...
  • How is your (enlarger) lens? Very dirty?
  • If you are constantly printing on grade 4-5 you are either under developing and/or under exposing
  • Development time, I use Moersch ECO 4812 at 1+14, my Adox MCC is wonderful at the recommended development time (180 s)
  • All printing problems are not solved by development, some contrast issues can be solved by dodging/burning
Not sure if it is of any help, but good luck!

- Enlarger is properly setup. It's a diffuser enlarger. Using the right diffusion box.
- Lens is clean, enlarger is clean, filters have been cleaned. Will use under the lens filter quite soon.
- I don't know... I never had troubles with losing shadow detail, so underexposure or undevelopment looks not the right decision. Developing for a longer time will only increase the highlights right?
- It looks great too here, just have to add contrast

It is not unusual to adjust the developing time of your negatives to the subject contrast. Outdoor situations in sunlight might ask for a shorter different development time then soft indoor light, so even when your outdoor negatives might print well on grade 2, the development time for this indoor situation might requier a much longer time - 10 to 15% longer sounds like a good starting point.

Also remember that creating pictures is not about brightness ranges or any other theory but about getting the results we want.

Mhm, I see, but I cannot always forsee the light circumstances, changing the development time of the negative is something you can't really see, so changing it in print is far easier no? I feel skeptical about it, since I don't really know if that is wrong. I regulary develop my negatives together with a good friend, he uses my chemicals, same water, same enlarger, paper .. and he doesn't have the issues. Even when we go out and take some pictures together he can easily print at grade 2-3 where I have to print at other grades sometimes. I quit suspecting one error... I guess it's a combination of things, but I need to find out what.

So far I noticed my previous paper developer was much more contrasty then before, also my personal taste requires a greater amount of contrast. Maybe the color filters aren't as contrasty as let's say the multigrade filters? Diffusion enlargers tend to have less contrast then a condenser enlarger right?

Yes, I do think you've misunderstood.

First, the width of a zone doesn't necessarily equal 1 f-stop when you spot meter a scene.

A window light portrait like your example probably doesn't cover anywhere near 10-stops of luminance, maybe 5 f-stops from black to white, but in Ansel's world there are still actually 11 zones (0 through X). So roughly 5/11th's of an f-stop wide. If you are outside 10 or 11 stops of luminance is very possible so outside 11/11 or 1:1 is very possible.

In Ansel's world a short scale scene (5-stops in this example) suggested expansion (extra film development) to fit the scene onto the paper and get a "perfect negative" for grade 2 paper.

An 11-stop scene in angel's world got less film development so that the longer scale scene would fit on the paper.

In the real world grade 5 paper isn't a sin, don't sweat the exact number if it works it's fine, but it does sound like that for 90% of your work your extra film development would make your life easier.

So it is okay to print at higher grades? That's what I'm bothered with, maybe I should't care too much about the higher grades and just print like that. About the film developing... yes that could be true, but the series is finished now and I will do individual projects now, so always different lightning.. It's hard to predict how extra development time will come out..
 
Joined
Sep 10, 2002
Messages
3,591
Location
Eugene, Oregon
Format
4x5 Format
Jesse,

Your problem seems to lie in not properly evaluating the scene you are shooting in terms of contrast (subject luminescence range) and, therefore, not knowing what to expect from your negatives. If you are spotmetering, measure at least the darkest low and the brightest high value you want to retain some detail in and get an idea of how many stops there are in between the extremes. Seven is about "normal" in terms of development. Less than that and you will want to increase development some or plan on printing at a higher contrast setting.

Furthermore, if you're shooting a low-contrast scene and you want to do things like "make the texture of the couch disappear," you'll end up needing to develop even more or use an even higher contrast grade...

Visualizing your print before shooting and correlating this to the actual luminescence values in the scene will help a lot in determining how you want to develop or print your negative. The Zone System is the classic method of doing this. You may want to check it out.

Although there is nothing wrong with printing with grade 4 or 5, if you are consistently using these grades you don't have much leeway if you need more contrast. It's better to aim to print most of your work in the middle range (2-3) and then use the extremes for those cases that require special attention.

So, "if your results are consistently too flat, increase development time," as Kodak suggests. And I'll add: spend more time evaluating the contrast range of the scene you are shooting and base your development on that.

Best,

Doremus
 

markbarendt

Member
Joined
May 18, 2008
Messages
9,422
Location
Beaverton, OR
Format
Multi Format
So it is okay to print at higher grades? That's what I'm bothered with, maybe I should't care too much about the higher grades and just print like that. About the film developing... yes that could be true, but the series is finished now and I will do individual projects now, so always different lightning.. It's hard to predict how extra development time will come out..
It is fine to print at whatever grade you please or need. The problem I see is running out of adjustment if you are consistently having to print at grade 5, there's little room for error so some extra film development would be a good choice at least for your window portraits. If I was getting that type of result I'd develop more.

It's actually not hard to predict how extra development will come out what tougher to predict is what's perfect for a given shot, subject matter and lighting and intent for each shot can vary wildly. But, let's consider a worst case scenario. If you added 25% extra development time for your film and had to print some photos (maybe from outside) at grade 1 and others (your window portraits) at grade 3, would that be such a bad thing? (I don't think so.)
 
Last edited:
OP
OP

Jessestr

Member
Joined
Mar 31, 2014
Messages
399
Format
35mm
It is fine to print at whatever grade you please or need. The problem I see is running out of adjustment if you are consistently having to print at grade 5, there's little room for error so some extra film development would be a good choice at least for your window portraits. If I was getting that type of result I'd

It's actually not hard to predict how extra development will come out what tougher to predict is what's perfect for a given shot, subject matter and lighting and intent for each shot can vary wildly. But, let's consider a worst case scenario. If you added 25% extra development time for your film and had to print some photos (maybe from outside) at grade 1 and others (your window portraits) at grade 3, would that be such a bad thing? (I don't think so.)

Thank you! I will now first, shoot a roll of HP5 which I shoot the most now, spotmeter everthing and carefully check my exposures and the tonal ranges in the scene and make sure they are higher then 10 stops. Then develop like I normally do, if that fixes the problem, then it's my exposure. If it's still flat, it's probably something else.

Still what I don't understand is. People tell, that the SBR should be 10 stops to print well at grade 5, but only grade 3-7 yield texture. So, if you have a scene that meters perfectly between zone 3 and zone 7 (and developed well) will this print good at grade 2 or will you have to increase contrast?
 

RobC

Member
Joined
Nov 5, 2007
Messages
3,880
Location
UK
Format
Multi Format
Actually, capturing a 10 stop SBR which prints at exactly Grade 2 will produce a slightly soft negative and the print would look a bit soft too.
But you can increase print contrast to make it look good. Everyone is going to give you different advice about this.
The methodology I explained to you produces a slightly soft negative but if you place exposure on a zone 7 then printing will be easy. If you place expsoure on grade 3 then you can run into printing problems if your SBR is less than 7 stops.
When I talk about SBR I mean from black to white and not just zone 3 to 7. Other people may mean only zones 3 to 7. You must get them to calrify on that.
Also when you post a single negative/print and say, for example, you had to print at Grade 3 1/2, everyone tells you to increase development. However, take that advice with a pinch of salt because they are specifying what the ideal development would be for a single negative. But your roll of film might have different subjects with different SBRs so no single development time can be perfect for all of them. The advice I gave to you in earlier topic was designed to get all SBRs upto 10 onto neg which will print at G2 but shorter than 10 stop SBR will require greater than G2 to print well.

For ease of printing you want highlight negative densities which are not too low and not too high. Exposing for a highlight, say zone 7 will always give you a good negative density for printing if you have calibrated dev for a 10 stop SBR to just into G2 but may require printing at G3.
Consistent negative densities for highlights makes printing much easier providing the neg density is at the right point on the film curve. If its too thin it makes printing harder. And exposing for shadows will make it hard to print if SBR is low, i.e. less than 7 stops.

The next person will give you different advice because they do it differently. There's a 1001 ways to skin a cat.

And note that Adams zone system trilogy of books were written very much with sheet film processing in mind where exposing for shadows and devloping for highlights works fine. Problem is that it doesn't work fine for roll film.

An ideal subject would be 5 stops from black to white, developed to fit into 1.3log range f negative and printed on G2. But the ideal subject combined with the ideal development is something that can only be achieved in the studio. With roll film you need to use a sensible workaround designed to get everything on neg at sensible and easily printable densities.
 
Last edited:

MattKing

Moderator
Moderator
Joined
Apr 24, 2005
Messages
53,034
Location
Delta, BC Canada
Format
Medium Format
Thank you! I will now first, shoot a roll of HP5 which I shoot the most now, spotmeter everthing and carefully check my exposures and the tonal ranges in the scene and make sure they are higher then 10 stops. Then develop like I normally do, if that fixes the problem, then it's my exposure. If it's still flat, it's probably something else.

Still what I don't understand is. People tell, that the SBR should be 10 stops to print well at grade 5, but only grade 3-7 yield texture. So, if you have a scene that meters perfectly between zone 3 and zone 7 (and developed well) will this print good at grade 2 or will you have to increase contrast?

I am going to sound like a broken record here.

The tonal ranges in a scene are fixed - they are determined by the scene and the light. Unless of course you can modify the light.

When you take your photograph, you should do so with the final result - a print - in mind.

If you envisage something with bright and detailed highlights, and deep and detailed shadows, that is fine. Unless those highlights and shadows are there in the scene, you have to adjust either or both of the film development and contrast in printing to get there.

But that may not lead to a good print. In most cases, prints are successful when the mid-tones and highlights are right. Shadows are usually more of an afterthought. If you base all of your printing choices on just the highlights and shadows, your prints will probably disappoint.

I went to look through the scanned photographs I have to see if I could show you a couple of examples of what I mean. I don't digitize many, so the examples I found are mostly colour, not black and white. But the lesson to be learned from these is that contrast determination is best if it is not made based only on the shadows and the highlights.

42a-2013-10-19b.jpg 2016-02-15-48h.jpg Image10e-2012-03-13-APUG.jpg leaves2.jpg
 
OP
OP

Jessestr

Member
Joined
Mar 31, 2014
Messages
399
Format
35mm
Actually, capturing a 10 stop SBR which prints at exactly Grade 2 will produce a slightly soft negative and the print would look a bit soft too.
But you can increase print contrast to make it look good. Everyone is going to give you different advice about this.
The methodology I explained to you produces a slightly soft negative but if you place exposure on a zone 7 then printing will be easy. If you place expsoure on grade 3 then you can run into printing problems if your SBR is less than 7 stops.
When I talk about SBR I mean from black to white and not just zone 3 to 7. Other people may mean only zones 3 to 7. You must get them to calrify on that.
Also when you post a single negative/print and say, for example, you had to print at Grade 3 1/2, everyone tells you to increase development. However, take that advice with a pinch of salt because they are specifying what the ideal development would be for a single negative. But your roll of film might have different subjects with different SBRs so no single development time can be perfect for all of them. The advice I gave to you in earlier topic was designed to get all SBRs upto 10 onto neg which will print at G2 but shorter than 10 stop SBR will require greater than G2 to print well.

For ease of printing you want highlight negative densities which are not too low and not too high. Exposing for a highlight, say zone 7 will always give you a good negative density for printing if you have calibrated dev for a 10 stop SBR to just into G2 but may require printing at G3.
Consistent negative densities for highlights makes printing much easier providing the neg density is at the right point on the film curve. If its too thin it makes printing harder. And exposing for shadows will make it hard to print if SBR is low, i.e. less than 7 stops.

The next person will give you different advice because they do it differently. There's a 1001 ways to skin a cat.

And note that Adams zone system trilogy of books were written very much with sheet film processing in mind where exposing for shadows and devloping for highlights works fine. Problem is that it doesn't work fine for roll film.

An ideal subject would be 5 stops from black to white, developed to fit into 1.3log range f negative and printed on G2. But the ideal subject combined with the ideal development is something that can only be achieved in the studio. With roll film you need to use a sensible workaround designed to get everything on neg at sensible and easily printable densities.

Thanks for the clarification. Indeed most of my rolls have different subjects on them, so most of the time I can't increase dev time or it would affect other pictures.
I have carefully examined my negatives once more. I have plenty of good negatives, that have a good density in the highlights. I tried to print one today and worked perfectly on grade 2.

But most of my negatives are too thin, they have a lack of dense highlights. Which is probably a combination of flat light (low SBR) and not compensating in development? See attachment. The negative with the hat, is a negative which I can print on grade 2, the other one I had to print at grade 5.

However some situations on how to use the zone system are not clear to me (yet):
- Could you clarify why exposing a highlight on zone 7 will be easier to print?
- If the SBR is less then 10, and you expose for zone 7 (highlight), won't you have to increase contrast too?
- Why is it more difficult to print a thin negative if exposed for the shadows? I know you said SBR > 10 = meter shadows & SBR < 10 meter highlights, but I don't understand why yet.
- If you have an SBR of 8, and thus meter for the highlights, like my first attachment in this topic. The lightest part is her shoulder which is zone 6, where should I meter? Or should I put the shoulder in zone 7 if that is the lightest part?
- If you have an SBR of 8 or bigger then 10, (same question as before) and have no real shadows or blacks in the image, where would you meter and how would you expose? I can provide an example if necessary

That's probably it, if I get to know what and why things are happening I think I'm getting close to the solution. Images that have a decent SBR that I have shot in the past and developed the same, just work out great on grade 2.. So now on to better exposures and development! I hope I can start using the zone system again
 

Attachments

  • grade2.jpg
    grade2.jpg
    144.6 KB · Views: 136
  • grade5.jpg
    grade5.jpg
    35.8 KB · Views: 134

markbarendt

Member
Joined
May 18, 2008
Messages
9,422
Location
Beaverton, OR
Format
Multi Format
Thank you! I will now first, shoot a roll of HP5 which I shoot the most now, spotmeter everthing and carefully check my exposures and the tonal ranges in the scene and make sure they are higher then 10 stops. Then develop like I normally do, if that fixes the problem, then it's my exposure. If it's still flat, it's probably something else.

Wrapping your head around contrast takes thought and practice, it's not an easy subject. Exposure can't fix a contrast problem.

If the shadow detail is on the negative and can be printed on a test strip, then exposure is probably not the problem. Camera exposure controls how much shadow detail is available on the negative.

A significant film underexposure will show as a lack of detail in the shadows on both the negative and the test strip regardless of how hard you try to fix it. Conversely, negative film like HP5 can take a considerable amount of "extra" exposure without harming the printability, you simply adjust the enlarger exposure to place the print tones appropriately on the paper.

If your scene measures only 5 stops it's not exposure that needs to change, it's the contrast. Contrast adjustments control whether 5-stops from the scene or 10-stops from the scene will straight print on a given paper.

You can use a hard paper like grade 5 instead of grade 2 to make that adjustment (as you have been) for the window light scene OR adjust the film development (a little extra in that case) and print at grade 2 or 3 instead.
 
OP
OP

Jessestr

Member
Joined
Mar 31, 2014
Messages
399
Format
35mm
Wrapping your head around contrast takes thought and practice, it's not an easy subject. Exposure can't fix a contrast problem.

If the shadow detail is on the negative and can be printed on a test strip, then exposure is probably not the problem. Camera exposure controls how much shadow detail is available on the negative.

A significant film underexposure will show as a lack of detail in the shadows on both the negative and the test strip regardless of how hard you try to fix it. Conversely, negative film like HP5 can take a considerable amount of "extra" exposure without harming the printability, you simply adjust the enlarger exposure to place the print tones appropriately on the paper.

If your scene measures only 5 stops it's not exposure that needs to change, it's the contrast. Contrast adjustments control whether 5-stops from the scene or 10-stops from the scene will straight print on a given paper.

You can use a hard paper like grade 5 instead of grade 2 to make that adjustment (as you have been) for the window light scene OR adjust the film development (a little extra in that case) and print at grade 2 or 3 instead.

Thanks for the nice summarization. Made it even more clear to me. Helpful to know.. !
 

RobC

Member
Joined
Nov 5, 2007
Messages
3,880
Location
UK
Format
Multi Format
I meter a zone 7 or 8 and expose for it in the knowledge that I will have a decent negative density for it. Zone 7 is full textural detail ust before it starts to become blown out.
For a model I might meter for a zone 6, 7 or 8 depending on skin colour and highlighting on the face. So the brightest part of forehead maybe zone 7. But if face is under the shadow of a hat then I might just put face on zone 6 or even zone 5 depending on how much shadow or exactly where I wanted the face to be.
Zone 7 or 8 is a good choice you have it in your subject because it will put that zone a sufficiently high negative density. But only if you have calibrated your dev and/or know where it will be.
If you are using box ISO speed and manufacturer recommended dev, then you will get a useable 7 stops of range so treat each zone as 0.7 of a stop instead of 1 stop. So to place something on zone 7 then you meter a zone 7 and open up 1.4 stops or 1 1/2 stops ( a tad of extra exposure won't hurt.
If you have calibrated dev as I suggested for for 10 stop range then meter zone 7 and open up 2 stops.

The next person will tell you to always meter and expose for a shadow and a lot of people do this and have no problems. But if using box speed and manufacturers recommended times, you can't meter a zone 3 and close down two 2 stops becasue you'll be too far in the shadows. You would need to close down only 1 1/2 stops at box speed and manufacturers recommended dev, temp and times.

So it all depends on what you've calibrated for and your SBR. But exposing for a highlight will always put your neg highlight density close to where you want it regardless of SBR. And that makes printing easier.
 

cliveh

Subscriber
Joined
Oct 9, 2010
Messages
7,536
Format
35mm RF
I think the basic rule about getting contrast correct in the print is to expose the film correctly for the lighting contrast in the original scene and then develop the film in relation to the type of enlarger you are using. Sounds easy, but requires lots of practice.
 

RobC

Member
Joined
Nov 5, 2007
Messages
3,880
Location
UK
Format
Multi Format
I think the basic rule about getting contrast correct in the print is to expose the film correctly for the lighting contrast in the original scene and then develop the film in relation to the type of enlarger you are using. Sounds easy, but requires lots of practice.
agreed but if you are using roll film with subjects of different SBRs then you need a strategy/methodolgy that works for all shots on the roll.

Some people just use manufacturers recommended dev, temp time, expose for shadows and deal with contrast when printing. But as I have repeatedly stated, thats fine if SBR is 6 or 7 or more stops but its not fine if SBR is only 3 or 4 or 5 stops becasue you really won't have as much highlight negative density as you need which causes printing difficulties.
 
Photrio.com contains affiliate links to products. We may receive a commission for purchases made through these links.
To read our full affiliate disclosure statement please click Here.

PHOTRIO PARTNERS EQUALLY FUNDING OUR COMMUNITY:


Ilford ADOX Freestyle Photographic Stearman Press Weldon Color Lab Blue Moon Camera & Machine
Top Bottom