Easy way to make single-location test-strips

3 Columns

A
3 Columns

  • 6
  • 7
  • 144
Couples

A
Couples

  • 4
  • 0
  • 105
Exhibition Card

A
Exhibition Card

  • 6
  • 4
  • 143

Recent Classifieds

Forum statistics

Threads
199,060
Messages
2,785,594
Members
99,792
Latest member
sepd123
Recent bookmarks
0

Nige

Member
Joined
Sep 8, 2002
Messages
2,317
Format
Multi Format
I made one out of Matt board after reading Ralph's PDF. Different but using similar principle. Not sure if my instructions are very clear... I just read them for the first time in years and not sure... needs more picture I think!
 

Attachments

  • ProofPrinter.pdf
    439.1 KB · Views: 428
Joined
Mar 18, 2005
Messages
451
Location
Toronto
Format
Medium Format
Way back when I first started in the darkroom I had a test strip printer that pulled the paper through with a pin. IIRC it was small and plastic and commercial. Might have been made by Paterson, but that was almost 30 years ago so don't quote me on that. I don't know what I ever did with it.
Durst made one - they called it a "teststrip cassette". I love it. I've bought a few on ebay over the years.

I also use a very complex system, where I tear up 5 or 6 pieces of paper. Unexposed pieces go in my right back pocket, exposed pieces go in my left back pocket. Then I pitch them all in the developer at the same time.

Main thing is, individual test pieces are far more valuable than a gradient test strip in most cases.
 

dkonigs

Subscriber
Joined
Sep 17, 2009
Messages
362
Location
Mountain View, CA
Format
Multi Format
Durst made one - they called it a "teststrip cassette". I love it. I've bought a few on ebay over the years.
I'm tempted to buy one of these the next time I see one come up for sale on eBay (assuming I remember). Then, perhaps, to 3D model it, and see how easy/hard it would be to make my own.
 
Joined
Mar 18, 2005
Messages
451
Location
Toronto
Format
Medium Format
I'm tempted to buy one of these the next time I see one come up for sale on eBay (assuming I remember). Then, perhaps, to 3D model it, and see how easy/hard it would be to make my own.
The push pin method the Testcassette uses for moving the paper forward is pretty smart. That's the only moving part.

They make 6 exposures that are 3/4" x 1 7/8", on a strip that is 5" long. I use an f-stop printer as well, and find that using 1/3 stop or 1/2 stop steps, you can get the information you need in 1 strip.

One 8x10 sheet of paper can get chopped up to make 8 individual strips.
 
OP
OP

albada

Subscriber
Joined
Apr 10, 2008
Messages
2,175
Location
Escondido, C
Format
35mm RF
Can somebody explain how the push-pin in the Durst Teststrip Cassette works? I saw one of these on eBay in original packaging, but that doesn't show how it operates. How does the push-pin advance the paper?
 
Joined
Mar 18, 2005
Messages
451
Location
Toronto
Format
Medium Format


The pushpin mechanism has a spring, so it pops back up when you release pressure on it. It leaves a little prick in the paper. It has no problems with any paper I've used, even heavier stock like Ilford Art 300.
 
OP
OP

albada

Subscriber
Joined
Apr 10, 2008
Messages
2,175
Location
Escondido, C
Format
35mm RF

The pushpin mechanism has a spring, so it pops back up when you release pressure on it. It leaves a little prick in the paper. It has no problems with any paper I've used, even heavier stock like Ilford Art 300.

Thanks for posting the link to this video.
I'll guess that there are two angled strips of springy metal inside (brass or steel). Each metal strip would prevent the paper from sliding in one direction because the metal strip would jab into the paper. But the paper can slide over the metal strip in the other direction.
The first metal strip would be stationary (mounted on the body), and prevents the paper from moving backward when the user slides the slider right (from the POV of the video).
The second metal strip is part of the slider assembly, and pushes the paper left. Because it's angled, it slides over the paper (probably leaving a scratch) when the slider is moved right.
For 3D printing, I suspect the parts could be designed to accommodate bent paperclips which would function as the angled metal strips (allowing only one direction of sliding).
Mark Overton
 

radiant

Member
Joined
Aug 18, 2019
Messages
2,135
Location
Europe
Format
Hybrid
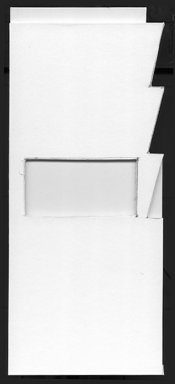
I like your design. It's suitable for color because you can advance the paper solely by feel in complete darkness.
Mark Overton

Thanks! I like it too, it doesn't need to be more than that. And pretty easy to build too.
 

Nige

Member
Joined
Sep 8, 2002
Messages
2,317
Format
Multi Format
Winner! Nicely done, so simple. I am going to make one of these.

Yes, nice!

I'd think I'd make two slight modifications.

1. Make the base slightly longer than the cover (on the paper insertion edge) so you can slide the paper in from the top without having to find the gap.
2. Make the overall width (i.e the notches) be slightly smaller than the paper width so that action is more positive. Having the paper poke out past that notch would make that action more foolproof I think.)
 

radiant

Member
Joined
Aug 18, 2019
Messages
2,135
Location
Europe
Format
Hybrid
Yes, nice!

I'd think I'd make two slight modifications.

1. Make the base slightly longer than the cover (on the paper insertion edge) so you can slide the paper in from the top without having to find the gap.
2. Make the overall width (i.e the notches) be slightly smaller than the paper width so that action is more positive. Having the paper poke out past that notch would make that action more foolproof I think.)

1) Great idea. Will do to my next version.
2) Actually when I was CNC milling I thought the same; I wasn't sure can I move the paper. But after testing it first time I found the paper is really easy to move although the width is exactly 5" (so no paper is visible behind the notch). Maybe some rounding to the notch corners and it is fine. It works probably so that I can move the paper few millimeters down by stretch of my finger skin (goes behind the notch a bit) and then the paper corner reveals under the notch. But it actually works better than it looks :D
 

Nige

Member
Joined
Sep 8, 2002
Messages
2,317
Format
Multi Format
I made a 3 notch 4x5 version out of mat board tonight. Glue currently drying and it's too hot to 'darkroom' tonight so will test it tomorrow. Will report in :smile:
 

AgX

Member
Joined
Apr 5, 2007
Messages
29,973
Location
Germany
Format
Multi Format
I was not aware of the Durst Teststrip Cassette. It has another interesting feature: two flanges, one can put the blades of an easel over, by that keeping it on position. Something one could add to other test strip printers oneself.
 
Last edited:

AgX

Member
Joined
Apr 5, 2007
Messages
29,973
Location
Germany
Format
Multi Format
To sum it up, there a basically 2 concepts for testprint devices:

-) moving the paper-strip under a stationary mask (>repetition of same detail at varying exposures)

-) moving a mask over a stationary paper-strip (>varying exposures spread over the image)
 

Todd Barlow

Subscriber
Joined
Aug 9, 2004
Messages
507
Location
Ontario
Format
Multi Format
Great thread...

Here is my contribution to conversation.
Link to my post showing my design:
https://www.photrio.com/forum/threads/diy-localized-test-strip-printer.115143/

Link to my Flicker page that has an album called "DIY Darkroom Localized Test Strip Printer" that shows the construction of the unit:
https://www.flickr.com/photos/c330shadowcatcher/sets/

All the best
Todd

DSC_0006 (1024x680) (640x425).jpg
DSC_0776 (1024x680) (640x425).jpg
 

Nige

Member
Joined
Sep 8, 2002
Messages
2,317
Format
Multi Format
So I've tested out my 4x5 3 strip prototype and here's the pictures to go with it. It was sized to suit a 4x5 piece of paper as I only buy 8x10 (or larger) and being a tight-arse, cutting it into equal portions works for me.

Roughly constructed out of mat board. Made the mistake of cutting out one too many notches than required however the test strip is visually more pleasing to OCD types :D The window is 70x35mm.

4x5 Proof Printer.jpg

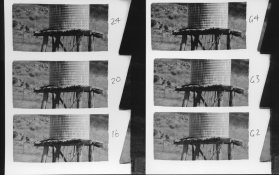
I made an initial test strip based around the proof print I had already done (which was 12secs @ f8 but was slightly dark). I chose to stop down another stop to allow for DOF at the baseboard (I haven't built this prototype up to the thickness of my easel so just lay it on the easel but didn't refocus) so ran with 16, 20 & 24 secs (left image). I then ran 20secs for 3 grades (2,3 & 4).

4x5 Proof Printer Test.jpg

I then selected G3 and made a 8x10 print.

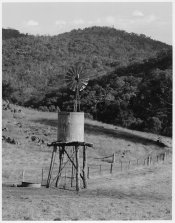
4x5 Proof Printer Print.jpg

Yeah!
 

radiant

Member
Joined
Aug 18, 2019
Messages
2,135
Location
Europe
Format
Hybrid
So I've tested out my 4x5 3 strip prototype and here's the pictures to go with it.

Seems to be working fine!

Just a tip: try to find more highlights to the strip because then you can adjust first the exposure easier ("whites" should have a slight tone). After you got that right then adjust the contrast with selected time exposing the strip to shadows. This is the way I use it :smile:
 
OP
OP

albada

Subscriber
Joined
Apr 10, 2008
Messages
2,175
Location
Escondido, C
Format
35mm RF
Great thread...
Here is my contribution to conversation.
Link to my post showing my design:
https://www.photrio.com/forum/threads/diy-localized-test-strip-printer.115143/
Link to my Flicker page that has an album called "DIY Darkroom Localized Test Strip Printer" that shows the construction of the unit:
https://www.flickr.com/photos/c330shadowcatcher/sets/
View attachment 263769 View attachment 263770
This design combines the advantages of (1) being suitable for color because you can advance the paper in darkness by feel, and (2) wasting no paper because the sawteeth are *under* the flap instead of over it. Clever.
 

AgX

Member
Joined
Apr 5, 2007
Messages
29,973
Location
Germany
Format
Multi Format
To sum it up, there a basically 2 concepts for testprint devices:

-) moving the paper-strip under a stationary mask (>repetition of same detail at varying exposures)

-) moving a mask over a stationary paper-strip (>varying exposures spread over the image)


This thread is about the first design. Now I hope not to spoil this thread by asking:

Is there a situation where you prefer in use the second design ?
 

radiant

Member
Joined
Aug 18, 2019
Messages
2,135
Location
Europe
Format
Hybrid
This design combines the advantages of (1) being suitable for color because you can advance the paper in darkness by feel, and (2) wasting no paper because the sawteeth are *under* the flap instead of over it. Clever.

I didn't even get this when I looked at the photos of the Red Device first. So simple solution. Why didn't I think of it!
 
OP
OP

albada

Subscriber
Joined
Apr 10, 2008
Messages
2,175
Location
Escondido, C
Format
35mm RF
I think the strip-maker jig shown below is as simple as you can get.

StripJigXacto1.jpg


It's merely a hanging file-folder with the tops cut off and a slot cut in the middle. As you can see in the above picture, it's held to the easel with magnets.
So how does one move the paper precisely after exposing each step?
StripJigXacto2.jpg


Use an X-acto knife! (Or a clone thereof.) Position it at one side of the slot, press down gently, and slide both it and the paper to the other side of the slot. It works well. And is precise. And is quick.
Practice first on scrap paper for a couple of minutes to get the feel of it. The paper can rotate instead of slide when you're close to the end; to prevent that, I put a finger on the paper to guide it along.

Optional: The white lines that I painted on the jig are the half-way points of a 4x5 sheet (an 8x10 cut in quarters) and a 5x7 cut in half. By covering half the slot, you can create two strips on one strip, each half as long. For the second strip, rotate the paper 180 degrees. With two strips in one, you can check two areas on the print, such as a light area and a dark area, thus ensuring that both exposure and contrast are correct. My first photo above shows a two-in-one strip.

Mark Overton
 

RalphLambrecht

Subscriber
Joined
Sep 19, 2003
Messages
14,658
Location
K,Germany
Format
Medium Format
The big advantage of having every step in a test-strip cover the same area of your image is that you can place the most important parts of the image there and see how they look with all the exposure-times.
sure
TestStripPrinter1.jpg


For example, every step above contains the foreground hill, trees and sky. But such a localized test-strip is hard to make because you must move the strip after each exposure and mask everything outside that exposure.
Here's an easy-to-make tool for creating such test-strips.

Start with a hanging file-folder. These are available in office-supply stores and online. Then cut it down like this.

TestStripPrinter2.jpg


Draw regularly spaced lines as shown above. I taped on a thin strip of white paper with lines so they would be easier to see in safelight. The diagonal sheet of paper is an example of a test-strip consisting of a 4x5 cut in half -- a size I often use when making 4x5 prints.

TestStripPrinter3.jpg


Hold the device on the easel with hobby magnets as shown above. If your easel lacks a steel surface, make the bottom larger so you can hold it down with weights instead of magnets.

After an exposure, raise the left flap, slide the paper to the right to the next line, and lower the flap.

Ralph Lambrecht, on pages 472-476 of his excellent book, Way Beyond Monochrome (2nd ed) tells us how to make a test-strip printer out of .25-inch-thick plastic sheets that are hinged. My printer above is a simplified version of his device.

I made it large enough to handle a 4x5 test-strip (from an 8x10 cut in quarters). I have found that 4 inches is usually enough to cover the important items in an 8x10.

Mark Overton
 

Attachments

  • TestStripPrinterEd1a.pdf
    238.5 KB · Views: 231
Photrio.com contains affiliate links to products. We may receive a commission for purchases made through these links.
To read our full affiliate disclosure statement please click Here.

PHOTRIO PARTNERS EQUALLY FUNDING OUR COMMUNITY:


Ilford ADOX Freestyle Photographic Stearman Press Weldon Color Lab Blue Moon Camera & Machine
Top Bottom