DIY Meniscus

Tomato

A
Tomato

  • 2
  • 0
  • 13
Cool

A
Cool

  • 2
  • 0
  • 28
Coquitlam River BC

D
Coquitlam River BC

  • 2
  • 0
  • 36
Mayday celebrations

A
Mayday celebrations

  • 2
  • 2
  • 81
MayDay celebration

A
MayDay celebration

  • 2
  • 0
  • 82

Recent Classifieds

Forum statistics

Threads
197,563
Messages
2,761,100
Members
99,404
Latest member
ManfrediFilm
Recent bookmarks
0
OP
OP
SteveH

SteveH

Member
Joined
Jan 3, 2006
Messages
552
Location
Wilmington,
Format
4x5 Format
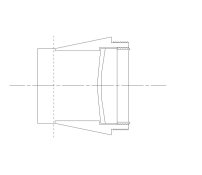
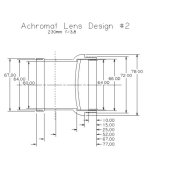
One design flaw that my drawing may/may not have is the way the lens faces. In looking throught the LVM, I only see two lenses that would be somewhat simular in construction - the Agfa Igenar f/8.8 105mm, and the Imagon. The agfa is setup how the lens in my drawing is; whereas the imagon has the thinner lens in the front.
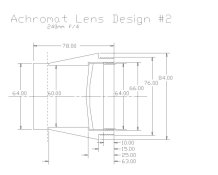
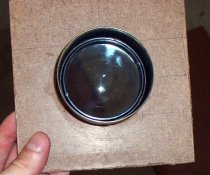
I am thinking that I will have to wait and see what the lens profile actually looks like before I can make this determination; or trial and error. Unfortunately, all that I know is that the lens is 235mm in focal length, 60mm in diameter, and is a cemented achromat.
 

Terence

Member
Joined
Mar 9, 2005
Messages
1,407
Location
NYC
Format
Multi Format
Also, I believe the landscape-type lenses have the concave surface facing away from the film.
 
OP
OP
SteveH

SteveH

Member
Joined
Jan 3, 2006
Messages
552
Location
Wilmington,
Format
4x5 Format
Ok...
I found an old brass projection lens today, and picked it up. Upon taking it apart, I found it to have a 240mm achromat in the front, and a 145 in the rear. The one in the front is quite large (64mm) in diameter, and is of a good focal length for me; so I'm going to use it.
I revised the plans, and have posted them. The nice thing is that I also have the proper sized lock ring for the lens, so that saves me from making one.

Here is a URL to some photos of the projector lens:
Dead Link Removed

Hopefully I'll get a chance to make the barrel this weekend. I don't see it taking more than 3-4 hours to setup, turn, and thread. Im not sure what Im going to do about affixing it to a lens board...Most likely I'll just thread it in.

Regards,
 

Attachments

  • meniscus2.jpg
    meniscus2.jpg
    16 KB · Views: 143
  • meniscus2_dims.jpg
    meniscus2_dims.jpg
    32.4 KB · Views: 158

Terence

Member
Joined
Mar 9, 2005
Messages
1,407
Location
NYC
Format
Multi Format
Nice. I've threaded several old brass lenses into tempered hardboard lens boards (made from 99 cent clipboards). Works great for relatively light lenses.
 

phfitz

Member
Joined
Dec 26, 2004
Messages
539
Format
Large Format
SteveH,

Wouldn't it be easy enough to temp. mount the lens to a piece of black PVC pipe with a slot cut in the bottom, make a stop plate with a small handle and move it back and forth to find the optimal spacing between pincushion =|= barrel distortion? The old formuale were just approx. starting points.

Just a thought.
 
OP
OP
SteveH

SteveH

Member
Joined
Jan 3, 2006
Messages
552
Location
Wilmington,
Format
4x5 Format
Yup, that would be the best idea. Since the lens is just over 2.5" OD, some 2 3/4" PVC and a little tape around the lens for a friction fit will work out pretty good.
The problem that I have though is how to test this setup ? The largest lens board I have is copal 3, which is no where near 2.75" ID....And Im not going to cut the hole until after the lens barrel is completed. I was thinking of making a home-brew optics table by projecting light through a 4x5 slide, and putting a piece of ground glass behind the lens. I can then cut out a cardboard aperture, and move it back and forth in the barrel.

Think that would work ?
 

jacobus

Member
Joined
Apr 14, 2005
Messages
34
Format
Medium Format
Just for clarification:
A meniscus lens can be positive or negative, single or compound, chromatic, achromatic or even apochromatic. What defines a menicus distinguishing it form bis-convex or bi-concave lenses is that both centers of curvature are on the same side of the lens.

Uli
 
OP
OP
SteveH

SteveH

Member
Joined
Jan 3, 2006
Messages
552
Location
Wilmington,
Format
4x5 Format
Uli,
Thanks for that. I was starting to think I was going crazy.

As for an update,
Im going to make a tempory barrel today out of PVC and a temp lens board. This way I can be assured that my measurements are correct. If all goes well, hopefully I'll have the barrel cut by the end of next week.

Thanks again,
 
OP
OP
SteveH

SteveH

Member
Joined
Jan 3, 2006
Messages
552
Location
Wilmington,
Format
4x5 Format
Getting closer...
Today I made a quick lens board and tested the lens. Instead of using PVC I just used the old lens barrel, as a portion of it unscrewed. Thankfully, that still gave me 40mm of barrel to work with, as my aperture calcs placed it somewhere between 32-38mm away from the glass.
Taking the average of that number, I affixed the aperture 35mm away from the glass. I didn't see any vingetting. However, to be honest, I didn't see any when I pushed the aperture all the way against the glass either. Even with some big rise, there really wasn't much fall off until after 2" of rise or so. Could the image circle possibly be that large ? Did I goof somewhere ? The only time I saw some vingette was when I affixed the 'snoot' shown in the last photo; and even that didn't show w/o some rise.
I am pretty excited though, as the images on the GG look to be just what I was looking for :D
Anyway, here's some photos:
 

Attachments

  • ap_test1.JPG
    ap_test1.JPG
    87.9 KB · Views: 145
  • ap_test2.JPG
    ap_test2.JPG
    105.5 KB · Views: 143
  • ap_test3.JPG
    ap_test3.JPG
    141.9 KB · Views: 148
  • ap_test4.JPG
    ap_test4.JPG
    81.2 KB · Views: 167
OP
OP
SteveH

SteveH

Member
Joined
Jan 3, 2006
Messages
552
Location
Wilmington,
Format
4x5 Format
More....

I still wasn't sure what was the correct orientation for the lens to face, either ---> ((], or ---> [)).

So now that I have it mounted, I figured I'd give it a shot. This is what I found:

F=230mm
Wide open = f/3.2
Stopped Down = f/16

----> ((] Gives you a super sharp image stopped down in the center. The OOF areas aren't as 'hazy' as a typical meniscus would be, but rather everyhing swirled around the focused area. There is a pretty sharp cut-off as well between in and out of focus. Wide open its still really soft however.

---> [)) Gives you that typical meniscus hazy/dreamy look. Still pretty sharp when stopped down, but it slowly bleeds into hazyness.


Im going to go with the first one, as I think it would work best for me. If I were doing studio work however, I would probably go with the second one, as for tighter shots I think it would work best.

When I put that snoot on (f/4.5), it makes some real nice images on the GG. I think I may revise my plan and close up the barrel slightly to have that as my 'wide open' aperture.
 
OP
OP
SteveH

SteveH

Member
Joined
Jan 3, 2006
Messages
552
Location
Wilmington,
Format
4x5 Format
Ok, final design which I will import into the CNC lathe. The only major difference between this and my first drawing is that I added provisions for a 67mm filter thread in the front, and I moved the aperture to the proper place.
I can say with certainty that the aperture on a meniscus sort of lens should be between 1/7-1/10th the focal distance away from the lens (if placing it in front of the element). I discovered this in some readings, and after confirming it with an individual on the Large Format board whom has done more than his fair share of reading.
 

Attachments

  • meniscus_final.jpg
    meniscus_final.jpg
    25.5 KB · Views: 126
Last edited by a moderator:
OP
OP
SteveH

SteveH

Member
Joined
Jan 3, 2006
Messages
552
Location
Wilmington,
Format
4x5 Format
Ok, so my hunk-o-aluminium arrived today. I just couldn't justify paying 5x the cost for brass on a lens design that is really untested. I still haven't decided upon which shutter system I am going to use (electomechanical packard or Ilex), so therefore I won't be cutting the barrel until I do so.
Thankfully I am on vacation, so I have some free time to think about things before I return. Either way, I hope to be cutting the barrel the first weekend of next month.
 

Attachments

  • raw_material.JPG
    raw_material.JPG
    86.1 KB · Views: 99
Photrio.com contains affiliate links to products. We may receive a commission for purchases made through these links.
To read our full affiliate disclosure statement please click Here.

PHOTRIO PARTNERS EQUALLY FUNDING OUR COMMUNITY:


Ilford ADOX Freestyle Photographic Stearman Press Weldon Color Lab Blue Moon Camera & Machine
Top Bottom