Ambitious project!
-
Welcome to Photrio!Registration is fast and free. Join today to unlock search, see fewer ads, and access all forum features.Click here to sign up
You are using an out of date browser. It may not display this or other websites correctly.
You should upgrade or use an alternative browser.
You should upgrade or use an alternative browser.
DIY Color RA4 Processor "RePrinto" A "Modern" Durst Printo clone
-
A
- Thread starter elgatosuizo
- Start date
Recent Classifieds
-
For Sale Mamiya TLR C33 with 80mm & 65mm Lenses
- Started by J Durr
-
For Sale FS: Sinar P 8x10 Rear Standard Bearer
- Started by B.S.Kumar
-
For Sale FS: Toyo VX23D Camera
- Started by B.S.Kumar
-
For Sale Antique 6x13cm French stereo cameras: Joux, Zion, Cornu _ 3D _ panoramic
- Started by Manual Camera
-
Want to Buy WTB/FT Goerz Dagor 19in/7.7 in Shutter
- Started by Jurgen Estanislao
Forum statistics
elgatosuizo
Member
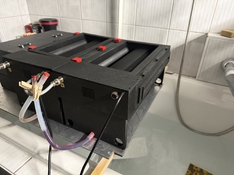
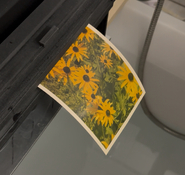
Okay. I have now conducted tests with RA4 Chemistry. The good news: it works! I used it for 3 hours in a row.
The downside was that I burned out the power supply for my M605C (I think, it just doesn't work anymore) and had to use a prototype LED light source that I had built once for this enlarger. These light sources are suitable for black-and-white VC prints, even if they don't quite meet the standards of the fine art of black-and-white enlargement. For color, they're rubbish... or more accurately, can be barely used with some very dodgy tricks to expose anything that looked like a color photo. From far away. I need to look into this LED with RA4 business. It's a challenging and sleep-depriving topic, but I don't think I can get around it. @koraks can sing a song about that... (don't ask me which LED I used, because it's the one you recommend the least).
Anyway, my Printo Clone works pretty well. Not without problems, though: it jammed once, but I think I found the source and a washer should solve that. What's worse is that I have a leak somewhere in the central drum. I printed it with not enough flow (it's the first version. The other one is massive PETG) and something seems to be coming through the PETG layers. I'll dry it and seal it with epoxy.
And the last disaster: I thought I still had some RA4 chemistry. I had some. But it was from 2019. I'll have to get some fresh one. I will test further and then start to collect all infos, files and stuff for a first publication.


I need to look into this LED with RA4 business. It's a challenging and sleep-depriving topic
It is if you need to figure it all out from the start and the required parts aren't available or very difficult to find. The good news is that (1) I can save you a lot of time by explaining what matters and what doesn't (and why), and (2) the required parts are easily available these days (and quite cheap). If you can teach yourself to 3D print a Printo, you sure can build a perfectly functional color LED head!
Looks like you've got yourself a working process on your hands! The minor details you mentioned are easy to iron out. Congratulations! It's really cool to see this concept working, although I didn't doubt you'd manage it!
elgatosuizo
Member
I certainly hope so! Thank you! I've read some of your blog posts and find them to be some of the most comprehensive and in-depth you can find online. Impressive. I'll be sure to send you a DM if I need more details. At the moment, there are still many issues to be resolved...The good news is that (1) I can save you a lot of time by explaining what matters
elgatosuizo
Member
In the meantime, I completely dismantled the machine. I didn't want to do this at first and wanted to wait for a few more tests, but I noticed that I had lost about 60-80 ml of developer. The machine had “sucked” it out. At first, I thought it was poor PETG printing, but it turned out that some of the drums were leaking. The M4 screws that held the gears in the axle were not enough to seal them. There is a hole along the entire axis. In version 2.0, this hole is sealed with silicone glue and a screw from the inside. In version 1.0 (the one with the leaks), I probably didn't do this (consistently). I have now rinsed everything thoroughly and will dry everything in the oven at 40-50°C. After that, I will seal the drums with silicone and grub screws. I will also apply a light coat of 2K epoxy to make sure that nothing gets into the printed parts. The mechanics of version 2.0 (the one for the BLIX) look good. No liquid was “drunk.” I just forgot to use stainless steel screws and used galvanized ones instead. They were already corroded by the BLIX. I will replace them with stainless steel ones. I've ordered some fresh chemicals and will tweak my LED color head (there's not enough red, so I'll try split RGB lighting) so that I can get almost acceptable images. And then, of course, reassemble everything. A major disassembly is necessary every now and then with these devices anyway.
They were already corroded by the BLIX
It's amazing how fast that happens, eh!
Split exposures should work OK. The 'not enough red' issue is one I'm familiar with.will tweak my LED color head (there's not enough red, so I'll try split RGB lighting)
- mattpro
- Deleted
elgatosuizo
Member
Another update after a little time has passed. The system is basically running, but I had to correct a lot of small things. What I noticed (and partially corrected):
- The gears also transport liquid above the fill line. This caused developer fluid to get into the gears of the transport roller of the intro module. This caused the machine steel sleeves there to stick together and apparently also corrode slightly. This made the transport rolls to stick a little bit in the sleeves. I now only use PETG as a bearing and the chamber containing the gears is sealed so that there is no longer any connection to the interior of the entry module.
- I learned how corrosive BLIX is. I hadn't protected the electronics sufficiently and a few drops got onto the stepper driver. It immediately started smoking and gave up the ghost. I have now sealed everything with epoxy, although clean, temperature-conductive silicone compound would be better.
- Overall, there is also a lot of BLIX fumes during use. I think this will damage the stepper over time. Therefore, I am planning an internally sealed stepper mount. This will only be open towards the ventilation grille.
I am now trying to compile and document everything and finally publish the files. But I'm in a situation like Hal, the father from “Malcolm in the Middle.” I actually wanted to test my Printo modules, but when I saw that my LED control for the enlarger wasn't good for color, I decided to develop a new one. Then I realized that my 4x5" enlarger LED light head also had to be compatible with this new control. This led me to notice that my enlarger stand for large formats was wobbly. So I built a new stand. Then I saw that I still had unused linear guides. So I made the enlarger digitally controllable with steppers. All because of the Printo modules. So I was very busy.
Hehe, I like how that project escalated! Very recognizable, too.
The fumes from the BLIX is mostly acetic acid, and yes, that's definitely corrosive. So good job on keeping the lid on that.
I'm not surprised to hear that a few drops of BLIX fried a power board; the liquid will be quite conductive so it'll basically just create a short.
The fumes from the BLIX is mostly acetic acid, and yes, that's definitely corrosive. So good job on keeping the lid on that.
I'm not surprised to hear that a few drops of BLIX fried a power board; the liquid will be quite conductive so it'll basically just create a short.
elgatosuizo
Member
I first develeoped a new controller that is able to control the simple WS2812b but also PWM with Cree-Style LED's (with correct wavelenghts, especially red 660nm and green 550nm). I will build a small lighthead for my 605er with the cree LED's.Hehe, I like how that project escalated!
in btw this is the result of the 4X5" enlarger rebuild (old version on th left):
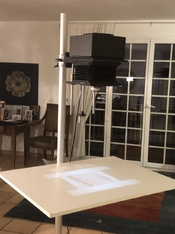
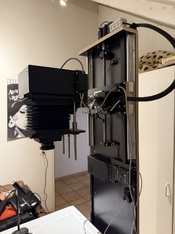
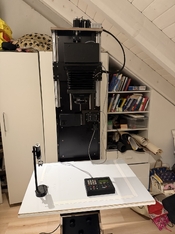
Focusing with the remote jopystick is really practical
Focusing with the remote jopystick is really practical
I imagine it is, indeed! Very cool setup. You're giving Heiland a run for his money alright.
Very impressive! Well done.
elgatosuizo
Member
Super cool project! Once you have it stable, do you think you'll publish the STLs and other docs for others to build one, or will this stay a personal project?
Sure. I will try to publish all needed info. Yust need some more time.
Hello.
@elgatosuizo I am think about building a paper processor too. Looking your desing...a have a question?
How did you manage to drive the rollers without any chemistry filtering throw the wall that connects to the gears? I am thinking to use an fkm oil seal.

I am thinking about to use the FKM material for the rollers too with a stainless steel core.
@elgatosuizo I am think about building a paper processor too. Looking your desing...a have a question?
How did you manage to drive the rollers without any chemistry filtering throw the wall that connects to the gears? I am thinking to use an fkm oil seal.
I am thinking about to use the FKM material for the rollers too with a stainless steel core.
elgatosuizo
Member
I have no sealing at all, as the gears are submerged. Like the original Durst Printo design. I anyway use POM bearings that work great submerged in the chemistry.
Ok. Thank you.I have no sealing at all, as the gears are submerged. Like the original Durst Printo design. I anyway use POM bearings that work great submerged in the chemistry.
elgatosuizo
Member
216 mm width, 177 mm height and 7.5 mm thick. If you can use SketchUp you can PM me and I send you the complete assembly as *.skp FIle.
216 mm width, 177 mm height and 7.5 mm thick. If you can use SketchUp you can PM me and I send you the complete assembly as *.skp FIle.
Oh, thank you very much.
elgatosuizo
Member
This project is getting more and more side quests. There are several challenges still to be solved before I can publish the project. It will definitely not be a project for beginners. Even with detailed instructions. Material compatibility is a big problem. I have noticed that PETG is not as chemical-resistant as was generally assumed. Compared to PETG parts for developer drum parts and spiral, etc. They are unsuitable examples because they are only in contact with the liquid for a few minutes and are rinsed frequently. A paper processor is in a completely different league: the material stays in there for hours. PETG behaves very strangely in the developer liquid. Small parts become brittle over time and break very easily. Large and thick parts, on the other hand, hardly lose any stability. In larger parts, it causes a kind of surface hardening, which is actually good for parts that have gears. At the very least, I now have to replace small parts with PP filament. I am also testing with overheated PETG printing (260°C), which apparently also helps with resistance. Since the mechanics have to transmit the movement via a large number of gears, the forces on the first gears are enormous. This also led to the clamps no longer holding. I solved this with axles with internal threads and now use screws in some cases, as with the gears of the axles. The tightness of the heat shrink tubing on the axles is also not 100%. I cut one open to see and noticed this. After each use, there is liquid between the hose and the lower surface fro the first 2-3 centimeters form the border. It turned out that the grooves in the 3D printing of the PETG end pieces of the rollers and this is causing the leak. Sanding these parts before attaching the hose should solve this. I also had to increase the torque of the stepper motors via higher current from the stepper drivers. However, this causes them to heat up. I am considering a pinion with fewer teeth on the motor or even an additional reduction with an intermediate gear. Until I have solved this, I will not release the project. I am trying to avoid having to print one or even two new modules (the amount of PETG and now also PP quickly makes this project quiet wasteful).
benderscameracorner
Member
Watching on with great interest!
I was thumbing through an old late-1980s issue of Darkroom Techniques last night and was shocked just how expensive these processors were back in the day - well north of US$1500-2000. No wonder they're as rare as hen's teeth these days and just as pricey. A new, affordably priced option would be awesome.
I was thumbing through an old late-1980s issue of Darkroom Techniques last night and was shocked just how expensive these processors were back in the day - well north of US$1500-2000. No wonder they're as rare as hen's teeth these days and just as pricey. A new, affordably priced option would be awesome.
Hey elgatosuizo, any update on the project ?
elgatosuizo
Member
I am s
It works, but not yet cleanly and reproducibly. Some serious weaknesses have emerged that require a rethink. Apart from the very surprising partial unsuitability of PETG for small parts (things keep breaking off), there are problems with the current position of the stepper motors. These are too close to the chemicals. They still work, but failure due to corrosion damage is inevitable. I am currently prioritizing my other project, a film processor (https://www.photrio.com/forum/threa...-and-step-processor-half-eurobox-size.216552/). I have received many requests from Reddit users to bring this to market. Since the film processor is actually a more complex project in terms of control but more manageable in terms of mechanics and has no problems with contact with chemicals, I am focusing on this. After that, I will return to the RA4 processor for publication or possibly (in parallel) in the form of a kit. However, the kit version will probably no longer be the 1:1 Printo design, but rather something with similar mechanics but closer to an RCP design. To avoid the problem of direct heating, I would use a temperature-controlled bath with a sous-vide heater and a fixed 2-bath mechanism with an intermediate bath and a 60x40cm Eorobox as a container. I will then publish the Printo clone files online regardless of whether I make a different version. But I will definitely have to position the motors differently and print the small parts from PP filament. I also have to check with the film processor to see what problems putting it on the market might entail. It's not entirely without its challenges.
Hey elgatosuizo, any update on the project ?
It works, but not yet cleanly and reproducibly. Some serious weaknesses have emerged that require a rethink. Apart from the very surprising partial unsuitability of PETG for small parts (things keep breaking off), there are problems with the current position of the stepper motors. These are too close to the chemicals. They still work, but failure due to corrosion damage is inevitable. I am currently prioritizing my other project, a film processor (https://www.photrio.com/forum/threa...-and-step-processor-half-eurobox-size.216552/). I have received many requests from Reddit users to bring this to market. Since the film processor is actually a more complex project in terms of control but more manageable in terms of mechanics and has no problems with contact with chemicals, I am focusing on this. After that, I will return to the RA4 processor for publication or possibly (in parallel) in the form of a kit. However, the kit version will probably no longer be the 1:1 Printo design, but rather something with similar mechanics but closer to an RCP design. To avoid the problem of direct heating, I would use a temperature-controlled bath with a sous-vide heater and a fixed 2-bath mechanism with an intermediate bath and a 60x40cm Eorobox as a container. I will then publish the Printo clone files online regardless of whether I make a different version. But I will definitely have to position the motors differently and print the small parts from PP filament. I also have to check with the film processor to see what problems putting it on the market might entail. It's not entirely without its challenges.
| Photrio.com contains affiliate links to products. We may receive a commission for purchases made through these links. To read our full affiliate disclosure statement please click Here. |
PHOTRIO PARTNERS EQUALLY FUNDING OUR COMMUNITY:  |

