• Welcome to Photrio!
    Registration is fast and free. Join today to unlock search, see fewer ads, and access all forum features.
    Click here to sign up

Digital creation of analogue negatives for alt-process

Recent Classifieds

Forum statistics

Threads
203,041
Messages
2,849,033
Members
101,615
Latest member
charliepongo
Recent bookmarks
0

AndrewBurns

Member
Joined
Jul 12, 2019
Messages
332
Location
Auckland, New Zealand
Format
Multi Format
As some of you may know, I've built and been using a digital UV light projector for making alt-process prints with good results for a fair few months now. However there are limitations to the process.

The main issue is that the LCD blocks a huge amount of light, about 96-97% of the UV light never makes it past the LCD screen even when it's set to maximum transmission. In the best case this just means long exposure times, but for some processes the results are non-linear with exposure, and below a certain light energy there's no effect at all. For example when carbon printing using DAS with the current system my shadow densities are pretty poor because past a certain depth there's just not enough UV energy to harden the gelatin any more, and there's really nothing I can do about that.

Another issue I've encountered is image persistence or burn-in like CRT computer TVs used to get. In theory this should be reversible, but I'm really having trouble getting rid of a ghost image from a previous test pattern and it's ruined a print I just tried to make. I think I might be able to prevent this in the future, but for now I'll probably have to replace the LCD screen which isn't cheap.

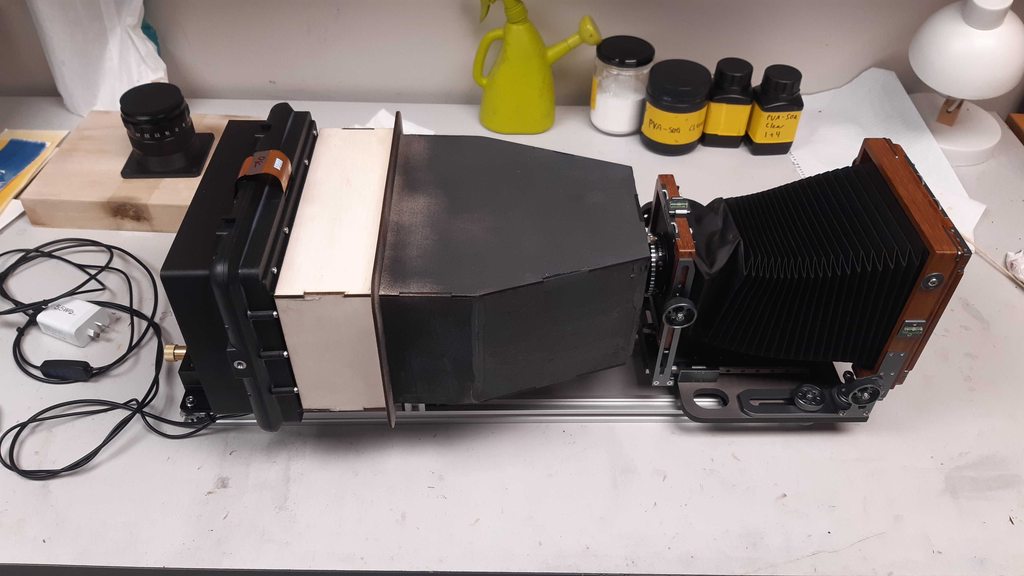
These two problems have me thinking of alternatives. I still want to be able to edit and print from digital files because that's my workflow, and I still want to use my projector as I don't want to deal with having an inkjet printer for making digital negatives (I've got one and it's always been a pain). My projector is basically a UV enlarger, with an LCD screen where the negative would be, which makes me think that I could replace the LCD screen with a film negative and get a significant performance improvement. This is because a film negative would block far less light than the LCD screen, I'd probably get an order of magnitude increase in light, which means much faster exposure times and much greater energy for processes like DAS carbon. It's also more robust as there's no chance of LCD screen burn-in and I can always make a new negative if one gets damaged.

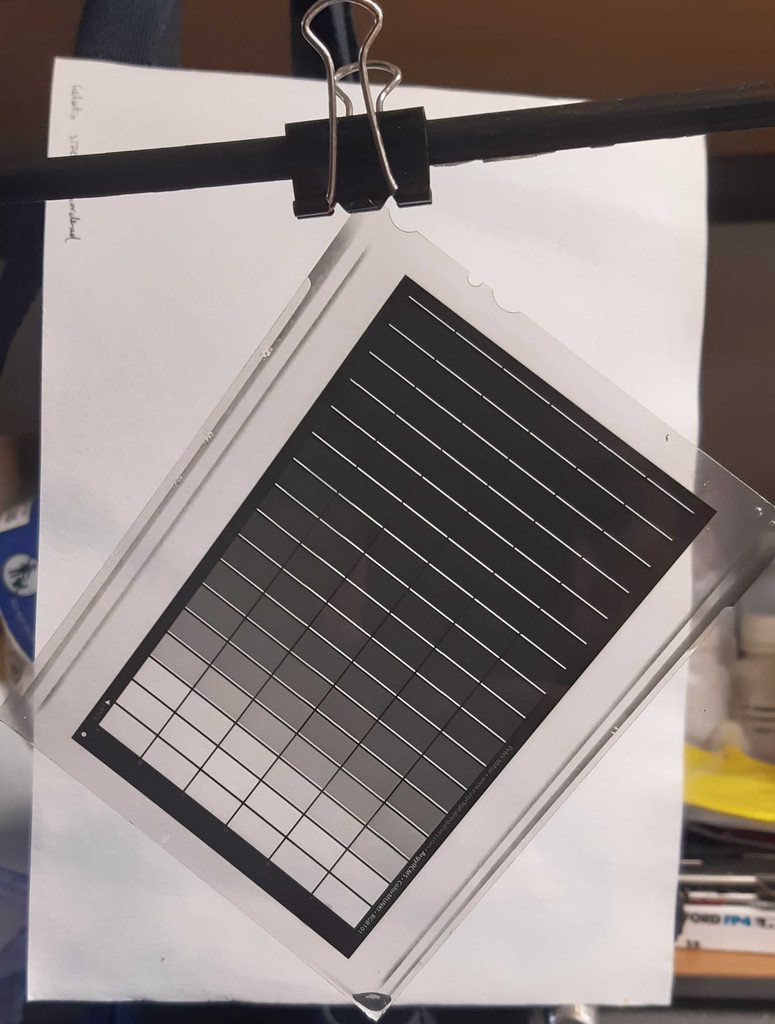
So the question is, how to get a film negative while using a hybrid process? My thought is that I can put the same type of monochrome LCD screen I'm currently using in the projector in front of an LED panel and literally take a photo of it with my 4x5 camera and some B&W film. I could then develop the film and put it into the enlarger for printing. It's more steps in the process and more work, but maybe not that much harder and would significantly improve my exposure times (and eliminate the chance of burning another LCD screen). The film should easily be able to resolve the detail in the LCD screen (which is the equivalent of about 32 megapixels) and the resolution of the screen is already fine for pretty large prints, so the film copy of the screen should also be fine (actually the grain the film adds would probably be an improvement).

For those of you who do alt-process prints fully analogue, what are your suggestions for film stock, developer, and exposure/develop settings to get a good density range for alt-process? With the LCD screen I can use calibration curves to change the contrast of the scene that gets exposed onto the film, so I'd be more interested in getting a high enough density range for carbon as a baseline which I can dial back for other processes if needed. I currently use FP4+ as my 4x5 film of choice and I have rodinal and LC29 but happy to give anything a shot.
 
For those of you who do alt-process prints fully analogue, what are your suggestions for film stock, developer, and exposure/develop settings to get a good density range for alt-process?

As you know, this is about the only part of your question that I can answer, since my own thinking is also pretty much stuck at the same point as yours. https://tinker.koraks.nl/photograph...e-of-digital-output-for-alternative-printing/

My preferred sheet film at the moment is Fomapan 200 (usually exposed at ca. 100) developed in a non-staining developer, I presently use ID62 in a replenished system and I don't control development time etc. very strictly. Dilution from the concentrate is around 1+2 (but that's also uncontrolled) and I develop for 5 minutes or so, sometimes 6, at room temperature in a tray with an agitation cycle every 30 seconds. When the negatives are dry, I have a look at them, maybe measure some densities, and usually then proceed to intensify them using chromium intensifier (permanganate can also be used) if they are for DAS carbon or salt printing. For the redeveloper I either use ID62 or sometimes a staining developer like pyrocat, but that gives a massive UV density boost and can produce challenging highlights esp. for DAS carbon because the stain also floods the space between the grains.

FP4+ is also an excellent choice. Really, you could use pretty much any film, but higher-speed films like HP5+ and Fomapan 400 can be challenging or may not work well at all due to a sloping gradient and high b+f.

You should be able to make an exposure with your LCD enlarger onto 4x5 or 8x10 film to make the digital-to-analog step. I wouldn't not bother with the camera in this setup. Just 'print' on the film as you'd do on paper. Use visible light; wavelength doesn't matter much. You can calibrate/linearize as you see fit.
 
You should be able to make an exposure with your LCD enlarger onto 4x5 or 8x10 film to make the digital-to-analog step. I wouldn't not bother with the camera in this setup. Just 'print' on the film as you'd do on paper. Use visible light; wavelength doesn't matter much. You can calibrate/linearize as you see fit.

Yes using the projector is one option, I could have an alternative white-light LED and swap between that and the UV one for exposing film, however the projector LCD is roughly 5x7" sized and it's not set up to be able to project such a small image as 4x5" (about 2:1 enlargement is as small as it can go before the LCD runs into the condensing lenses).
 
Well, as a stop-gap measure you could only use part of the LCD image for a 4x5" negative. Resolution would be lower, of course.
Alternatively, see if you can get some 8x10" film. Perhaps even x-ray film would be an option for this.
 
I keep going back to ilford ortho film for this purpose it works very well https://www.photrio.com/forum/threads/negatives-from-a-digital-enlarger.210346/

I don't think I'd even seen your thread before (I haven't actually really done any searching to see what else people have done). It's good to see that people have basically done what I planned to do and have managed good results with it. I'm still thinking that the digital projector makes sense for something like PVA-SbQ which is so fast you hardly need any power, but I'm coming around to the idea of making an intermediate negative and using the projector like an enlarger for other less sensitive processes.

I should look at modifying my projector so that the LCD is on a removable carrier that can easily be swapped with a negative.
 
I keep going back to ilford ortho film for this purpose it works very well https://www.photrio.com/forum/threads/negatives-from-a-digital-enlarger.210346/

I was discussing my plans with some other photographers I know and they raised the possibility of moire patterns when using an LCD to write to film. Have you ever seen this in your case?

It's my understanding that a moire pattern requires two regular patterns with a difference in spatial frequency resulting in interference patterns. In this case the LCD definitely has a regular pattern (pixels) but I can't imagine that the film's grains would be regular enough to create any significant moire?

I was also thinking of using 4x5 film as it would better fit my projector, and it should have a significantly higher resolving power than the LCD resolution, which I'd imagine could help eliminate moire patterns.
 
In this case the LCD definitely has a regular pattern (pixels) but I can't imagine that the film's grains would be regular enough to create any significant moire?
Firstly, grain is not a sufficiently regular pattern for this to happen. Secondly, grain is orders of magnitude smaller than LCD pixels even if you print at a very high resolution, so there's no way this is going to create visible moiré patterns. So don't worry about it; it's a non-issue. I assume that the photographers who worried about this have limited experience with the nature of film and are mostly experienced in digital photography, in which this is indeed a more pressing/common issue (cf. sensors without an AA filter interacting with subject matter like narrow-spaced fences etc.)
 
Firstly, grain is not a sufficiently regular pattern for this to happen. Secondly, grain is orders of magnitude smaller than LCD pixels even if you print at a very high resolution, so there's no way this is going to create visible moiré patterns. So don't worry about it; it's a non-issue. I assume that the photographers who worried about this have limited experience with the nature of film and are mostly experienced in digital photography, in which this is indeed a more pressing/common issue (cf. sensors without an AA filter interacting with subject matter like narrow-spaced fences etc.)

Yeah I didn't imagine film grain would be regular enough to cause an issue. If there was to be moire captured in a (scanned) film photo I would imagine it was some artifact of the scanning and not something inherent to the negative itself.

I've asked around a little here to see if anybody knows if there are any old film recorders laying around but given how small NZ is I really doubt there's anything appropriate still in existence and I wouldn't bother shipping one from overseas.
 
Assuming there is a homegrown motion picture film industry there, I would check with them.
 
So apparently the New Zealand Ilford importer doesn't even list 4x5 Ortho as a product that shops can order, and they also don't seem to stock Phenisol. I've got a good relationship with the guy who owns the local film lab so I could probably get both imported but it might be easier to look at other options.

Another option could be FP4+ (which is my go-to LF film already) in Pyrocat HD, with a process tuned to dense contrasty negs. Does anybody have any suggestions for exposure and processing parameters for this combo when printing alt-process?

I've got a UV/Vis densitometer on the way (because I can't help but want more data) so I can probably work it out myself, but it would be nice to have a good starting point.
 
Been busy, but made some progress on my LCD-based 'digital film writer'. It's basically a fancy metal frame to hold my 4x5 camera and backlit LCD screen in alignment, which also allows for separate movement of the LCD and lens standard for changing enlargement and focusing (a very futuristic copy-camera).


20260331_151622.jpg


The whole contraption

20260331_151638.jpg


Test image displayed on the LCD screen.

20260331_151746.jpg


Test image as viewed through the camera ground glass.
 
Very cool!

For alt processes needing lots of contrast, I use FP4+ in Ilford Universal PQ Developer...at paper strength if needed. It seems to expand the mid-tones and highlights nicely. I have even used Dektol (straight) to boost contrast.

For a few negatives lacking in contrast, but still well-exposed, a slight bleaching to lower the shadow values and then selenium toning to boost the highlights has worked for me to slip the contrast up a notch.

Ahh interesting, I was looking to mix up some pyrocat HD to use with FP4+ for making my internegatives, but I haven't managed to get the chemicals on order yet. I could go and buy Universal PQ from the local film shop easily enough though. There will be a bit of experimentation involved in getting consistent dense and contrasty negatives I'd imagine...
 
I record the range of reflected light values from the landscape and where I have placed the shadows. This gives me the info I need to develop the film for either platinum or carbon printing. I could be (and probably should be) better at testing, consistency, and all that, but I usually can give it a good guess based on the exposure data and often hit it right. I am always messing with the dilution and dev time, but usually around 50% to 100% more that what would be considered normal time for negatives for average silver gelatin printing.

Universal PQ is easy to use. I often use out-dated film that can have a slight base fog. Staining developers (I also use PyrocatHD) end up staining that base fog also, lengthening the exposure under the UV lights even more.
 
For those of you who do alt-process prints fully analogue, what are your suggestions for film stock, developer, and exposure/develop settings to get a good density range for alt-process? With the LCD screen I can use calibration curves to change the contrast of the scene that gets exposed onto the film, so I'd be more interested in getting a high enough density range for carbon as a baseline which I can dial back for other processes if needed. I currently use FP4+ as my 4x5 film of choice and I have rodinal and LC29 but happy to give anything a shot.

I haven't made an alternative print for a few years now but when I did I always used the Sun which is free, always on (during the day), and emits all the required electromagnetic radiation to get the job done correctly. It doesn't have to be constant either - it will work with passing clouds or even with a 100% overcast as long as you have a split-back printing frame for the negative/paper combo. The "trick" is to know what you are looking for in the image and to stop exposing when it reaches that point. You can even "dodge and burn" just like with regular silver gelatin printing.
 
Last edited:
For those of you who do alt-process prints fully analogue, what are your suggestions for film stock, developer, and exposure/develop settings to get a good density range for alt-process? With the LCD screen I can use calibration curves to change the contrast of the scene that gets exposed onto the film, so I'd be more interested in getting a high enough density range for carbon as a baseline which I can dial back for other processes if needed. I currently use FP4+ as my 4x5 film of choice and I have rodinal and LC29 but happy to give anything a shot.

I haven't made an alternative print for a few years now but when I did I always used the Sun which is free, always on (during the day), and emits all the required electromagnetic radiation to get the job done correctly. It doesn't have to be constant either - it will work with passing clouds or even with a 100% overcast as long as you have a split-back printing frame for the negative/paper combo. The "trick" is to know what you are looking for in the image and to stop exposing when it reaches that point. You can even "dodge and burn" just like with regular silver gelatin printing.

All well and good if you get consistent sun like in California, but Auckland in New Zealand tends to be cloudy and wet much more frequently, and I work full-time so typically only have nights to print. Also works well for print-out processes where you can gauge exposure from the latent image, but for something like the carbon on glass process I was working on there's no way of knowing how exposed it is until development, which means accuracy and repeatability is important (particularly when doing multi-layer colour processes).

The nice thing about the UV enlarger I've built is that it behaves exactly the same way as an enlarger in the silver-gelatin processes, so you can still dodge and burn (but I haven't really felt the need to as I can edit digitally before printing).
 
Photrio.com contains affiliate links to products. We may receive a commission for purchases made through these links.
To read our full affiliate disclosure statement please click Here.

PHOTRIO PARTNERS EQUALLY FUNDING OUR COMMUNITY:


Ilford ADOX Freestyle Photographic Stearman Press Weldon Color Lab Blue Moon Camera & Machine
Top Bottom