-
Welcome to Photrio!Registration is fast and free. Join today to unlock search, see fewer ads, and access all forum features.Click here to sign up
You are using an out of date browser. It may not display this or other websites correctly.
You should upgrade or use an alternative browser.
You should upgrade or use an alternative browser.
Differences in grades of VC paper
-
A
- Thread starter cowanw
- Start date


Recent Classifieds
-
For Sale Saunders VT-1400 11x14 Easel
- Started by Roger Thoms
-
For Sale Canon F1n with Power Winder, 50/1.4 S.S.C, and some extras [EU]
- Started by Laurent
-
Free New bellows for Linhof Super TECHNIKA 6x9
- Started by Simon Benton
-
Want to Buy LVT printer/developer machine in EU, Durst rhino or similar.
- Started by ScandiPhoto
-
For Sale Ilford hp5 7x17 plus contact printing frame
- Started by Ales'
Forum statistics
I have 6, 2 ea 35mm, 2 ea 120 and 2 ea 4x5. And, I use a MacBeth color checker to get full coverage which includes a shot at the start and end of a shooting session giving me process uniformity and flare!
PE
PE
OP
OP
Well, some time back, I tried the whole shebang of setting up for zone system, personal EI with Stouffer wedge, when I started large format. Did very well and consistent with the testing and then applied it to actual portraits and hit a brick wall of crappy exposures and prints.
After that, trial and error got me to were I could make proper exposures and prints quite quickly.
But OK I can try again with the step wedge. what do I do with this? The grey card I get.
Very kind of you to take the time.
After that, trial and error got me to were I could make proper exposures and prints quite quickly.
But OK I can try again with the step wedge. what do I do with this? The grey card I get.
Very kind of you to take the time.
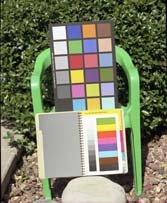
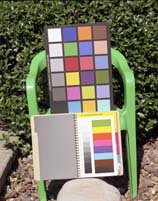
First shoot a MacBeth color checker using a typical scene and use +1, 0 and -1 exposures. So, using a 100 film shoot at 50, 100 and 200. See the attached example prints.
At the same time, contact print a Stouffer step wedge onto film such that the step wedge exposure is centered in the chart (there is high density on at least one step and Dmin on at least one step). Plot everything with D = y axis and step = x axis.
Make a good print out of everything you did above. Use several grades of paper if you have the time. Now, you can compare the step wedges with the color checker neutral scale, and you can place the correct exposure on the step scale. You can also read the contrast of the film to make sure that they are processed properly and you can read the paper contrast and print contrast.
When you have the plots of the print, the paper and the film, you should have curves such as shown in the final attachment. The proper print curve is between a gamma of 1.5 and 1.7. A proper grade 2 paper is about 2.5 in gamma.
Glad to try and help you guys.
PE
Attachments


OP
OP
I am sure this all makes sense to the knowledgeable. but let me try to get it clarified in my mind. I know you go over this again and again, but I think I am close. I understand the graph. I am just not clear on some of the instructions.
1. I presume the pictures of the colour checker can be in B&W. and developed the same as the contact print.
2. By making a good print you mean a print with the greatest range of colour checker neutral scale and Stouffer steps that I can get.
3. "Now, you can compare the step wedges with the color checker neutral scale,"
What are you comparing?
4. "and you can place the correct exposure on the step scale"
by doing or seeing what?
I appreciate your generosity.
- Joined
- Mar 6, 2005
- Messages
- 2,261
- Format
- Large Format
In my humbug opinion, variable grade papers are not very good. They are okay from a grade two through about a 3.5 but then fall on their faces. "Back in the day" I used to use single grade papers one through six. I don't know if you can get single grade six any more. Variable grade paper will not give you a true grade 4, or higher, IMO.
You are correct, or were when I stopped testing VC papers. I never found one which would go above about Grade 3.6, or below about grade 1.25.
Agfa made the last Grade 6 paper many years ago when it was forced to remove cadmium from its emulsion.
- Joined
- Feb 9, 2010
- Messages
- 9,549
- Format
- 4x5 Format
Hi cowanw,
I'm sure PE can illustrate the points more, but I want to explain something about the film curve on his graph, the long straight line and the two vertical lines he indicated are your latitude.
Recognize that? It's what you already recognize as the densities on your negative that fit your paper.
I'm sure PE can illustrate the points more, but I want to explain something about the film curve on his graph, the long straight line and the two vertical lines he indicated are your latitude.
Recognize that? It's what you already recognize as the densities on your negative that fit your paper.
Cowanw, yes to all of the above. Just compare density to density.
PE
PE
- Joined
- Feb 9, 2010
- Messages
- 9,549
- Format
- 4x5 Format
PE,
To confirm my understanding, your graph shows about .4 to 1.4 of film density is used to give .1 to 2.1 density in the print?
If I understand that, you are using only the straight-line section of film curve. Which is fine... but I thought maybe a little of the toe was preferred.
To confirm my understanding, your graph shows about .4 to 1.4 of film density is used to give .1 to 2.1 density in the print?
If I understand that, you are using only the straight-line section of film curve. Which is fine... but I thought maybe a little of the toe was preferred.
I think I might have an example to illustrate what is being discussed although not a perfect one. Both examples use a normal 2.20 subject luminance range with normal flare, or in other words, the same subject. The first example can be considered normal processing and printing. The second has extended development and the additional negative density range is closely match to a grade one. The reproduction curve shows decreased local contrast in the lower tones in example two compared to normal conditions. The darker shadows match but the rest of the tones are printing darker than those from the normal negative. Example two has higher local contrast in the lighter tones (step 6-8) as compared to example one. Both examples have the same white and almost the same black, but are different in between.
Example 1 Example 2
Reproduction Curve
Example 1
Example 2 Reproduction Curve
Bill, you might find these of some help. The first is a paper I wrote "What is Normal?" It explains the conditions involved in determining a developmental model and film/paper matching. The second is an example from Theory of the Photographic Process. While it uses a transparency, it distinguishes between the 7 1/3 stop shadow to highlight luminance range that is used for the statistical average luminance range and the 10 stop range from accent black to specular highlights.
View attachment What is Normal.pdf

View attachment What is Normal.pdf
Dear All,
Since MGIV we have a full range from 00 to a full grade 5 exposed with ILFORD Multigrade filters.
Simon. ILFORD Photo / HARMAN technology Limited :
Since MGIV we have a full range from 00 to a full grade 5 exposed with ILFORD Multigrade filters.
Simon. ILFORD Photo / HARMAN technology Limited :
PE,
To confirm my understanding, your graph shows about .4 to 1.4 of film density is used to give .1 to 2.1 density in the print?
If I understand that, you are using only the straight-line section of film curve. Which is fine... but I thought maybe a little of the toe was preferred.
My graphs are illustrative but not exact. However, yes it is best to use the straight line portion in capturing the image. This gives the best results.
PE
- Joined
- Oct 9, 2010
- Messages
- 7,878
- Format
- 35mm RF
My graphs are illustrative but not exact. However, yes it is best to use the straight line portion in capturing the image. This gives the best results.
PE
How true this is. PE well said.
I kind of agree with Bill in that one can make excellent prints from all those conditions, however, in an experiment the prints will have subtle differences when viewed side-by-side. For example the print on #5 paper will have augmented grain structure whereas the print on #0 may have mushy grain structure. This may cause perceptible differences in what appears "sharp." Also, any unevenness of the enlarger light will be accentuated by the #5 print and minimized in the #0 print. Dodging and burning will be a royal pain in both extreme cases. In the #5 print frustration arises because one can't time the dodge or burn accurately enough to be consistent from print to print (due to the narrow latitude of the high contrast emulsion). In the #0 print, frustration arises because doubling or tripling a burn time might not even be noticed in the print due to the extreme latitude of the low contrast emulsion.
So, when using multigrade paper, even though one can make good prints from negatives developed to a wide range of contrast levels, it is probably prudent to still be very careful with negative development and aim to print on grades from 1.5 through 3. Not necessarily for aesthetic reasons, but for technical reasons.
very true

OP
OP
OK, I have done a negative of the Stouffer step wedge on HP5. Developed for 5.5 minutes I get a full range of blacks to whites with densitometer readings of .19 to 191 which is as black and as clear as the film gets. I have done 8 sheets of differing exposures; more exposure doesn't get any darker and less doesn't get any clearer. This one is smack dab in the middle.
My straight line is a slope of pretty close to 1; that is between step 5 and 17 (12) the densitometer reads between 1.66 and .41 (1.25).
Is it supposed to be a slope of .6? i.e. Am I supposed to develop longer?
I am thinking the best print assessment will depend on development, that's coming up next.
Bill
Last edited by a moderator:
- Joined
- Feb 9, 2010
- Messages
- 9,549
- Format
- 4x5 Format
Hi cowanw,
Each step of a Stouffer scale (the typical 21-step scale most of us have) is 0.15 so going across the exposure scale your 12 steps give you 1.80 exposure difference
The density difference from 0.41 to 1.66 is 1.25 density difference
1.25 divided by 1.80 is 0.69 which you could call your gradient, contrast index, gamma or slope (different words for same concept and each has it's own peculiar definition)
I am surprised you got 0.69 gradient with 5.5 minutes of developing. For comparison it takes me 12 minutes in D-76 straight to get 0.72 with TMAX 100 at 68-degrees F, and I usually develop in D-76 1 to 1. What developer/concentration are you using? HC-110 at 1 to 15? If so, and if you agree in principle, a more dilute mix would let you be more relaxed about your process timings.
Next steps of testing: Choose that exposure time that gave you these results, make several sheets up with the same exposure and develop them for different times.
Next steps for matching print to paper: I found two negatives in my collection that were hard to print (needed some dodge and burn) but made excellent prints on Grade 2 (the dense, long-scale negative) and Grade 3 paper (the properly exposed but thin, flat negative). Sort of the Goldilocks formula. If you can find two such negatives in your collection, you can measure the densities of those two negatives and choose to make those your standards to meet.
Bill has it right. I don't know how you got the slope number you did get. Bill did it correctly. The film density is a little low. Most films go up to a density of 3.0 or higher. This might be underdeveloped. IDK.
PE
PE
OP
OP
Thanks Bill and PE. How did I get that easy peasy ! densitometer difference1.21; Number of stouffer steps 12; not right but easy.
Ok I am at .69. I will increase development to get to .57. Then I will do the best picture test and also check my past negatives.
Ok I am at .69. I will increase development to get to .57. Then I will do the best picture test and also check my past negatives.
- Joined
- Oct 9, 2010
- Messages
- 7,878
- Format
- 35mm RF
So, when using multigrade paper, even though one can make good prints from negatives developed to a wide range of contrast levels, it is probably prudent to still be very careful with negative development and aim to print on grades from 1.5 through 3. Not necessarily for aesthetic reasons, but for technical reasons.
In other words, with zero filtration. How true.
Thanks Bill and PE. How did I get that easy peasy ! densitometer difference1.21; Number of stouffer steps 12; not right but easy.
Ok I am at .69. I will increase development to get to .57. Then I will do the best picture test and also check my past negatives.
Increasing development time increases contrast. So, be careful. Look at the dataguide for the film. The contrast will be listed for each development time recommended.
PE
Given a softer negative that prints with grade 4 filter, or a more contrasty negative that prints with a grade 1 filter, or a medium negative that prints with a 2.5 filter; what differences can I expect to see viewing the prints?
Apart from the tone reproduction curve differences that this thread has focused on, and the relative grain size issues that were briefly mentioned, as were concerns about ease and convenience of D&B, there is one other important difference that you will observe with some papers: colour after selenium toning. My paper of choice, MGWT fibre will tone redder/browner when exposed at lower contrast settings, and cooler and more purple at higher grades. So, if you happen to enjoy cooler tones, while minimising (can't avoid) split toning with this paper, then you need slightly softer negatives that require slightly higher printing grades (2.5-3 rather than 2-2.5).
- Joined
- Mar 6, 2005
- Messages
- 2,261
- Format
- Large Format
In my humbug opinion, variable grade papers are not very good. They are okay from a grade two through about a 3.5 but then fall on their faces. "Back in the day" I used to use single grade papers one through six. I don't know if you can get single grade six any more. Variable grade paper will not give you a true grade 4, or higher, IMO.
You are correct!
Even though each paper is slightly different, and light sources have an effect on the contrast of variable papers, when I was printing on them O never found one to go as high as a true Grade 4, or as soft as a true Grade 1. Graded papers have always been my choice for this reason. The range of contrast available when properly using two appropriate developers will astound those who have only worked with variable contrast papers.
It should be mentioned that fresh variable-contrast paper can be noticeably more contrasty than old stuff. A lot of contrast complaints might be down to the condition of the different papers used... That said, I haven't seen anything recently quite as contrasty as some Grade-5 paper from Agfa that I used decades ago (nostalgic sigh).
- Joined
- Jul 14, 2011
- Messages
- 15,027
- Format
- 8x10 Format
I admittedly don't have the time to follow every past post in this thread. But when it comes to VC papers I utterly ignore any talk of grade such as it originally meant with true graded papers. Each different flavor of paper has a somewhat different personality, even from the same manufacturer, and this is in turn significant affected by the specific developer and even degree of development, in conjunction with how much of each of the two sensitivity layers are exposed. You could spend years trying to quanitfy all this; and by the time you were done, the paper you tested would probably no longer even be on the market! My own habit is to buy a box of each of the papers I find promising and experiment with it until I really understand it. Unless I have very strong preconceptions of how a negative must be tweaked, I just use ordinary white light to expose the first test strip, then afterwards punch in either the highlights or shadows as needed, or resort to true split printing. This has all become extremely intuitive for me. But then I learned on graded papers where you pretty much had to
develop the neg contrast correctly to begin with. With sheet film this is easy; but with roll films sometimes you end up with an odd duck
on the same strip that needs to be tweaked during printing. Some of the current VC papers are simply wonderful; but the selection of classic graded papers is almost extinct.
| Photrio.com contains affiliate links to products. We may receive a commission for purchases made through these links. To read our full affiliate disclosure statement please click Here. |
PHOTRIO PARTNERS EQUALLY FUNDING OUR COMMUNITY:  |