Differences between Tmax 400 and Tri-x characteristic curves?

Frank Dean,  Blacksmith

A
Frank Dean, Blacksmith

  • 10
  • 5
  • 127
Woman wearing shades.

Woman wearing shades.

  • 1
  • 1
  • 99
Curved Wall

A
Curved Wall

  • 6
  • 0
  • 112
Crossing beams

A
Crossing beams

  • 11
  • 1
  • 134

Recent Classifieds

Forum statistics

Threads
198,848
Messages
2,781,823
Members
99,727
Latest member
rohitmodi
Recent bookmarks
0

Lachlan Young

Member
Joined
Dec 2, 2005
Messages
4,943
Location
Glasgow
Format
Multi Format
I use T-Max and TX since the mid 1980s, and teaching darkroom technique in a high school.

That's neither an indicator of useful insight/ knowledge nor teaching ability.

Why do you want to ignore what Phil Davis has written on pp.154-155 of the BTZS Manual? After all, you expend thousands of words trying to force people to buy it.


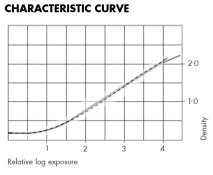
Why do you cut the Graph at 2.0D man ? The shoulder shows beyond that. I paint two hypotetic shoulders compared to linear behaviour:

Irrelevant.

Do you accept that Kodak intends both films to have the same (short) toe characteristic?

Steve Sherman sent me his method and tutorials, after I analyzed for him some histograms to find technical conclusions about microcontrast effects in stand processing.

Personally, I'm pretty aware about the effects of minimal agitation, you state a pejorative "simplistic notions of the stand/ semi-stand brigade", you have to know that there was a lot of work in refining that technique, that it has very clear effects, and that an skilled photographer can take principal advatages from that technique in the situations it is suitable, of course not always by far. Sherman's gallery is self explanatory.

Sorry, but you show a deep ignorance about this matter.

Agitation methods have been very, very thoroughly analysed post-WWII at a level very far beyond what you or Steve Sherman can do - and the outcome was that emulsion construction techniques offered far greater potential for acutance/ speed/ grain improvement without problematic side-effects. If various stand techniques really achieved their claimed end results consistently and reliably, it would have been set in stone as standard technique by Kodak. That it works at all owes as much to emulsion designers allowing for bad agitation technique on the part of the end user as anything else. There have been films made that had to be machine processed because otherwise they would produce uneven results.
 

138S

Member
Joined
Dec 4, 2019
Messages
1,776
Location
Pyrenees
Format
Large Format
Why do you want to ignore what Phil Davis has written on pp.154-155 of the BTZS Manual? After all, you expend thousands of words trying to force people to buy it.

My copy is in Spanish , pag 154 and 155 covers recipocity failure in those pages, so be clear because I don't understand you.


Irrelevant.

Not irrelevat at all, a core difference in the shoulder, the most important sensitometric difference between TX vs TMY

Do you accept that Kodak intends both films to have the same (short) toe characteristic?

Those graphs look from kodak datasheets, and show same toe, true, but It would be good to know what processing-developers were used


If various stand techniques really achieved their claimed end results consistently and reliably, it would have been set in stone as standard technique by Kodak.

Compensating development is not for all scenes. It is an advanced technique for certain situations, not a general procedure. There are calibrations around showing the difference.
 

Lachlan Young

Member
Joined
Dec 2, 2005
Messages
4,943
Location
Glasgow
Format
Multi Format
My copy is in Spanish , pag 154 and 155 covers recipocity failure in those pages, so be clear because I don't understand you.

Chapter 10, figure 10-5. 10-1 should make it clear what the T-Max films are doing too.

Not irrelevat at all, a core difference in the shoulder, the most important sensitometric difference between TX vs TMY

You stated:
400TX is Mid Toe, not short toe, it is longer toe compared to linear TMY. Of course it depends a bit on processing...

Kodak's own published data shows that they are intended to have near identical toe characteristics. That is what I showed you. Of course the mid-tone and highlight behaviour is different - as I said upthread. Those curves are in D-76. T-Max developer delivers near identical toe characteristics between the films too.

Compensating development is not for all scenes. It is an advanced technique for certain situations, not a general procedure. There are calibrations around showing the difference.

Actual compensating development at a significant level rarely achieves anything other than making negatives harder to print well by muddling tonalities. A more linear negative is always going to make a better print. It's much more likely that you aren't getting true 'compensation' but rather development to finality at a CI that overall gives a better result than your assumptions about 'correct' CI suggested.
 

138S

Member
Joined
Dec 4, 2019
Messages
1,776
Location
Pyrenees
Format
Large Format
Kodak's own published data shows that they are intended to have near identical toe characteristics. That is what I showed you.

Well, kodak graphs say what you say, so there is no debate.


Of course the mid-tone and highlight behaviour is different -

So you finally accept that printing extreme highlights from TX it's easier than deom TMY? Because by reaching lower densities from a more pronounced shoulder...


Actual compensating development at a significant level rarely achieves anything other than making negatives harder to print well by muddling tonalities. A more linear negative is always going to make a better print.

A compensated development may deliver exactly the same shadows and the same linear mids, while compressing highlights to get it's texture on the print. Those highlights would be a white blob on the print if the negative is linear, requiring a remarkable manipulation work in wanting to print that.

It can consist in obtaining a regular development for shadows and mids, while relatively slowing development in the extreme highlights to reach selectively lower densities in the extreme highlights only.

BTW you increase microcontrast in the negative, this is an effect you miss.
 

Lachlan Young

Member
Joined
Dec 2, 2005
Messages
4,943
Location
Glasgow
Format
Multi Format
So you finally accept that printing extreme highlights from TX it's easier than deom TMY? Because by reaching lower densities from a more pronounced shoulder...

Like I said, that's nonsense. If you have a low powered enlarger, it can seem faster to print in highlights from 400TX because the absolute density may be a little lower. The actual gradation in those highlights (because they are being compressed) will be muddier than burning in highlights from TMY-II. The point is that I can develop TMY-II to a 0.6 CI, keep nice solid mids etc and be able to bring in highlights with good separation, wheras with 400TX I might end up having to aim for a 0.5-0.52 CI which will have a knock-on effect across the rest of the scale, just in order to push the shouldering later & give me better highlight gradation. But there might be other aesthetic reasons why I prefer 400TX than having to listen to errant claims about its shouldering. Increasing microcontrast is much easier than you assume: aim a negative to G4 or higher & it happens as a matter of fact. Nothing new or innovative about it, despite all the reams of over-heated claims about a few rather toxic developing agents.
 

138S

Member
Joined
Dec 4, 2019
Messages
1,776
Location
Pyrenees
Format
Large Format
The actual gradation in those highlights (because they are being compressed) will be muddier than burning in highlights from TMY-II.

:smile: you will have to compress highlights anyway, by burning with a low contrast filter, the 0 or the 00... if not HL textures won't fit with in the paper dynamic range. Because of the higher density in TMY you may have to extend the burning x2 or x3 times longer, delivering side effects to the sorrounding areas, or forcing an HLM job.

For many images have the power in the highlight detail and numerous techniques have been praised for excelling in that:

> AZO-Lodima-Lupex silver-chloride long toe paper

> Pyro on VC paper, exposing highlights with a yellow low contrast filter from the proportional stain

> HLM masking

The shoulder simply helps that, the linearity in the highlights makes the negative more flexible, but it may require an stronger manipulation.
 

Lachlan Young

Member
Joined
Dec 2, 2005
Messages
4,943
Location
Glasgow
Format
Multi Format
:smile: you will have to compress highlights anyway, by burning with a low contrast filter, the 0 or the 00... if not HL textures won't fit with in the paper dynamic range. Because of the higher density in TMY you may have to extend the burning x2 or x3 times longer, delivering side effects to the sorrounding areas, or forcing an HLM job.

Highlight compression should ideally only be controlled by the toe of the paper interacting with straight-line information from the film - not from a difficult to control interaction between a film shoulder and a paper toe. Sometimes you might get paper toe and film shoulder shapes that track perfectly, but all too often you will get interactions where already compressed information (shouldering) is compressed further by the toe of the paper creating muddy and poorly separated highlights. These toe/ shoulder interactions are a big part of why direct printing/ duping from transparencies was challenging because of how information was placed on the curve of the transparency, such that it would look good on a light table or projection screen without consideration for how it could be successfully printed.

For many images have the power in the highlight detail and numerous techniques have been praised for excelling in that:

> AZO-Lodima-Lupex silver-chloride long toe paper

Long toe papers reduce highlight contrast and separation. Quite drastically so in some cases. Most of the people who use and promote chloride papers prefer films that don't shoulder significantly when processed for a longer scale.

Dye Transfer matrix film had a fairly long toe as well - thus why some practitioners placed so much emphasis on highlight masking techniques at the separation stage with the intention of bring able to boost the crispness of the highlights when making the matrices.

> Pyro on VC paper, exposing highlights with a yellow low contrast filter from the proportional stain

You could achieve the same effect by various other means. But it's not shouldering of the neg, it's more like you're applying a local contrast filter to affect the behaviour of the paper. And not everyone was terribly keen on this effect - why do you think Pyrocat etc were invented?

> HLM masking

The shoulder simply helps that, the linearity in the highlights makes the negative more flexible, but it may require an stronger manipulation.

A contrast reducing mask should ideally have no impingement at all on the highlights of a negative. A highlight boosting mask should essentially do what you spend so much time decrying TMax's highlights for doing at higher CI's.
 
OP
OP

Acticus

Member
Joined
Jul 14, 2019
Messages
51
Location
East Coast
Format
Medium Format
So I exposed a roll of Tmax 400 and developed in Rodinal. This film is amazing, but I'm not sure it's what I'm looking for. The images are ultrasharp, with a very fine grain, only really visible if you view the 24MP RAW files at 100%. Even then, it's still quite fine. At a more reasonable 70%, the grain is almost invisible, and the details I could cut with a knife. This is all too digital looking for me....too perfect. I might try Ilford HP5 in HC-110. Its curve looks straight, somewhat like Tmax's, I am sure i can get more grain.
 

markjwyatt

Subscriber
Joined
Apr 26, 2018
Messages
2,417
Location
Southern California
Format
Multi Format
I have not used TMAX much, but I ran a roll through last year. I liked the results, but noticed I really pushed the highlights using the same f16 rule I normally use. In this scene of cliifs, look at the upper right cliff face (above the oak tree). I almost lost the highlights there. I feel I would not have had that issue with FP4+ (but cannot say for sure). This was TMX 100, shot at 100 iso, developed in DDX (The Darkroom). Shot as f16 rule + medY (so open 1 stop). It is also possible this particular sand stone material is too reflective and I should not have opened a stop. Of course had I not I would have lost more shadow detail (maybe ok, maybe 1/2 stop would have been a good compromise). I still feel that FP4+ would not have acted this way.


(Voigtlander SC Skopar 21mm f4)

Below Cliffs
by Mark Wyatt, on Flickr

Here is the same scene shot at the same time (within 10 minutes) with Fujifilm Superia XTRA 400 using the same f16 rule criteria. The angle of view is a little different. In this case, I did not lose the highlights (but likely was pushing onto the shoulder); just to challenge the reflective sandstone explanation (and to consider whether the medY filter caused its overexposure).

(Carl Zeiss 50mm f1.8 Ultron)

Eroded Hill
by Mark Wyatt, on Flickr

An alternative explanaiton is that the SC Skopar being a more modern lens (and a Tessar type design I believe, i.e., fewer internal surfaces) has much less internal reflection and thus more contrast...

I think in both cases, that particular surface was getting the most direct sunlight also.
 
Last edited:

RalphLambrecht

Subscriber
Joined
Sep 19, 2003
Messages
14,649
Location
K,Germany
Format
Medium Format
I'm new to B&W developing (35mm), and I'm trying to decide what my everyday film and developer will be. I have a lot of digital experience, and I do understand the fundamentals of film photography, exposure and processing. I'm digitizing with a Sony mirrorless camera.

I see that in Kodak's literature that Tmax 400's characteristic curve has essentially no shoulder. Tri-x has a bit of a shoulder. What does this mean for practical photography? I've read that Tmax has greater contrast in the highlights. What does that look like? Can anyone point me to an image that demonstrates high contrast in the highlights? And what would the converse look like, highlights using a film with a defined shoulder? Is that Tri-x's look? What other differences would you say there are between the two films?

So far, I've shot Tri-x, developed in Rodinal, Tmax 100 and 400 in HC-110. Tmax 100 is too grainless for my taste. I like some grain. Tmax 100 is almost like shooting digital. That's not the look I'm after. I'm not sure how much grain I like....I'm trying to figure that out now. I'm shooting with a Nikon FM2n, together with a medium 1 stop yellow filter. Yellow because I thought that would make my street portraits look a little nicer, more flattering skin tones for those subjects who care about skin tones (a year ago I would have written "for the ladies.") So, with the 1/4000 top shutter speed, together with the yellow filter, I can shoot at wider apertures in most all situations.

So I guess the biggest question is what are the real practical differences between Tri-x and Tmax 400, especially as it pertains to the characteristic curve, and also, what's the best method for exposure? I'm using the center-weighted meter of the Nikon, so there will be no precise spot meter measurements.
a shoulder is a sign of decreased highlight contrast and separation and sensitivity to overexposure but, both these films are great and I wouldn't hesitate to make either my standard film. shooting it and getting a feel for it is worth more than sensitivity curves.
 

138S

Member
Joined
Dec 4, 2019
Messages
1,776
Location
Pyrenees
Format
Large Format
I have not used TMAX much, but I ran a roll through last year. I liked the results, but noticed I really pushed the highlights using the same f16 rule I normally use. In this scene of cliifs, look at the upper right cliff face (above the oak tree). I almost lost the highlights there. I feel I would not have had that issue with FP4+ (but cannot say for sure).

With TMAX your highlights usually ar not ar risk, because it has an insane highlight latitude, but you it's not shouldered highlights may reach higher densities that may require an additional effort in the post processing.

TMax has an additional low sensitivity cubic layer under the main emulsion that keeps linearity in the highlights, while extending a lot highlight latitude, your highlight information is always there, usually, another thing is having to do something additional to recover that highlight texture.
 

Lachlan Young

Member
Joined
Dec 2, 2005
Messages
4,943
Location
Glasgow
Format
Multi Format
So I exposed a roll of Tmax 400 and developed in Rodinal. This film is amazing, but I'm not sure it's what I'm looking for. The images are ultrasharp, with a very fine grain, only really visible if you view the 24MP RAW files at 100%. Even then, it's still quite fine. At a more reasonable 70%, the grain is almost invisible, and the details I could cut with a knife. This is all too digital looking for me....too perfect. I might try Ilford HP5 in HC-110. Its curve looks straight, somewhat like Tmax's, I am sure i can get more grain.

I've attached some very quickly superimposed curves from the published data for: TMax 400 in D-76 (dashed line); HP5+ in ID-11/ D-76 (the one that shoulders slightly); HP5+ in Ilfotech HC (the curve that's neither of the above - HC is functionally equivalent to HC-110 if not absolutely identical). I have used the Kodak curve for what seems to be a 0.6 Contrast Index (close enough to Ilford's G-Bar/ Average Gradient of 0.62) and scaled everything to match. The curves were shifted around so that their shapes could be compared - thus don't take them as indicative of relative shadow speed.

My own preference with HP5+ is ID-11 1+1 at about 9-10 mins/ 20oC & rating at about an EI of 200. I find it straightens out the shoulder and softens the mids a bit.
 

Attachments

  • HP5_TMY_II.jpg
    HP5_TMY_II.jpg
    148.2 KB · Views: 101

Lachlan Young

Member
Joined
Dec 2, 2005
Messages
4,943
Location
Glasgow
Format
Multi Format
a shoulder is a sign of decreased highlight contrast and separation and sensitivity to overexposure but, both these films are great and I wouldn't hesitate to make either my standard film. shooting it and getting a feel for it is worth more than sensitivity curves.

Of course the corollary of this is that a shoulder in a film curve makes it easier for the less competent printmaker to produce a print by forcibly limiting the highlight density of the negative - at the expense of highlight separation.
 

138S

Member
Joined
Dec 4, 2019
Messages
1,776
Location
Pyrenees
Format
Large Format
Of course the corollary of this is that a shoulder in a film curve makes it easier for the less competent printmaker to produce a print by forcibly limiting the highlight density of the negative - at the expense of highlight separation.


yeah, those using a film with shoulder are less competent than you, isn't it? LOL

look, when dynamic range of the scene you want to print exceeds the paper (small) dynamic range you have to compress highlights anyway, in the negative or in the printing, so you end in the same highlight separation

when this compression in made, at least in part, in the negative then a less agressive mannipulation is required in the print, with less chances of damaging other things, and perhaps avoiding the need to use a time consuming job like HLM.

A great photographer is a master of his tools, and some are able to nail a negative that prints easily to deliver their visualization, taking advantage of film toe and shoulder to minimize the print manipulation.

Of course there is nothing wrong in making a flexible linear capture and later manipulating what necessary in the post, but one way is not better than the other, and overall you are not morally superior or more nice if using a way, the other, or anything in the middle.
 

Lachlan Young

Member
Joined
Dec 2, 2005
Messages
4,943
Location
Glasgow
Format
Multi Format
@138S If you actually bothered to read Post Exposure and Beyond The Zone System in its most recent edition, rather than jumping up and down insisting you alone are correct (in direct contradiction of basic and directly observable sensitometric behaviour), you might instead find out why you are wrong.

My comments are based on innumerable negs I've worked with from both Tri-X and TMax400 and direct knowledge of how they print. That they pretty exactly mirror what the sensitometry says they should do (and what I wrote about them) suggests that you have nowhere near even the most basic perceptual knowledge or experience to be able to visually identify the obvious visual differences in a print. Most printers with even quite minimal experience (weeks/ months) would be able to identify the differences, even if they could not necessarily use the language of sensitometry to describe them.
 
Last edited:
  • 138S
  • 138S
  • Deleted

138S

Member
Joined
Dec 4, 2019
Messages
1,776
Location
Pyrenees
Format
Large Format
If you actually bothered to read Post Exposure and Beyond The Zone System in its most recent edition, rather than jumping up and down insisting you alone are correct (in direct contradiction of basic and directly observable sensitometric behaviour), you might instead find out why you are wrong.

It's you insisting you alone are correct, what I say is that both ways are totally correct:

> taking a linear capture and compressing what necessary to fit the excessive range in the negative into the 2.1D range of the paper

> refining the exposure-processing to get a negative that will print easily like we want, and making those compressions with the help of toe/shoulder,

Many artists have exploited and exploit the second way with perfect results, as perfect than those from first way. In fact the entire Zone System it's based in explaining what zones are compressed or not in the toe or shoulder, depending on exposure/processing. No need to follow the ZS, and linear films are less suitable for the ZS recipe, but they way we use is a personal choice.
 
Last edited:
OP
OP

Acticus

Member
Joined
Jul 14, 2019
Messages
51
Location
East Coast
Format
Medium Format
A question OT, but since I'm here...Anyone doing alternative processing printing, like palladium or kallitype? What are the other archival processes? Second question, in doing, say a palladium print, how doable is to to start with a good 35mm negative? No, I'm not talking about contact printing a 35mm neg lol. I'm talking about digitizing and then printing a large negative on an inkjet, and then contact printing that. My digitizing process of the 35mm neg is excellent, capture all the detail in the 35mm neg, especially considering my subjects...portraits. I
 

138S

Member
Joined
Dec 4, 2019
Messages
1,776
Location
Pyrenees
Format
Large Format
What are the other archival processes?

There are many... Archival endurance is rated in categories like LE-10, LE-100 or LE-500 , LE means Life Expectancy, and the number is the specter number of years.

Most common archival print is Fiber Based silver photopaper fixed (also perhaps toned) and washed under necessary procedures. Another popular medium is carbon printing. There are many, but most popular are silver, carbon and pt/pd.

Second question, in doing, say a palladium print, how doable is to to start with a good 35mm negative?

Toyally doable: make an enlarged negative. It can be done from film in the darkroom or (more convenient) printed with an image setter. From the big negative you make a contact print.


You may start ordering a carbon job to have in your hands a well crafted carbon print to learn if that way suits your taste and to have a reference.

https://thewetprint.com/en/home-2/

 
OP
OP

Acticus

Member
Joined
Jul 14, 2019
Messages
51
Location
East Coast
Format
Medium Format
There are many... Archival endurance is rated in categories like LE-10, LE-100 or LE-500 , LE means Life Expectancy, and the number is the specter number of years.

Most common archival print is Fiber Based silver photopaper fixed (also perhaps toned) and washed under necessary procedures. Another popular medium is carbon printing. There are many, but most popular are silver, carbon and pt/pd.


Toyally doable: make an enlarged negative. It can be done from film in the darkroom or (more convenient) printed with an image setter. From the big negative you make a contact print.


You may start ordering a carbon job to have in your hands a well crafted carbon print to learn if that way suits your taste and to have a reference.

https://thewetprint.com/en/home-2/


Regarding the silver print, I saw a discussion recently about optical brighteners in the paper fading over time with exposure to UV light, or even on their own, since they are dyes. The print's highlights get yellowy. One poster talked about seeing an Ansel Adams print that was faded because of these optical brightners. The curator noticed it too, and immediately removed the print from display. The poster made the point that the print's highlights had changed to the point that he would have considered it a substandard print, not suitable for purchase. It was also commented that there are few, if any wet printing papers without these optical brighteners available.
 
Last edited:

Lachlan Young

Member
Joined
Dec 2, 2005
Messages
4,943
Location
Glasgow
Format
Multi Format
Regarding the silver print, I saw a discussion recently about optical brighteners in the paper fading over time with exposure to UV light, or even on their own, since they are dyes. The print's highlights get yellowy. One poster talked about seeing an Ansel Adams print that was faded because of these optical brightners. The curator noticed it too, and immediately removed the print from display. The poster made the point that the print's highlights had changed to the point that he would have considered it a substandard print, not suitable for purchase. It was also commented that there are few, if any wet printing papers without these optical brighteners available.

Optical brighteners have been in papers since the early 1950's - and are locked into the emulsion to one extent or another in many photographic papers. Some can be washed out with extended wet times. Worrying too much about 'archivalness' is a misnomer - meet the important standards for whatever process you use, but there is a pretty clear inverse relationship today between work heavily (often almost to the exclusion of all else) marketed as 'archival' and its artistic quality/ worth.
 
OP
OP

Acticus

Member
Joined
Jul 14, 2019
Messages
51
Location
East Coast
Format
Medium Format
Optical brighteners have been in papers since the early 1950's - and are locked into the emulsion to one extent or another in many photographic papers. Some can be washed out with extended wet times. Worrying too much about 'archivalness' is a misnomer - meet the important standards for whatever process you use, but there is a pretty clear inverse relationship today between work heavily (often almost to the exclusion of all else) marketed as 'archival' and its artistic quality/ worth.

So it's true, wet BW prints aren't all that archival due to optical brightners? The Amsel Adams print I referenced was done in the 60's if I recall. That's less than 60 years of relative stability.
 

Lachlan Young

Member
Joined
Dec 2, 2005
Messages
4,943
Location
Glasgow
Format
Multi Format
So it's true, wet BW prints aren't all that archival due to optical brightners? The Amsel Adams print I referenced was done in the 60's if I recall. That's less than 60 years of relative stability.

No, they generally are 'archival', unless you bake them to hell under over strong lighting - and even then, the worst you are going to likely do is bleach out the brightener in some older BW papers (50's-70's). Pre-1990's chromogenic papers' dyes are also pretty light sensitive. Obviously, this is for prints that have generally been produced to generally adequate archival standards of fix/ wash/ possible toning.

Any photographic process print can be damaged by poor storage or display conditions - or for that matter, anything using dyes/ pigments in general, apart from pure carbon on pure cotton/ linen substrate.

A lot of the obsession over 'archivalness' was to try to make photography valuable as an art form, compared to the ephemeral nature of much photography in history.
 
Last edited:
OP
OP

Acticus

Member
Joined
Jul 14, 2019
Messages
51
Location
East Coast
Format
Medium Format
No, they generally are 'archival', unless you bake them to hell under over strong lighting - and even then, the worst you are going to likely do is bleach out the brightener in some older BW papers (50's-70's). Same with any photographic process print - or anything using dyes/ pigments in general, apart from pure carbon on pure cotton/ linen substrate.

A lot of the obsession over 'archivalness' was to try to make photography valuable as an art form, compared to the ephemeral nature of much photography in history.

From what I'm reading, all it takes is a few decades displayed. No mention in the link below of any torture test being applied. When you write "the he worst you are going to likely do is bleach out the brightener", that's significant. From what I'm reading, those brighteners add a lot to the viewing quality of the print. As I mentioned, one poster commented that an Amsel Adams print was changed in such a way that it wouldn't be sale-able. I find that disconcerting.

https://www.aardenburg-imaging.com/optical-brighteners-obas/
 

138S

Member
Joined
Dec 4, 2019
Messages
1,776
Location
Pyrenees
Format
Large Format
Regarding the silver print, I saw a discussion recently about optical brighteners in the paper fading over time with exposure to UV light, or even on their own, since they are dyes. The print's highlights get yellowy. One poster talked about seeing an Ansel Adams print that was faded because of these optical brightners. The curator noticed it too, and immediately removed the print from display. The poster made the point that the print's highlights had changed to the point that he would have considered it a substandard print, not suitable for purchase. It was also commented that there are few, if any wet printing papers without these optical brighteners available.

Today no silver FB photopaper from ilford or foma has Optical Brightening Agents, some papers for inkjet may have, a list with inkjet paper free from OBAs and with it (https://www.photoreview.com.au/tips/outputting/optical-brighteners-in-inkjet-paper/):

A fine art silver print may suffer yellowing from several factors:

> A flawed fixing or washing procedure.

> Humidity: stored in condensation conditions, condensation is not pH neutral buy it is acidic from CO2 taken from the air.

> Mounting: acidic glue, acidic mounting board

> Other I don't know
 
OP
OP

Acticus

Member
Joined
Jul 14, 2019
Messages
51
Location
East Coast
Format
Medium Format
Today no silver FB photopaper from ilford or foma has Optical Brightening Agents, some papers for inkjet may have, a list with inkjet paper free from OBAs and with it (https://www.photoreview.com.au/tips/outputting/optical-brighteners-in-inkjet-paper/):

A fine art silver print may suffer yellowing from several factors:

> A flawed fixing or washing procedure.

> Humidity: stored in condensation conditions, condensation is not pH neutral buy it is acidic from CO2 taken from the air.

> Mounting: acidic glue, acidic mounting board

> Other I don't know
No silver paper from Ilford or Foma has OBA's? Do you have a source for that? I really have my doubts about that, as the poster I read seemed to know what he was talking about, and said few, if any wet printing silver papers have no OBA's.
 
Photrio.com contains affiliate links to products. We may receive a commission for purchases made through these links.
To read our full affiliate disclosure statement please click Here.

PHOTRIO PARTNERS EQUALLY FUNDING OUR COMMUNITY:


Ilford ADOX Freestyle Photographic Stearman Press Weldon Color Lab Blue Moon Camera & Machine
Top Bottom