

Some here may recall my previous thread on this subject, wherein I accidentally turned on the hot water tap instead of the cold, and washed my film for 40 minutes in 120-130 degree water. I'm sure some people were bemused, while others were not.
(there was a url link here which no longer exists)
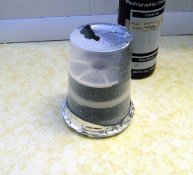
Well, I'm at it again. Having sold all of my developing stuff in order to return to painting for a stretch, there were 2 rolls of film that were yet to be developed. My Mic-X that had been previously mixed up was getting more and more active, so I decided that today was a good day to develop those last 2 rolls. But first I needed a homemade developing tank. Fortunately we had a container from the last Chinese Takee Outee meal, and I still had two extra film reels. I cut down a vitamin bottle to take up the slack in the bottom of tank. Now I could open the tank, pour in the developer, agitate it, take the lid off, pour it out and put in the stop bath, etc.


But that wasn't going to work. Once I filled up the tank, there would be no room at the top for the developing fluid to go when I inverted it. So I got rid of the vitamin bottle spacer, but I then realized that the tank was constructed upside down. I needed to flip it over in order to have the air space at the top instead of the bottom, so I used some tape and taped the lid on. That would now be the bottom of the tank.

Now how do I get the chemicals in the tank (I photographed all this after the film was developed, as everything had to be done in complete darkness). I know, I'll flip the tank and cut a small hole in it, pour in the developer in the dark, stick my finger in the hole to gauge the fluid level, and tape it back up. Then take the tape off after the development cycle, pour it out, pour in the stop bath, put the tape back, etc. By now you're probably thinking just redo the tank, but I wanted to get it done ASAP. It was getting hot in the completely closed up and unvented bathroom.
Oh oh, the thin Takee Outee tank cracked when I started to make my finger hole

That's OK, I have plenty of 200 mph tape here. Time to do it!
Got my chemicals iced down to 68 degrees, turned out the lights, loaded the reels, set the egg timer, and poured in the Mic-X developer. Stuck my finger in the hole and the level was juuust right. But now I realized that I hadn't taken the backing paper off my special water proof tape that was going to cover my "inspection hole" (crack), and had to try and remove that in the dark. Meanwhile, the developer was developing, and the #!!+%@ backing paper wouldn't come off the tape. OK, to hell w/ that, I'll put on the rubber gloves and hold my fingers over the hole when I invert it. Have you ever tried to find your rubber gloves and put them on in a hurry in the dark?
I finally got them on, but who knows how long the developer had been sitting there w/ no agitations? I made my first agitation, and some of the developer sloshed out. My gloved fingers weren't exactly a good fit over that ragged crack on top. Fine, I'll just shake it up and down. Did that a few times and set it down, and it was at that point where I realized that even w/ the gloves on I could feel (and hear) the developer leaking out the bottom. My tape job was not sealing! So what about the developer level?
I pulled a glove off and stuck a finger in there. Whoa, couldn't feel any fluid. I wonder how much leaked out? That was all of the developer, so I carried the leaking tank from the tub where I was working to the sink, ran some tap water in it, then sloshed it up and down a few times. Back to the tub.
After a few more frantic shaking-up-and-down episodes, and knowing that the developer was leaking out the bottom, I heard the egg timer go off. Unfortunately, I had calculated things at 8 minutes with full strength developer, and it had been diluted by my tap water addition some minutes ago. OK, better give it another couple of extra minutes. But I'd better keep shaking it up and down to keep what little developer is left in there on the film.
After what I guessed was two more minutes, I poured the developer out, and gave the film a quick rinse w/ tap water for a stop bath in order to speed things up. Sure was hot in that bathroom. Got the fixer in, and knew that I needed 5 minutes for that, but you have not lived until you've stooped over a bath tub w/ a leaking tank of Kodak Rapid Fixer for 5 minutes. Boy, that smell is awful. 5 minutes of shaking the tank up and down, and I can finally turn on the lights (and more importantly, open the door to get some air in there) and wash the film.

Since the tank leaked, I simply topped it up, then let it leak out, and repeated for 15 minutes or so. Next, 30 seconds in the old Photo Flo, and its time to hang it up to dry.

Here's the first negative scans (Epson 2450 flatbed) w/ only about +3 additional contrast. There are a couple (like the second) one that look a little odd in the background, and a few that seem to have not gotten enough developer on the top edge, but I can crop that out during printing.
All in all, it somehow worked. Better to be lucky than good I suppose. The first pic is from a Canon FT QL w/ a 135 2.5 lens. I didn't meter that roll right, so all the others are from the Nikkormat FTn w/ an H 50 2 lens. I used Arista EDU Ultra 100 that was metered at ISO 125 w/ a yellow filter.


(there was a url link here which no longer exists)
Well, I'm at it again. Having sold all of my developing stuff in order to return to painting for a stretch, there were 2 rolls of film that were yet to be developed. My Mic-X that had been previously mixed up was getting more and more active, so I decided that today was a good day to develop those last 2 rolls. But first I needed a homemade developing tank. Fortunately we had a container from the last Chinese Takee Outee meal, and I still had two extra film reels. I cut down a vitamin bottle to take up the slack in the bottom of tank. Now I could open the tank, pour in the developer, agitate it, take the lid off, pour it out and put in the stop bath, etc.
But that wasn't going to work. Once I filled up the tank, there would be no room at the top for the developing fluid to go when I inverted it. So I got rid of the vitamin bottle spacer, but I then realized that the tank was constructed upside down. I needed to flip it over in order to have the air space at the top instead of the bottom, so I used some tape and taped the lid on. That would now be the bottom of the tank.
Now how do I get the chemicals in the tank (I photographed all this after the film was developed, as everything had to be done in complete darkness). I know, I'll flip the tank and cut a small hole in it, pour in the developer in the dark, stick my finger in the hole to gauge the fluid level, and tape it back up. Then take the tape off after the development cycle, pour it out, pour in the stop bath, put the tape back, etc. By now you're probably thinking just redo the tank, but I wanted to get it done ASAP. It was getting hot in the completely closed up and unvented bathroom.
Oh oh, the thin Takee Outee tank cracked when I started to make my finger hole
That's OK, I have plenty of 200 mph tape here. Time to do it!
Got my chemicals iced down to 68 degrees, turned out the lights, loaded the reels, set the egg timer, and poured in the Mic-X developer. Stuck my finger in the hole and the level was juuust right. But now I realized that I hadn't taken the backing paper off my special water proof tape that was going to cover my "inspection hole" (crack), and had to try and remove that in the dark. Meanwhile, the developer was developing, and the #!!+%@ backing paper wouldn't come off the tape. OK, to hell w/ that, I'll put on the rubber gloves and hold my fingers over the hole when I invert it. Have you ever tried to find your rubber gloves and put them on in a hurry in the dark?
I finally got them on, but who knows how long the developer had been sitting there w/ no agitations? I made my first agitation, and some of the developer sloshed out. My gloved fingers weren't exactly a good fit over that ragged crack on top. Fine, I'll just shake it up and down. Did that a few times and set it down, and it was at that point where I realized that even w/ the gloves on I could feel (and hear) the developer leaking out the bottom. My tape job was not sealing! So what about the developer level?
I pulled a glove off and stuck a finger in there. Whoa, couldn't feel any fluid. I wonder how much leaked out? That was all of the developer, so I carried the leaking tank from the tub where I was working to the sink, ran some tap water in it, then sloshed it up and down a few times. Back to the tub.
After a few more frantic shaking-up-and-down episodes, and knowing that the developer was leaking out the bottom, I heard the egg timer go off. Unfortunately, I had calculated things at 8 minutes with full strength developer, and it had been diluted by my tap water addition some minutes ago. OK, better give it another couple of extra minutes. But I'd better keep shaking it up and down to keep what little developer is left in there on the film.
After what I guessed was two more minutes, I poured the developer out, and gave the film a quick rinse w/ tap water for a stop bath in order to speed things up. Sure was hot in that bathroom. Got the fixer in, and knew that I needed 5 minutes for that, but you have not lived until you've stooped over a bath tub w/ a leaking tank of Kodak Rapid Fixer for 5 minutes. Boy, that smell is awful. 5 minutes of shaking the tank up and down, and I can finally turn on the lights (and more importantly, open the door to get some air in there) and wash the film.
Since the tank leaked, I simply topped it up, then let it leak out, and repeated for 15 minutes or so. Next, 30 seconds in the old Photo Flo, and its time to hang it up to dry.
Here's the first negative scans (Epson 2450 flatbed) w/ only about +3 additional contrast. There are a couple (like the second) one that look a little odd in the background, and a few that seem to have not gotten enough developer on the top edge, but I can crop that out during printing.
All in all, it somehow worked. Better to be lucky than good I suppose. The first pic is from a Canon FT QL w/ a 135 2.5 lens. I didn't meter that roll right, so all the others are from the Nikkormat FTn w/ an H 50 2 lens. I used Arista EDU Ultra 100 that was metered at ISO 125 w/ a yellow filter.
Attachments
Last edited by a moderator:

