Densitometer advice

Do-Over Decor

A
Do-Over Decor

  • 1
  • 0
  • 18
Oak

A
Oak

  • 1
  • 0
  • 21
High st

A
High st

  • 6
  • 0
  • 61
Flap

D
Flap

  • 0
  • 0
  • 26

Recent Classifieds

Forum statistics

Threads
199,216
Messages
2,788,017
Members
99,836
Latest member
HakuZLQ
Recent bookmarks
0

Bill Burk

Subscriber
Joined
Feb 9, 2010
Messages
9,327
Format
4x5 Format
Bet you're thinking "what have I gotten myself into?" It is a cool book, I bet Drew Wiley knows it cover to cover since it talks about all kinds of cool stuff like setting target minimum densities and gammas for making separation negatives for dye transfer from Dufaycolor and Kodachrome originals in a contact printer.

The scale divisions are 0.02 so you can read to 0.01 precision by taking the in-between readings as the odd number.

The deviation is statistics and carried to more decimal places to see how bad the errors are.
 
OP
OP
ParkerSmithPhoto
Joined
Jan 16, 2010
Messages
1,685
Location
Atlanta, GA
Format
Medium Format
Bet you're thinking "what have I gotten myself into?" It is a cool book, I bet Drew Wiley knows it cover to cover since it talks about all kinds of cool stuff like setting target minimum densities and gammas for making separation negatives for dye transfer from Dufaycolor and Kodachrome originals in a contact printer.

In that case, don't send it to me. Still trying to get my head around BTZS. :blink:

The scale divisions are 0.02 so you can read to 0.01 precision by taking the in-between readings as the odd number.

Whoops, I thought the scale was in 0.1. That would be a pretty huge number from a densitometry point of view, I suppose.
 

DREW WILEY

Member
Joined
Jul 14, 2011
Messages
14,086
Format
8x10 Format
Don't forget Kodak visual densitometers. But you can make something like this! Just get some black card stock and a regular single-hole paper punch, and punch a couple holes a few inches apart. Then you put your negative and a calibrated step tablet on the same light box, comparing
which single step on the step tablet most closely matches the brightness of your selected part of the negative. Plenty good for things like Zone Dysfunction work. Most electronic transmission densitometers are accurate only within .2 density units anyway. But I am keeping my X-Rite, just
in case I can't find my paper punch!
 
OP
OP
ParkerSmithPhoto
Joined
Jan 16, 2010
Messages
1,685
Location
Atlanta, GA
Format
Medium Format
I think ParkerSmithPhoto just got a densitometer I recommended...

Now to see if it is all I say it is...

Well, let's get started! I have a new 40 watt bulb in this thing. Cleaned it with Windex and managed to partially erase the scale markings! But I can see enough that I can write them back in with India Ink.

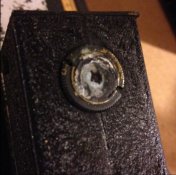
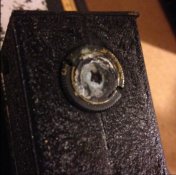
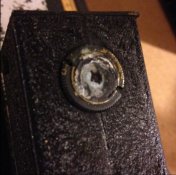
So, how does this thing work? Negatives all ready to go. One note is that the bottom aperture on the little arm seems awfully crusty. I didn't want to start scraping until I knew how it's supposed to look.
 

Attachments

  • IMG_2189.JPG
    IMG_2189.JPG
    274.6 KB · Views: 120
Last edited:

Bill Burk

Subscriber
Joined
Feb 9, 2010
Messages
9,327
Format
4x5 Format
Yow 40 watt will probably get too hot and burn your eye, you couldn't find a lower wattage?

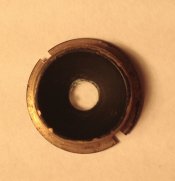
So the bottom aperture, what I was calling the field mirror, is a circular piece of glass mirror painted black on the silver downward facing side (glass side is up). There is a tiny hole in the silvering.

It's removable, there are a couple notches for a spanner.

Once you get it out, you could clean the glass side but I wouldn't mess with the silver side because it is such a tiny hole. I experimented with an ordinary piece of mirror glass where I tried to scrape a similar hole and all I got was something that looked scratchy. So you can see by my picture that the mirror may be covered with speckles, but you can still easily judge when the center patch matches the sample.

In the head that lifts up you may find a piece of glass that looks tilted and doesn't seem to do anything.

That's actually the zero adjust. It seems that when you hold a piece of glass at an angle, a ray of light following an otherwise straight path has to travel through more glass to get to the other side. By changing the angle of that piece of glass, you "add" density and reduce the intensity of the comparison field.
 

Bill Burk

Subscriber
Joined
Feb 9, 2010
Messages
9,327
Format
4x5 Format
Oh that's ugly.

Sorry I was hoping for better.

So the "entire view" gets light from the bulb without going through the sample. Light takes the long way around the back, up and then to the front without going through any film. The sample sits on the opal target and a very tiny hole in the middle of the bottom aperture (the ugly thing you show)... lets light through the sample. When the densitometer is dialed to 3.0 the center spot should be very bright and the background dim. (so a 3.0 sample would be dark and both the foreground and background would be equally dark) When it's dialed to 0.0 then the background and spot should be medium intensity because the light has to go about 12 inches either way. Dialed in between such as 1.0 center spot should be brighter than background without a sample. And of course with a 1.0 sample the spot would match the background.
 

Bill Burk

Subscriber
Joined
Feb 9, 2010
Messages
9,327
Format
4x5 Format
This is what that mirror should look like (top view)

Screenshot 2016-04-30 at 8.11.55 PM.png


Screenshot 2016-04-30 at 8.11.26 PM.png

Bottom view
 

Luis-F-S

Member
Joined
Sep 19, 2013
Messages
774
Location
Madisonville
Format
8x10 Format
What the heck did you buy? From the photos you've posted should be really accurate and reproducible!
 

Bill Burk

Subscriber
Joined
Feb 9, 2010
Messages
9,327
Format
4x5 Format
It's a Marshall Studios densitometer.

I have one which is in good shape with field mirror in speckled but usable condition.

ParkerSmithPhoto got a different one in fair shape with that field mirror in crusty unknown condition. I'm hoping it's just a flake of paint over the hole that can be picked off with Scotch tape on a toothpick.

And don't scrape - just the center dot needs to be open from below. Once you reveal that opening (if it's not incorrigible) - I'd just cover up the rest with a black paint like model paint.
 
OP
OP
ParkerSmithPhoto
Joined
Jan 16, 2010
Messages
1,685
Location
Atlanta, GA
Format
Medium Format
ParkerSmithPhoto got a different one in fair shape with that field mirror in crusty unknown condition. I'm hoping it's just a flake of paint over the hole that can be picked off with Scotch tape on a toothpick.

My friend Seth helped me out with the spanners and it appears the entire mirror surface has corroded away. The black is pretty much gone on the other side, too. I have some small plastic mirrors around the house somewhere and I thought I might try drilling a tiny hole in one of them and seeing if that works. I know the glass adds a little density but it can't be too much.

FullSizeRender.jpg
 

Bill Burk

Subscriber
Joined
Feb 9, 2010
Messages
9,327
Format
4x5 Format
I couldn't find my plastic signal mirror, have no idea where it got away to.

I took an ordinary piece of glass mirror and with an X-Acto blade I scraped a bit with the blade nearly flat to the glass. Then with about 30 seconds of making repetitive short circular strokes I was able to make a reasonable field mirror with a clear hole in the middle. It's really not critical for it to be 1/50" same as the original. It's just nice to have a small circle. It's not even critical to have a perfect shape.
 

alanrockwood

Member
Joined
Oct 11, 2006
Messages
2,185
Format
Multi Format
I have a X-Rite 810 and it is a great little unit. It does visual, and RGB for both transmission and reflection readings, and HD-LD calculations for you (for use with control strips).

Yes, X-Rite 810. Just make sure it comes with calibration targets. Otherwise the calibration targets are expensive and hard to find.
 
Photrio.com contains affiliate links to products. We may receive a commission for purchases made through these links.
To read our full affiliate disclosure statement please click Here.

PHOTRIO PARTNERS EQUALLY FUNDING OUR COMMUNITY:


Ilford ADOX Freestyle Photographic Stearman Press Weldon Color Lab Blue Moon Camera & Machine
Top Bottom