Hi all,
long time "lurker" here, I guess it's finally time to post something... It's gonna be a long post. What prompted me was the other thread about Svinotypes, but, though related in principle, I think my stuff fits better here.
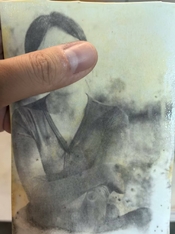
Over the last couple weeks I wound up finding a way to UV-enlarge regular film negatives using cuprous chloride (CuCl). It's still WIP, there are many degrees of freedom and I'm not a chemist either, so please take everything I write with a grain of salt. Also I've only ever made a handful of 10x15cm prints so far... Here is the first one, before I figured out contrast control (silver toned):

And here is how another print looks just after exposure (the air bubbles don't hurt much unless they get really big):

-----------------
The key aspects:
CuCl, when wet, is directly sensitive to UV (the threshold should be around 390nm as per the band gap voltage). Let's call this "primary" exposure. Broadly speaking, this results in a disproportionation reaction: 2 Cu(1+) -> Cu(0) + Cu(2+).
After CuCl has been exposed to some UV, the spectral sensitivity broadens towards longer wavelengths. Let's call this "secondary" exposure. (For details check out B.Carlsson : "The photochemical disproportionation reaction in the system CuCl(s)-H2O(l)")
Now, if we expose using a mix of light that does some primary exposure and a lot of secondary exposure, the light sensitivity in strongly exposed areas will be higher than in the weakly exposed ones. In an idealized case this leads to a quadratic response curve, rather than linear. This principle is how we get sufficient contrast out of a silver gelatin negative. In fact, the contrast will be too high usually, so it has to be brought down by post-exposure flashing with orange light (which will further expose the image linearly in proportion to the underlying primary exposure).
A 395nm LED works well for exposing, but blue (460nm) and white ("6000K") LEDs also kind of work, at half the speed at the same power.
The (under-the-negative-) speed is 30-60x faster than cyanotype (with a 395nm LED). With my UV enlarger with a 100W LED, this means I can expose e.g. for 4 minutes at f8 rather than 30 minutes at f2.8.
If you have very high contrast / digital negatives, you can probably add another zero to the factor, but then you need to increase the amount of orange light flashing, and sensitivity to ambient light increases.
Generally, the image should be faintly visible after exposure is complete. You cannot "print out" an image it seems, in my attempts it always faded in the fixer whilst a developed image is largely stable.
The developer is ascorbate at around PH 4 (as you increase PH, the developer gets faster but CuCl will decompose into CuOH). I think it mostly does "physical development", since I could not get CuBr, which is more light sensitive but far less soluble than CuCl, to develop.
You soak the paper in the developer already before exposure and keep it sandwiched between e.g. a glass plate and a laser printer transparency sheet to protect it from air until development is complete.
Developing takes about 20-60 minutes depending on exposure amount and room temperature.
Fixing can be done with regular rapid fixer, though I added some extra bisulfite to mine since the concentrate was past it's official shelf life. I have yet to check if increasing the PH will increase copper stability.
The copper image itself is very unstable (will already fade a bit during washing/fixing) and needs toning. What works reliably is silver toning with old fixer, this gives a neutral black image.
Sulfur toning looks promising, I haven't made any really presentable prints with it yet but my tests show no fading so far, at least. The resultant image is from yellow to dark brown, can be almost black.
So far the only paper I have used is "Herlitz Aquarellblock", student tier 150gsm watercolor paper.
Some tangential patents:
AU609868B2 / US4904576A | Photosensitive cuprous halide materials and methods for their preparation
US5236813A | Dry processable copper halide photosensitive system
-------------
The recipes:
As stated above, these probably aren't optimal yet.
Sensitizer:
10g CuSO4.5H2O
2.5 NaCl
10g Fructose (or 14g Agave syrup)
Water to 100ml
Developer - "Buffer" solution:
20g NH4HCO3
80ml 10% Acetic acid (vinegar)
Water to 1l (1000ml)
Developer (for 1 10x15 print):
10ml buffer solution
0.8g Ascorbic Acid
Fixer:
Commercial paper strength rapid fixer. I've been using it one-shot so far.
Silver (Black) toner:
Old fixer with silver in it. Pretty trivial to use as it will not produce stain with improperly fixed prints. If toning is incomplete, the shadows will turn yellow after 1-2 weeks.
Sulfur toner:
Wear gloves and eye protection when mixing and handling this!
Work in a well ventilated area! This will emit some hydrogen sulfide, especially if the PH of the working solution gets too low.
Do not store this in a PET bottle, it will start to leak eventually.
Actually I ballparked the amounts for mine. What should work:
80ml Water
20g NaOH
10g Flower of Sulfur
Water to 100ml
The sulfur takes about two weeks to dissolve into the caustic lye at room temperature.
Mix 1+50 with (warm to hot) water and pour onto a thoroughly fixed and washed print, tone for about 5 minutes. Have not figured out an optimal washing routine yet, the thing is that in principle the toner will spit out sulfur if diluted too much, so an alkaline wash may be necessary first.
---------------
The process:
Coat the paper with the sensitizer, I use 3ml for a 625cm2 (DIN-A4) sheet. It is not light sensitive yet.
Let it dry completely. The color should be pale green.
Optional but recommended: Heat the dried paper, sandwiched between copier paper, for one minute with a clothes iron at temperature setting 1.5 of 3. This will shift the color to a very pale beige if done right. Getting the movement right to avoid overheating takes some practice, basically it's moving the iron in circles whilst also rotating it.
This pre-converts most of the CuSO4 to CuCl. The developer would later also convert the sensitizer to CuCl but I think this way gets us a slightly higher DMax, since the wet conversion takes a couple of miliseconds, allowing some sensitizer to travel out of the paper or to deeper parts of the paper before converting. This was a massive issue back when I was using plain AA solution, the buffered version reacts much faster.
Make a puddle of sensitizer on a large glass plate, place the paper face down, move around until covered.
Brush sensitizer on the back side (or make a puddle, bend the transparent cover sheet and use that to cover the back side).
Flip the paper, pour on some more sensitizer, move the puddle around for at least 20 seconds across the entire paper (I use the bent cover sheet), otherwise you may get uneven development.
Place down the cover sheet on the paper, gently squeeze so there is an even layer of sensitizer everywhere.
Expose under negative, as stated above the speed is 30-60x faster than cyanotype with a 395nm LED source.
When contact printing, make sure to avoid any contamination of the negative with the developer, which will readily spill out from the sides.
Flash with yellow to orange light quantum satis, you will have to figure out the right amount by trying (this is quite time consuming in the beginning, since you only see the final result after an hour).
I use a white LED floodlight and a stack of 6 yellow and 2 red gel filters. Unfiltered white light will cause fogging.
Cover the sandwich with e.g. old newspaper to avoid further exposure.
Let it develop for 20-60 minutes, take a peek from time to time
Rinse, briefly fix, silver tone, wash, dry, or
Rinse, fix, wash, sulfur tone, wash, dry.
-----------------
That's all, for now. Have fun!
long time "lurker" here, I guess it's finally time to post something... It's gonna be a long post. What prompted me was the other thread about Svinotypes, but, though related in principle, I think my stuff fits better here.
Over the last couple weeks I wound up finding a way to UV-enlarge regular film negatives using cuprous chloride (CuCl). It's still WIP, there are many degrees of freedom and I'm not a chemist either, so please take everything I write with a grain of salt. Also I've only ever made a handful of 10x15cm prints so far... Here is the first one, before I figured out contrast control (silver toned):
And here is how another print looks just after exposure (the air bubbles don't hurt much unless they get really big):
-----------------
The key aspects:
CuCl, when wet, is directly sensitive to UV (the threshold should be around 390nm as per the band gap voltage). Let's call this "primary" exposure. Broadly speaking, this results in a disproportionation reaction: 2 Cu(1+) -> Cu(0) + Cu(2+).
After CuCl has been exposed to some UV, the spectral sensitivity broadens towards longer wavelengths. Let's call this "secondary" exposure. (For details check out B.Carlsson : "The photochemical disproportionation reaction in the system CuCl(s)-H2O(l)")
Now, if we expose using a mix of light that does some primary exposure and a lot of secondary exposure, the light sensitivity in strongly exposed areas will be higher than in the weakly exposed ones. In an idealized case this leads to a quadratic response curve, rather than linear. This principle is how we get sufficient contrast out of a silver gelatin negative. In fact, the contrast will be too high usually, so it has to be brought down by post-exposure flashing with orange light (which will further expose the image linearly in proportion to the underlying primary exposure).
A 395nm LED works well for exposing, but blue (460nm) and white ("6000K") LEDs also kind of work, at half the speed at the same power.
The (under-the-negative-) speed is 30-60x faster than cyanotype (with a 395nm LED). With my UV enlarger with a 100W LED, this means I can expose e.g. for 4 minutes at f8 rather than 30 minutes at f2.8.
If you have very high contrast / digital negatives, you can probably add another zero to the factor, but then you need to increase the amount of orange light flashing, and sensitivity to ambient light increases.
Generally, the image should be faintly visible after exposure is complete. You cannot "print out" an image it seems, in my attempts it always faded in the fixer whilst a developed image is largely stable.
The developer is ascorbate at around PH 4 (as you increase PH, the developer gets faster but CuCl will decompose into CuOH). I think it mostly does "physical development", since I could not get CuBr, which is more light sensitive but far less soluble than CuCl, to develop.
You soak the paper in the developer already before exposure and keep it sandwiched between e.g. a glass plate and a laser printer transparency sheet to protect it from air until development is complete.
Developing takes about 20-60 minutes depending on exposure amount and room temperature.
Fixing can be done with regular rapid fixer, though I added some extra bisulfite to mine since the concentrate was past it's official shelf life. I have yet to check if increasing the PH will increase copper stability.
The copper image itself is very unstable (will already fade a bit during washing/fixing) and needs toning. What works reliably is silver toning with old fixer, this gives a neutral black image.
Sulfur toning looks promising, I haven't made any really presentable prints with it yet but my tests show no fading so far, at least. The resultant image is from yellow to dark brown, can be almost black.
So far the only paper I have used is "Herlitz Aquarellblock", student tier 150gsm watercolor paper.
Some tangential patents:
AU609868B2 / US4904576A | Photosensitive cuprous halide materials and methods for their preparation
US5236813A | Dry processable copper halide photosensitive system
-------------
The recipes:
As stated above, these probably aren't optimal yet.
Sensitizer:
10g CuSO4.5H2O
2.5 NaCl
10g Fructose (or 14g Agave syrup)
Water to 100ml
Developer - "Buffer" solution:
20g NH4HCO3
80ml 10% Acetic acid (vinegar)
Water to 1l (1000ml)
Developer (for 1 10x15 print):
10ml buffer solution
0.8g Ascorbic Acid
Fixer:
Commercial paper strength rapid fixer. I've been using it one-shot so far.
Silver (Black) toner:
Old fixer with silver in it. Pretty trivial to use as it will not produce stain with improperly fixed prints. If toning is incomplete, the shadows will turn yellow after 1-2 weeks.
Sulfur toner:
Wear gloves and eye protection when mixing and handling this!
Work in a well ventilated area! This will emit some hydrogen sulfide, especially if the PH of the working solution gets too low.
Do not store this in a PET bottle, it will start to leak eventually.
Actually I ballparked the amounts for mine. What should work:
80ml Water
20g NaOH
10g Flower of Sulfur
Water to 100ml
The sulfur takes about two weeks to dissolve into the caustic lye at room temperature.
Mix 1+50 with (warm to hot) water and pour onto a thoroughly fixed and washed print, tone for about 5 minutes. Have not figured out an optimal washing routine yet, the thing is that in principle the toner will spit out sulfur if diluted too much, so an alkaline wash may be necessary first.
---------------
The process:
Coat the paper with the sensitizer, I use 3ml for a 625cm2 (DIN-A4) sheet. It is not light sensitive yet.
Let it dry completely. The color should be pale green.
Optional but recommended: Heat the dried paper, sandwiched between copier paper, for one minute with a clothes iron at temperature setting 1.5 of 3. This will shift the color to a very pale beige if done right. Getting the movement right to avoid overheating takes some practice, basically it's moving the iron in circles whilst also rotating it.
This pre-converts most of the CuSO4 to CuCl. The developer would later also convert the sensitizer to CuCl but I think this way gets us a slightly higher DMax, since the wet conversion takes a couple of miliseconds, allowing some sensitizer to travel out of the paper or to deeper parts of the paper before converting. This was a massive issue back when I was using plain AA solution, the buffered version reacts much faster.
Make a puddle of sensitizer on a large glass plate, place the paper face down, move around until covered.
Brush sensitizer on the back side (or make a puddle, bend the transparent cover sheet and use that to cover the back side).
Flip the paper, pour on some more sensitizer, move the puddle around for at least 20 seconds across the entire paper (I use the bent cover sheet), otherwise you may get uneven development.
Place down the cover sheet on the paper, gently squeeze so there is an even layer of sensitizer everywhere.
Expose under negative, as stated above the speed is 30-60x faster than cyanotype with a 395nm LED source.
When contact printing, make sure to avoid any contamination of the negative with the developer, which will readily spill out from the sides.
Flash with yellow to orange light quantum satis, you will have to figure out the right amount by trying (this is quite time consuming in the beginning, since you only see the final result after an hour).
I use a white LED floodlight and a stack of 6 yellow and 2 red gel filters. Unfiltered white light will cause fogging.
Cover the sandwich with e.g. old newspaper to avoid further exposure.
Let it develop for 20-60 minutes, take a peek from time to time
Rinse, briefly fix, silver tone, wash, dry, or
Rinse, fix, wash, sulfur tone, wash, dry.
-----------------
That's all, for now. Have fun!
Last edited: