Controlling contrast with Pan-F

From the Garden

D
From the Garden

  • 1
  • 0
  • 334
Kildare

A
Kildare

  • 6
  • 1
  • 683
Sonatas XII-26 (Homes)

A
Sonatas XII-26 (Homes)

  • 3
  • 1
  • 778
Johnny Mills Shoal

H
Johnny Mills Shoal

  • 2
  • 1
  • 670
The Two Wisemen.jpg

H
The Two Wisemen.jpg

  • 0
  • 0
  • 621

Recent Classifieds

Forum statistics

Threads
199,298
Messages
2,789,317
Members
99,861
Latest member
Thomas1971
Recent bookmarks
0

Daniel Lawton

Member
Joined
Mar 8, 2005
Messages
474
Location
California
Format
Multi Format
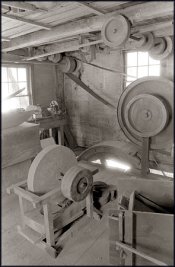
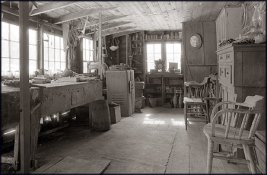
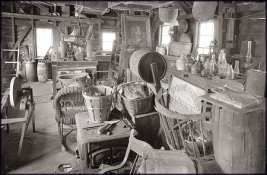
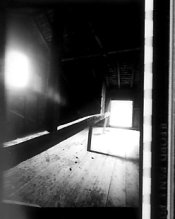
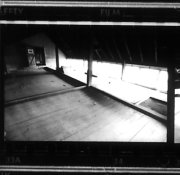
Hi everyone. I've been struggling as of late to get easily printable negatives using Pan-F in extremely contrasty scenes. Specifically I'm using this film for rather poorly lit interiors of barns and old buidings where the main light source is a couple windows. I have recently tried devloping in Diafine with EI's of 32, 50 and 80 and still get blown highlights with little or no detail in the bright, window-lit areas when exposing for the shadows. On sites like Unblinkingeye.com I see that some people recommend altering developing times for Tech-Pan in Diafine (as opposed to the standard 3 min. in each bath.) Since Pan-F is also a fickle film in regards to contrast does anyone have any unwritten rules about using it with Diafine. Or better yet is there some other compensating developer that will better tame this film in contrasty scenes. As of now its a real chore printing these negatives with heavy handed dodging and burning needed to get any decent results. Thanks in advance for any help.
Dan
 
Joined
Jan 24, 2005
Messages
279
Format
Multi Format
I had a similar issue with Ilfosol-S 1+9, I changed my agitation cycle from once every minute to once every 2 minutes and it seems to have helped.
 

Tom Hoskinson

Member
Joined
Mar 7, 2004
Messages
3,867
Location
Southern Cal
Format
Multi Format
I've always had good results with Pan F in Rodinal at 50:1. Recently, I've been developing it in Pyrocat-HD with excellent results.
 

BWGirl

Member
Joined
May 15, 2004
Messages
3,049
Location
Wisconsin, U
Format
Multi Format
Tom Hoskinson said:
I've always had good results with Pan F in Rodinal at 50:1. Recently, I've been developing it in Pyrocat-HD with excellent results.

I also use Rodinal for my Pan-F (1:50...with '1' being the Rodinal and '50' being the water)... :wink:

I use very gentle agitation once per minute... and only about 4 inversions each minute... just enough to get the solution moving a wee bit.
 

Donald Miller

Member
Joined
Dec 21, 2002
Messages
6,230
Format
Large Format
There are times that all of the developer choices, considerations and procedures are simply not going to cut it when you deal with the type of high scene brightness ratios that you indicate. For those situations there are exposure procedures that will allow one to compress the scene brightness and still support the shadow details.
 
OP
OP
Daniel Lawton

Daniel Lawton

Member
Joined
Mar 8, 2005
Messages
474
Location
California
Format
Multi Format
Being that I'm getting blown highlights with Diafine I'm a little hesitant to use Rodinal since I'm under the impression that it might compound the problem. I will admit that I haven't tried it however. The scenes really have excessive contrast from deep dark shadows all the way to bright sunlight in the windows. As was brought to my attention I realize that Pan-F probably isn't the best choice for these scenes but I got 100 ft. of it so I figured I'd try. Donald, what exposure procedures are you refering to? I could use any tips or hints. I've seen shots of dark interiors of buildings where the scene outside the window retains superb detail but I'm starting to think they made 2 exposures (one for the window and one for the interior) and somehow combined them in the printing stage.
 

david b

Member
Joined
Oct 20, 2003
Messages
4,026
Location
None of your
Format
Medium Format
I am not trying to be a wise ass or anything but maybe the old saying:

"expose for the shadows and develop for the highlights"

might work?
 

Donald Miller

Member
Joined
Dec 21, 2002
Messages
6,230
Format
Large Format
Donald said:
This procedure requires the ability to make multiple exposures on your camera.

If you will preexpose the film, in camera, to non image bearing light at at two stops below a Zone V value (Zone III exposure) then follow this with a normal image bearing exposure placing the highlights at three stops above a Zone V exposure (Zone VIII) you will find that your negatives will print without a lot of burning and dodging.

Send me a private message if you need to further information on how to go about this.
 

Donald Miller

Member
Joined
Dec 21, 2002
Messages
6,230
Format
Large Format
david b said:
I am not trying to be a wise ass or anything but maybe the old saying:

"expose for the shadows and develop for the highlights"

might work?

That may work in most applications...it won't work in the type of extreme brightness ratio situation that is addressed here...and yes your reply was a wise assed answer.
 

Flotsam

Member
Joined
Sep 30, 2002
Messages
3,221
Location
S.E. New Yor
Ive been struggling with the same problem. Here is a thread that started a short time ago. (there was a url link here which no longer exists)
Maybe it has something that you can use. I'm still experimenting with general pictorial stuff, trying to nail it down.
 

fschifano

Member
Joined
May 12, 2003
Messages
3,196
Location
Valley Strea
Format
Multi Format
Donald Miller said:
There are times that all of the developer choices, considerations and procedures are simply not going to cut it when you deal with the type of high scene brightness ratios that you indicate. For those situations there are exposure procedures that will allow one to compress the scene brightness and still support the shadow details.

Well said. There are times like that. There are a few things you can do, but even with the best of them you can outstrip the films ability to deliver a decent straight print. I've always had good luck with dilute XTOL myself. Try it at 1+3 even though Kodak doesn't recommend this any longer. Just be sure to use enough stock solution; at least 100 ml per roll. With gentle agitation, you can tame some of the excess contrast - maybe even enough to hold some highlight detail with well developed shadow areas. After that, you'll probably still need to burn some of the highlight areas in when printing. If you haven't done it before now is the time to start practicing the technique.
 

Flotsam

Member
Joined
Sep 30, 2002
Messages
3,221
Location
S.E. New Yor
Here are some shots that I took in a very dark mill, lit only by small windows, some of which were within the frame. They could be printed darker to more accurately portray the scene but these were shot as records so I printed for more detail. Tri X is such a malleable film. I rated it at 25 and under developed like crazy and got excellent detail throughout (except for the windows which were light sources). Grain is pretty darned fine that way but if I wanted finer, I think that I might try Efke 50 or 100. Pan F is hard to handle.
 

Attachments

  • mill17.jpg
    mill17.jpg
    46.9 KB · Views: 213
  • mill23.jpg
    mill23.jpg
    53.4 KB · Views: 201
  • mill24.jpg
    mill24.jpg
    63.9 KB · Views: 229

Donald Miller

Member
Joined
Dec 21, 2002
Messages
6,230
Format
Large Format
It seems that this is as good a point as any to talk about the effects of pre-exposing film to non-image bearing light.

There are basically two ways of compressing an excessive scene brightness ratio. The one that is used most often is altered development...by that I mean altered developer choices, dilutions, agitations, and times... Since development affects negative high density regions more then the low density ranges the effect is one of compressed highlight tonal scale. Taking this in an extreme situation as what this thread began with the effects will be highlight values that are lumped together without adequate separation

The other way of compressing an excessive scene brightness ratio is to alter exposure. By giving the film a pre- exposure to non-image bearing light we maintain our highlight tonal separation and we support shadow values by compressing them upward.

The process by which this is accomplished is to meter the scene through a diffusion panel (I use 1/8 inch opaque acrylic). I first give the film a pre-exposure by placing this diffusion panel over the lens and exposing at a Zone II to Zone IV exposure. This pre-exposure will depend on the amount of compression required. Then I next remove the diffusion panel and give a normal exposure for the second exposure...metering and placing the highlights at a Zone VIII exposure value for this second exposure...If you use this procedure, it is vitally important to place the highlights and don't worry about shadow placement...the pre-exposure has already accomplished this.

The effects of this can be seen when we assign a numerical value to each zone of exposure. Beginning by giving a Zone I a value of one and Zone II a value of two..Zone III would then have a value of eight and Zone IV would have a value of sixteen. We would have a Zone VIII numerical value of 256 since subsequent Zones represent stops of exposure and hence a doubling of numerical value.

The effects of preexposure can be seen by drawing up tables depicting normal and normal plus pre-exposure. Taking and example of a Zone III preexposure we can see that we are adding eight units of exposure to the entire film. This represents a proportionally higher value to the lower density regions then it does to the higher density regions.

This is a much more predictable and much more desireable practice, in my experience, when one encounters extreme scene brightness ratios.
 

Donald Miller

Member
Joined
Dec 21, 2002
Messages
6,230
Format
Large Format
jdef said:
Donald,

Ansel Adams describes a very similar pre-exposure technique in The Negative. Could you elaborate a little on your method of metering the scene through a diffusion panel?

Jay

Since we are concerned with a non-image bearing light exposure, the only thing one needs to do is to place the diffusion panel over the lens of the spot meter, take a reading and then translate that reading to the corresponding pre-exposure value.

The major difference, as I recall, between what I suggest and what Ansel mentioned is that the second image-bearing light exposure is made on the basis of highlight value placement. This techique is a major departure from conventional metering procedures in that respect.
 

Donald Miller

Member
Joined
Dec 21, 2002
Messages
6,230
Format
Large Format
Neal said:
Dear Daniel,

Have you considered using an unsharp mask?

Neal Wydra


A typical unsharp mask (max peak density of .35) would accomplish only approximately one zone of upward contraction of shadow values. That is probably not sufficient to the task at hand. In many cases the scene brightness ratio may exceed SBR 12 in these scenes involving deep shadow building interiors and brightly lit window openings. Pre-exposure affords much more upward contraction capability. A max pre-exposure would afford four zones of upward contraction of shadow values at the time of the exposure.

This pre-exposure procedure could also be used in conjunction with altered development if more contraction is needed.

There is one masking technique that will solve this problem at the printing stage and that is a burn mask. This requires that a sharp mask of the camera negative be made. This is a two step procedure in which a high density and high contrast interpositive becomes the basis for a high density and high contrast burn mask. This technique does require sharp masking capability and hence pin registration modifications of the enlarging equipment.
 

Neal

Subscriber
Joined
Dec 3, 2004
Messages
2,020
Location
Chicago, West Suburbs
Format
Multi Format
Dear Donald,

Clearly you've considered masking.<g> It seems you have quite a situation where a combination of pre-exposure, exposure and development manipulation, masking, dodging and burning are insufficient.

Large reflectors?

I look forward to reading your final solution.

Neal Wydra
 

Donald Miller

Member
Joined
Dec 21, 2002
Messages
6,230
Format
Large Format
Neal said:
Dear Donald,

Clearly you've considered masking.<g> It seems you have quite a situation where a combination of pre-exposure, exposure and development manipulation, masking, dodging and burning are insufficient.

Large reflectors?

I look forward to reading your final solution.

Neal Wydra

Neal,

Perhaps I failed to make myself clear. I did not intend to imply that negative pre-exposure or sharp masking (burn mask) at the printing stage were inadequate to the task at hand. I did mean to imply that unsharp masking (CRM) and development alterations were at times inadequate to control extreme scene brightness ratios.

I have never encountered a scene brightness ratio that either pre-exposure or sharp masking (burn mask) failed to provide me a print which showed full detail in both shadow and highlight regions.

Clearly all of these are tools available to a photographer. It is up to the photographer to choose and utilize those tools that best serve the ends of a good print.

My purpose in my posts on this thread were to indicate that in my experience development modifications, whether of formulation or procedure, were incapable of controlling the extreme scene brightness ratio described by the original poster's comments at the beginning of this thread.

Donald Miller
 

Neal

Subscriber
Joined
Dec 3, 2004
Messages
2,020
Location
Chicago, West Suburbs
Format
Multi Format
Dear Donald,

No, it was my mistake. I didn't watch the names carefully enough and assumed that you had posted the original question (as I had responded to that question, not your response).

In any case, an enjoyable thread.

Neal Wydra
 
OP
OP
Daniel Lawton

Daniel Lawton

Member
Joined
Mar 8, 2005
Messages
474
Location
California
Format
Multi Format
Thanks to everyone for their responses. I'm overwhelmed by the wealth of knowledge here so I guess it shows that this place is quite a valuable resource for someone like myself. Admittedly I am a beginner so I have not tried some of the more advanced methods that Neal and Donald have suggested. Donald, the multiple exposure method you mention sounds like it might solve the problem. Do you have any links or resources that I could use to research this technique? I only ask because my ignorance on this particular method may be to great to overcome on an internet forum. Thanks again.
 

Donald Miller

Member
Joined
Dec 21, 2002
Messages
6,230
Format
Large Format
Daniel Lawton said:
Thanks to everyone for their responses. I'm overwhelmed by the wealth of knowledge here so I guess it shows that this place is quite a valuable resource for someone like myself. Admittedly I am a beginner so I have not tried some of the more advanced methods that Neal and Donald have suggested. Donald, the multiple exposure method you mention sounds like it might solve the problem. Do you have any links or resources that I could use to research this technique? I only ask because my ignorance on this particular method may be to great to overcome on an internet forum. Thanks again.

Daniel,
Other then the mention that Ansel Adams has in his book "The Negative", I am not aware of any other sources addressing pre-exposure of film. His description does not go into a great deal of detail, in my opinion. Having used this process repeatedly over many years, I can assure you that it will solve your problem. Please send me an email if you lack understanding and I will cover this in detail for you.
 
OP
OP
Daniel Lawton

Daniel Lawton

Member
Joined
Mar 8, 2005
Messages
474
Location
California
Format
Multi Format
Examples

Here are some examples of the scenes I am talking about. My scanning is atrocious but hopefully it gives you a general idea. These are scans from my contact sheet with no corrections. In other negatives when I expose to get better detail in the shadows, the highlights are completely 100% destroyed (even worse than these examples) My goal is to have perfect exposure and detail in the interior of the building and allow the viewer to see the scene on the outside of the windows as well. As of now the highlights are a black blob on the negative. Hope this gives a better understanding of my dilemma.
 

Attachments

  • scan0001.jpg
    scan0001.jpg
    28.1 KB · Views: 134
  • scan0003.jpg
    scan0003.jpg
    36.1 KB · Views: 159

arigram

Member
Joined
Sep 21, 2004
Messages
5,465
Location
Crete, Greec
Format
Medium Format
I like the strong contrast between the blacks and whites, but then its just me, I never have been much of a follower of the philosophy of "full detail everywhere".
As it is it gives a great mood to the scene with the viewer getting lost inside those mysterious and spooky corridors. Having the view of the outside could take away that foreboding and clistophobic feeling.
Another way you could do it is make two exposure and merge them in the printing.
But that could prove to be too much work.
 

Flotsam

Member
Joined
Sep 30, 2002
Messages
3,221
Location
S.E. New Yor
Daniel,
IMHO I think that you are asking too much. That is a huge range for any film, much less Pan F. Remember that the windows are serving as light sources for the interior. Imagine trying to get detail both in the light bulb and also the object that it is illuminating. The only way that I can see handling a project like that would require artificial lighting and trying to balance more closely to the outdoor light. Lighting building interiors and making them look natural is a pretty specialized area of photography.
 
Photrio.com contains affiliate links to products. We may receive a commission for purchases made through these links.
To read our full affiliate disclosure statement please click Here.

PHOTRIO PARTNERS EQUALLY FUNDING OUR COMMUNITY:


Ilford ADOX Freestyle Photographic Stearman Press Weldon Color Lab Blue Moon Camera & Machine
Top Bottom