Contax ii ribbon replacement.

In the Vondelpark

A
In the Vondelpark

  • 2
  • 2
  • 63
Cascade

A
Cascade

  • sly
  • May 22, 2025
  • 5
  • 4
  • 57
submini house

A
submini house

  • 0
  • 0
  • 62
Diner

A
Diner

  • 5
  • 0
  • 108
Gulf Nonox

A
Gulf Nonox

  • 10
  • 3
  • 127

Recent Classifieds

Forum statistics

Threads
197,823
Messages
2,765,020
Members
99,482
Latest member
Fedebiiii
Recent bookmarks
1

awty

Subscriber
Joined
Jul 24, 2016
Messages
3,638
Location
Australia
Format
Multi Format
Hi
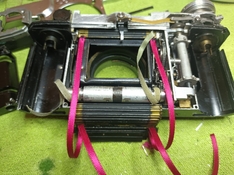
Bought a Contax ii 1936 fixa upper.
Grubby, but otherwise not too bad condition apart from the shutter was open.
20220930_161519.jpg 20220930_163953.jpg 20220930_170433.jpg 20220930_172541.jpg 20220930_183032.jpg

Any way I have been following the Rick Oleson lovely mub maps but am confused about a couple of things.

(iv) says to unscrew the yoke from bottom shutter, mine looks like it's held on with two rivets as well as screws and won't come off. Can't see why it would be necessary unless I'm missing something.
(v) says to wind spring 15 times, does that sound right? Seems an awful lot.
Also it looks like he is tensioning clockwise, shouldn't it be tensioned anti clockwise?
Also it has tension reels on both sides, I assume you need to tension both independently before sticking on the ribbon?

Thanks, all the other tutorials I can find are either too vague or a complete complicated strip down.
 

Attachments

  • 20221001_175843.jpg
    20221001_175843.jpg
    574.7 KB · Views: 230

Don_ih

Member
Joined
Jan 24, 2021
Messages
7,430
Location
Ontario
Format
35mm RF
I followed the same guide when I replaced my Contax III ribbons. Other than noticing there were times when I could have used three hands, everything seemed straightforward and worked out. Unfortunately, it was too long ago to remember details.

1664618488588.png


On his document, though, he has this photo of pins holding the tensioned bottom spool. So, you can tell which way you tension is (rotating bottom-to-top).

And he also seemed to take the yoke off to put the ribbon on it - but I think that can be done without removing it (especially if yours is riveted)
 
OP
OP
awty

awty

Subscriber
Joined
Jul 24, 2016
Messages
3,638
Location
Australia
Format
Multi Format
I followed the same guide when I replaced my Contax III ribbons. Other than noticing there were times when I could have used three hands, everything seemed straightforward and worked out. Unfortunately, it was too long ago to remember details.

View attachment 317753

On his document, though, he has this photo of pins holding the tensioned bottom spool. So, you can tell which way you tension is (rotating bottom-to-top).

And he also seemed to take the yoke off to put the ribbon on it - but I think that can be done without removing it (especially if yours is riveted)

Thanks, must be clockwise, just didn't seem right at the time.

Yes fiddly, but no where near as bad as Barnac curtains.
 
OP
OP
awty

awty

Subscriber
Joined
Jul 24, 2016
Messages
3,638
Location
Australia
Format
Multi Format
I got the ribbons on ok'ish.

The problem now is the camera won't wind the curtain on the higher the speed the worse it is. Can wind it up to a 10th, but after that is a depleting amount. Also can't change to a higher speed once camera is cooked at a 10th, seems to want to wind. Not sure what is going on. Don't think it has anything to do with the curtain ribbon or bottom roller. All the gears look good, lubed everything. Have no idea if it was doing it before I started..something is amiss.
20221002_195756.jpg
 

Don_ih

Member
Joined
Jan 24, 2021
Messages
7,430
Location
Ontario
Format
35mm RF
So, since the ribbon was broken when you bought the camera, that winding problem could have been there all along. I'd look to see if there's anything obviously stuck or bent. I'm sure someone here probably knows what could cause that particular problem.
 
OP
OP
awty

awty

Subscriber
Joined
Jul 24, 2016
Messages
3,638
Location
Australia
Format
Multi Format
So, since the ribbon was broken when you bought the camera, that winding problem could have been there all along. I'd look to see if there's anything obviously stuck or bent. I'm sure someone here probably knows what could cause that particular problem.

Can't see anything obvious, looks clean, no signs of anything broken or warn. Doesn't look like the camera has ever been pulled apart before.
Was hoping it was something simple I done wrong.
 
OP
OP
awty

awty

Subscriber
Joined
Jul 24, 2016
Messages
3,638
Location
Australia
Format
Multi Format
So I dug deeper
It is a problem with the way the film advance and the way the upper shutter roller engages.
If you look at the photo the upper arrow points to the film advance latch, which unlatches after firing allowing for film to advance 1 frame before latching again (actually there's another on the other side as well).
The second arrows points to where the latch that triggers the upper shutter roller to start winding up. That latch isn't in photo, but sits above the cog. The latch orientates and moves with the speed selector. So on 2 it has less distance to travel and engages the upper roller and turns it the required amount to operate correctly at half a second after that it has further to travel before engaging the upper roller and there for doesn't raise the lower shutter enough to operate before the film advance latch has engaged. So by the time you select the fast speeds where the curtains join it on moves 1/4". All speeds seem to be OK. Doesn't seem to be a problem further down the chain. I have looked and looked and can't see anything amiss and none of the tutorials seem to show much on how the speed selector and film advance work.

20221004_132807.jpg


Actually do have a photo of the lower latch, you can see that it is aligned with the speed selector pin.
20221004_140433.jpg


20221003_112210.jpg
20221003_112146.jpg
20221003_112201.jpg
 
Last edited:
OP
OP
awty

awty

Subscriber
Joined
Jul 24, 2016
Messages
3,638
Location
Australia
Format
Multi Format
You're braver than I !! Did you get the shutter working on the faster speeds? Beautiful camera.

I've reassembled it for now. The film advance will only cock the shutter enough to fire correctly @ 2 or 1/2second.
When disassembled I can lift the film advance stopper and cock the shutter to fire at other speeds.
There are quite a few tutorials showing how to disassemble, about the only hard part is the removing of the film plane box, that's an art in itself. The rest is not much harder than a Barnak style camera. Doing the ribbons is fiddly but not too bad. I redid mine several times to make sure it was OK.

Is a nice camera, optics need a proper clean and I need to fix the mechanical problem then it will be a great little camera. I have a Jupiter 8 and 12 to use with it.
 
OP
OP
awty

awty

Subscriber
Joined
Jul 24, 2016
Messages
3,638
Location
Australia
Format
Multi Format

Don_ih

Member
Joined
Jan 24, 2021
Messages
7,430
Location
Ontario
Format
35mm RF
That's a good idea, then you can tell me what the hell is wrong with mine.😉

Apart from the film plain cast box thingy the basic strip down is straight forward.
This tutorial gives a detailed screw by screw strip down. https://richardhaw.com/2018/04/15/repair-zeiss-ikon-contax-2/

Don't think I would want to take the curtains Apart though.

I definitely would not be taking the curtain apart.

Mine is a III, so it has the meter on top. Other than that, it would be the same. But I doubt I could diagnose yours. I will only venture so far into something with that many gears...
 

flavio81

Member
Joined
Oct 24, 2014
Messages
5,063
Location
Lima, Peru
Format
Medium Format
I've reassembled it for now. The film advance will only cock the shutter enough to fire correctly @ 2 or 1/2second.
When disassembled I can lift the film advance stopper and cock the shutter to fire at other speeds.
There are quite a few tutorials showing how to disassemble, about the only hard part is the removing of the film plane box, that's an art in itself. The rest is not much harder than a Barnak style camera. Doing the ribbons is fiddly but not too bad. I redid mine several times to make sure it was OK.

Is a nice camera, optics need a proper clean and I need to fix the mechanical problem then it will be a great little camera. I have a Jupiter 8 and 12 to use with it.

Hi,

You should read RIchard Haw's tutorial on the Contax camera, it has three parts and covers it extensively.

Now, before putting the curtain drums on their axis, particularly the upper curtain drum, you need to be sure the shutter is timed correctly. Otherwise nothing will work as it should. Richard how covers this thing on his posts.

As for the film advance/shutter speed knob, you see that underneath the knob there is this brass disk with notches on it for each speed. This brass disk, once the film is advanced past a certain point, is locked in place by two cams/stops that keep it in place. These cams rely on springs and all this part of the mechanism should be really clean, otherwise the brass disk will not lock into position and thus speed selection will be completely wrong and, yes, you will probably only get 1/2 speed and/or B speed.

Congrats on your Contax. I prefer the IIa and IIIa but I also own the III and it's a nice machine.
 
OP
OP
awty

awty

Subscriber
Joined
Jul 24, 2016
Messages
3,638
Location
Australia
Format
Multi Format
I definitely would not be taking the curtain apart.

Mine is a III, so it has the meter on top. Other than that, it would be the same. But I doubt I could diagnose yours. I will only venture so far into something with that many gears...

Damn! So I had to take my 3a Keive apart.

And found the problem, well at least one problem, there's a little latch missing or stuck on my ii see photo. Haven't taken the 2 apart again to see what's going on or best way to fix. The 3a has a mangled bottom curtain so will have to work out the easiest transplant. I never liked the 3a as it was too bulky.
20221005_162631.jpg
 
OP
OP
awty

awty

Subscriber
Joined
Jul 24, 2016
Messages
3,638
Location
Australia
Format
Multi Format
Hi,

You should read RIchard Haw's tutorial on the Contax camera, it has three parts and covers it extensively.

Now, before putting the curtain drums on their axis, particularly the upper curtain drum, you need to be sure the shutter is timed correctly. Otherwise nothing will work as it should. Richard how covers this thing on his posts.

As for the film advance/shutter speed knob, you see that underneath the knob there is this brass disk with notches on it for each speed. This brass disk, once the film is advanced past a certain point, is locked in place by two cams/stops that keep it in place. These cams rely on springs and all this part of the mechanism should be really clean, otherwise the brass disk will not lock into position and thus speed selection will be completely wrong and, yes, you will probably only get 1/2 speed and/or B speed.

Congrats on your Contax. I prefer the IIa and IIIa but I also own the III and it's a nice machine.

Thanks, already done all those things.
But with nothing to compare to its hard to work what's going on. Now I have one to compare I can see the cogs are out of sinc.
Will look through the tutorial again to see how to remedy.
I bought the ii cause it was cheap and a challenge. Also it is a little more compact than the others and it will take my Jupiter 12.
 
Last edited:

Don_ih

Member
Joined
Jan 24, 2021
Messages
7,430
Location
Ontario
Format
35mm RF
When you reassembled, the cutout in this gear was where it should be?

1664964338408.png
 

flavio81

Member
Joined
Oct 24, 2014
Messages
5,063
Location
Lima, Peru
Format
Medium Format
Thanks, already done all those things.
But with nothing to compare to its hard to work what's going on. Now I have one to compare I can see the cogs are out of sinc.
Will look through the tutorial again to see how to remedy.
I bought the ii cause it was cheap and a challenge. Also it is a little more compact than the others and it will take my Jupiter 12.

Nice to know you have located the fault (I told you to check timing!) But note that the tutorial at Richard Haw page does tell you how the main cog (the biggest one) should be positioned before assembling the shutter.
 
OP
OP
awty

awty

Subscriber
Joined
Jul 24, 2016
Messages
3,638
Location
Australia
Format
Multi Format
When you reassembled, the cutout in this gear was where it should be?

View attachment 318156

I didn't disassemble the shutter I installed the ribbons with everything thing in place. Not sure why the pawl on the film advance was so far out. Even after taking the top roller out it still doesn't look right. I'll have a better look when I have time. Might be better off doing a transplant.

20221005_184052.jpg
 

Arthurwg

Subscriber
Joined
Dec 16, 2005
Messages
2,567
Location
Taos NM
Format
Medium Format
Slightly different kind of machine....

Seeing these pictures makes me want to take apart my Kiev and clean the gunk out.

Yes, but the ribbon is supposed to be its major fault. If I every find where I put it I'll try to find out more.
 
OP
OP
awty

awty

Subscriber
Joined
Jul 24, 2016
Messages
3,638
Location
Australia
Format
Multi Format
Just up dating, I think the best way is to take the shutter mechanism out and remove the bottom roller and install the ribbons that way. The biggest pain is accessing the spring tension screw which is partially under film winding sprocket preventing you getting the screw driver square on. The rest is straight forward and outlined in the tutorials. Good opportunity to clean everything and if your winder mechanism is OK no need to touch the top roller.
Unfortunately I could not work out what was wrong with my Contax shutter mechanism, so I have re ribboned the Kiev shutter and fitted it in the Contax. Major pain.

20221007_154358.jpg
 

Don_ih

Member
Joined
Jan 24, 2021
Messages
7,430
Location
Ontario
Format
35mm RF
I have re ribboned the Kiev shutter and fitted it in the Contax

Sometime in the future, your camera will be determined to be an ultra-rare prototype, obviously one of the first Kievs ever made, since it has so many Contax parts. Cash in now.
 
Photrio.com contains affiliate links to products. We may receive a commission for purchases made through these links.
To read our full affiliate disclosure statement please click Here.

PHOTRIO PARTNERS EQUALLY FUNDING OUR COMMUNITY:


Ilford ADOX Freestyle Photographic Stearman Press Weldon Color Lab Blue Moon Camera & Machine
Top Bottom