Contact Sheets and Metering

about to extinct

D
about to extinct

  • 0
  • 0
  • 17
Fantasyland!

D
Fantasyland!

  • 9
  • 2
  • 94
perfect cirkel

D
perfect cirkel

  • 2
  • 1
  • 121
Thomas J Walls cafe.

A
Thomas J Walls cafe.

  • 4
  • 6
  • 277

Recent Classifieds

Forum statistics

Threads
198,745
Messages
2,780,269
Members
99,692
Latest member
jglong
Recent bookmarks
0

NorthAtlantic

Member
Joined
Aug 8, 2019
Messages
13
Location
London
Format
35mm RF
I have a question as I’ve managed to completely confuse myself after spending quite a long time thinking I had a firm understanding of it all. Ive been shooting film again for last year and a half and develop it at home. Up until recently I purely scanned my negs and whilst there would be a few tricky customers (over exposed, dense negatives) overall metering didn’t seem a big problem using an incident meter in the classical sense - meter for shadows, aimed at camera / sometimes shade lumisphere as shadow surrogate.

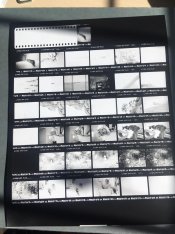
However I recently started darkroom printing again – the confusion has arisen from making contact sheets again. I have used the method shown to me by exposing the contacts to achieve the minimum level of black around the sprocket holes. I was very surprised to see that lots of my dense negatives were pure white frames on the contacts which seem to suggest some kind large exposure error even though there are a lot of online articles extolling the virtues that bw film has a big latitude range and I’ve followed guidelines for basic incident meter use as far as I know. I also know people like Ralph Gibson prefer dense negatives and the old adage of expose for the shadows.

It seems like a common problem is people underexposing bw film and shooting in low light – weirdly I’ve found out I’m fine guessing low light exposures but seem to be overexposing sunlit / daylight shots using an incident meter which should be fairly fool proof. I guess my question is have you ever found the overexposed negatives just to be blank frames on contacts and is this a darkroom issue or a metering issue. I have also thought about refining my incident meter technique if I know I’m overexposing in daylight by not exposing for shadows or angling slightly more towards light areas to balance out – I’m aware this is unconventional but struggling to work out why those contact frames are white when contacts have been produced in correct way :S

Ive attached a few of the worst offenders, I did about 30 contacts and some were ok but regular problem with incident metering in daylight / sky blown out. I have a basic understanding of zone system and don't know if id be better off going reflected readings.

Many thanks
 

Attachments

  • 0f16a688-c036-4343-8d37-3f789b528aac.jpg
    0f16a688-c036-4343-8d37-3f789b528aac.jpg
    155.5 KB · Views: 394
  • 719b042f-2353-4638-8521-affe74aa0bfd.jpg
    719b042f-2353-4638-8521-affe74aa0bfd.jpg
    229.3 KB · Views: 1,318

mshchem

Subscriber
Joined
Nov 26, 2007
Messages
14,627
Location
Iowa City, Iowa USA
Format
Medium Format
Check your meter, your darkroom thermometer. I use a Minolta incident meter, I have a couple, check them against each other now and then.
Sunny 16 never fails. I tend to overdevelop my film a bit, but like your frames exposures are consistent. My darkroom is very stable temperature wise, I tend to be pretty consistent.
I use an enlarger for light source and sometimes dial in a bit of contrast control too.
 
OP
OP

NorthAtlantic

Member
Joined
Aug 8, 2019
Messages
13
Location
London
Format
35mm RF
Thanks for reply, fairly confident that temps are solid and seemed to have had same issue with two almost new incident meters which makes me think prob a technique issue. I do a test strip for each contact with grade 2 filter and have also tried a test one with a longer exposure than min. black but still have frames that are almost white which would suggest I'm more than a few stops over. Is this typical for dense negs in relation to minimum black? Don't want to get too hung up on the contact sheets as I know from scans there is info in the offending negs but just surprised they mainly went white and revealed metering issues.
 
OP
OP

NorthAtlantic

Member
Joined
Aug 8, 2019
Messages
13
Location
London
Format
35mm RF
Forgot to say - good call on learning sunny 16. Think this would be useful for me to at least have a rough guide to compare incident meter to. Ive gone back through past exposure notes and already seen a few occasions I was off based on this.
 

Sirius Glass

Subscriber
Joined
Jan 18, 2007
Messages
50,356
Location
Southern California
Format
Multi Format
I found for contact prints, minimum back for the rebate area does not give the best proofs, but I use it because it somehow shows be the best and worst of a negative at the same time. Stick with that.

Sunny 16 works well as either a go-to method or a reference check. Sunny 11 in high latitude areas.

At one time people would say if "I did not have a life I would buy a PC, but I have a life so I bought a MAC." In a similar vein, forget the underexpose over develop crap and shoot box speed and also use the following:

For an incident meter:
1) Is it calibrated? Send it off to Quality Light Metric https://www.facebook.com/pages/Quality-Light-Metric/554305868044042
2) Use Box Speed​
For a reflectance meter:
1) Is it calibrated? Send it off to Quality Light Metric https://www.facebook.com/pages/Quality-Light-Metric/554305868044042
2) Use Box Speed
3) Meter the subject or equivalently lit object without the sky.​
For a reflectance meter and a variation of the Zone System:
1) Is it calibrated? Send it off to Quality Light Metric https://www.facebook.com/pages/Quality-Light-Metric/554305868044042
2) Use Box Speed
3) Meter an area in the shade that you want texture or detail and put that in Zone 2, Zone 3, or Zone 4 depending on your experience or desire.​
For a spot meter:
1) Is it calibrated? Send it off to Quality Light Metric https://www.facebook.com/pages/Quality-Light-Metric/554305868044042
2) Use Box Speed
3) Meter an area in the shade that you want texture or detail and put that in Zone 2, Zone 3, or Zone 4 depending on your experience or desire.​
 

ic-racer

Member
Joined
Feb 25, 2007
Messages
16,544
Location
USA
Format
Multi Format
Use a longer exposure time when making your contact sheet.
 

eddie

Member
Joined
Jul 24, 2005
Messages
3,258
Location
Northern Vir
Format
Multi Format
I'm not sure what you mean by "minimum level of black". What you want to find is the minimum time to maximum black. The best way to do this is by using an unexposed (but developed) frame. Set up your enlarger so it casts enough light to cover an entire sheet of 8x10 paper. Set your aperture to 5.6 or 8. Then, do a test strip of the unexposed sheet. Once developed you'll be able to see the differences between the strips until you get to where 2 strips look the same. The time on the second strip is your minimum time to maximum black. Mark your enlarger height at the height you've run the test, and always use that height and f-stop for all of your contact sheets. You'll get consistent results, but it will also tell you if there's any variation in your processing method, as well as alerting you to any potential variations in your camera's shutter speed.
 

NedL

Subscriber
Joined
Aug 23, 2012
Messages
3,388
Location
Sonoma County, California
Format
Multi Format
Seems to me that you haven't quite found minimum time to maximum black. I can see that the sprocket holes are a deeper black than the film rebate.
Screenshot from 2019-08-08 17-22-18.png


I was interested in seeing Sirius' reply, because I've come to the same thing... minimum time to max black might not make the best looking contact sheets but I learn more about the frame's exposure and get a little better idea of how to print that way. That said, when I have a batch of similarly shot/developed film ( like right now I've got 25 rolls of acros, all shot using the same basic exposing method in the same camera, and all developed the same way ), I will sometimes refine the time a little for the contacts by making test strips, and apply to all the rolls ( but more to pick a contrast rather than radically changing the exposure time... I use split grade for contacts, so there are a lot of ways to get to max black )...
 
Last edited:

MattKing

Moderator
Moderator
Joined
Apr 24, 2005
Messages
52,873
Location
Delta, BC Canada
Format
Medium Format
I've always been leery about the "minimum time to maximum black" approach, but the idea is good in principle.
My concern is at least partially related to the difficulty of using unexposed areas of the rebate, which receive none of the exposure (including flare) that the image recording parts of the negative receives.
I'm a little confused about your reference to using incident meters to meter for the shadows.
If your incident meter is in the shadowed areas, you aren't reading from the main light source, and that tends to lead to over-exposure.
An incident meter works best if you meter the main light source, and then use a shadow reading to address SBR and contrast issues.
In addition, those contact sheets look really contrasty - you may have over-developed your film.
Here is an excerpt from a Contact Sheet that I consider to be both appropriately produced, and from appropriately exposed and developed negatives:

upload_2019-8-8_18-24-39.png


And yes, I have lots of contact sheets that don't look this nice :redface:.
 

Bill Burk

Subscriber
Joined
Feb 9, 2010
Messages
9,290
Format
4x5 Format
The advice to overexpose film by a stop is good for a bunch of different reasons. But it is inconsistent with the idea of contact printing with minimum time to maximum black. Don't worry. You would just need to add about half stop of contact printing exposure to correct for having overexposed your negatives slightly.

Though people who look at critical sharpness and resolution will think that one stop overexposure degrades the print from a 35mm negative, I don't think the degradation is worth the risk (when you try to perfectly expose every time and mess up) of underexposure. Because underexposure ruins a negative pretty seriously.

Aiming for minimum time for maximum black is part of a "Fred Picker" idea to make a "Proper Proof" that proves the best exposure index to use.

Ah but you're incident metering in the shadows. If you were following "BTZS" there's a little asterisk that you missed. You're supposed to "double" the film speed that you set on the incident meter when you base your exposure on the shadow reading.
 

tezzasmall

Member
Joined
Dec 29, 2013
Messages
1,132
Location
Southend on Sea Essex UK
Format
Plastic Cameras
I've had similar contact sheets to the OP's for years, until I found it generally better to give a bit more exposure than the 'max black exposure' you think you need AND to use filter NUMBER ZERO / 0. The individual cells may come across a little more grey than any finished prints, but at least you should be able to see what's on each negative, which in turn helps you choose which to enlarge.

The only rolls where I get an overall good result on my contacts, are films taken in the studio, where they are all metered and getting the same or only slightly different exposures.

Terry S
 

markbau

Member
Joined
Apr 16, 2009
Messages
867
Location
Australia
Format
Analog
At one time people would say if "I did not have a life I would buy a PC, but I have a life so I bought a MAC." In a similar vein, forget the underexpose over develop crap and shoot box speed and also use the following:

I've been doing B&W seriously for nearly 40 years, in that time I've done my share of film testing (including owning a densitometer) and used to devour everything that people like Phil Davis used to write. I've also printed for many pro photographers and can confidently say that the maxim of "reduce the ISO by a stop and cut development by 10-20%" is almost sacred to me. If you read any of the gurus and their film exposure/development tests the results always seem to be the same: If you have ISO400 film, expose it at 200 and if the recommended development is 10 minutes give it 8 minutes and if you want to get really specific, expose a frame to zone 8 and measure it to critically to adjust your development time. This method is proven time and time again. David Vestall even wrote a great article about why film manufacturers tell us to underexpose film by giving us a too high ISO recommendation.

Having worked in pro labs and run my own custom printing business I know the perils of underexposed film and also the horror of trying to print overdeveloped film.

I just pulled St Ansel's "The Negative" off the bookshelf and sure enough, his film recommendations consistently recommend more exposure than the manufacturer recommends. Plus X EI64, Tri X Pro EI200, FP4 EI64, HP5 EI160.

I would NEVER recommend anyone use "box speed"
 

MattKing

Moderator
Moderator
Joined
Apr 24, 2005
Messages
52,873
Location
Delta, BC Canada
Format
Medium Format
If you want to make straight prints, without dodging and burning, or if you rely on a lab to make machine prints for you, your prints will look/be better if you use box speed.
The ISO speed standards were designed that way, because box speed favours mid-tone and highlight rendition, at the potential expense of shadow rendition.
 

John Koehrer

Subscriber
Joined
Apr 3, 2004
Messages
8,276
Location
Aurora, Il
Format
Multi Format
MattKing, post #9 I believe is correct on the problem. An incident meter isn't used to measure the darkest shadow area
that's the purpose of the reflected/spot meter. Wasn't it Fred Picker that used incident to use the zone system?

Any reference I've seen for general photography has been meter from the camera position with the diffuser facing the subject.
 
Joined
Sep 10, 2002
Messages
3,586
Location
Eugene, Oregon
Format
4x5 Format
A couple of thoughts on this subject.

A "proper proof," i.e., minimum time for maximum black of the rebate is a great tool for evaluating your exposure and development. It isn't and shouldn't be thought of as a finished print. Getting the right proper proof is more than just finding the exposure time for maximum black. First, you really need to decide what maximum black is. Depending you your viewing light, the "maximum black" will vary quite a bit. If you evaluate your proof under sunlight you'll end up exposing your proof for way too long; vice-versa with dim viewing light. Use a light source that is an average of the display lighting you prefer and find an exposure time that just gives you an almost imperceptible difference between the film rebate and the black of the uncovered paper. Use a paper contrast that is your target contrast or just slightly less, keeping in mind that properly exposed highlights will appear a bit greyer in the proof in the latter case. And, use a paper that you would use for display prints. Papers are different; there's no use proofing on one kind and printing on another. Once you get the proof nailed down, you will see how you need to adjust your exposure and development.

If, as in the case of the OP, you have grossly overexposed proofs (almost all white), then start looking for problems with metering, the meter itself, the shutter, etc. (It seems to me that the OP is overexposing because no adjustment is being made for basing the exposure on a shadow value, which will result in 2-3 stops overexposure.) It's especially important for smaller film formats that you expose properly. With LF, the problem is less; I've made great prints from negatives that proofed almost completely white. With smaller formats, however, the print will show the grain more with overexposure. The opposite happens as well: no shadow detail in the proof means you need more exposure, so adjust metering technique / E.I. accordingly.

I use my proofs to make small tweaks to my negative development times as well: a regime that gives me consistently underdeveloped negs gets a longer time and vice-versa.

Best,

Doremus
 

Sirius Glass

Subscriber
Joined
Jan 18, 2007
Messages
50,356
Location
Southern California
Format
Multi Format
I found for contact prints, minimum back for the rebate area does not give the best proofs, but I use it because it somehow shows be the best and worst of a negative at the same time. Stick with that.

Sunny 16 works well as either a go-to method or a reference check. Sunny 11 in high latitude areas.

At one time people would say if "I did not have a life I would buy a PC, but I have a life so I bought a MAC." In a similar vein, forget the underexpose over develop crap and shoot box speed and also use the following:

For an incident meter:
1) Is it calibrated? Send it off to Quality Light Metric https://www.facebook.com/pages/Quality-Light-Metric/554305868044042
2) Use Box Speed​
For a reflectance meter:
1) Is it calibrated? Send it off to Quality Light Metric https://www.facebook.com/pages/Quality-Light-Metric/554305868044042
2) Use Box Speed
3) Meter the subject or equivalently lit object without the sky.​
For a reflectance meter and a variation of the Zone System:
1) Is it calibrated? Send it off to Quality Light Metric https://www.facebook.com/pages/Quality-Light-Metric/554305868044042
2) Use Box Speed
3) Meter an area in the shade that you want texture or detail and put that in Zone 2, Zone 3, or Zone 4 depending on your experience or desire.​
For a spot meter:
1) Is it calibrated? Send it off to Quality Light Metric https://www.facebook.com/pages/Quality-Light-Metric/554305868044042
2) Use Box Speed
3) Meter an area in the shade that you want texture or detail and put that in Zone 2, Zone 3, or Zone 4 depending on your experience or desire.​

Minimum black means the minimum exposure to get complete black. Any more exposure messes up the goal which is go to a print that shows whether or not to print, it is not one that in anyway shows what the print will look like. Some call this maximum black, and it is as black as the the black will get, more exposure messes up the contact print.
 

pentaxuser

Member
Joined
May 9, 2005
Messages
19,934
Location
Daventry, No
Format
35mm
I've had similar contact sheets to the OP's for years, until I found it generally better to give a bit more exposure than the 'max black exposure' you think you need AND to use filter NUMBER ZERO / 0. The individual cells may come across a little more grey than any finished prints, but at least you should be able to see what's on each negative, which in turn helps you choose which to enlarge.

Terry S
I'll give this a go next time and see how I get on. I feel the real point of a contact print is as you say to see what's on each negative- with 35mm that can be difficult at times on a "one exposure fits all" contact sheet

pentaxuser
 
OP
OP

NorthAtlantic

Member
Joined
Aug 8, 2019
Messages
13
Location
London
Format
35mm RF
Many thanks for all the informative replies to my original post - certainly a lot to think about. Amazing how confused I’ve got. Despite fact my question is quite a rookie one I have tried to invest a fair amount of time in reading up on the theoretical side by reading The Negative / A few books by Roger Hicks and Les McClean.

Part of this might come from some of the restrictions in applying various theories to 35mm film with varying situations on the same roll and my choice of metering method. I am keen to learn the theory behind it to a usable level but also don’t want to paralyse myself with more info than I need for small format.

A few have suggested just longer exposure time and lower grade filter for the contacts (beyond minimum time to maximum black) which looking at some of my test strips would benefit a few frames but still appears a fair few would just be white frames. Im guessing this is gross overexposure through metering error which would take a very long exposure to resolve properly on a contact whilst making ‘normally exposed’ images way too dark.

I do like the approach of Sirius to use a contact as a tool upon which things like exposure can be judged and not just a thumbnail sheet of what I’ve got. I think this is why I originally asked the question in order to refine technique / find any issues and improve my exposures to a more consistent level which would translate onto contact sheets.

With regards to the incident meter it appears my technique might be off or I’ve misunderstood. There are a lot of articles for newbie film users which talk of black and white having large amount of latitude and overexposing by 2-4(!) stops is fine also ‘exposing for shadows’ with it a half box speed. I think I’ve discovered it is just about acceptable for scanning but this recent darkroom foray and producing contacts has revealed although a little extra over exposure is good I still need to be careful.

I think my overexposure in daylight problem has come from (Im aware some of these sound abit silly upon review):
1) Holding the incident meter infront of me (facing me - e.g. subject position to camera) for readings - presume my body is blocking some light and making it think less light than there is as the subject is usually further infront of me than the meter is.
2) Shading the bulb in daylight for the ‘expose for the shadows reading’ which has probably increased exposure by a few more stops

Question for Bill Burk’s reply:

Ah but you're incident metering in the shadows. If you were following "BTZS" there's a little asterisk that you missed. You're supposed to "double" the film speed that you set on the incident meter when you base your exposure on the shadow reading. When you say double do you mean ISO would be at 200 if its a 400 film? Thanks


From what I can gather in these replies maybe best general approach to start with is - build a little over exposure into ISO chosen then just take a straight incident reading in daylight (not standing in the way or artificial shading). Further tweaks could include: altering incident bulb angle e.g. pointed to take in more of the sky to lower exposure if needed. Or possible reduction in dev time.

Just out of interest, how would someone who favours the dense over exposed / over developed negative A la Ralph Gibson deal with this on a contact sheet? Is the idea of a dense negative and making a ‘proper proof’ using minimum time to maximum black mutually exclusive? Would making a contact sheet with very dense negs just need to be overexposed over the level of what is defined as a proper proof?

Thanks again
 

MattKing

Moderator
Moderator
Joined
Apr 24, 2005
Messages
52,873
Location
Delta, BC Canada
Format
Medium Format
You need to remember that Ralph Gibson was trained when there were no variable contrast papers. He may also have learned on large format equipment.
You would be better off trying to emulate his results by exposing and developing close to "normally" and then adjusting the results at the printing/post processing stage.
If you base your exposure on a shadow reading, you are likely to end up greatly over-exposing your film. If you take a shadowed incident reading with 400 ISO film, use 400 and reduce your exposure by at least a stop. That is equivalent to using an EI of 800.
Unless you see are dealing with a subject that is going to have a really wide subject brightness range, just stand in the light that is hitting your subject and point the incident meter with dome in the direction of your camera. If necessary, you can adjust the reading to "taste" - a small amount of increased exposure to favour the shadows or, where important, a small reduction to favour the highlights - ala Raph Gibson.
Develop it normally, to arrive at negatives that result in a full range of tones.
Then use the printing or post processing tools to arrive at your desired results.
By the way, the images below are simply the contact sheet image I linked to earlier, plus another version resulting from about 20 seconds of post processing adjustments:

Contact Proof.jpg Contact Proof ala Raph Gibson.jpg
 

Eric Rose

Member
Joined
Nov 21, 2002
Messages
6,842
Location
T3A5V4
Format
Multi Format
I like to produce my contact prints with a much lower contrast than what I would normally print at. It gives me a much better visual indication of what I can do with a negative.
 

Vaughn

Subscriber
Joined
Dec 13, 2006
Messages
10,079
Location
Humboldt Co.
Format
Large Format
The only reason one gives a proof sheet enough exposure to just achieve the same black between the sprocket holes as the holes is to tell you which areas of the neg have no exposure -- those shadow areas will be pure black on the contact sheet. If any shadows got exposure, they will be less black and you can see how much detail you have there.

The reason I check the rebate of sheet film in a print (contact, alt processes) is that unless the rebate at least matches the black of the print outside of the rebate, I will not have a pure black within the image.
 

Bill Burk

Subscriber
Joined
Feb 9, 2010
Messages
9,290
Format
4x5 Format
Beyond The Zone System incident metering is unlike the usual incident metering.

Usually, you determine exposure with an incident meter in the main light.

In BTZS you determine exposure using an incident meter reading taken in the shadows.

In that unusual way of working with the meter Phil Davis literally wants you to double the exposure index. That tricks the meter to underexpose one stop.

You said you were taking incident readings in the shadows. I thought maybe you had seen or heard about BTZS. In that specific way of working you are reading the shadows and underexposing them because you want that part of the picture to come out kind of dark.
 
Photrio.com contains affiliate links to products. We may receive a commission for purchases made through these links.
To read our full affiliate disclosure statement please click Here.

PHOTRIO PARTNERS EQUALLY FUNDING OUR COMMUNITY:


Ilford ADOX Freestyle Photographic Stearman Press Weldon Color Lab Blue Moon Camera & Machine
Top Bottom